
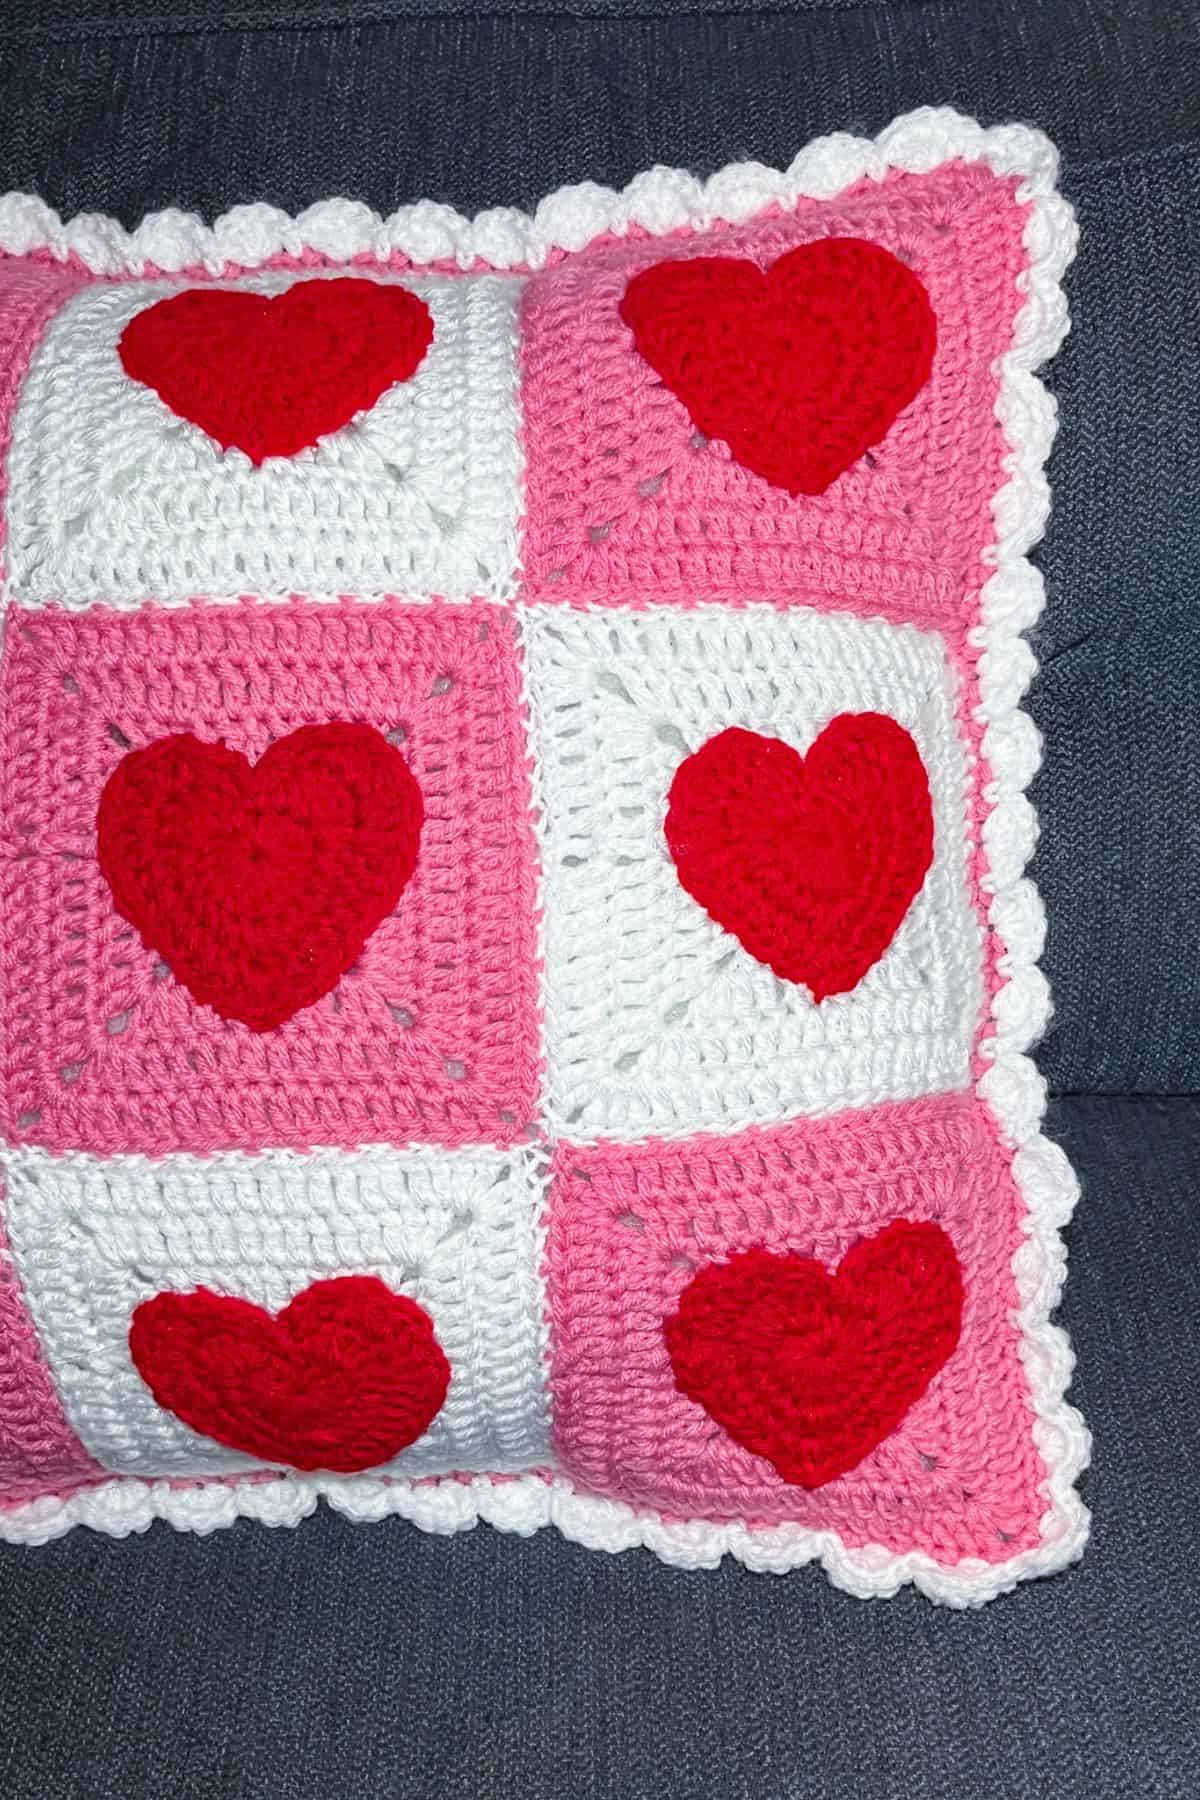
Looking for the perfect way to add a little extra love to your home this Valentine’s Day? This heart pillow crochet pattern is just what you need to cozy up your space!
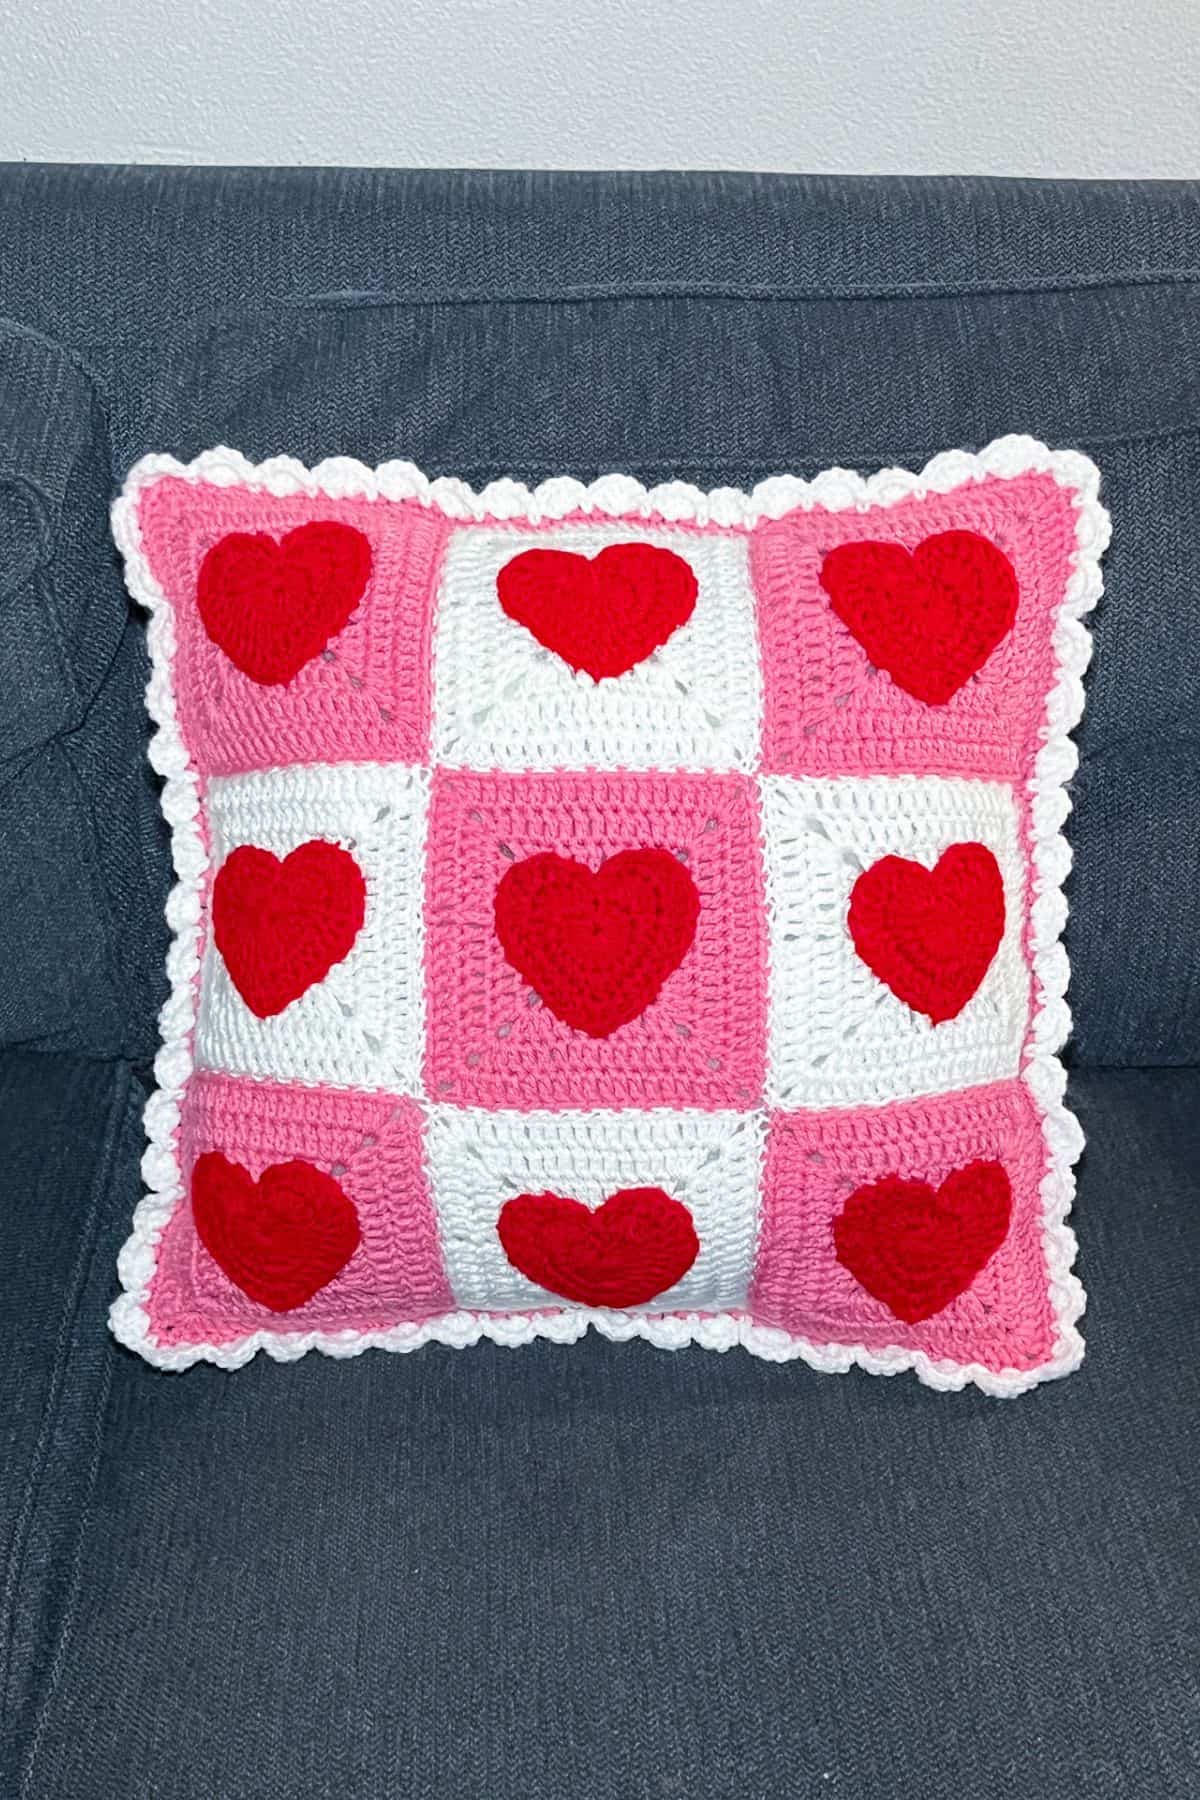
Whether you toss it on the couch or place it on your bed, this adorable crochet heart cushion will instantly bring a warm and festive touch to any room.
Fun story: This heart pillow crochet pattern was actually meant to be a bag! But when I realized I’d made the granny squares too big, I decided to turn it into a crochet heart cushion instead—no need to rip out all my work, right? Just turn lemons into lemonade! The pattern combines solid crochet granny squares and large, sweet crochet heart appliques from my crochet heart scarf pattern, making it both fun and simple to stitch up.
Best of all, this is a free crochet Valentine’s Day pattern, so you can create a lovely accent piece without spending a dime - well except for maybe the cost of yarn. While you’re at it, be sure to check out my other Valentine’s Day crochet patterns, like my cute crochet heart coasters and the adorable crochet two peas in a pod pattern—perfect for adding even more love to your celebrations!
So, let's get started making this heart pillow crochet pattern!
Jump to:
✏️ Things To Note:
- Intermediate Skill Level: The heart pillow crochet pattern is best suited for crocheters who have a basic understanding of crochet stitches and techniques, especially if you’re familiar with working granny squares and crochet appliques.
- Crochet Heart Appliques: The crochet heart applique pattern is beginner-friendly but requires some attention to detail for shaping the hearts correctly. If you’ve made other appliques in the past, you’ll be just fine!
- Joining Techniques: The hardest part of this heart pillow crochet pattern is the joining of the squares, so be sure to check out any additional resources or videos on joining granny squares if you're unfamiliar.
🪡 Materials Needed
- Red Heart Yarn - white
- Red Heart Yarn - perfect pink
- Red Heart Yarn - red
- Polyfil
- 5mm hook
- Tapestry needle
💭Abbreviations to Remember (US terms)
- Chains (ch)
- Magic ring (mr)
- Single crochet (sc)
- Half double crochet (hdc)
- Double crochet (dc)
- Slip stitch (sl st)
- Increase (inc) — this can be seen as inc, hdc inc, or dc inc depending on what stitch you should make as an increase.
* If you see a stitch abbreviation with "x" after it, it means how many times you do that stitch in the following amount of stitches. For example: sc x6 would mean you make a single crochet in the next 6 stitches. Inc x2 means you make an inc in the next 2 stitches.
🧋Variations
- Color Combinations: Play around with different color schemes to match your home décor or personal style. You can go for classic red and pink for a traditional Valentine’s Day look, or mix it up with soft pastels, bold brights, or even neutral tones for a more subtle design.
- Different Applique Sizes: Experiment with different sizes for the crochet heart appliques by either doing 2 rounds or 3 rounds! You could make some hearts bigger or smaller to create a more dynamic and playful effect, or arrange them in different patterns across the pillow.
- Size Variations: While the heart pillow crochet pattern makes a great-sized pillow, feel free to adjust the number of granny squares and heart appliques to create a smaller or larger version depending on where you plan to display it!
- Different Appliques: Switch the crochet heart applique design out for another applique like my crochet butterfly applique pattern - a cute spring applique with a 3d effect.
🍵Instructions for Heart Pillow Crochet Pattern
Crochet Heart Applique Pattern:
Make 18 crochet heart appliques.
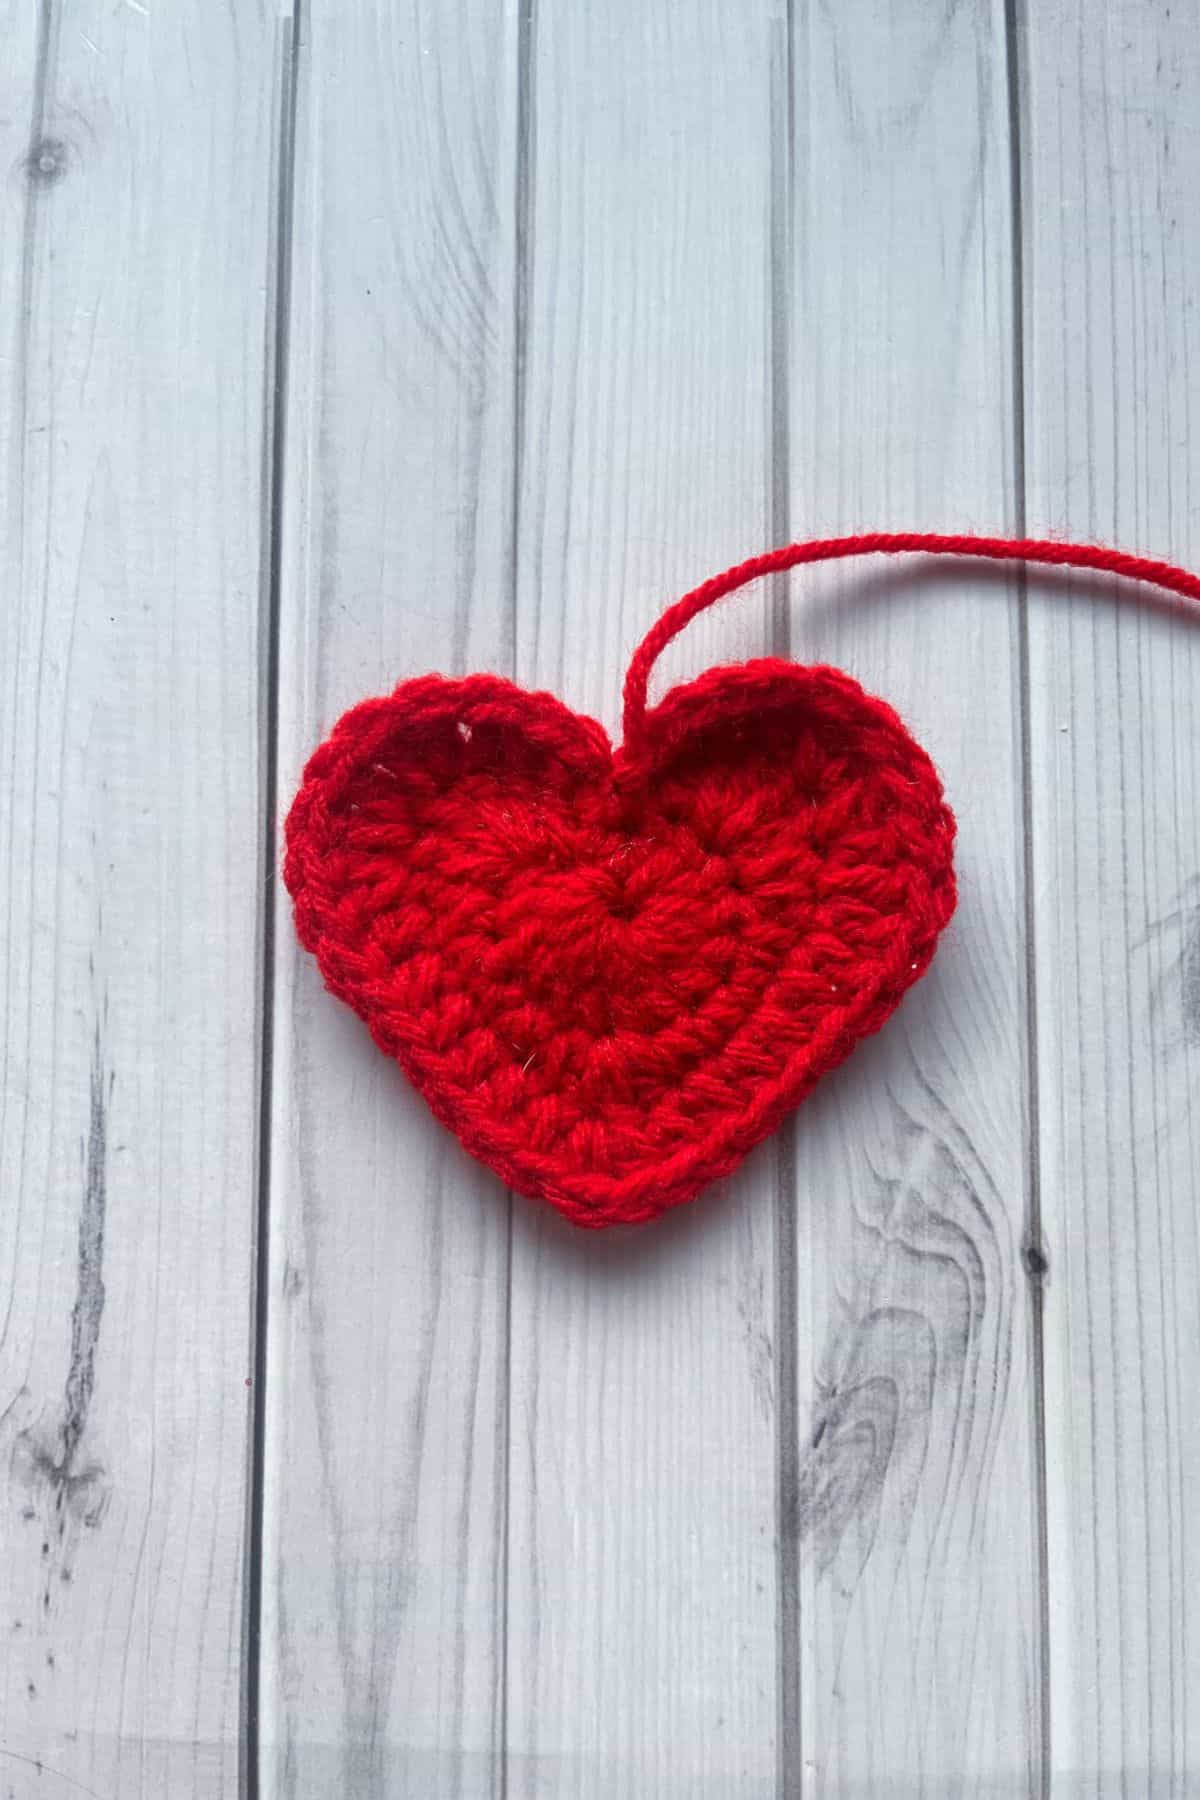
Round 1: Using the red yarn, make a magic ring, ch x3 (counts as a stitch) and dc x14 into the ring. Then sl st to the top of the 3rd ch you made, pull the ring tight (15).
Round 2: Ch x1, then hdc into the same stitch. Make 4 dc into the next stitch, then hdc inc in the next. Sc in the next 4 stitches. You are now at the bottom of the heart so make a hdc, dc, and hdc into one stitch. Then sc x4, and hdc inc in the next. Make 4 dc in next, hdc in the next stitch. Then ch x1 and sl st to the sl st from joining the last round together (25 + 2 chains and sl st used for the point).
Round 3: Ch x1, then hdc where you made the first hdc in the last round. Then follow the rest of the sequence of stitches for the round:
Hdc, dc, dc inc x3, dc, hdc in the next 5 stitches, hdc + dc + hdc for the bottom stitch, hdc in the next 5 stitches, dc, dc inc x3, dc, hdc, hdc, ch x1 sl st to the sl st from the first round to make a deep indent at the top of the heart (33 + 2 chains and the sl st).
Then fasten off and leave long ends for sewing.
Crochet Solid Granny Square Pattern:
Make 10 pink and 8 white granny squares.
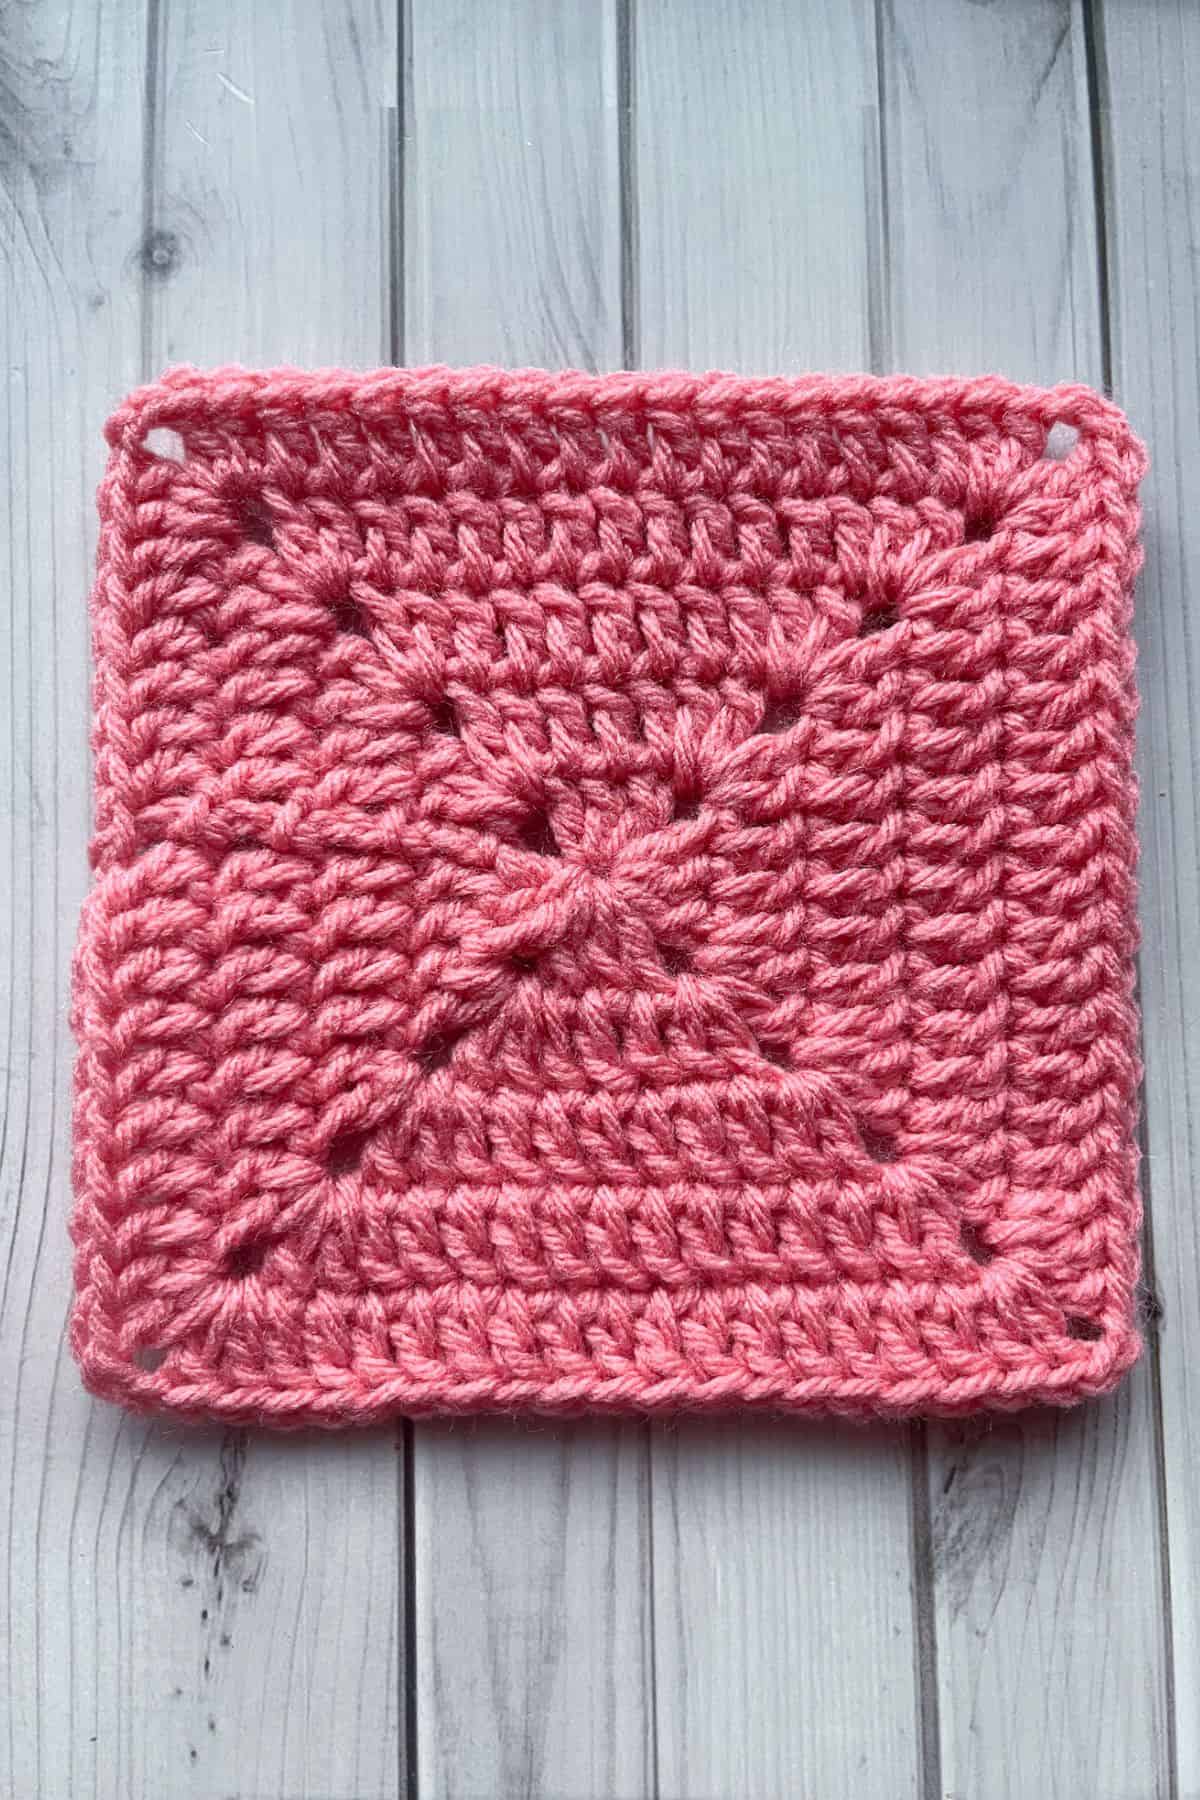
Round 1: Make a mr, ch x3 and then dc x2 in the circle. Ch x2, dc x3, ch x2 and dc x3, ch x2 and dc x3, ch x2 and sl st to the 3rd chain. You should have 4 sides. Pull the magic circle closed and you can see you have a small square.
Round 2-5: Ch x3. Dc in each dc stitch from the previous round, dc x2, ch x2, dc x2 in each chx2 corner stitch. Then sl st to the 3rd chain you made at the beginning when you get to the end of each round.
After the 5th round, fasten off and weave in any tails.
Finishing:
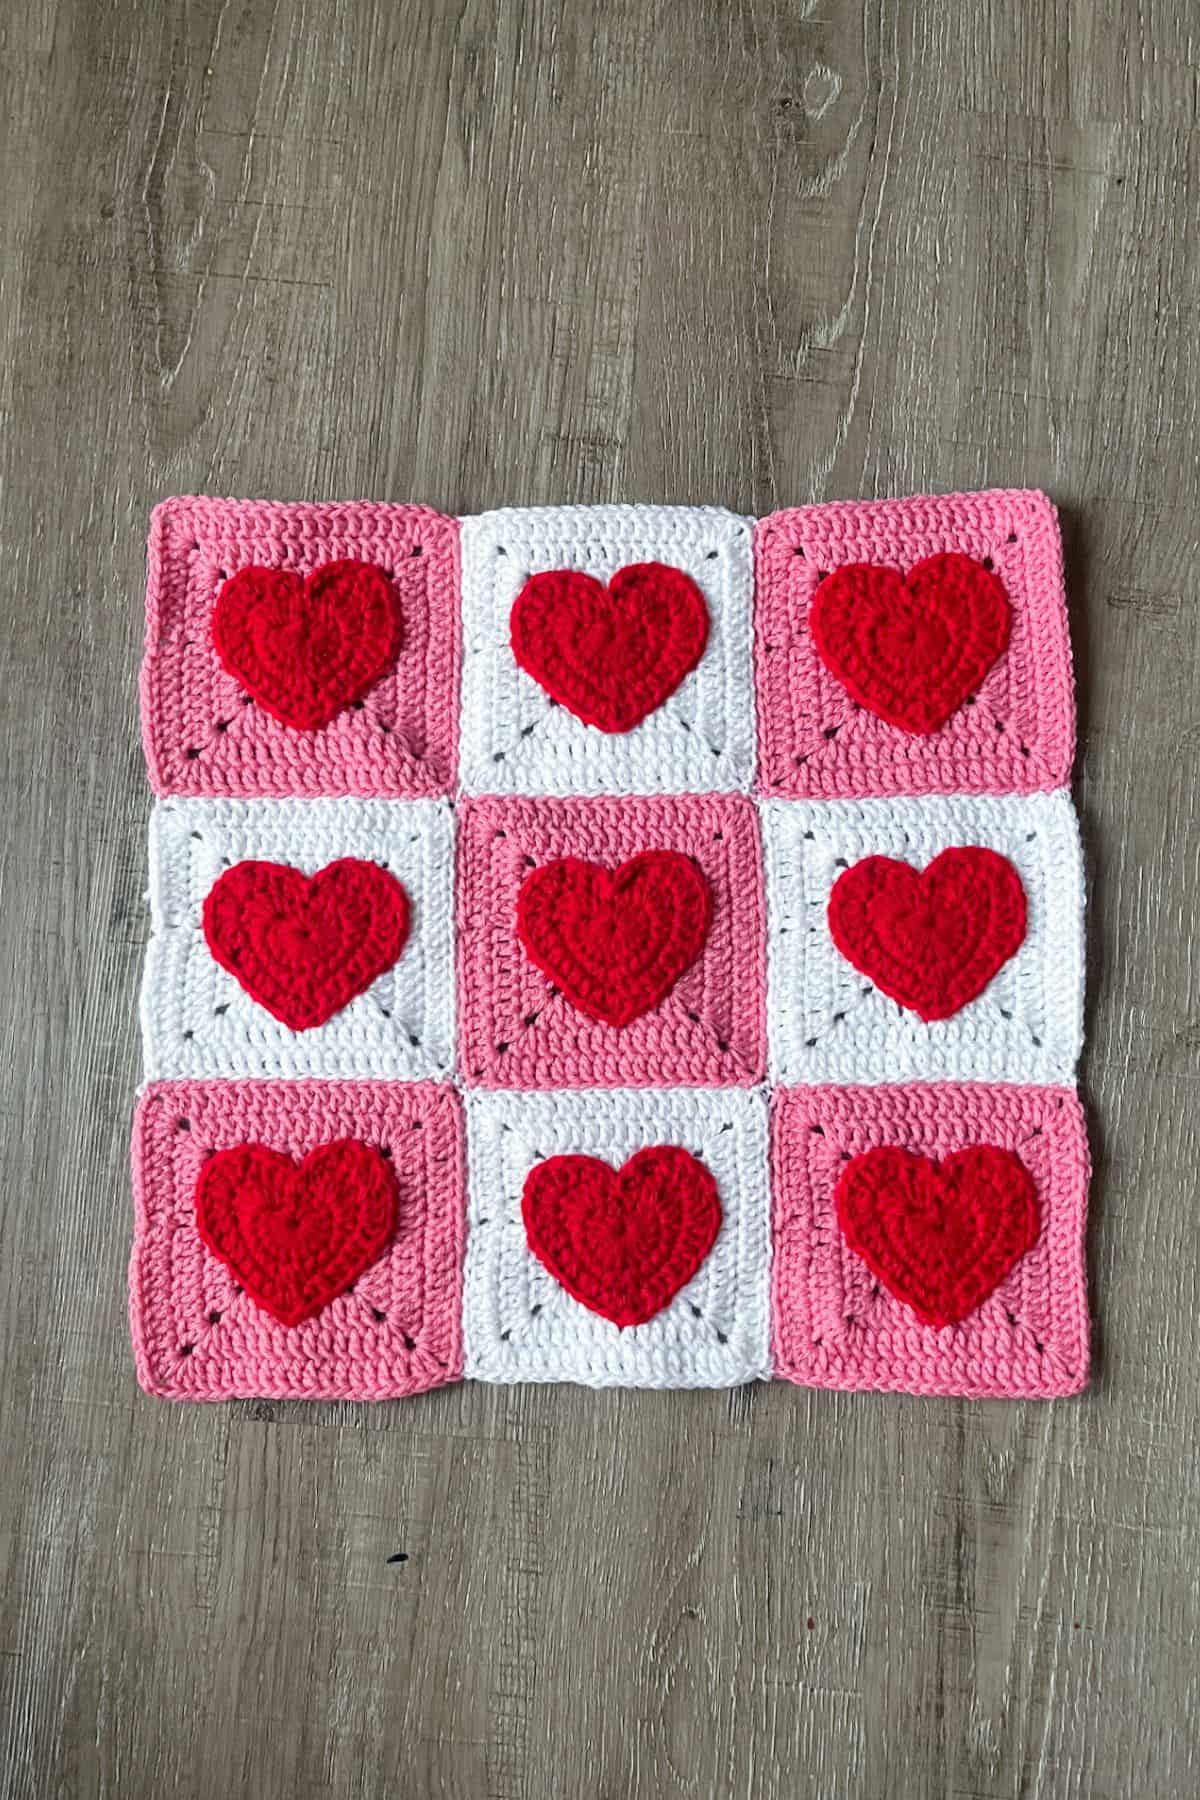
Sew the hearts on to the squares, then sew the squares together like I did above using the sewing technique, the mattress stitch. Alternate colors, with 3 squares in each row and column.
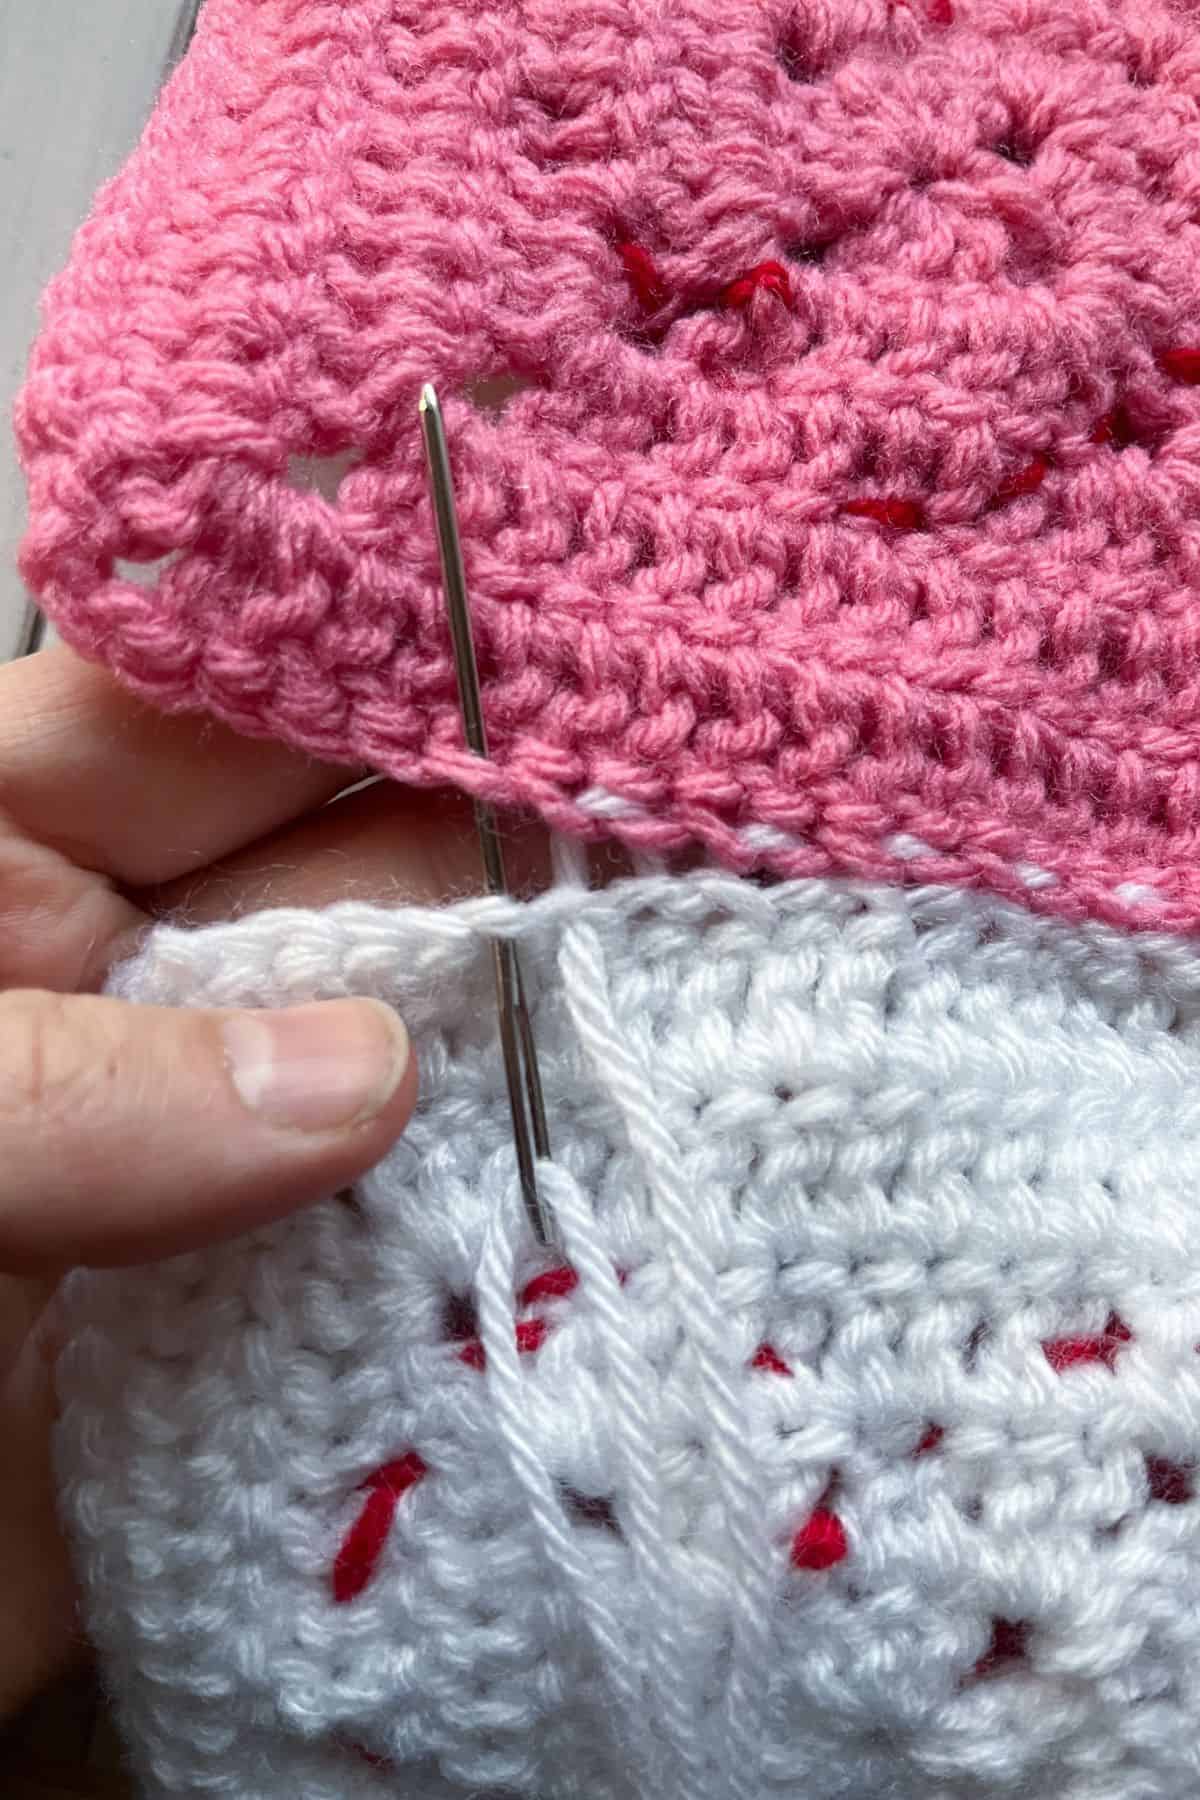
Mattress Stitch:
- Align the Edges: Place the two crochet pieces you want to join side by side, with the right sides facing each other (the side you want to show should be facing inward). Make sure the edges you're joining are aligned properly.
- Thread Your Needle: Cut a length of yarn (about 18 inches) and thread it through your tapestry needle.
- Insert the Needle: Starting at one end of the edge, insert the needle through the outermost stitch on the first piece. You want to go under both loops of the stitch.
- Pull the Needle Through: Gently pull the yarn through, leaving a small tail to tie off later. Do not pull too tightly yet.
- Move to the Other Piece: Next, insert the needle into the corresponding stitch on the second piece, just slightly to the left of the edge. Go under both loops of the stitch, and pull the needle through.
- Repeat: Continue this process along the entire edge. Work your way back and forth between both pieces, stitching into the same stitch on each piece, always under both loops. Your stitches will create a “mattress” effect that lies flat against the crochet fabric.
- Even Tension: As you stitch, make sure to keep an even tension. You want the seam to be neat, but not so tight that it distorts the shape of the pieces.
- Finish Off: When you’ve reached the end, pull the yarn gently to tighten the stitches. Be sure the seam is secure, but not overly tight. Tie off the yarn at the end, weaving in the ends on the wrong side to finish.
Crochet the Pillow Closed:

Now we will make a single crochet border to close the pillow.
Align the front and back squares together with the hearts facing outward on both sides of the pillow. Then join the pink yarn to both pieces and single crochet the edge of the square.

After 3 sides are done, begin to stuff the crochet heart pillow, then continue crocheting the last side closed - stuffing it along the way. When you get to the corners make 3 sc stitches.
Fasten off the pink yarn and weave in any ends.
Shell Stitches:

Join the white yarn to anywhere on the border. Then skip a stitch and then make a shell stitch.
To crochet a shell stitch, you will dc x5 into the same stitch or space. This will create the "shell." then skip a stitch and make a sc in the next stitch.
You will repeat making a skipped stitch, dc x5, skip a stitch, sc for the entire round.
If you do not have an even amount of stitches at the end you can fudge it a little for a stitch or two to make the shell stitches fit by either extending a shell an extra space or taking a skipped space away. It doesn’t have to be exact and no one will notice anyways.
I hope you enjoyed making this adorable heart pillow crochet pattern and that it adds a lovely touch to your Valentine’s Day decor! If you have any leftover yarn after finishing your pillow, why not put it to good use with my crochet tulip bag pattern or my crochet heart keychain pattern? It’s the perfect way to use up those scraps while creating something beautiful and practical for spring!
Thank you for stopping by, and happy crocheting! Don’t forget to check out all my other Valentine’s Day crochet patterns for even more ways to spread the love through your creations.
🐌Expert Tips
- Tension is Key: Make sure your tension is consistent throughout the project, especially when crocheting the granny squares. If your squares are slightly different sizes, it can make joining them a bit tricky, so keep your stitches even for a neat finish.
- Secure Appliques Well: When attaching your crochet heart appliques, make sure to sew them on securely, especially around the edges, so they don’t shift or unravel. A whip stitch or backstitch works great for this!
- Block Your Squares: After finishing your crochet heart granny squares, take a few minutes to block them. This step ensures they are all the same size and have crisp, straight edges, which will make joining them much easier.
🧵Pattern FAQs
The finished pillow should be about 20-22 inches square, depending on how tightly or loosely you crochet your squares. You can adjust the size by adding or removing granny squares to make it larger or smaller if desired.
Absolutely! While I recommend a worsted-weight yarn for a sturdy pillow, you can use any yarn you like. Just be sure to adjust your hook size to match your yarn, and remember that the size of the pillow may change depending on your yarn choice.
Yes! If you prefer a simpler design, you can skip the crochet heart appliques and just make a pillow with the granny squares. You could also create a different shape or motif to embellish the pillow if you'd like.

🧶More Crochet Pillow Patterns
If you tried this Heart Pillow Crochet Pattern (or any other pattern on my website), please let me know how it went in the 📝 comments below. I'd love to hear from you!

Heart Pillow Crochet Pattern
Materials
Abbreviations (US terms)
- Chains - ch
- Magic ring - mr
- Single crochet - sc
- Half double crochet - hdc
- Double crochet - dc
- Slip stitch - sl st
- Increase - inc this can be seen as inc, hdc inc, or dc inc depending on what stitch you should make as an increase.
Notes
- Intermediate Skill Level: The heart pillow crochet pattern is best suited for crocheters who have a basic understanding of crochet stitches and techniques, especially if you’re familiar with working granny squares and crochet appliques.
- Crochet Heart Appliques: The crochet heart applique pattern is beginner-friendly but requires some attention to detail for shaping the hearts correctly. If you’ve made other appliques in the past, you’ll be just fine!
- Joining Techniques: The hardest part of this pattern is the joining of the squares, so be sure to check out any additional resources or videos on joining granny squares if you're unfamiliar.
Instructions
Crochet Heart Applique Pattern:
- Make 18 heart appliques.
- Round 1: Using the red yarn, make a magic ring, ch x3 (counts as a dc) and dc x14 into the ring. Then sl st to the top of the 3rd ch you made, pull the ring tight (15).
- Round 2: Ch x1, then hdc into the same stitch. Make 4 dc into the next stitch, then hdc inc in the next. Sc in the next 4 stitches. You are now at the bottom of the heart so make a hdc, dc, and hdc into one stitch. Then sc x4, and hdc inc in the next. Make 4 dc in next, hdc in the next stitch. Then ch x1 and sl st to the sl st from joining the last round together (25 + 2 chains and sl st used for the point).
- Round 3: Ch x1, then hdc where you made the first hdc in the last round. Then follow the rest of the sequence of stitches for the round:
- Hdc, dc, dc inc x3, dc, hdc in the next 5 stitches, hdc + dc + hdc for the bottom stitch, hdc in the next 5 stitches, dc, dc inc x3, dc, hdc, hdc, ch x1 sl st to the sl st from the first round to make a deep indent at the top of the heart (33 + 2 chains and the sl st).
- Then fasten off and leave long ends for sewing.
Crochet Solid Granny Square Pattern:
- Make 10 pink and 8 white granny squares.
- Round 1: Make a mr, ch x3 and then dc x2 in the circle. Ch x2, dc x3, ch x2 and dc x3, ch x2 and dc x3, ch x2 and sl st to the 3rd chain. You should have 4 sides. Pull the magic circle closed and you can see you have a small square.
- Round 2-5: Ch x3. Dc in each dc stitch from the previous round, dc x2, ch x2, dc x2 in each chx2 corner stitch. Then sl st to the 3rd chain you made at the beginning when you get to the end of each round.
- After the 5th round, fasten off and weave in any tails.
Finishing:
- Sew the hearts on to the squares, then sew the squares together like I did above using the sewing technique, the mattress stitch. Alternate colors, with 3 squares in each row and column.
Mattress stitch:
- Align the Edges: Place the two crochet pieces you want to join side by side, with the right sides facing each other (the side you want to show should be facing inward). Make sure the edges you're joining are aligned properly.
- Thread Your Needle: Cut a length of yarn (about 18 inches) and thread it through your tapestry needle.
- Insert the Needle: Starting at one end of the edge, insert the needle through the outermost stitch on the first piece. You want to go under both loops of the stitch.
- Pull the Needle Through: Gently pull the yarn through, leaving a small tail to tie off later. Do not pull too tightly yet.
- Move to the Other Piece: Next, insert the needle into the corresponding stitch on the second piece, just slightly to the left of the edge. Go under both loops of the stitch, and pull the needle through.
- Repeat: Continue this process along the entire edge. Work your way back and forth between both pieces, stitching into the same stitch on each piece, always under both loops. Your stitches will create a “mattress” effect that lies flat against the crochet fabric.
- Even Tension: As you stitch, make sure to keep an even tension. You want the seam to be neat, but not so tight that it distorts the shape of the pieces.
- Finish Off: When you’ve reached the end, pull the yarn gently to tighten the stitches. Be sure the seam is secure, but not overly tight. Tie off the yarn at the end, weaving in the ends on the wrong side to finish.
Crochet the Pillow Closed:
- Align the front and back squares together with the hearts facing outward on both sides of the pillow. Then join the pink yarn to both pieces and single crochet the edge of the square. After 3 sides are done, begin to stuff the crochet heart pillow, then continue crocheting the last side closed - stuffing it along the way. When you get to the corners make 3 sc stitches.
- Fasten off the pink yarn and weave in any ends.
Shell Stitches:
- Join the white yarn to anywhere on the border. Then skip a stitch and then make a shell stitch.
- To crochet a shell stitch, you will dc x5 into the same stitch or space. This will create the "shell." then skip a stitch and make a sc in the next stitch.
- You will repeat making a skipped stitch, dc x5, skip a stitch, sc for the entire round.
- If you do not have an even amount of stitches at the end you can fudge it a little for a stitch or two to make the shell stitches fit by either extending a shell an extra space or taking a skipped space away. It doesn’t have to be exact and no one will notice anyways.
- I hope you enjoyed making this adorable heart pillow crochet pattern and that it adds a lovely touch to your Valentine’s Day decor!

Hayley says
Hi. I've counted and recounted but I'm not getting 27 for Round 2.
Ch x1, then hdc into the same stitch = 1 stitch total
Make 4 dc into the next stitch = 5 stitches total
Then hdc inc in the next = 7 stitches total.
Sc in the next 4 stitches = 11 stitches total
A hdc, dc, and hdc into one stitch = 14 stitches total.
Then sc x4 = 18 stitches total
A hdc inc in the next = 20 stitches total
Make 4 dc in next = 24 stitches total
hdc in the next stitch = 25 stitches total
Then ch x1 and sl st to the sl st from joining the last round together (27).
Where am I missing 2 stitches? Thanks so much.
Hayley
Kimberly Arenas says
I counted the chains as also being stitches, I have updated the end counts to read the (stitch number + chains + the sl st used for the indent at the top for the heart). Hopefully this clears up any confusion as this is a more complex shape to crochet 🙂