
Got a kiddo with a wiggly tooth and big dreams of a visit from the Tooth Fairy? This crochet tooth fairy pillow pattern is the perfect little project to make the moment extra special—and magical! It’s super easy, works up in just an hour or two, and makes the sweetest keepsake for kids who are eagerly waiting to trade a tooth for treasure.
When my son found out his first tooth was getting wiggly, he asked me to make him a special plushie for the occasion. We decided to make this crochet tooth fairy pouch that he designed, so he could catch the Tooth Fairy in the act—he’s determined! This crochet tooth fairy bag turned into a fun bonding project and a sweet tradition we’ll keep for every lost tooth.
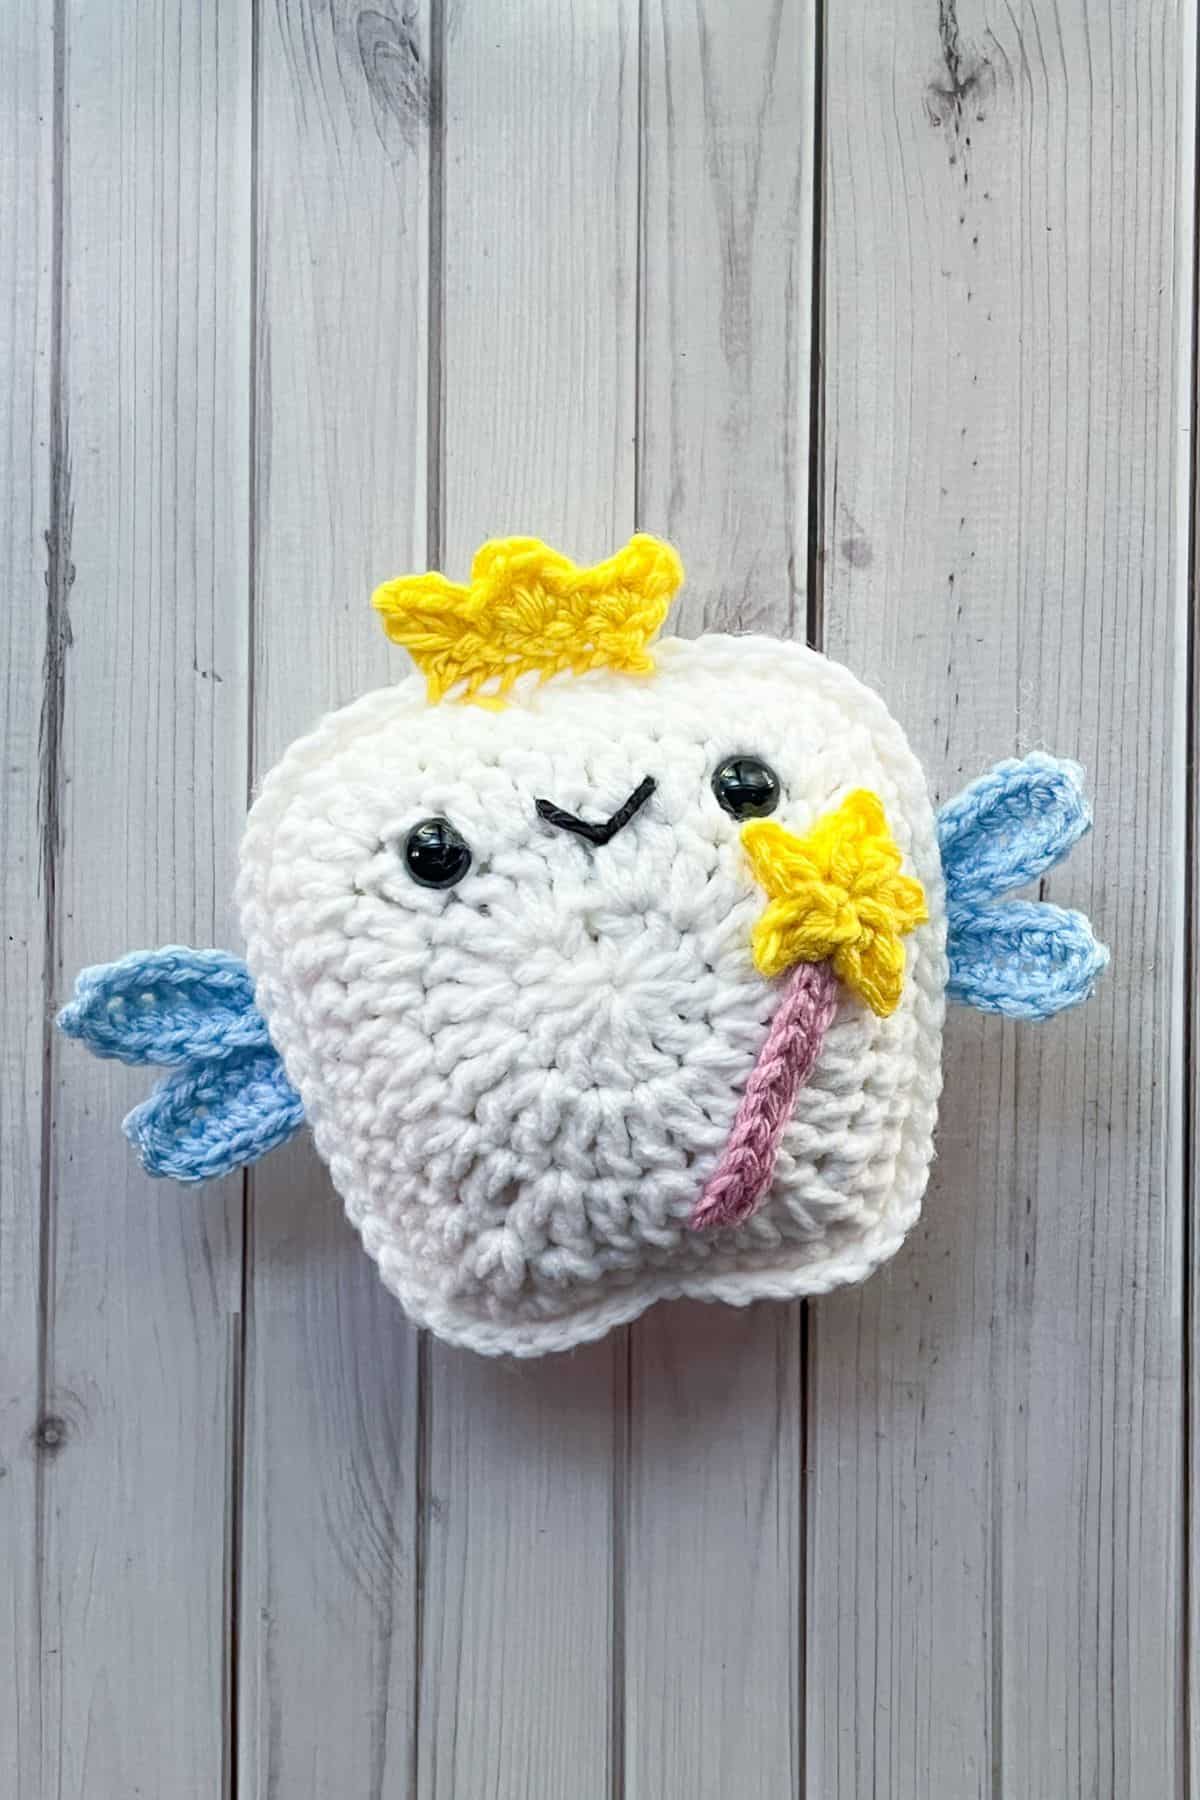
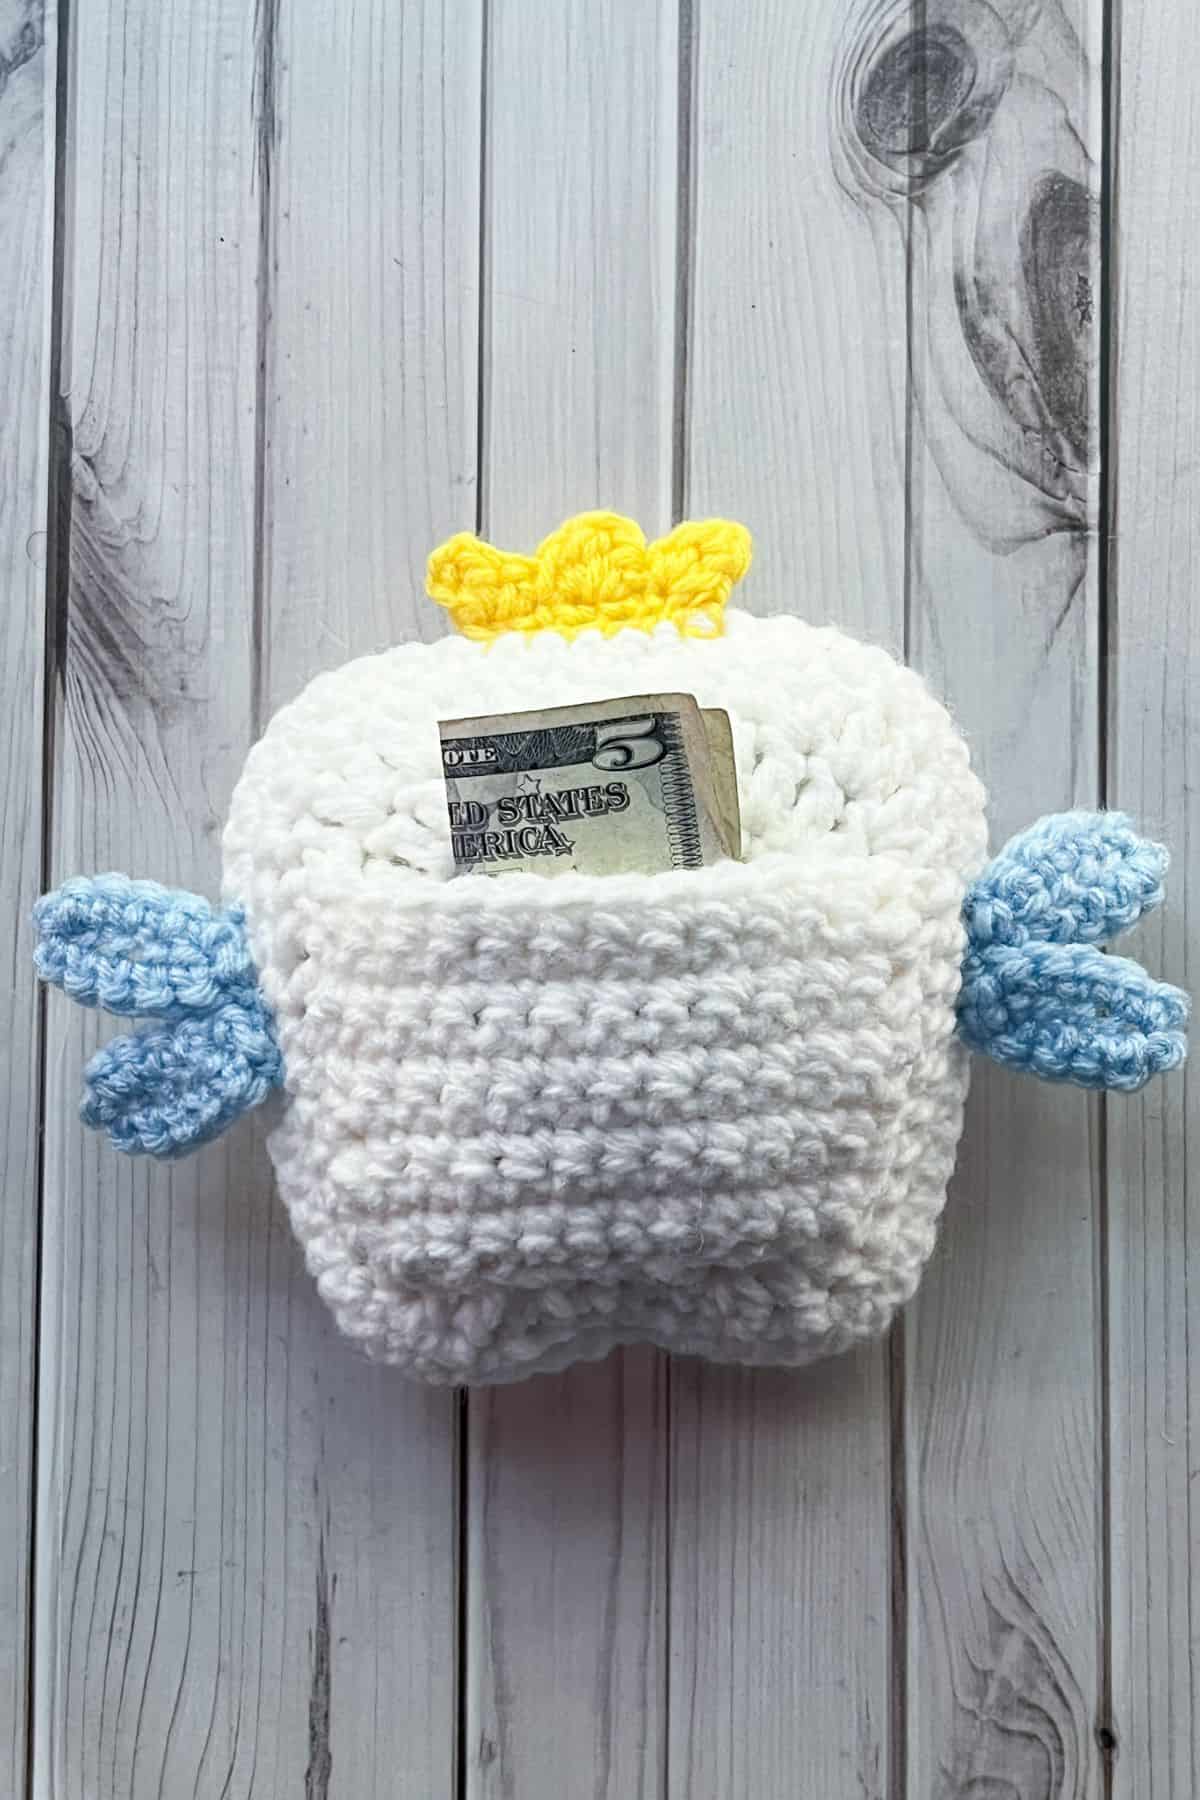
The crochet tooth fairy pillow pattern uses two flat crochet tooth pattern pieces that you stitch together to create a soft, plush pillow. Then comes the fun part—decorating it! Add adorable wings, a little crown, and of course, a wand to turn it into the cutest tooth fairy companion. On the back, there’s a small pouch designed to hold a tiny bag with the lost tooth. That way, the Tooth Fairy doesn’t have to go digging under a pillow (especially helpful if your kid is a light sleeper like mine!). It also gives your child a fun place to check for a surprise in the morning.
Want more fun, kid-friendly crochet patterns? Check out my crochet ice cream pint cozy pattern and crochet popsicle holder pattern—perfect for keeping little hands warm while enjoying those cold treats of summer. And for everyday fun, try my crochet fish bag pattern or crochet polar bear hat pattern for winter!
This crochet tooth fairy pillow pattern is not just a craft—it’s a little bit of magic for your family.
Jump to:
✏️ Things To Note:
- Skill Level: The crochet tooth fairy pillow pattern is great for beginners! If you’re comfortable with basic crochet stitches, you’ll have no trouble making the crochet tooth fairy pillow pattern. Even if you’re new to crochet, don’t worry – this project is simple and fun, and you’ll be amazed at how quickly it comes together!
- Purpose: This plush doubles as a crochet tooth fairy pouch for holding the lost tooth and a coin or bill from the Tooth Fairy. No more digging under pillows—this pillow can sit right beside your child’s bed!
- Kid Approved: My own child helped design the crochet tooth fairy pillow pattern, and it’s now a treasured part of our bedtime routine during the tooth-losing stage.
- Great Gift Idea: A sweet handmade gift for kids, grandkids, nieces, or nephews with loose teeth on the horizon!
🪡 Materials Needed
- Red Heart - white yarn
- Red Heart - yellow yarn
- Red Heart - orchid yarn
- Red Heart - light blue yarn
- Polyfill
- 10mm safety eyes
- 4.5mm hook
- Tapestry needle
💭Abbreviations to Remember (US terms)
- Magic ring (mr)
- Chains (ch)
- Single crochet (sc)
- Half double crochet (hdc)
- Double crochet (dc)
- Slip stitch (sl st)
- Increase (inc) - can be seen as inc for sc, hdc inc for increasing with hdc, or dc inc for increasing with dc.
* If you see a stitch abbreviation with "x" after it, it means how many times you do that stitch in the following amount of stitches. For example: sc x6 would mean you make a single crochet in the next 6 stitches. Inc x2 means you make an inc in the next 2 stitches.
🧋Variations
- Tooth Character Faces: Add safety eyes, embroidered eyes, or felt eyes to give your plush a personality. Or stitch a cute smiley or sleepy face on our blush!
- Custom Back Pouch: Embroider your child’s name or an initial onto the pouch.
🍵Instructions for Crochet Tooth Fairy Pillow Pattern
For this Crochet Tooth Fairy Pillow Pattern, we will be working in rounds. YOU WANT YOUR STITCHES TIGHT.
Crochet Tooth Pattern:
This pattern is made in the round.
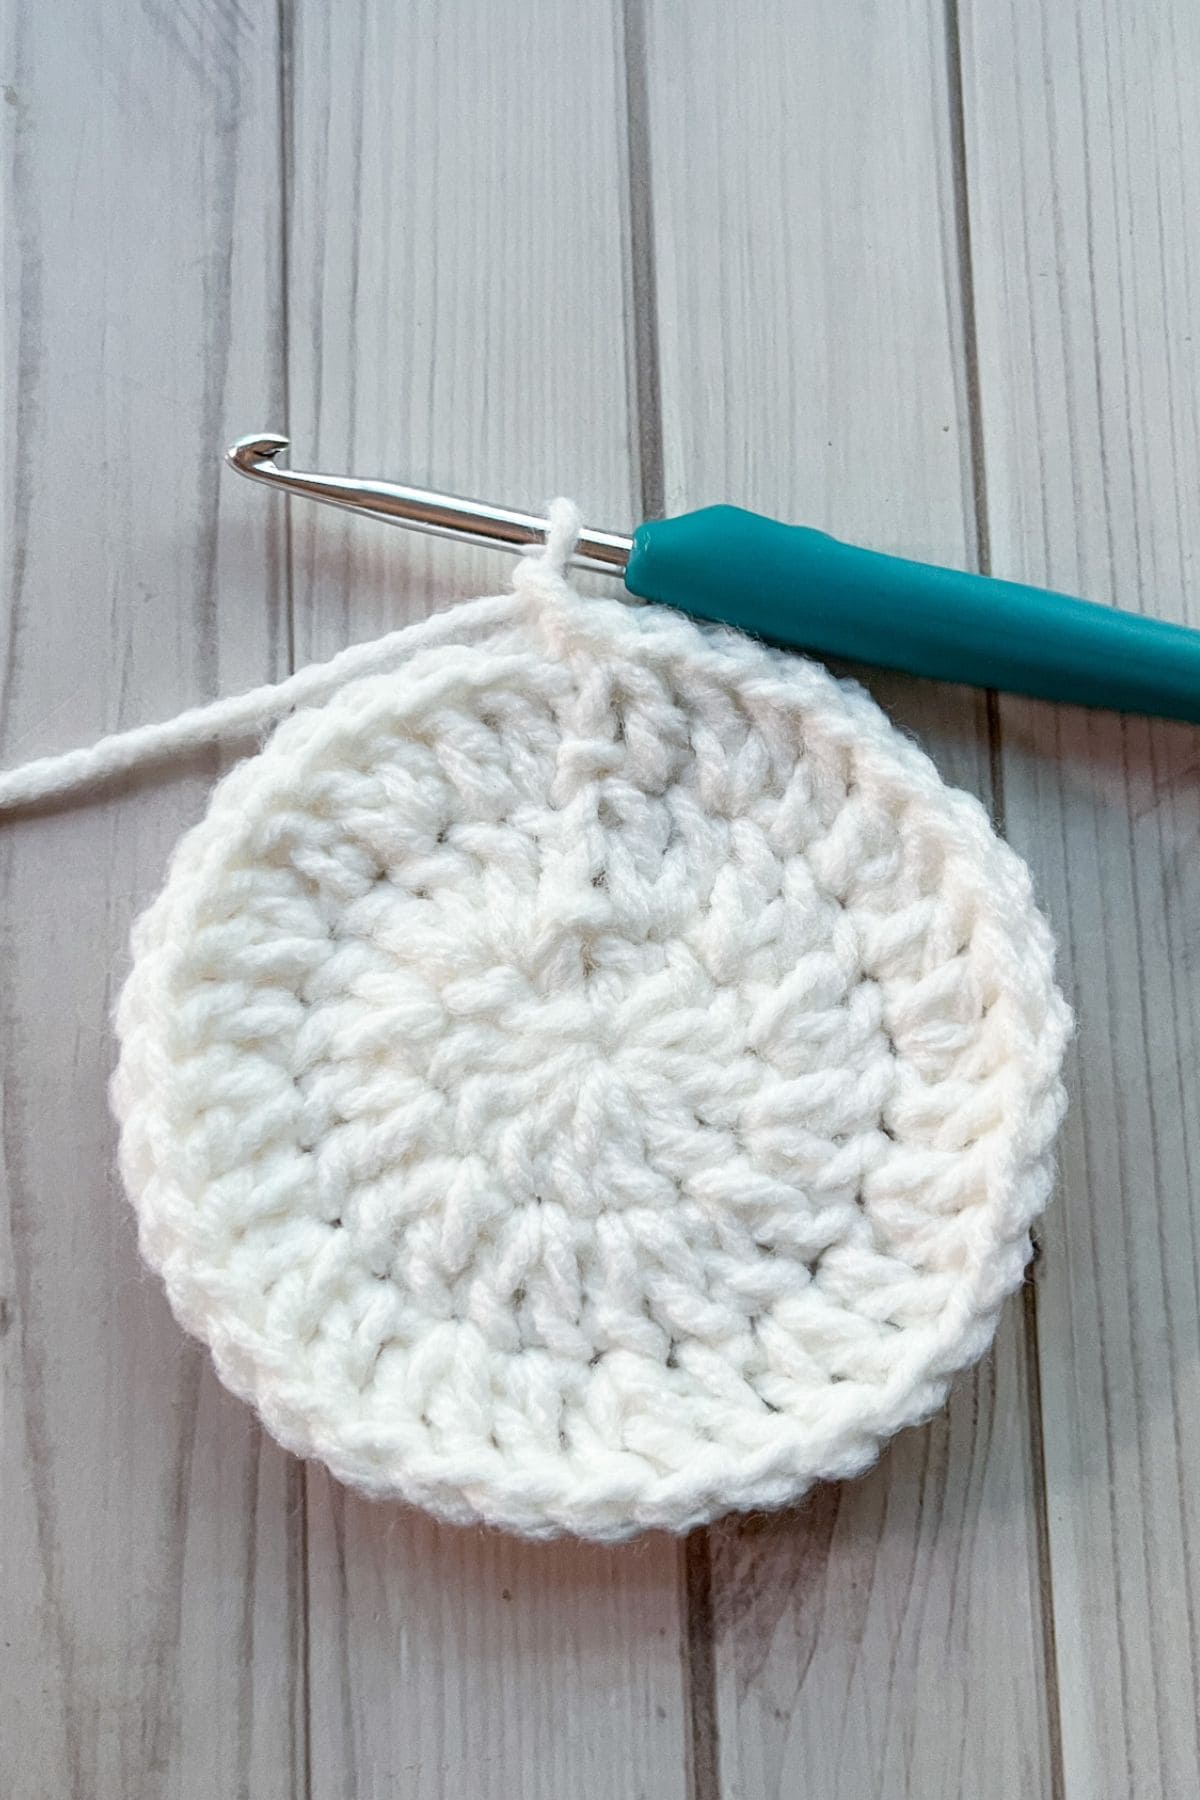
Round 1: Using the white yarn, make a magic ring and immediately chain 3 (does not count as a stitch). Then dc x12 into the magic ring. To secure the round, sl st to the 1st dc in the round (12).
Round 2: Ch x3, then dc inc in every stitch from the previous round. Then to secure the round, sl st to the 1st dc in the round (24).
Round 3: Ch x3, then dc inc, dc and repeat for the rest of the round. Then to secure the round, sl st to the 1st dc in the round (36).
Round 4: This is where the tooth will start to take shape.
Ch x1 (unlike previous rounds THIS DOES COUNT AS A STITCH!) and follow this sequence of stitches for this round:
Sc x2, hdc, dc inc x3, dc, hdc, sc x5, hdc inc, dc inc, hdc inc, sc, sl st, sc, hdc inc, dc inc, hdc inc, sc x5, hdc, dc, dc inc x3, hdc, sc x2, sl st to the first ch you made. (48)
Round 5: Ch x1 (counts as a stitch), and starting in the next stitch: Sc x5, sc inc x3 (the increases in this round should start where you made the second increase on the last round), sc x10, sc inc x3, sc x5, sc inc x3, sc x10, sc inc x3, sc x5, then sl st to the ch. (60)
Fasten off the yarn and weave in any ends.
Make x2.
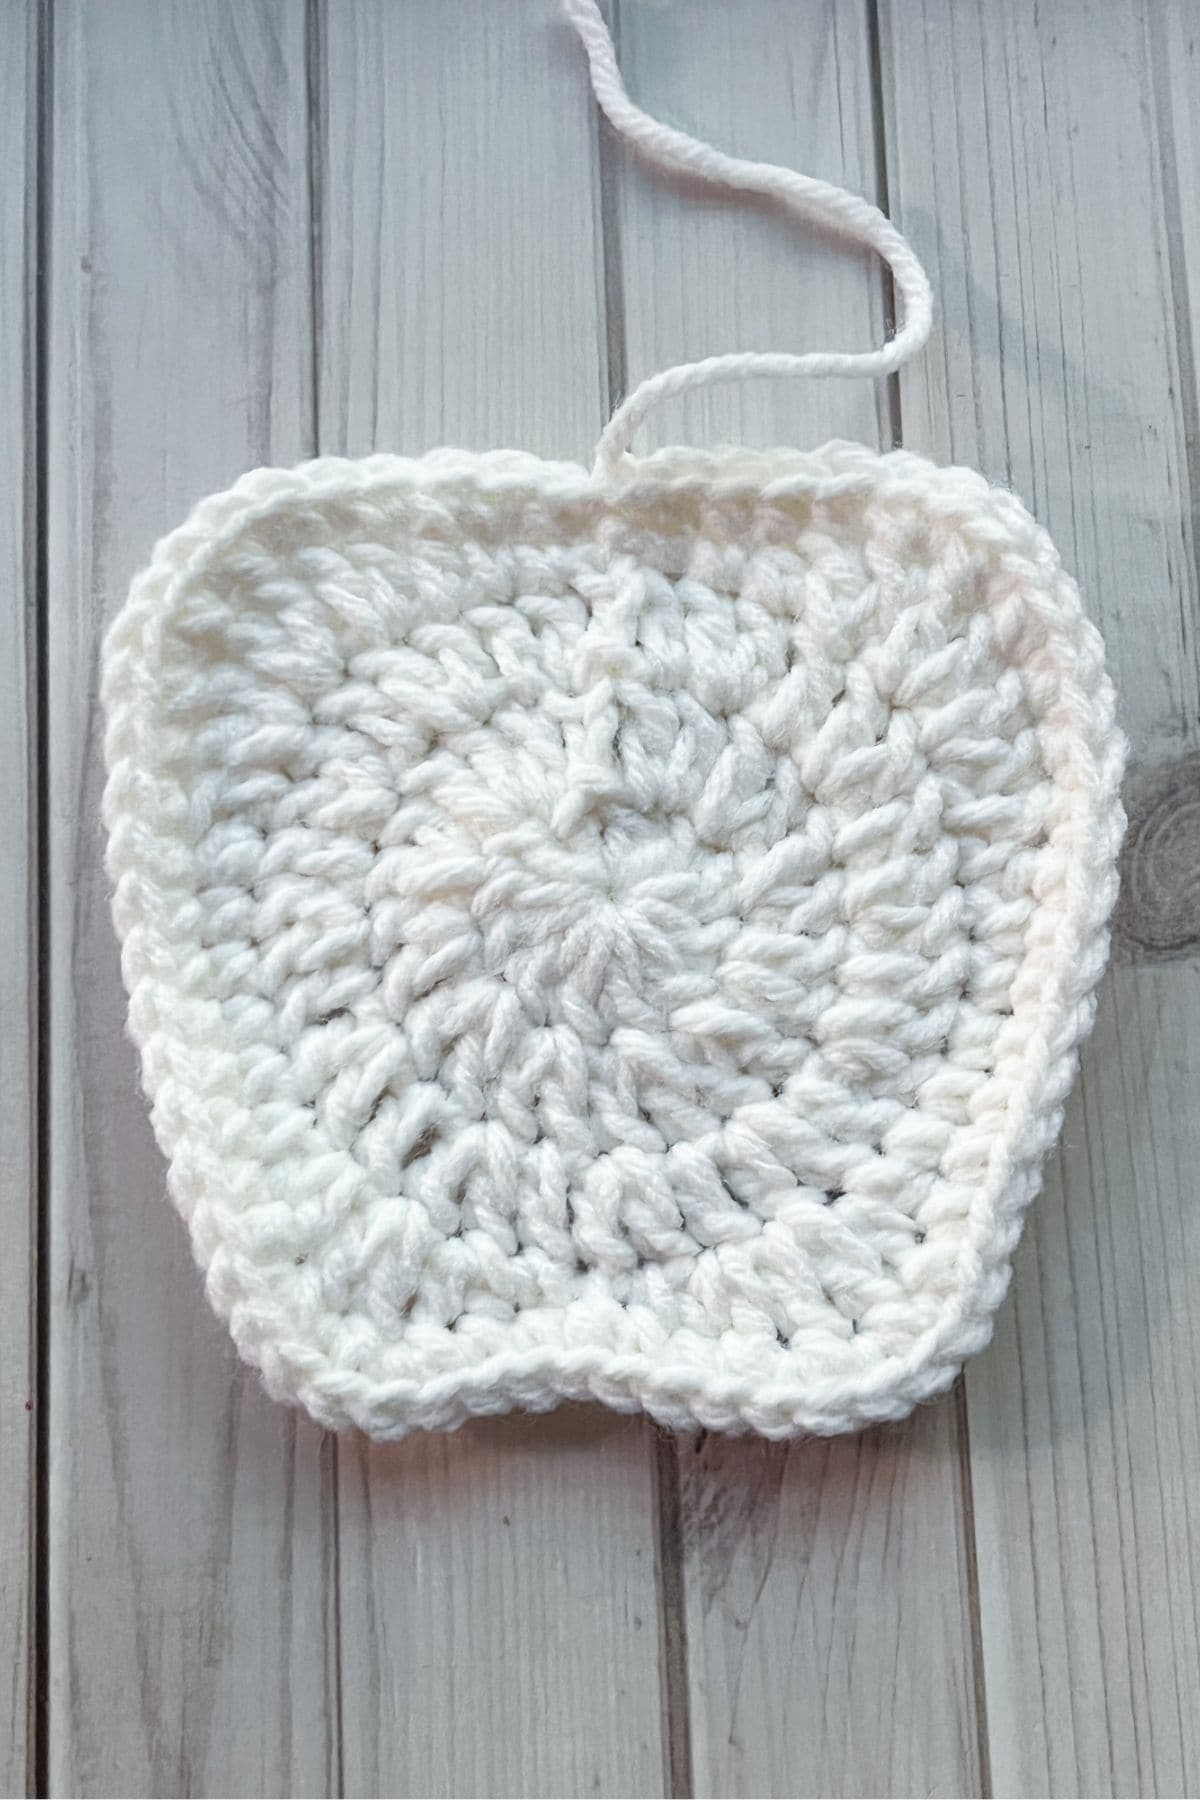
Crochet Pouch:
This part of the pattern is made in rows.
Row 1: With the white yarn still, ch x13 (13).
Row 2: In the second ch from the hook make a sc then sc for the rest of the row. Then ch x1 and turn (12).
Row 3-11: Repeat row 2 (12). After the last row, fasten off the yarn but leave a long tail for sewing.
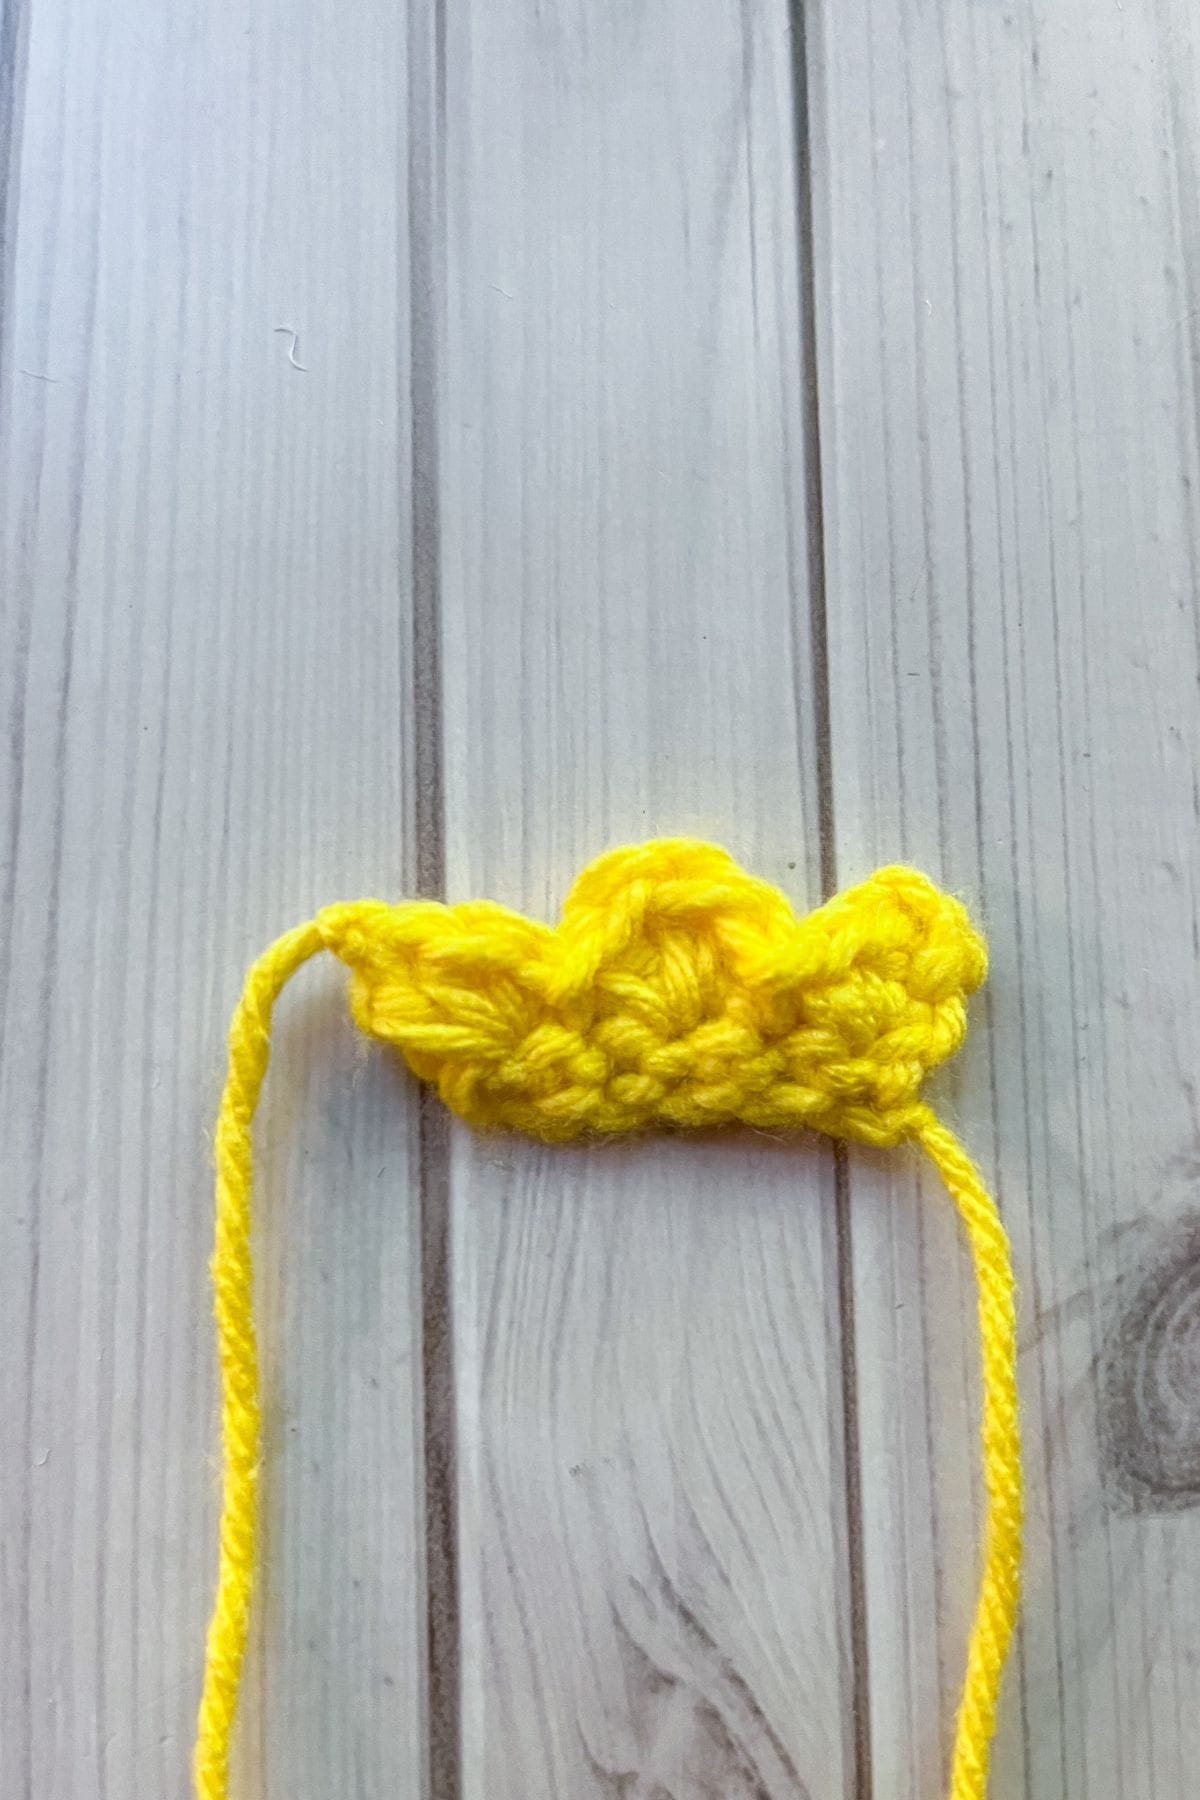
Crochet Crown:
Row 1: With the yellow yarn ch x6 (6).
Row 2: In the second ch from the hook make a sc. Sc for the rest of the row. Then ch x3 and turn (5).
Row 3: In the last stitch you worked in the last row (not the chains), make a hdc and sc. In the next stitch make a sl st. Hdc + dc + hdc in the following stitch and sl st in the next. In the last stitch in the row make a sc + hdc + dc. Then fasten off and leave a tail for sewing, you will need to wiggle the yarn end to the flat bottom side of the crown to sew to the top of the tooth later. Also - you may need to hand shape the crown a little if you want the points of the crown sharper as they come out more rounded.
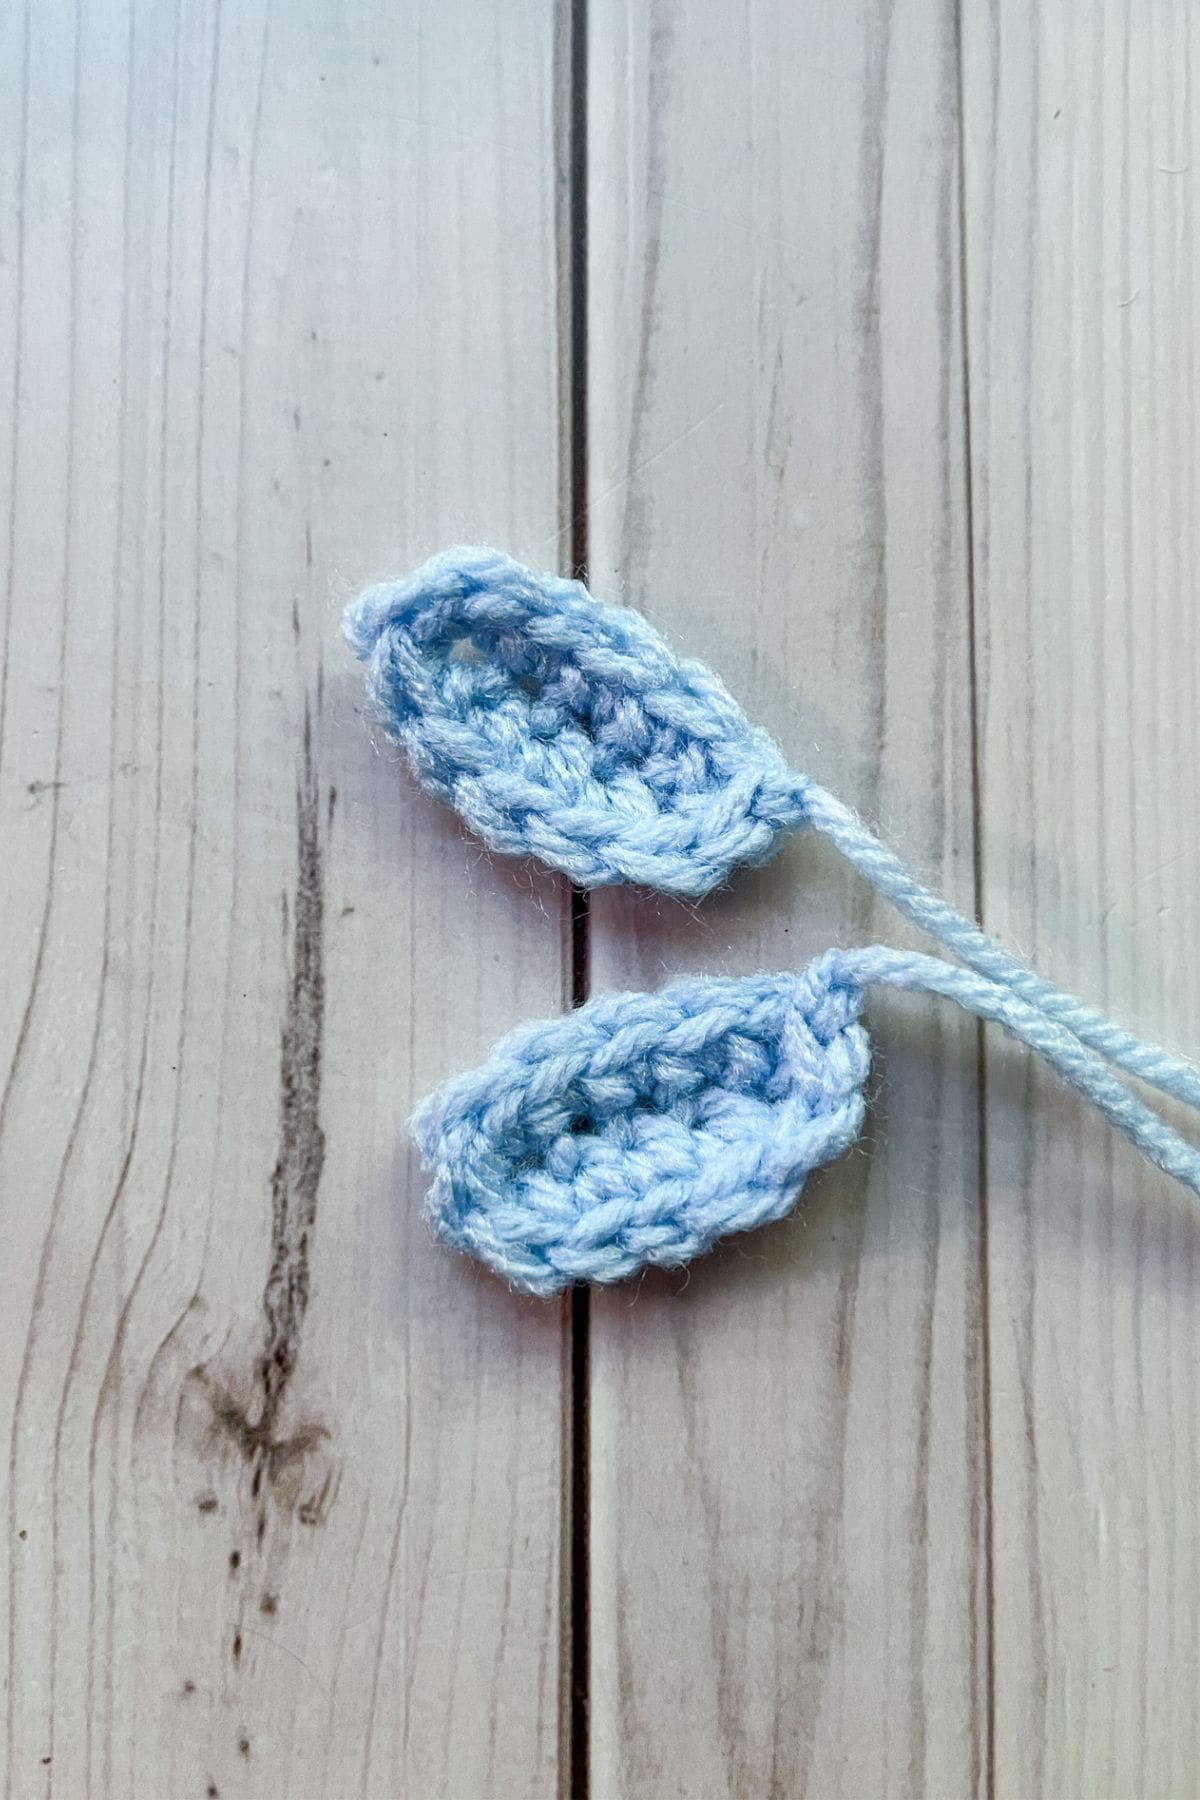
Crochet Wings:
With the light blue yarn, ch x6. Then in the second ch make a sc. Sc x3 in the following chains. In the last chain make 3 sc. Then turn to the unworked side of the chain. Sc x4 and sl st to the first sc you made on the other side. This adds a slight taper to the side of the wing that gets sewn to the tooth.
Make x4.
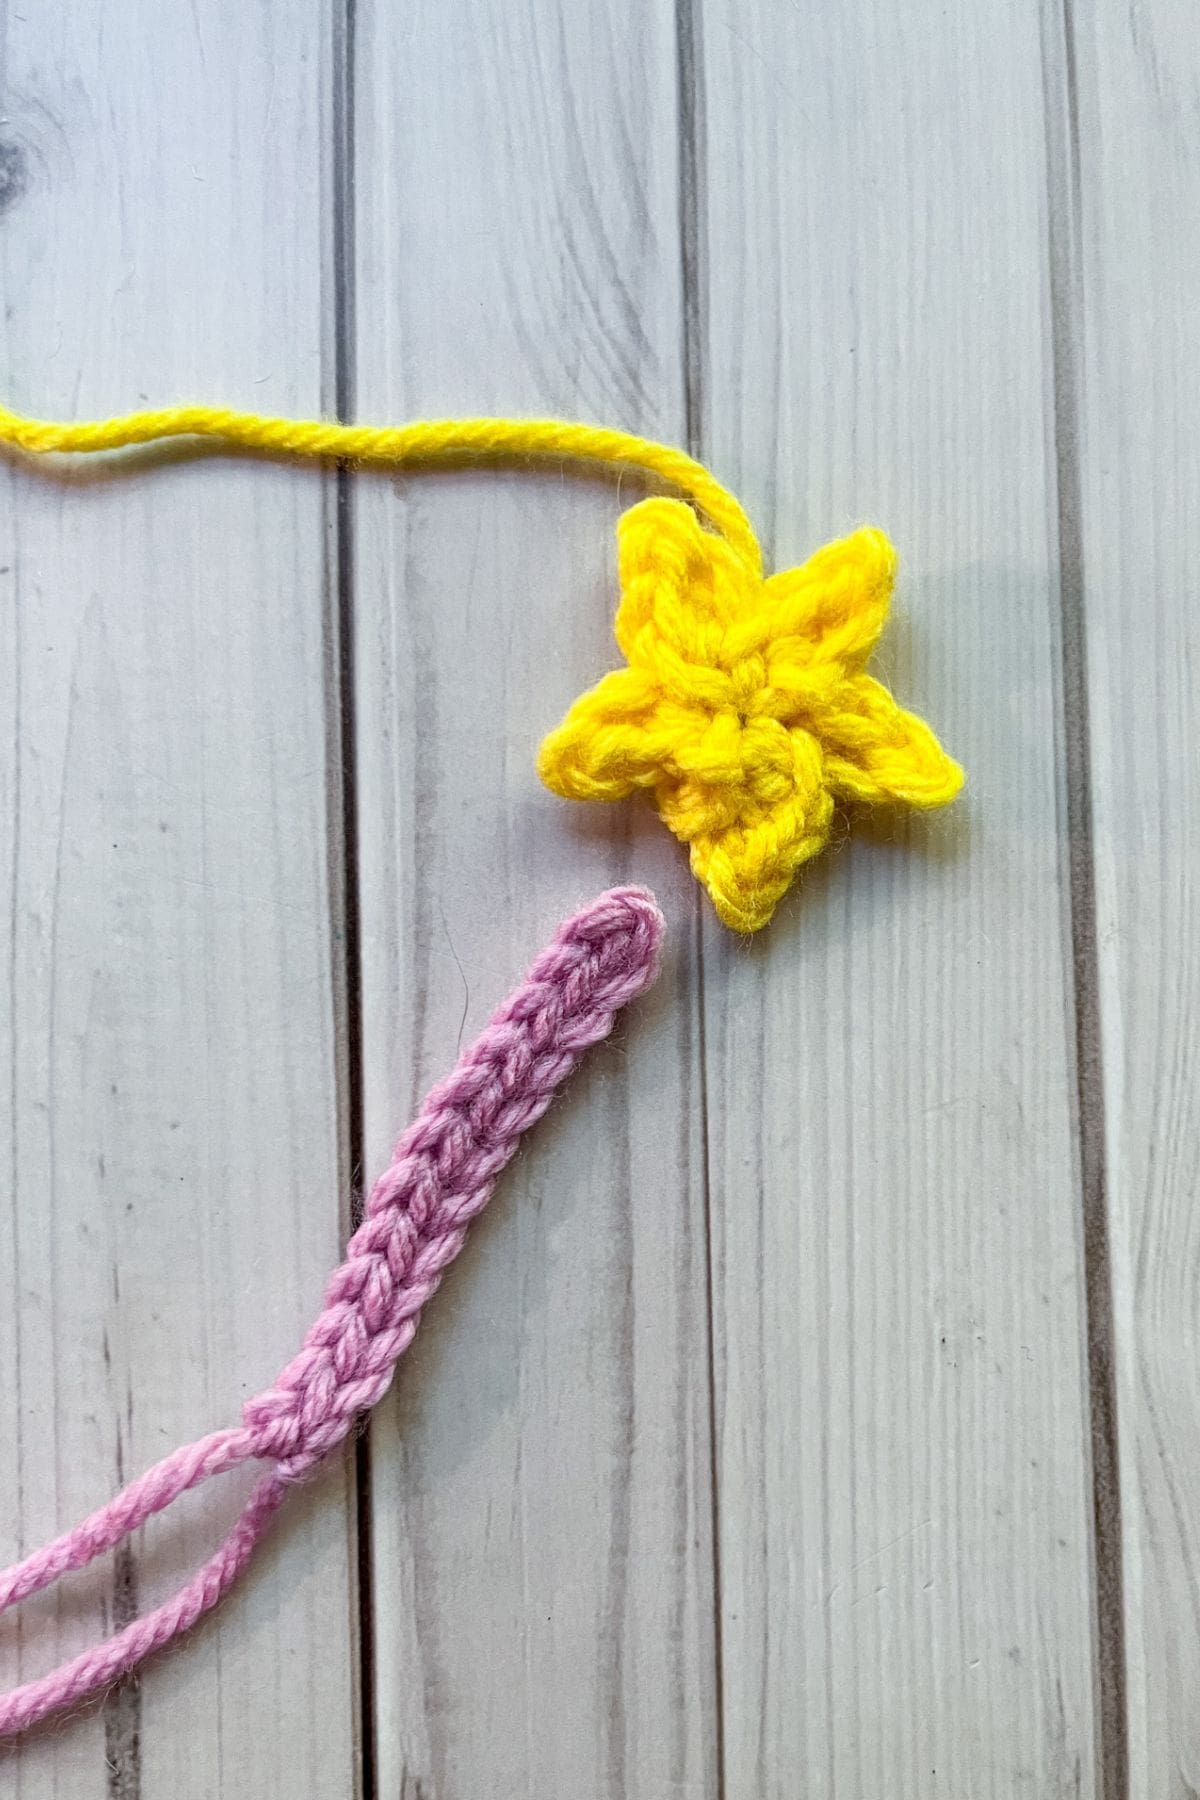
Crochet Wand:
This part of the pattern is in 2 parts - the stick and the star.
Crochet Stick: With the purple yarn, ch x13, then in the second ch from the hook make a sl st. Sl st for the rest of the chain length then fasten off the yarn and leave a tail for sewing.
Crochet Star: With the yellow yarn, make a magic ring, then immediately *ch x3, in the second ch from the hook make a sl st, then in the 3rd ch make a hdc. Then sl st into the circle. Repeat from * 4 more times. Then pull tight and leave a tail for sewing.
Finishing:
Crochet the 2 flat tooth pieces together, you really want to make sure the stitches are matched up.
Before closing the tooth - add safety eyes and a mouth to round 3. Also loosely stuff the tooth. You do not want to over fill the tooth since it is made in double crochet - you do not want filling to come out.
Next sew the crown to the top of the tooth, the wings are sewn next to each other across the middle of the tooth. Then the wand is sewn across the body of the tooth.
Lastly, sew the pouch to the back of the tooth.
I hope you had so much fun making this magical little crochet tooth fairy pillow pattern! Whether your kiddo is eagerly waiting for their first loose tooth or you're just adding some fairy-tale charm to your crochet collection, this project is such a sweet way to create memories—and a little bit of magic too.
If you’ve got some leftover yarn (especially white!), don’t let it go to waste—check out my crochet bunny keychain pattern! It’s a perfect mini project and makes a cute backpack charm or gift.
Looking for more adorable patterns? You’ll love my crochet bear bag pattern—it’s fun, functional, and totally huggable! Or try my crochet frog pattern, a quick and easy under-an-hour make that’s sure to hop right into your heart.
Thanks again for making this crochet tooth fairy pouch with me! I’d love to see your finished creations—tag me or share your photos so we can celebrate the cuteness together.
Happy crocheting!
🐌Expert Tips
- Use Stitch Markers: Since the crochet tooth fairy pillow pattern involves sewing two flat pieces together, marking your starting points (especially at corners and center top/bottom) helps keep everything aligned for a clean, even shape.
- Match Your Tension: When making both tooth pieces, try to crochet with consistent tension. If one side feels tighter or looser, it might not line up perfectly when seaming.
- Stuff Gently: Stuff the pillow lightly but evenly. Overstuffing can stretch the stitches and distort the shape. Fiberfill or scrap yarn both work well.
🧵Pattern FAQs
This pattern is beginner-friendly and great for anyone who knows basic crochet stitches. If you’ve made amigurumi or small plushies before, you’ll have no problem!
The entire project takes about 1 to 2 hours, depending on how detailed you get with decorations like the wings, crown, or wand.
Any worsted weight yarn (category 4) works well. Acrylic or cotton yarn are both great options—cotton gives a neater look, while acrylic makes it soft and cuddly. You can even mix yarns for different textures!
I recommend a 4mm (G) or 4.5mm crochet hook, but feel free to adjust based on your tension and the yarn you choose. Just make sure your stitches are tight enough that the stuffing doesn’t show through.

🧶More Crochet Kid Approved Patterns


If you tried this Crochet Tooth Fairy Pillow Pattern (or any other pattern on my website), please let me know how it went in the 📝 comments below. I'd love to hear from you!

Crochet Tooth Fairy Pillow Pattern
Materials
Abbreviations (US terms)
- Magic ring - mr
- Chains - ch
- Single crochet - sc
- Half double crochet - hdc
- Double crochet - dc
- Slip stitch - sl st
- Increase - inc
Notes
- Skill Level: This pattern is great for beginners! If you’re comfortable with basic crochet stitches, you’ll have no trouble making the crochet tooth fairy pillow pattern. Even if you’re new to crochet, don’t worry – this project is simple and fun, and you’ll be amazed at how quickly it comes together!
- Purpose: This plush doubles as a crochet tooth fairy pouch for holding the lost tooth and a coin or bill from the Tooth Fairy. No more digging under pillows—this pillow can sit right beside your child’s bed!
- Kid Approved: My own child helped design this one, and it’s now a treasured part of our bedtime routine during the tooth-losing stage.
- Great Gift Idea: A sweet handmade gift for kids, grandkids, nieces, or nephews with loose teeth on the horizon!
Instructions
- For this Crochet Tooth Fairy Pillow Pattern, we will be working in rounds.
Crochet Tooth Pattern:
- This pattern is made in the round.
- Round 1: Using the white yarn, make a magic ring and immediately chain 3 (does not count as a stitch). Then dc x12 into the magic ring. To secure the round, sl st to the 1st dc in the round (12).
- Round 2: Ch x3, then dc inc in every stitch from the previous round. Then to secure the round, sl st to the 1st dc in the round (24).
- Round 3: Ch x3, then dc inc, dc and repeat for the rest of the round. Then to secure the round, sl st to the 1st dc in the round (36).
- Round 4: This is where the tooth will start to take shape.
- Ch x1 (unlike previous rounds THIS DOES COUNT AS A STITCH!) and follow this sequence of stitches for this round:
- Sc x2, hdc, dc inc x3, dc, hdc, sc x5, hdc inc, dc inc, hdc inc, sc, sl st, sc, hdc inc, dc inc, hdc inc, sc x5, hdc, dc, dc inc x3, hdc, sc x2, sl st to the first ch you made. (48)
- Round 5: Ch x1 (counts as a stitch), and starting in the next stitch: Sc x5, sc inc x3 (the increases in this round should start where you made the second increase on the last round), sc x10, sc inc x3, sc x5, sc inc x3, sc x10, sc inc x3, sc x5, then sl st to the ch. (60)
- Fasten off the yarn and weave in any ends.
- Make x2.
Crochet Pouch:
- This part of the pattern is made in rows.
- Row 1: With the white yarn still, ch x13 (13).
- Row 2: In the second ch from the hook make a sc then sc for the rest of the row. Then ch x1 and turn (12).
- Row 3-11: Repeat row 2 (12). After the last row, fasten off the yarn but leave a long tail for sewing.
Crochet Crown:
- Row 1: With the yellow yarn ch x6 (6).
- Row 2: In the second ch from the hook make a sc. Sc for the rest of the row. Then ch x3 and turn (5).
- Row 3: In the last stitch you worked in the last row (not the chains), make a hdc and sc. In the next stitch make a sl st. Hdc + dc + hdc in the following stitch and sl st in the next. In the last stitch in the row make a sc + hdc + dc. Then fasten off and leave a tail for sewing, you will need to wiggle the yarn end to the flat bottom side of the crown to sew to the top of the tooth later. Also - you may need to hand shape the crown a little if you want the points of the crown sharper as they come out more rounded.
Crochet Wand:
- This part of the pattern is in 2 parts - the stick and the star.
- Crochet Stick:
- With the purple yarn, ch x13, then in the second ch from the hook make a sl st. Sl st for the rest of the chain length then fasten off the yarn and leave a tail for sewing.
- Crochet Star:
- With the yellow yarn, make a magic ring, then immediately *ch x3, in the second ch from the hook make a sl st, then in the 3rd ch make a hdc. Then sl st into the circle. Repeat from * 4 more times. Then pull tight and leave a tail for sewing.
Crochet Wings:
- With the light blue yarn, ch x6. Then in the second ch make a sc. Sc x3 in the following chains. In the last chain make 3 sc. Then turn to the unworked side of the chain. Sc x4 and sl st to the first sc you made on the other side. This adds a slight taper to the side of the wing that gets sewn to the tooth.
- Make x4.
Finishing:
- Crochet the 2 flat tooth pieces together, you really want to make sure the stitches are matched up.
- Before closing the tooth - add safety eyes and a mouth to round 3. Also loosely stuff the tooth. You do not want to over fill the tooth since it is made in double crochet - you do not want filling to come out.
- Next sew the crown to the top of the tooth, the wings are sewn next to each other across the middle of the tooth. Then the wand is sewn across the body of the tooth.
- Lastly, sew the pouch to the back of the tooth.
- I hope you had so much fun making this magical little crochet tooth fairy pillow pattern! Whether your kiddo is eagerly waiting for their first loose tooth or you're just adding some fairy-tale charm to your crochet collection, this project is such a sweet way to create memories—and a little bit of magic too.


Angela says
Row 2&3 are suppose to be increases correct ?
Kimberly Arenas says
Yes 🙂 In this pattern I have double crochet increases, single crochet increases and half double crochet increases so I write the pattern with the stitch type + increase.
Lily C. says
I have so many questions, I have started over like 5 times already but I am determined. Ok, so for round 2 the instructions say Ch x3, then dc inc in every stitch from the previous round but in the video it looks like you are putting it into the 2nd stitch from that round. Can you clarify, do you start round 2, after the 3 chains, in the same stitch you used to slip stitch the first round or the next stitch?? I hope this makes sense, I am new to crocheting but eager to get it right! THANKS!!!
Kimberly Arenas says
The ch x3 for every round (as stated in round 1) does not count as a stitch. Instead, I use the ch x3 to get the height needed and then start in the next stitch over. So in the case the dc inc would be made in the next stitch, not the same stitch where you made the ch x3. Hope this helps!
Cathy says
I just made 4. Love them. Wish I new how to post pictures of them. Thanks for sharing your pattern.
Kimberly Arenas says
I'm glad you like the pattern!
Ina says
Hello I absolutely love your Design. it is absolutely stunning! Can I sell the finished product on Etsy the store? Best Wishes Ina
Kimberly Arenas says
Absolutely!
Farina says
Hey, thank you so much for this cute pattern. I have a problem in row 4 of the tooth: the pattern says, I will end up with 48 stitches, but there are only 47. The last stitch 36 of the previous row 3 is unworked? Do I skip it?
And the pattern says to slst into the chain, but in previous rounds it said to slst into the first stitch in the row. Thank you so much.
Kimberly Arenas says
Hi there, the chain for round 4 and 5 does count as a stitch (I realized I should have clarified this and added this note to the pattern). The last stitch of round 3 is technically the slip stitch, but since we are counting the chain as a stitch we skip it and sl st to the chain instead. I normally don't do this in patterns, but had to for this pattern because it created a dip on the top of the tooth.
Hope this helps!
Jill says
This came out adorable! Thank you so much! I decided to attach everything before I sewed the two halves together. (Except I forgot the mouth.) My grandson loves it.
Anna R says
I’m confused with the wings. Do I turn my work after the last 3sc in the last chain stitch? Where do the 4sc go?
Kimberly Arenas says
The wings are worked similarly to how you would make an oval in crochet. You work one side of the crochet chain, make the 3 sc in the last chain stitch and turn to the unworked (flat side) of the chain. You make 1 sc into the bottom of the next 4 chains and then sl st to the first sc you made in the round.
Anna R. says
Ohhh got it!! Thank you so much for clarifying. I can’t wait to put this together and gift it to my niece. Happy crocheting!
Lisa says
The first round of the tooth pattern, its chain 3 and then 12dc for a total of 13? Or is the pattern counting the chain 3 as the first dc and then it’s 11dc for a total of 12?
Kimberly Arenas says
The ch x3 gets skipped over (sometimes I count it as a dc, but in this pattern I skip over it so no gaps are created since we are stuffing it. You can count it as a dc if you want - just make sure you end the round with 12 workable stitches.
Jane says
re directions for the pouch on tooth fairy pillow....row 2 is confusing. I assume the pouch is made entirely of sc rows. Am I correct?
Kimberly Arenas says
Yes! I just fixed the pattern