
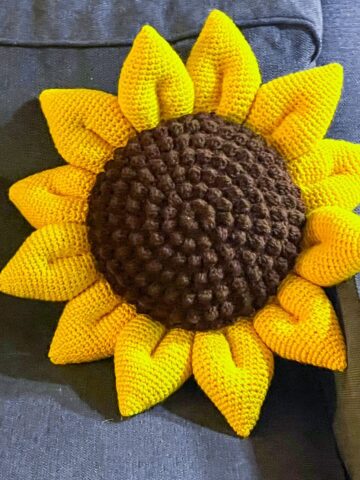
Have you ever wanted to squeeze a cactus? Follow along with this easy Crochet Cactus Pillow Pattern! This is one cactus that won't prick you.

Today, I will show you how to crochet a cactus with my easy, free crochet cactus pillow pattern! It's perfect for all your crochet boho needs, allowing you to bring some of that desert life into your home. Who wouldn't want to make their house feel like a crochet desert with all the crochet succulents and cactus amigurumi lying about on the couch?
If you want to continue with the southwest/boho crochet patterns, check out my Bohemian Crochet Pillow. It's a perfect complement to the cactus crochet pattern and a simple boho crochet blanket.
I have two designs for making crochet cactus patterns. The one we are making here is the round crochet cactus pattern, which is essentially a cactus-shaped pillow. I also have a Cactus Crochet Pattern for a saguaro cactus pillow.
The round cactus crochet pattern is super simple to make and can easily be completed in just a few hours. You can also adjust the size to create a variety of shapes. If you make smaller versions, you can add faces to turn the crochet cactus pattern into a cactus amigurumi pattern!
Soon, you'll have a whole patch of cactus pillows in a corner of your living room because they are pretty addictive to make. So, let's get started on this crochet cactus free pattern! Time's a-wasting!
Jump to:
✏️ Things to Note:
- Yarn Choice: I made this crochet cactus pillow pattern with a skein of light sage yarn from the Red Heart Fiesta collection to emulate a cactus and its prickles because of the flecks of white throughout the yarn. You can use any green to make the cactus pattern, but the speckled fiesta yarn creates a nice visual statement.
- Yarn Types: I made the crocheted cactus with acrylic yarn since it's what I had on hand, but this project can be completed with any type of yarn. Cotton, acrylic, and chunky yarn are highly recommended.
- Finished Size: The finished size of the crochet cactus pillow pattern with flower is roughly a foot in width, height, and length.
🪡 Materials Needed
- 1 skein of light sage from the Red Heart Fiesta collection, (It has since been discontinued so you can find any green tweed looking yarn to get a similar effect, otherwise you can use a solid green)
- and a small ball of pink yarn - could be light, dark or a standard normal pink shade.
- J hook (6mm)
- Tapestry needle for weaving in the ends and sewing pieces together
- Polyfill
💭 Abbreviations to Remember (US Terms)
- Magic ring (mr)
- Single crochet (sc)
- Increase (inc) - 2 stitches in the same stitch
- Chains (ch)
- Double crochet (dc)
- Half double crochet (hdc)
- Back loop only (blo)
- Front loop only (flo)
🧋 Variations
Consider altering the starting chain by adding or removing chains to modify the cactus size. Opt for various shades of green to add diversity!
🍵 Instructions for Crochet Cactus Pillow Pattern
For this pattern, we will be working in rows.
Cactus Pattern:
We will be alternating crochet rows of front loop only and back loop only.
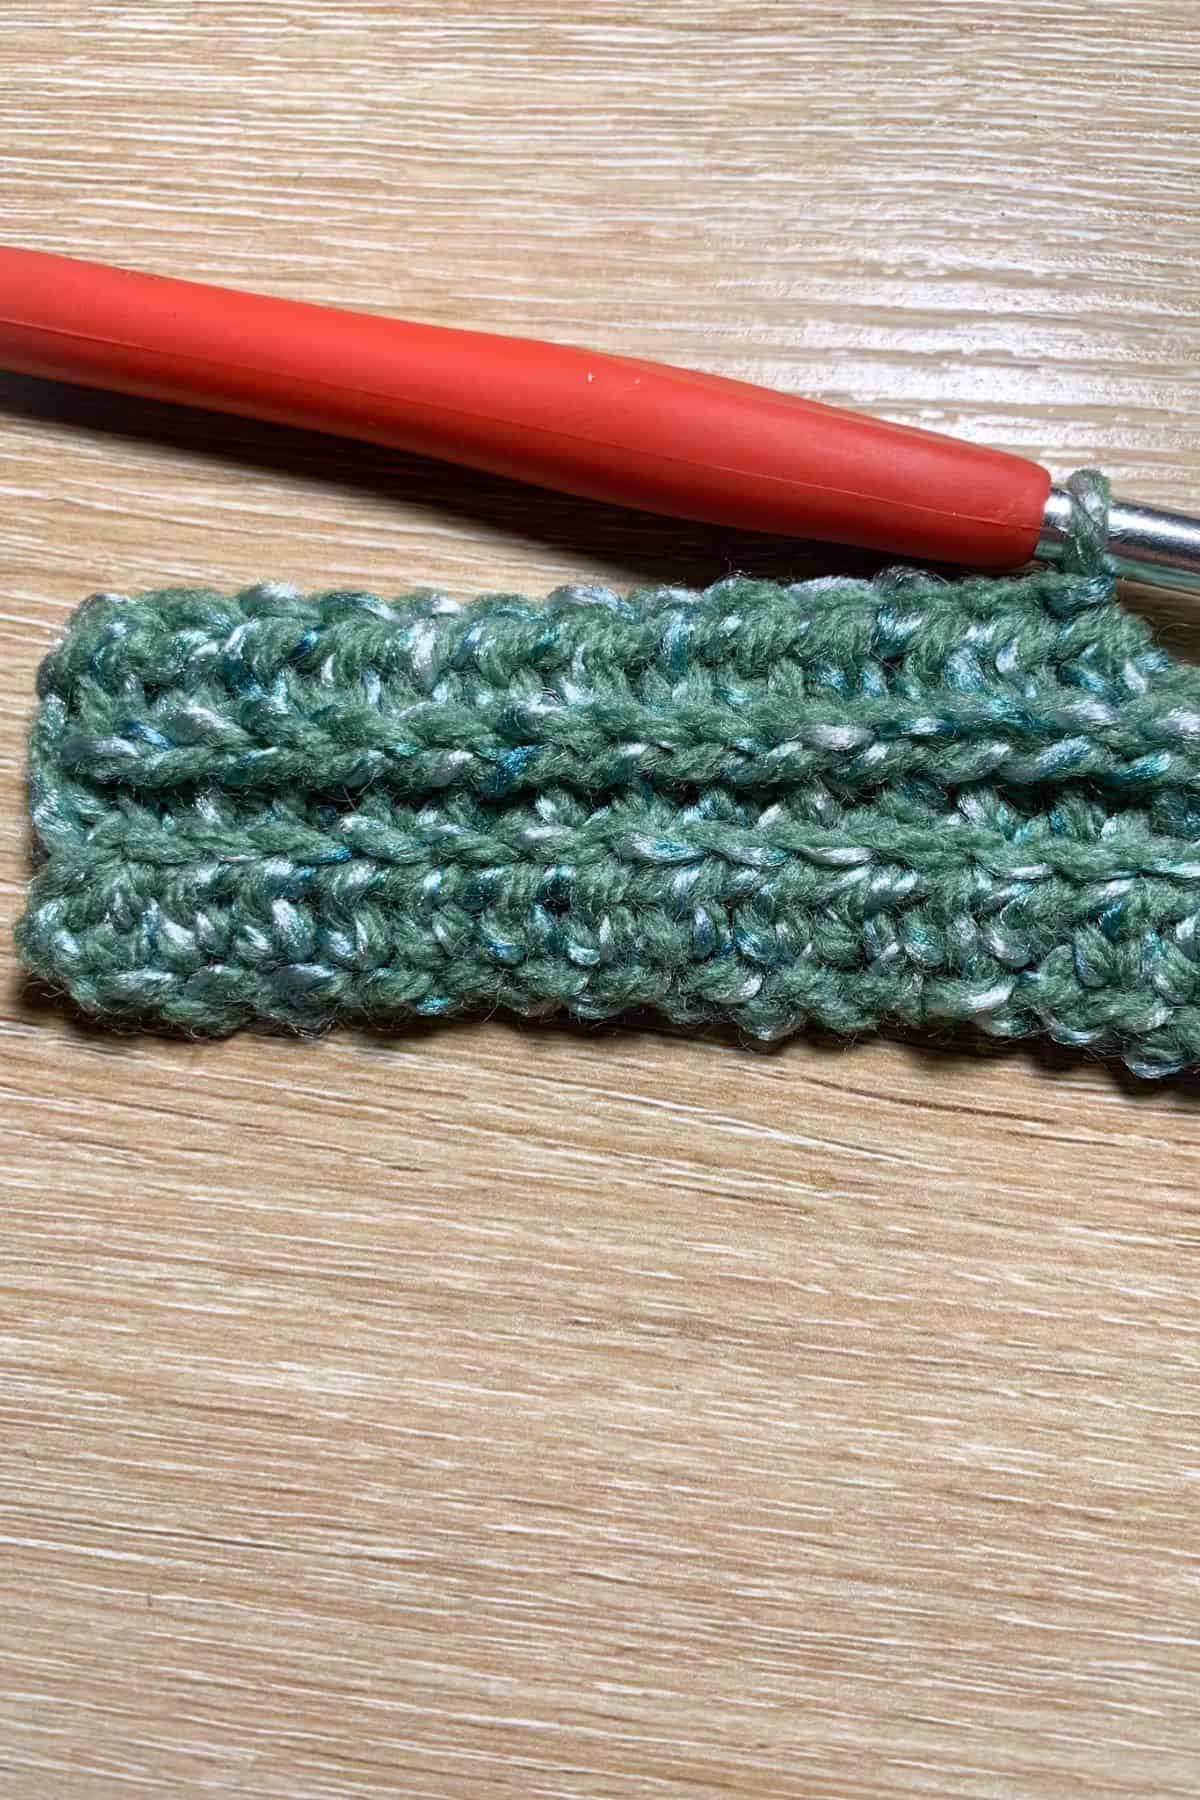
Row 1: Ch x40 (40). Then ch 1 and turn
Row 2: Starting in the second chain from hook, make a HDC in every ch (40). Then ch 1, turn
Row 3: In FLO, HDC the entire row. When you go through a stitch normally, usually you go through 2 loops. The front loop of a stitch is the loop that is closest to you. Only go through this loop and leave the back loop alone. (40) Ch 1, turn

Row 4: In BLO, HDC the entire row. This is where you skip the front loop of a stitch and work in the back loop. It’s the opposite of what you did in the last row. (40) Ch 1, turn

Row 5-55: Continue alternating rows 3 and 4. (40)

Fasten off and leave tail for sewing.
Fold the rectangle in half so the beginning row and ending row are touching each other, then sew the 2 ends together so it makes a completed loop or circle.
Sewing:


You will now have an open end at the bottom and then the top of the rectangle. Using the same yarn (or new yarn - if you don't have enough tail left) cinch both the bottom and top of the rectangle closed. Do this by going in and out of the ends of the rows about every half inch/inch. First do the bottom and pull tight, stuff the cactus with poyfill and then move onto the top of the cactus and cinch the top closed.
IF THERE ARE OPEN HOLES AT THE TOP AND BOTTOM THAT WON'T CLOSE ALL THE WAY, THAT'S OKAY SEE NEXT STEP!
If you can’t get your cactus to close all the way on the top and bottom, that is okay! I couldn’t either and I think it's just due to there being a lot of yarn and rows that we are trying to tighten together. In order to fix this we are going to make circles to cover the top and bottom holes. Kind of like a beach ball.
Crochet Circles x2:

Round 1: Using the same green color. Make a MR and work sc x6 in the circle. If you find it difficult making a magic ring you can chain 2 and then crochet sc x6 in the second chain from the hook. (6)
Round 2: Inc x6. (12).
Round 3: [Inc, sc], repeat what's in the brackets for the rest of the round. (18).
Round 4: [Inc, sc x2], repeat what's in the brackets for the rest of the round. (24).
Round 5: [Inc, sc x3], repeat what's in the brackets for the rest of the round (30)

You may need to make more rounds depending on how big the hole is, so double check by placing the circle over the hole to make sure it's covered. If you need more rows continue the pattern of doing an increase and then adding an additional single crochet to each single crochet cluster.
Otherwise, fasten off and leave a tail for sewing.
Sew the circles over the holes on the top and bottom of the round cactus.
Cactus Flower:

Row 1: Leave a long starting ch tail for sewing later. Ch x60, + ch x5, turn
Row 2: Dc in 6th ch from hook. Then [ch 1, skip the next 2 chs on the foundation chain row, dc, ch 2, dc in the same stitch that you did the last dc in.] Repeat what is in the brackets for the rest of the row. At the end of the row, ch x3 and turn.

Row 3: Make a dc in the 2 chain gap between the pair of dc stitches in the row below. Don't stitch into the ch, stitch around its entirety. Then ch x2, and make dc x2 in the same gap. So there should be 2 dc (the first dc is made of turning chains), 2 ch, and then 2 dc
Then [ch x2, skip the single chain gap in the row below, and make dc x2 in the gap below that has the 2 ch, then ch x2, and dc x2.] Repeat what’s in the brackets for the rest of the row. At the end of the row ch x3, and turn

Row 4: In the gap below dc x5, then make a sc in the next gap, then make [dc x6 in the following gap, and make a sc in the next gap], repeat what's in the brackets for the rest of the row. This row should make a shell type top creating individual petals. Fasten off and weave in the end.

Weave the starting tail through the base of the foundation ch and pull tight making sure it's tightened in a way that allows the flower to spiral around itself, then make a few stitches through the bottom to secure its shape. Then sew to the cactus anywhere you would like! I did mine on the top off center.
And now you have a cactus pillow to hug and snuggle made from my crochet cactus pillow pattern! The crochet cactus also makes a perfect gift for cactus loving friends! If you are giving it as a gift to a friend, pair it with a set of my Crochet Cactus Coaster Pattern.
Looking for other bohemian crochet patterns? I do have a Sunflower Coaster Crochet Pattern and Crochet Sunflower Blanket Pattern for a more fall boho look verses a desert boho look.
If you have a small amount of green yarn left over, try making my Crochet Headphone Sprout Pattern for a fun quirky crochet project.
🐌Expert Tips
- Choose Your Yarn Wisely: Opt for yarn that has some texture or color variation to enhance the visual appeal of your cactus. Look for flecked or tweed yarns to create a more realistic look.
- Adjust the Size: If you want a smaller or larger cactus, simply adjust the starting chain. This also allows you to create smaller versions as gifts or decor.
- Experiment with Colors: Feel free to mix and match different shades of green for a more dynamic appearance. You can also add flowers in various colors to give your cactus a pop of personality.
- Stuffing: Use a high-quality polyfill to ensure your cactus retains its shape. Consider using leftover fabric scraps for a more eco-friendly option.
🧵 Pattern FAQs
Although tedious, you could embroider white specks on the cactus. I actually do this in my saguaro cactus pattern for the prickles. Alternatively, you can find green tweed yarn because the white specks will already be in the yarn.
No, but it is very similar. The camel stitch uses the little hump created by the hdc stitch; we just alternate front loop and back loop.
I never have, but I'm sure you can! Depending on the fuzzy factor, it might be hard to see the stitch details. If you want to keep the structure of the stitch intact, I would recommend using normal worsted yarn.

🧶More Crochet Boho Patterns


If you tried this Crochet Cactus Pillow Pattern (or any other pattern on my website), please let me know how it went in the 📝 comments below. I'd love to hear from you!

Crochet Cactus Pillow Pattern
Materials
- 1 skein of light sage from the Red Heart Fiesta collection
- small ball of pink - could be light, dark, or a standard normal pink shade.
- 6mm hook
- Tapestry needle
- Polyfill
Abbreviations (US terms)
- ch = Chain
- dc = Double Crochet
- hdc = Half Double Crochet
- blo = Back Loop Only
- flo = Front loop only
- mr = Magic ring
- sc = Single crochet
- inc = Increase (2 stitches in the same stitch)
Notes
Instructions
Cactus:
- Row 1: Ch x40 (40), Ch 1 and turn
- Row 2: Starting in the second chain from hook, make a HDC in every ch (40) Ch 1, turn
- Row 3: In FLO, HDC the entire row. When you go through a stitch normally, usually you go through 2 loops. The front loop of a stitch is the loop that is closest to you. Only go through this loop and leave the back loop alone. (40) Ch 1, turn
- Row 4: In BLO, HDC the entire row. This is where you skip the front loop of a stitch and work in the back loop. It’s the opposite of what you did in the last row. (40) Ch 1, turn
- Row 5-55: Continue alternating rows 3 and 4. (40)
- Fasten off and leave tail for sewing.Fold the rectangle in half so the beginning row and ending row are touching each other, then sew the 2 ends together so it makes a completed loop or circle.
- You will now have an open end at the bottom and then the top of the rectangle. Using the same yarn (or new yarn - if you don't have enough tail left) cinch both the bottom and top of the rectangle closed. Do this by going in and out of the ends of the rows about every half inch/inch. First do the bottom and pull tight, stuff the cactus with poyfill and then move onto the top of the cactus and cinch the top closed. IF THERE ARE OPEN HOLES AT THE TOP AND BOTTOM THAT WON'T CLOSE ALL THE WAY, THAT'S OKAY SEE NEXT STEP!If you can’t get your cactus to close all the way on the top and bottom, that is okay! I couldn’t either and I think it's just due to there being a lot of yarn and rows that we are trying to tighten together. In order to fix this we are going to make circles to cover the top and bottom holes. Kind of like a beach ball.
Circles x2:
- Round 1: Using the same green color. Make a MR and work sc x6 in the circle. If you find it difficult making a magic ring you can chain 2 and then crochet sc x6 in the second chain from the hook. (6)
- Round 2: Inc x6 (12)
- Round 3: [Inc, sc], repeat what's in the brackets for the rest of the round (18)
- Round 4: [Inc, sc x2], repeat what's in the brackets for the rest of the round (24)
- Round 5: [Inc, sc x3], repeat what's in the brackets for the rest of the round (30)
- You may need to make more rounds depending on how big the hole is, so double check by placing the circle over the hole to make sure it's covered. If you need more rows continue the pattern of doing an increase and then adding an additional single crochet to each single crochet cluster.
- Otherwise, fasten off and leave a tail for sewing.
- Sewing: Sew the circles over the holes on the top and bottom of the round cactus.
Crochet Cactus Flower:
- The flowers I make for my cactus patterns are very similar to crochet roses, just a little longer. I made one for my crocheted cactus but you can add as many as you want and can experiment adjusting the size!
- Row 1: Leave a long starting ch tail for sewing later. Ch x60, + ch x5, turn
- Row 2: Dc in 6th ch from hook. Then [ch 1, skip the next 2 chs on the foundation chain row, dc, ch 2, dc in the same stitch that you did the last dc in.] Repeat what is in the brackets for the rest of the row. At the end of the row, ch x3 and turn.
- Row 3: Make a dc in the 2 chain gap between the pair of dc stitches in the row below. Don't stitch into the ch, stitch around its entirety. Then ch x2, and make dc x2 in the same gap. So there should be 2 dc (the first dc is made of turning chains), 2 ch, and then 2 dc
- Then [ch x2, skip the single chain gap in the row below, and make dc x2 in the gap below that has the 2 ch, then ch x2, and dc x2.] Repeat what’s in the brackets for the rest of the row. At the end of the row ch x3, and turn
- Row 4: In the gap below dc x5, then make a sc in the next gap, then make [dc x6 in the following gap, and make a sc in the next gap], repeat what's in the brackets for the rest of the row. This row should make a shell type top creating individual petals. Fasten off and weave in the end.
Sewing:
- Weave the starting tail through the base of the foundation ch and pull tight making sure it's tightened in a way that allows the flower to spiral around itself, then make a few stitches through the bottom to secure its shape. Then sew to the cactus anywhere you would like! I did mine on the top off center.


Leave a Reply