
Looking for a crochet backpack pattern that’s cute, practical, and totally customizable to your vibe? This free crochet drawstring backpack pattern is inspired by boho style but versatile enough to fit just about any aesthetic — from minimalistic to cottagecore, and everything in between.
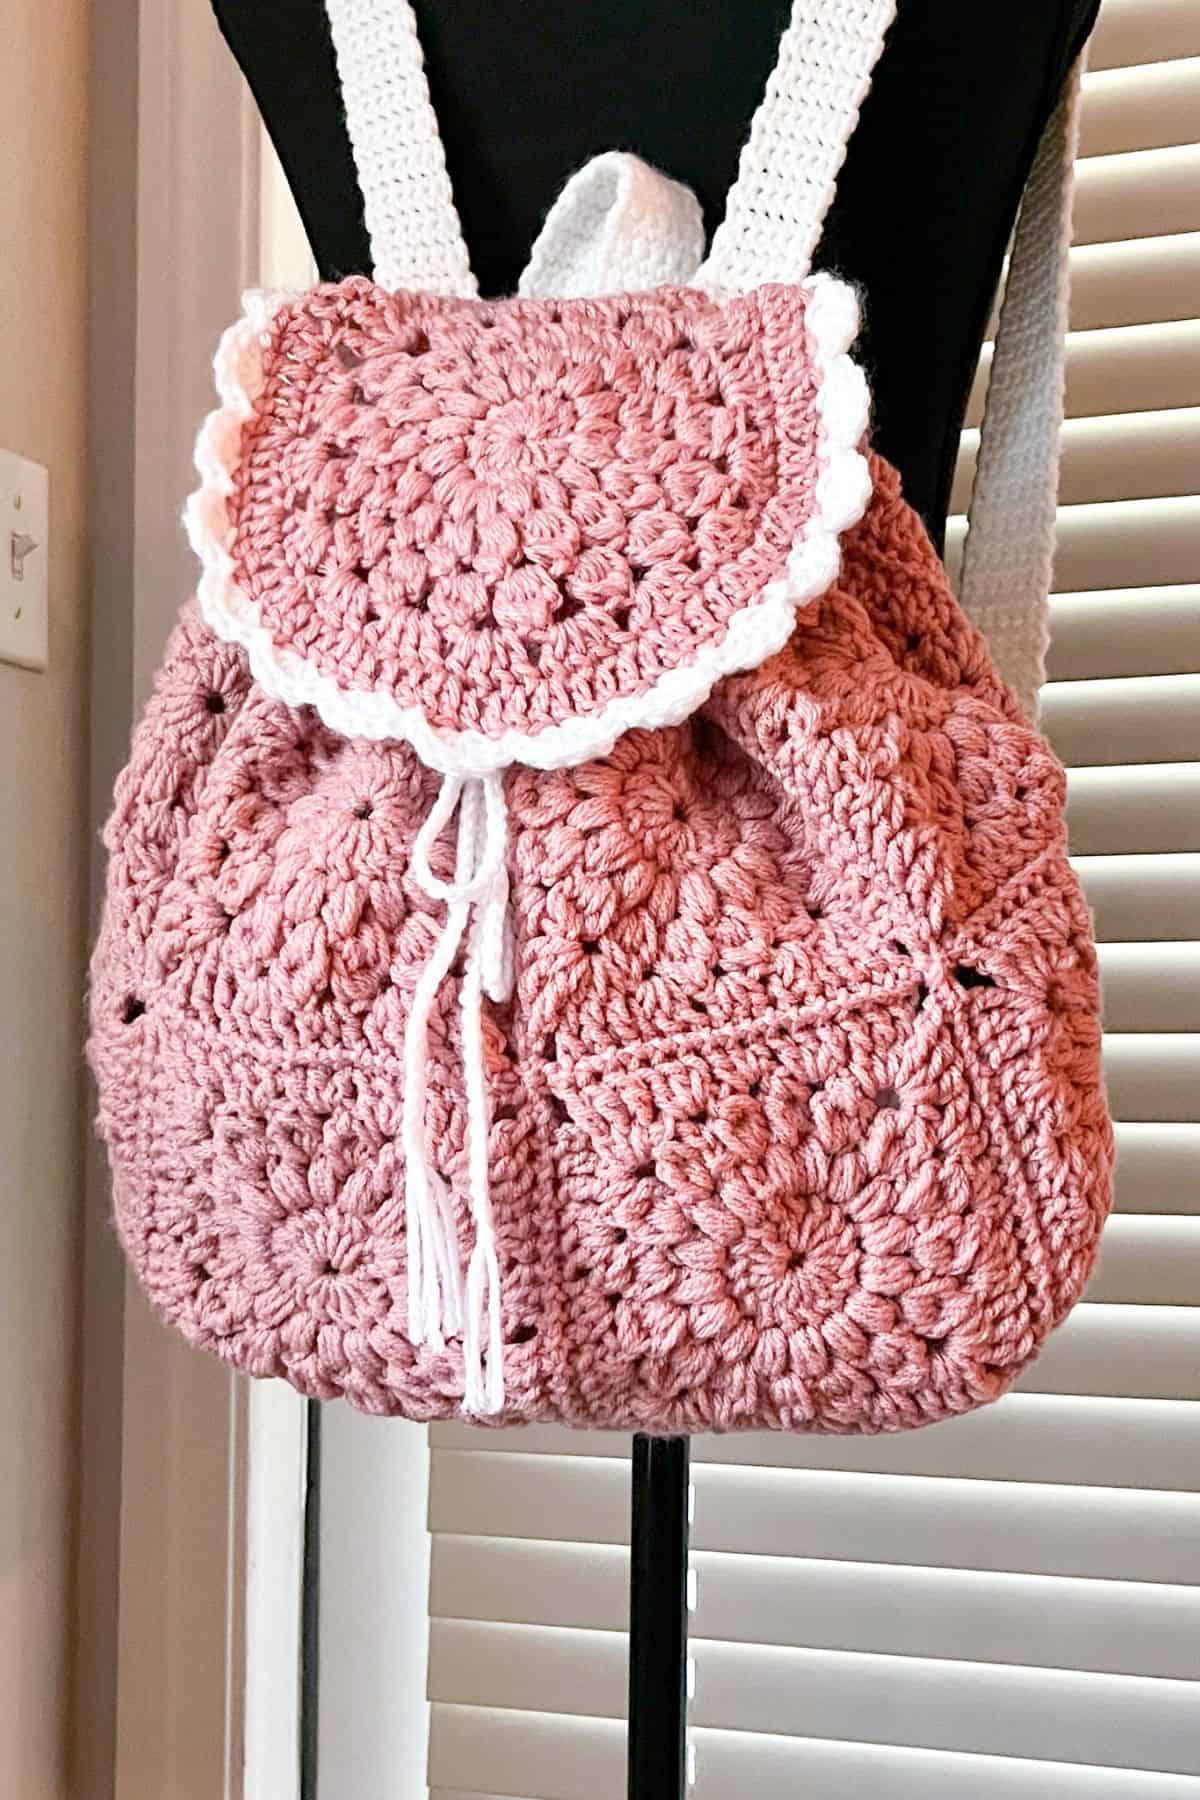
Whether you're heading to a picnic in the park or just want a lightweight, stylish day bag, this crochet granny square backpack will be your new go-to accessory.
This charming crochet backpack pattern is made using the sunburst granny square technique, giving it that dreamy, vintage feel that crochet lovers can’t get enough of. When I finished this crochet backpack pattern, I sent a picture to my preteen niece — and she immediately asked me to make one for her too. Needless to say, it’s perfect for tweens and teens who love fashion and handmade pieces. Just don’t forget to line the inside of the bag and the straps with fabric to prevent stretching if they plan to use it for heavier items like schoolbooks!
With its drawstring closure and handy lid, this crochet sunburst bag offers both function and flair. It’s an easy, satisfying make for any level of crocheter, and makes a fantastic gift or market item.
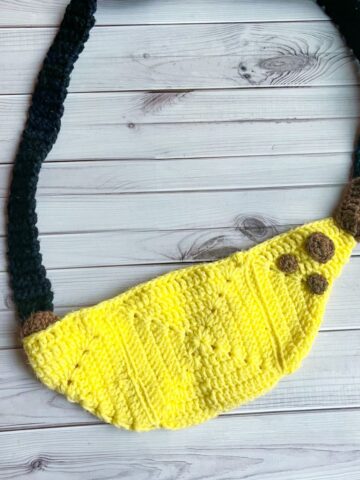
Want more fun and free crochet inspiration? Don’t miss some of my other popular bag patterns like the playful crochet emoji bag pattern, the eye-catching crochet African flower bag pattern, or the sweet and quirky crochet strawberry bag pattern. Each pattern is designed to be fun to make and even more fun to carry.
So grab your hook, gather your favorite yarn colors, and let’s dive into how to crochet a backpack that you’ll want to wear every day!
Jump to:
✏️ Things To Note:
- Skill Level: The crochet backpack pattern is beginner-friendly but assumes basic knowledge of granny squares and joining techniques. If you're new to crochet, you might want to practice making a few sunburst granny squares before jumping into the full crochet backpack pattern.
- Lining is essential – especially if the backpack will be used for carrying heavier items. Cotton fabric works great for the interior and for reinforcing the straps. This will prevent your crochet backpack from stretching over time.
- Gauge isn't critical, but try to keep your squares from the crochet backpack pattern consistent in size for the cleanest finish when joining.
🪡 Materials Needed
- Red Heart Soft - rose blush (2-3 needed depending on size of bag)
- Red Heart Soft - white
- 5 mm Hook
- 4.5mm Hook
- Tapestry needle
💭Abbreviations to Remember (US terms)
- Chains (ch)
- Magic ring (mr)
- Single crochet (sc)
- Double crochet (dc)
- Half double crochet (hdc)
- Double crochet cluster (dc cluster)
- Triple crochet (tr)
- Slip stitch (sl st)
🧋Variations
- Color Block Style: Use different colors for each sunburst granny square in the crochet backpack pattern to create a fun patchwork effect, or choose two to three coordinating tones for a more modern, color-blocked look. This works great for achieving cottagecore or boho vibes depending on your palette.
- Mini Backpack Version: Reduce the number of granny squares for the crochet backpack pattern and make smaller squares to create a cute mini version of the crochet drawstring backpack. Perfect as a purse or for little kids!
- Add a Flap Button or Toggle: Modify the flap closure for the crochet backpack pattern by adding a wooden button, toggle, or magnetic snap for extra security and style. It adds a more polished finish and reinforces the boho feel.
- Add Pockets: Create a matching square and stitch it to the inside or outside as a small pocket for keys, a phone, or lip balm.
🍵Instructions for Crochet Backpack Pattern
For this crochet backpack pattern, we will be working in rounds.
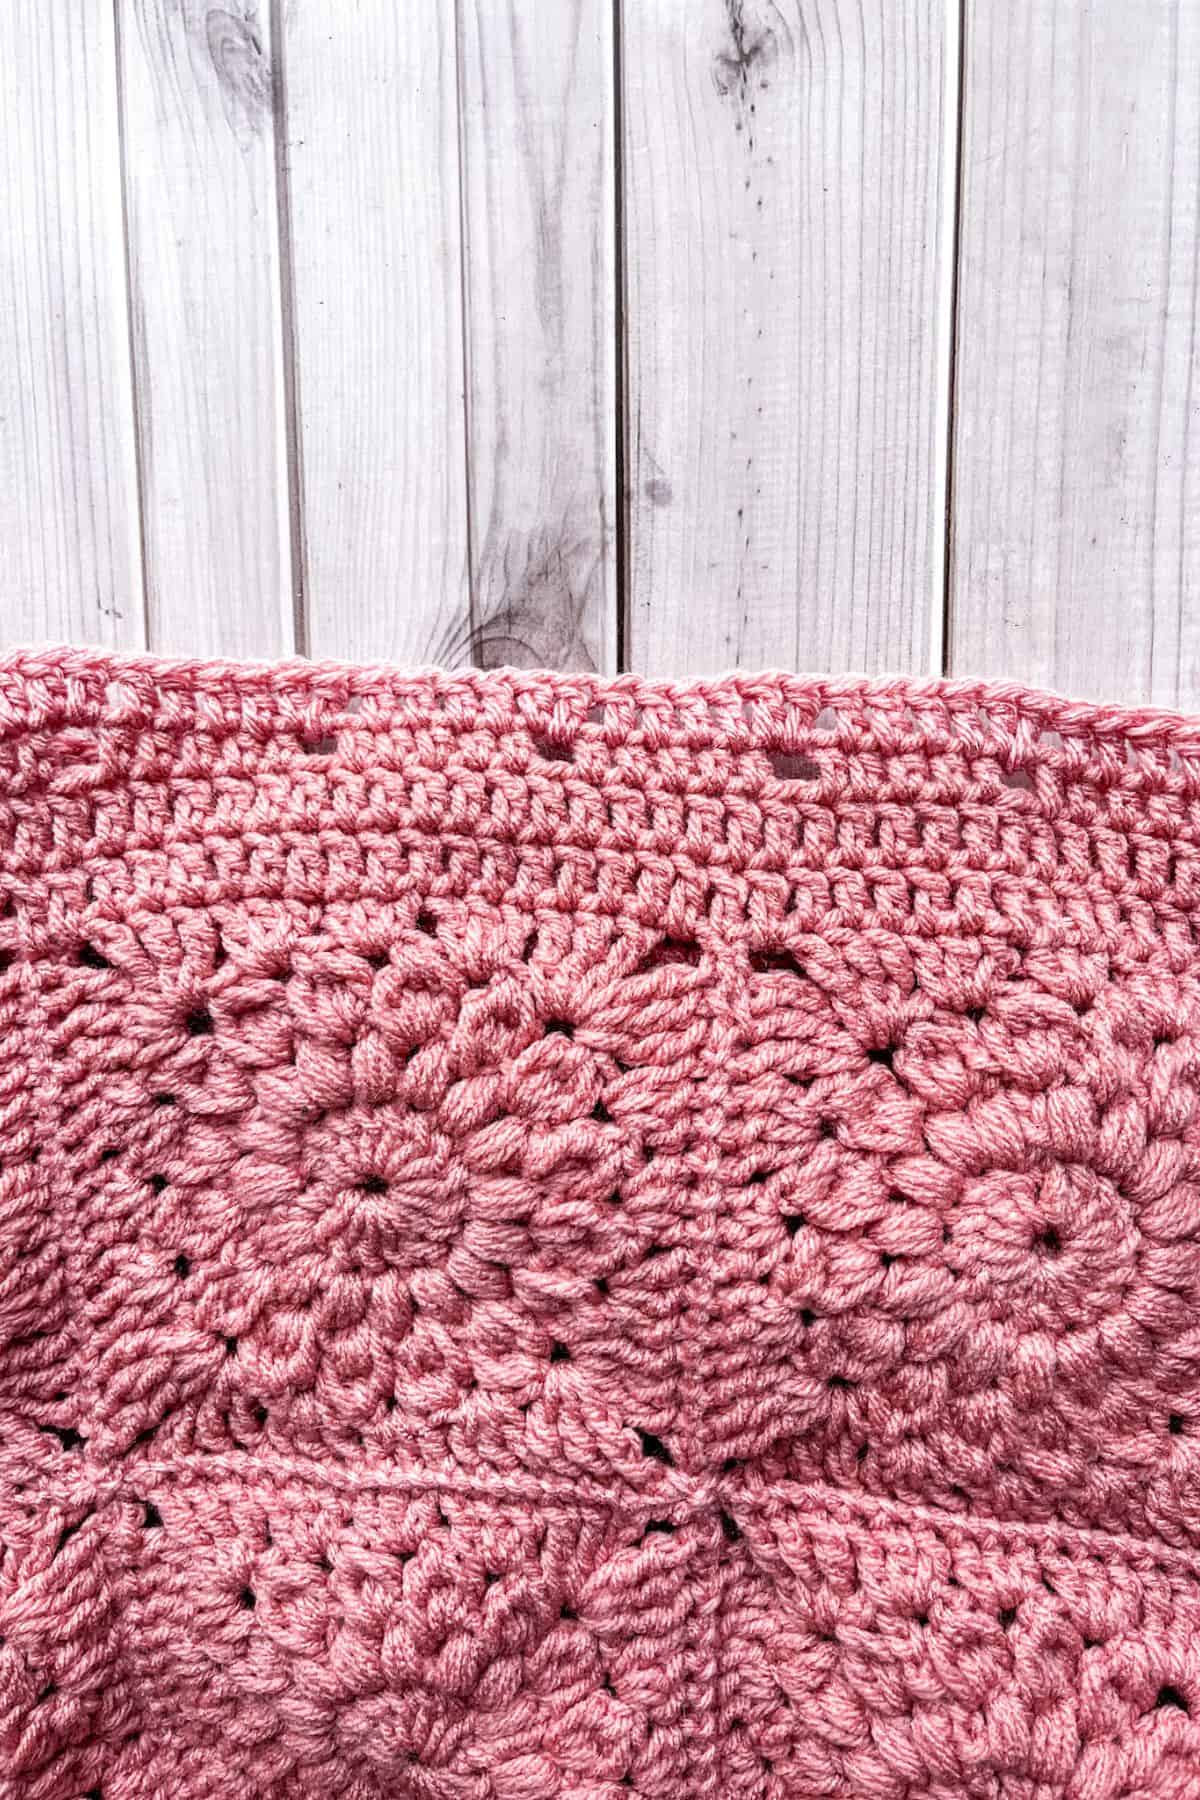
Sunburst Granny Square:
Make x14 for the base of the crochet backpack pattern.


Round 1: Using the 5mm hook, make a magic ring, then ch x3 (this counts as a dc) and dc x15 into the ring. Then sl st to the top of the chains that you made at the beginning to close the round (16).
Round 2: Ch x2 and in the same stitch make a modified puff stitch. To make a puff stitch you will yarn over, insert the hook into the stitch, yarn over again and pull up a loop (you have 3 loops on your hook).
Now yarn over, insert the hook into the same stitch, yarn over again and pull up a loop (you have 5 loops on your hook). You can now yarn over and pull through all 5 loops. Then make a chain.
*In the next stitch make a puff stitch like before but repeat the yarn over, insert hook, pull up a loop, step 1 more time so you have 7 loops on the hook. Then yarn over and pull through all 7 loops on the hook. Ch x1.*
Repeat from *. Sl st to the first puff stitch to close the round. (16 puffs + 16 ch)


Round 3: Make a sl st into the ch space. Ch x2 and then make a 3-dc cluster in the same stitch.
To make a 3-dc cluster: *yarn over, insert hook into the stitch or space, yarn over and pull up a loop (3 loops on hook). Then yarn over, pull through 2 loops (2 loops remain on hook). Repeat from * two more times, always inserting into the same stitch or space. You'll have 4 loops on the hook. Yarn over, pull through all 4 loops.
Then ch x2 and *make a 4-dc cluster (5 loops on the hook) in the next available stitch. Ch x2. Repeat from * for the rest of the round. Then when you get to the end of the round make a sl st to the top of the first dc cluster stitch. (16 dc clusters + 16 ch x2 spaces)
Round 4: Now we will square off the sunburst granny square.
Sl st into the ch x2 space from the round below. Then ch x3 and tr x2 into the ch space. In the next ch x2 space dc x3. In the following ch x2 spaces complete the following: hdc x3, dc x3,
*tr x3 + ch x3 + tr x3 (this is a corner), dc x3, hdc x3, dc x3*
Repeat from * 2 more times. When you get to the half corner that was done in the beginning of the round, go ahead and tr x3 and ch x3 into that corner then sl st to the top of the first ch x3 (which acts as a triple crochet). (60 + 4 ch x3 spaces)
Building the Crochet Backpack Pattern:


Sew the squares flat by following the layout in the picture.
Making a liner for the crochet backpack pattern: At this point, this is where you would make a liner for the crochet backpack pattern. Lay the flat sewn squares on top of fabric, cut out, and leave a ½ inch seam allowance. Then sew the side seams together. Set aside for now. Okay now back to the crocheting.
Once they are sewn together flat like above, sew the side seams of the bag so it becomes a proper bag with 2 granny squares on the bottom, 4 on the front and back and 2 on the sides.
Once the bag is sewn together we are ready to begin crocheting the top part of the crochet backpack pattern.
Round 1: Join the pink yarn to the top of the bag (anywhere is fine), then ch x3. Dc in the next stitch. Continue making dc stitches in every top stitch of the bag. When you get to the end of the round, sl st to the ch x3 at the beginning.
Round 2: Ch x3 and then dc in every stitch. When you get to the end of the round, sl st to the ch x3 at the beginning.
Round 3: This is the round we will make spaces for the drawstring. Ch x1 then in the next stitch make a hdc. Hdc another 4 times then ch x1 and skip the next stitch. *Hdc x5, then ch x1 and skip the next stitch*. Repeat from * for the rest of the round. When you get to the end of the round sl st to the first hdc in the round. If this round does not evenly divide, that's okay - it shouldn’t make a noticeable difference.
Round 4: Ch x3 and then dc in every stitch. When you get to the end of the round, sl st to the ch x3 at the beginning. Fasten off and weave in any ends.
Large Sunburst Granny Square Lid:


With the pink yarn, repeat the first 3 rounds of the normal sunburst granny square we did for the base of the bag.
Round 4: Sl st to the ch space from the round below, then ch x2 and then make a 4-dc cluster in the same ch space (5 loops on hook). After, ch x3.
*In the next ch space make a 5-dc cluster and then ch x3.* Repeat from * for the rest of the round (16 clusters + 16 ch x3 spaces). Sl st to the top of the 4-dc cluster to close the round.
Round 5: Sl st to the ch space and then ch x3. Tr x2 into the same ch space. Then in the next ch space dc x4. In the following ch spaces follow this sequence: hdc x4, dc x4, tr x3 + ch x3 + trx3 (this is a corner), now dc x4 for every ch space. When you get to the beginning ch space, tr x3 and ch x3, then sl st to the top of the beginning ch x3 (it acts as a triple crochet).
Round 6: Ch x2 and then dc in every stitch on the straight side of the lid. When you get to the corners, dc x2 + ch x2 + dc x2. For the rest of the clusters dc into the top of the stitches from the previous round but add an increase to one of the stitches per cluster that you are working into.
When you get to the end of the round sl st to the ch x2. Fasten off and leave a tail for sewing.
Round 7: With white yarn, join the yarn to the side of the backpack lid, near the straight edge and make a shell stitch. A shell stitch is completed by Skipping a stitch, dc x5 into 1 stitch, skip a stitch and then sc into the next stitch. You will repeat this until you reach the other side of the straight edge. You do not want to make shells on the flat side of the backpack lid.
Fasten off and weave in any ends.
Crochet Hook Loop:
Row 1: With the white yarn and a 4.5mm hook ch x7 and then in the second ch from the hook make a sc. Sc for the rest of the row (6). Then ch x1 and turn.
Row 2-25: Sc x6 and then ch x1 and turn. At the end of the last row, fasten off but leave a tail for sewing.
Crochet Straps:
Make x2.
Row 1: With the white yarn and a 4.5mm hook ch x7 and then in the second ch from the hook make a sc. Sc for the rest of the row (6). Then ch x1 and turn.
Row 2-100: Sc x6 and then ch x1 and turn. At the end of the last row, fasten off but leave a tail for sewing. Note: you may need to adjust the amount of rows needed for the straps so adjust accordingly!
Adding a liner to the straps: Lay straps on fabric and then cut out the shape with a ½ inch seam allowance. Then either hand sew or machine sew the fabric to the straps.
Crochet Drawstring:
With white yarn and the 4.5mm hook, ch x175 and fasten off. Weave it through the top of the backpack, then with 1-2 6 inch pieces of yarn make tassels at the bottom of the chain. I do this with a lot of my scarves so if you need help you can find a tutorial on it with my crochet houndstooth scarf pattern.

Sewing:
Sew the bag liner to the inside edge of where the squares and double crochet rows meet - either by hand or by machine.
Sew the lid of the backpack to the backside of the backpack where the sunburst granny squares and first round of dc meet. Make sure it is centered.
On the same line where you sewed the bag and lid together, sew the hook loop to the center top of the crochet backpack lid. Sew the straps to the left and right of the hook, and then the bottom of the straps to the bottom corners of the bag right where the backside, sides, and bottom sunburst granny squares meet.
I hope you loved making this crochet backpack pattern as much as I enjoyed designing it! Whether you styled it boho, minimalistic, or cottagecore, this versatile and fun crochet drawstring backpack pattern is sure to become a favorite in your handmade collection. Don’t forget to line your bag and straps for extra durability. Especially if you're planning to carry it to school or on daily adventures.
If you’re feeling inspired and want to keep the momentum going, check out a few of my other bag patterns. Try the adorable crochet toast bag pattern for something fun and quirky, the elegant crochet tulip bag pattern for a floral statement piece, or the functional crochet Japanese knot bag pattern—perfect for everyday use or gift-giving.
Thanks for crafting with me, and I can’t wait to see your finished backpacks! Be sure to tag me or share your version online—I love seeing all the creative spins you put on my patterns.
Happy hooking!

🐌Expert Tips
- Block Your Squares: Before assembling the crochet backpack pattern, block your sunburst granny squares to ensure they are all the same size and lie flat. This makes joining them much easier and gives your finished bag a clean, structured shape.
- Reinforce Stress Points: When attaching straps or drawstrings from the crochet backpack pattern, reinforce those connection points with extra stitching (both in yarn and lining). These areas take the most stress and need to be extra secure.
- Add a Closure to the Flap: For added security, sew on a snap, button, or magnetic clasp under the flap of the crochet backpack pattern. This will help keep everything tucked inside.
🧵Pattern FAQs
On average, you can complete the crochet backpack pattern in about 6–10 hours depending on your speed and experience. The most time-consuming part is making and joining the squares.
Yes, especially if you plan to carry anything heavy like books, water bottles, or electronics. Lining adds strength, helps the bag keep its shape, and prevents the straps from stretching. It also prevents things from poking out of the stitches.
Definitely! As long as your squares are the same size, you can substitute with another favorite motif to make this crochet backpack pattern truly yours.

🧶More Crochet Bag Patterns

If you tried this Crochet Backpack Pattern (or any other pattern on my website), please let me know how it went in the 📝 comments below. I'd love to hear from you!

Crochet Backpack Pattern
Materials
- Red Heart Soft - rose blush 2-3 needed depending on size of bag
- Red Heart Soft - white
- 5 mm Hook
- 4.5 mm Hook
- Tapestry needle
Abbreviations (US terms)
- Chains - ch
- Magic ring - mr
- Single crochet - sc
- Double crochet - dc
- Half double crochet - hdc
- Double crochet cluster (dc cluster)
- Triple crochet - tr
- Slip stitch - sl st
Notes
- Skill Level: This crochet backpack pattern is beginner-friendly but assumes basic knowledge of granny squares and joining techniques. If you're new to crochet, you might want to practice making a few sunburst granny squares before jumping into the full crochet backpack pattern.
- Lining is Essential: Especially if the backpack will be used for carrying heavier items. Cotton fabric works great for the interior and for reinforcing the straps. This will prevent your bag from stretching over time.
- Gauge: Isn't critical, but try to keep your squares consistent in size for the crochet backpack pattern for the cleanest finish when joining.
Instructions
- For this crochet backpack pattern, we will be working in rounds.
Sunburst Granny Square:
- Make x14 for the crochet backpack pattern.
- Round 1: Using the 5mm hook, make a magic ring, then ch x3 (this counts as a dc) and dc x15 into the ring. Then sl st to the top of the chains that you made at the beginning to close the round (16).
- Round 2: Ch x2 and in the same stitch make a modified puff stitch. To make a puff stitch you will yarn over, insert the hook into the stitch, yarn over again and pull up a loop (you have 3 loops on your hook).
- Now yarn over, insert the hook into the same stitch, yarn over again and pull up a loop (you have 5 loops on your hook). You can now yarn over and pull through all 5 loops. Then make a chain.
- *In the next stitch make a puff stitch like before but repeat the yarn over, insert hook, pull up a loop, step 1 more time so you have 7 loops on the hook. Then yarn over and pull through all 7 loops on the hook. Ch x1.*
- Repeat from *. Sl st to the first puff stitch to close the round. (16 puffs + 16 ch)
- Round 3: Make a sl st into the ch space. Ch x2 and then make a 3-dc cluster in the same stitch.
- To make a 3-dc cluster: *yarn over, insert hook into the stitch or space, yarn over and pull up a loop (3 loops on hook). Then yarn over, pull through 2 loops (2 loops remain on hook). Repeat from * two more times, always inserting into the same stitch or space. You'll have 4 loops on the hook. Yarn over, pull through all 4 loops.
- Then ch x2 and *make a 4-dc cluster (5 loops on the hook) in the next available stitch. Ch x2. Repeat from * for the rest of the round. Then when you get to the end of the round make a sl st to the top of the first dc cluster stitch. (16 dc clusters + 16 ch x2 spaces)
- Round 4: Now we will square off the sunburst granny square.
- Sl st into the ch x2 space from the round below. Then ch x3 and tr x2 into the ch space. In the next ch x2 space dc x3. In the following ch x2 spaces complete the following: hdc x3, dc x3,
- *tr x3 + ch x3 + tr x3 (this is a corner), dc x3, hdc x3, dc x3*
- Repeat from * 2 more times. When you get to the half corner that was done in the beginning of the round, go ahead and tr x3 and ch x3 into that corner then sl st to the top of the first ch x3 (which acts as a triple crochet). (60 + 4 ch x3 spaces)
Building the Bag:
- Sew the squares together by following the layout in the picture. Making a liner for the bag: At this point, this is where you would make a liner for the crochet backpack pattern. Lay the flat sewn squares on top of fabric, cut out, and leave a ½ inch seam allowance. Then sew the side seams together. Set aside for now. Okay now back to the crocheting.Once they are sewn together flat like above, sew the side seams of the bag so it becomes a proper bag with 2 granny squares on the bottom, 4 on the front and back and 2 on the sides.
- Once the bag is sewn together we are ready to begin crocheting the top of the bag.
- Round 1: Join the pink yarn to the top of the bag (anywhere is fine), then ch x3. Dc in the next stitch. Continue making dc stitches in every top stitch of the bag. When you get to the end of the round, sl st to the ch x3 at the beginning.
- Round 2: Ch x3 and then dc in every stitch. When you get to the end of the round, sl st to the ch x3 at the beginning.
- Round 3: This is the round we will make spaces for the drawstring. Ch x1 then in the next stitch make a hdc. Hdc another 4 times then ch x1 and skip the next stitch. *Hdc x5, then ch x1 and skip the next stitch*. Repeat from * for the rest of the round. When you get to the end of the round sl st to the first hdc in the round. If this round does not evenly divide, that's okay - it shouldn’t make a noticeable difference.
- Round 4: Ch x3 and then dc in every stitch. When you get to the end of the round, sl st to the ch x3 at the beginning. Fasten off and weave in any ends.
Large Sunburst Granny Square Lid:
- With the pink yarn, repeat the first 3 rounds of the normal sunburst granny square we did for the base of the bag.
- Round 4: Sl st to the ch space from the round below, then ch x2 and then make a 4-dc cluster in the same ch space (5 loops on hook). After, ch x3.
- *In the next ch space make a 5-dc cluster and then ch x3.* Repeat from * for the rest of the round (16 clusters + 16 ch x3 spaces). Sl st to the top of the 4-dc cluster to close the round.
- Round 5: Sl st to the ch space and then ch x3. Tr x2 into the same ch space. Then in the next ch space dc x4. In the following ch spaces follow this sequence: hdc x4, dc x4, tr x3 + ch x3 + trx3 (this is a corner), now dc x4 for every ch space. When you get to the beginning ch space, tr x3 and ch x3, then sl st to the top of the beginning ch x3 (it acts as a triple crochet).
- Round 6: Ch x2 and then dc in every stitch on the straight side of the lid. When you get to the corners, dc x2 + ch x2 + dc x2. For the rest of the clusters dc into the top of the stitches from the previous round but add an increase to one of the stitches per cluster that you are working into.
- When you get to the end of the round sl st to the ch x2. Fasten off and leave a tail for sewing.
- Round 7: With white yarn, join the yarn to the side of the backpack lid, near the straight edge and make a shell stitch. A shell stitch is completed by Skipping a stitch, dc x5 into 1 stitch, skip a stitch and then sc into the next stitch. You will repeat this until you reach the other side of the straight edge. You do not want to make shells on the flat side of the backpack lid.
- Fasten off and weave in any ends.
Crochet Hook Loop:
- Row 1: With the white yarn and a 4.5mm hook ch x7 and then in the second ch from the hook make a sc. Sc for the rest of the row (6). Then ch x1 and turn.
- Row 2-25: Sc x6 and then ch x1 and turn. At the end of the last row, fasten off but leave a tail for sewing.
Crochet Straps:
- Make x2.
- Row 1: With the white yarn and a 4.5mm hook ch x7 and then in the second ch from the hook make a sc. Sc for the rest of the row (6). Then ch x1 and turn.
- Row 2-100: Sc x6 and then ch x1 and turn. At the end of the last row, fasten off but leave a tail for sewing. Note: you may need to adjust the amount of rows needed for the straps so adjust accordingly!Adding a liner to the straps: Lay straps on fabric and then cut out the shape with a ½ inch seam allowance. Then either hand sew or machine sew the fabric to the straps.
Crochet Drawstring:
- With white yarn and the 4.5mm hook, ch x175 and fasten off. Weave it through the top of the backpack, then with 1-2 6 inch pieces of yarn make tassels at the bottom of the chain. I do this with a lot of my scarves so if you need help you can find a tutorial on it with my crochet houndstooth scarf pattern.
Sewing:
- Sew the bag liner to the inside edge of where the squares and double crochet rows meet - either by hand or by machine.Sew the lid of the backpack to the backside of the backpack where the sunburst granny squares and first round of dc meet. Make sure it is centered.
- On the same line where you sewed the bag and lid together, sew the hook loop to the center top of the crochet backpack lid. Sew the straps to the left and right of the hook, and then the bottom of the straps to the bottom corners of the bag right where the backside, sides, and bottom sunburst granny squares meet.
- I hope you loved making this crochet backpack pattern as much as I enjoyed designing it!


Cailyn says
If my yarn recommends I use a 3 mm hook, other than making the bag smaller, does it matter, or should I stick to using a 5mm hook instead? (This is my first Granny Square backpack I've only ever made plushies)
Kimberly Arenas says
It doesn't matter the hook size 🙂 The pattern can be completed with any hook and yarn size, just the size will be different (as you mentioned)
Kelly says
Dear Kimberly,
I absolutely love this pattern you created! I have made 3 backpacks so far, 2 for my daughters and one for me and plan to make more to have for gifts. I have lined everything as you recommended with cute coordinating fabrics and sewn the linings by machine making sure everything is attached to fabric for strength. Your pattern and video make it so easy to follow. Thank you so much for the terrific pattern!!!
Kimberly Arenas says
Im happy you enjoy the pattern! I bet they turned out so cute!
Caitlin says
I modified mine to fit my laptop. It came out so great! The pattern was so easy to follow along with. I get compliments on my bag daily! Thank you so much.
kona says
how much white yarn did you use?
Kimberly Arenas says
Depending on how big you want your straps, I would say no more than 100 yards.
FairieyFreak says
About what size are your squares after blocked and what are the dims of the finished bag? Thanks!
Kimberly Arenas says
It depends on your tension, but my squares are roughly 5 inches before blocking, which would be 5.5-6 inches after blocking. Finished bag size: 14 x 12 x 6
:) says
Hi! I was wondering if your stitches are tighter(like mine are) and you want a bigger backpack could you adjust the number of squares to make it 20 ( 6 squares in front and back and 3 on sides)? Thanks!
Kimberly Arenas says
You can always do that!
Kayley Crane says
I'd like to make a bigger bag as well. Do you have to adjust the lid/big sunburst square? If so how? I've made stuffies for quite a while but this is my first jump into the granny square world. 🙂
Kimberly Arenas says
You might have to in order to keep the proportions the same, but it's not necessary. You can just add an extra round before making the scalloped edge 🙂
Sheila says
My first granny square backpack. Great pattern, thank you.
Crochet Queen says
Can you use cotton yarn for this?
Kimberly Arenas says
Yes 🙂 just make sure you have roughly 350-400 yards of it for the main color of the bag if using worsted weight cotton yarn
Jodie says
Do I HAVE to line the straps?
Kimberly Arenas says
You don't have to, only if you intend to put heavy things in the bag.
Kennie says
Thank you so much for the easy to follow steps. I thought I would make a backpack for each of my daughters but half way in I saw how beautiful it was becoming and it did turn out really really nice. I’m keeping the backpack for myself. I really enjoyed this project. Thanks again.
Kimberly Arenas says
Haha! I tend to do that with some of my crochet projects too! I am so happy you enjoyed the pattern!
Pauline Goh says
Dear Kimberly,
Do you have a tutorial video on "how to just make the FLAP" as I've ALREADY made 14 pieces of the Granny Squares. Besides, greatly appreciate if you could also kindly specifically "video the part of the "JOINED BAG'S TOP" ( as I can't figure out how to crochet the few rows to make an edge ). Thank you very much and looking forward to your short video tutorial on youtube very soon to enable me to proceed with putting them together.
Kimberly Arenas says
Ill try to have a video up in 2 weeks! Ill get started making a new backpack for the video 🙂
Charlene says
How long should the straps be if I want to purchase ready made ones? Thank you.
Kimberly Arenas says
it depends on if its for a child or an adult, but for an adult 30-33inches should be good (depending on where you want the backpack to lay on your back).
Arkella says
Do you have a tutorial video on how to make this bag. For those who are more visual then reading patterns.
Kimberly Arenas says
Not yet, but I am hoping to make more crochet tutorial videos.
Stevi says
Hi, did you ever end up making the video tutorial? would love one! this bag is stunning!!
Kimberly Arenas says
yes it is on my youtube channel! https://www.youtube.com/watch?v=44tv9ZIsISE&t=11s
Sarah Hartridge says
What a beautiful bag. It’s definitely going onto my Christmas list this year. I will tag you when it’s made and gifted (so it stays a secret!) 😍😍😍
Itsthesnuggleshop says
Do you mind the selling of your finished patterns?
Kimberly Arenas says
Selling finished items is ok 🙂 Just not the patterns themselves