
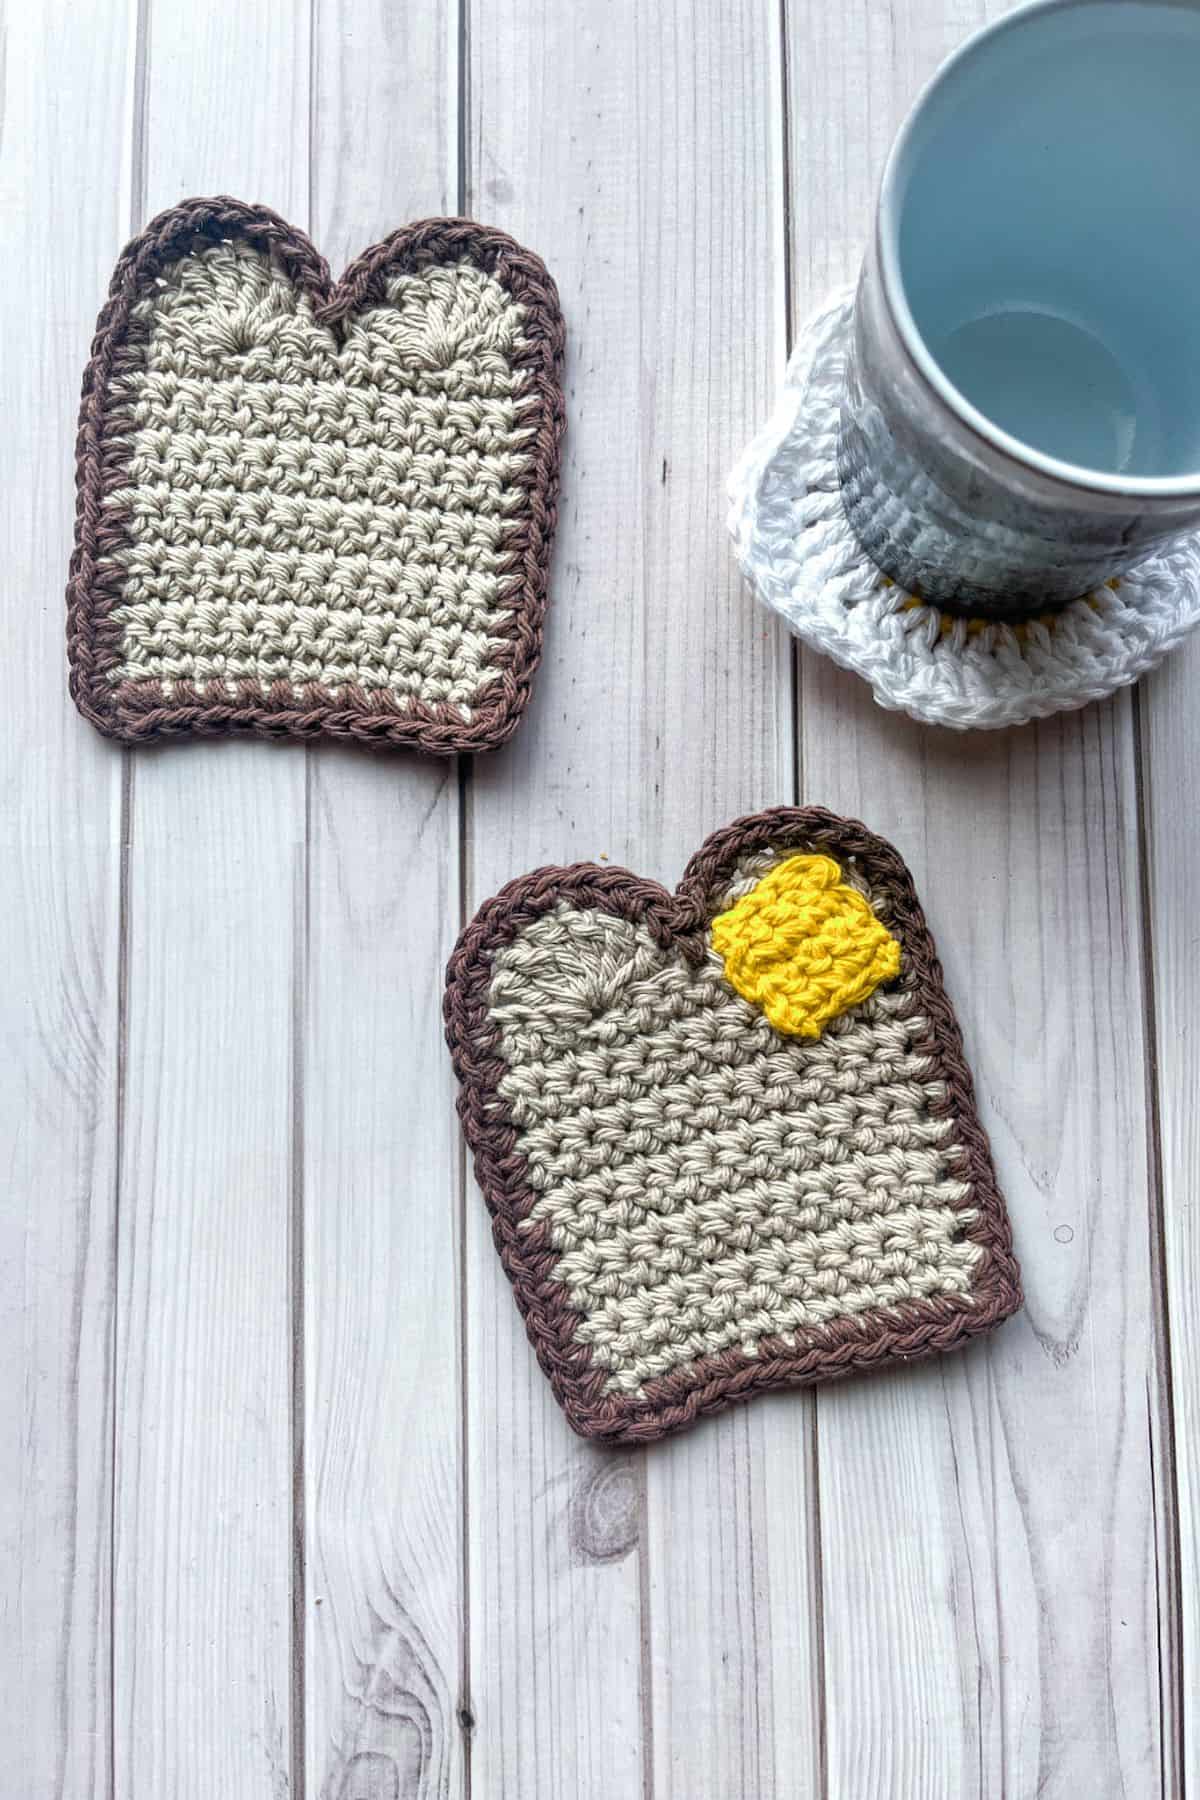
If you're looking for a fun and simple crochet pattern, you're in the right place. Today, I'm excited to share my crochet toast coaster pattern, perfect for adding a playful touch to your home decor.

This easy-to-follow design can be made into adorable crochet bread coasters or even used as part of a crochet breakfast coaster set! Whether you're creating these for yourself or as a thoughtful gift, these coasters are a charming addition to any kitchen or dining room.
This toast crochet pattern works up quickly, making it a great project for beginners and seasoned crocheters alike. And if you're a fan of breakfast-inspired designs, pairing this crochet toast coaster with my crochet egg coaster will make a delightful set of crochet breakfast coasters that’ll brighten up your mornings. Imagine sipping your coffee with a fun, homemade coaster beneath your cup!
But that’s not all! If you're into food-themed crochet projects, be sure to check out some of my other food coasters, such as the sweet crochet donut coaster and the fruity crochet strawberry coaster or crochet lemon coaster pattern. Each design is unique, adding a fun and whimsical touch to any setting.
So grab your yarn and hook, and let’s get crocheting! With this coaster pattern, you’ll have a cute and useful project in no time. Happy crocheting!
Jump to:
✏️ Things To Note:
- Skill Level: The toast crochet pattern is perfect for beginners and works up quickly, making it ideal for those new to crochet or anyone seeking a fun, simple project. It’s an easy pattern that yields satisfying results in no time!
- Materials: All you need are basic crochet supplies: yarn, a crochet hook, and a yarn needle to weave in the ends. For the most authentic look, choose yarn in warm, toast-like shades, but feel free to get creative with your color choices!
- Size: The crochet toast coaster pattern is designed to create a coaster-sized piece, but you can adjust it easily by changing the yarn or modifying the stitch count. This makes it a versatile pattern, whether you want larger coasters or different shapes for other creative uses.
🪡 Materials Needed
- Lily Sugar n Cream - warm brown
- Lily Sugar n Cream - jute
- Lily Sugar n Cream - sunshine yellow
- 5mm hook
- Tapestry needle
💭Abbreviations to Remember (US terms)
- Chains (ch)
- Single crochet (sc)
- Triple crochet (tr)
- Slip stitch (sl st)
* The ch x1 at the end of each row does not count as a stitch in the row, it is a turning chain.
* If you see a stitch abbreviation with "x" after it, it means how many times you do that stitch in the following amount of stitches. For example: sc x6 would mean you make a single crochet in the next 6 stitches. Inc x2 means you make an inc in the next 2 stitches.
🧋Variations
- Add a Topping: Make your crochet toast coaster even more fun by adding small embellishments like a crochet "butter" square, a jam spread, or even a tiny crochet fried egg on top to match with the crochet egg coaster.
- Crochet Toast Pouch: A fun variation of the crochet toast coaster is to crochet two toasts together, creating a cozy pouch! Simply make two separate toast pieces and then stitch them together along the edges, leaving the top open. This creates a cute and functional crochet toast pouch perfect for holding small items like AirPods, coins, or other little treasures. You can even add a small button or a crochet chain as a closure for extra security. This makes for a quirky and practical gift, or a fun way to keep your essentials organized in style!
🍵Instructions for Crochet Toast Coaster Pattern
For this crochet toast coaster pattern, we will be working in rows.
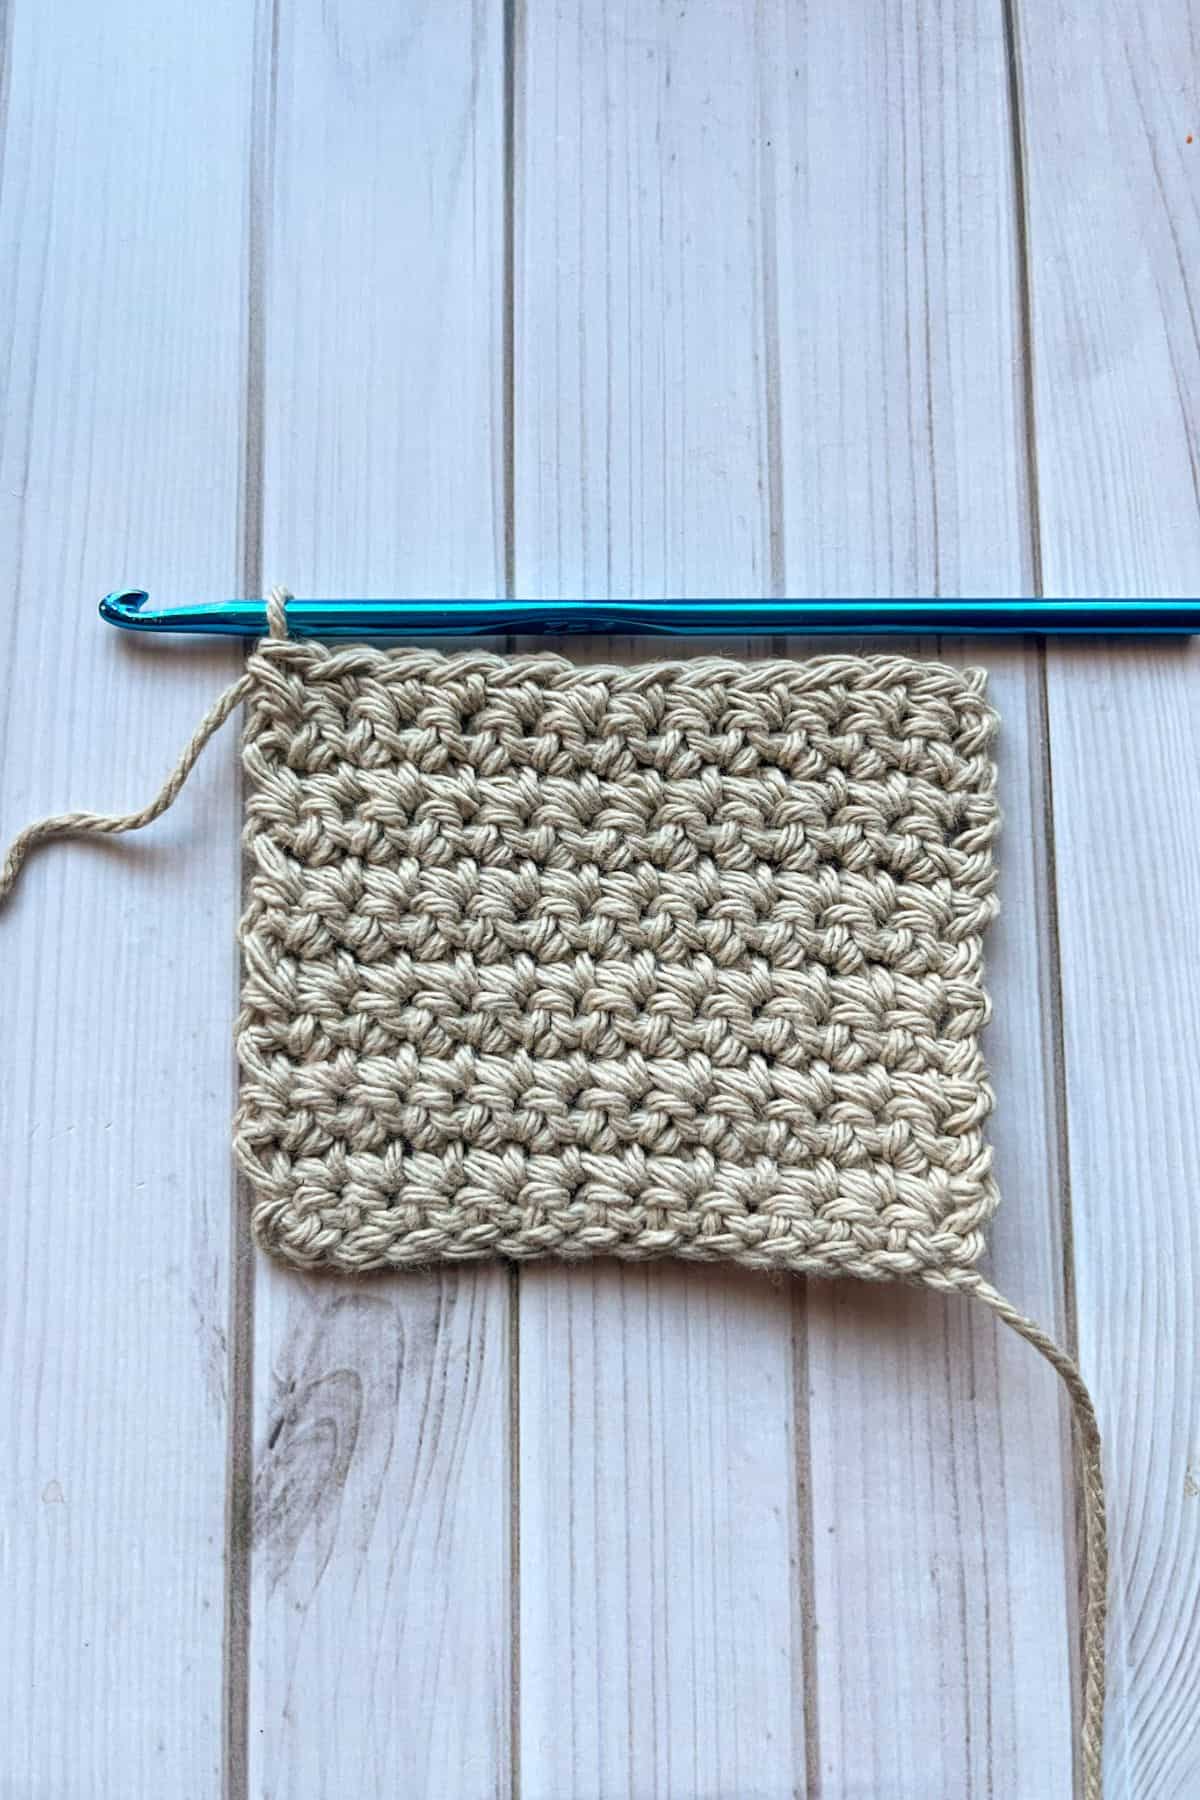

Row 1: Ch x13 with the light brown yarn.
Row 2: In the second ch from the hook, make a sc. Then sc for the rest of the row (12). Finally, ch x1 and turn.
Row 3-13: Sc in every stitch (12). At the end of row 13, do not chain 1, instead just turn.
Row 14: This row is going to be forming the top of the bread that has the bumps.
In the 3rd stitch from the end of the row, tr x8 into one stitch to create a tr shell. Then in the 3rd stitch from the stitch you worked in, make a sl st. You just made the first bump of the crochet toast. Now you are going to make the second bump.
In the 3rd stitch from the stitch you worked in last, tr x8 to create the second triple crochet shell stitch. Then sl st to the final stitch in the row. Fasten off your yarn and then weave in any ends.
Crochet Crust:
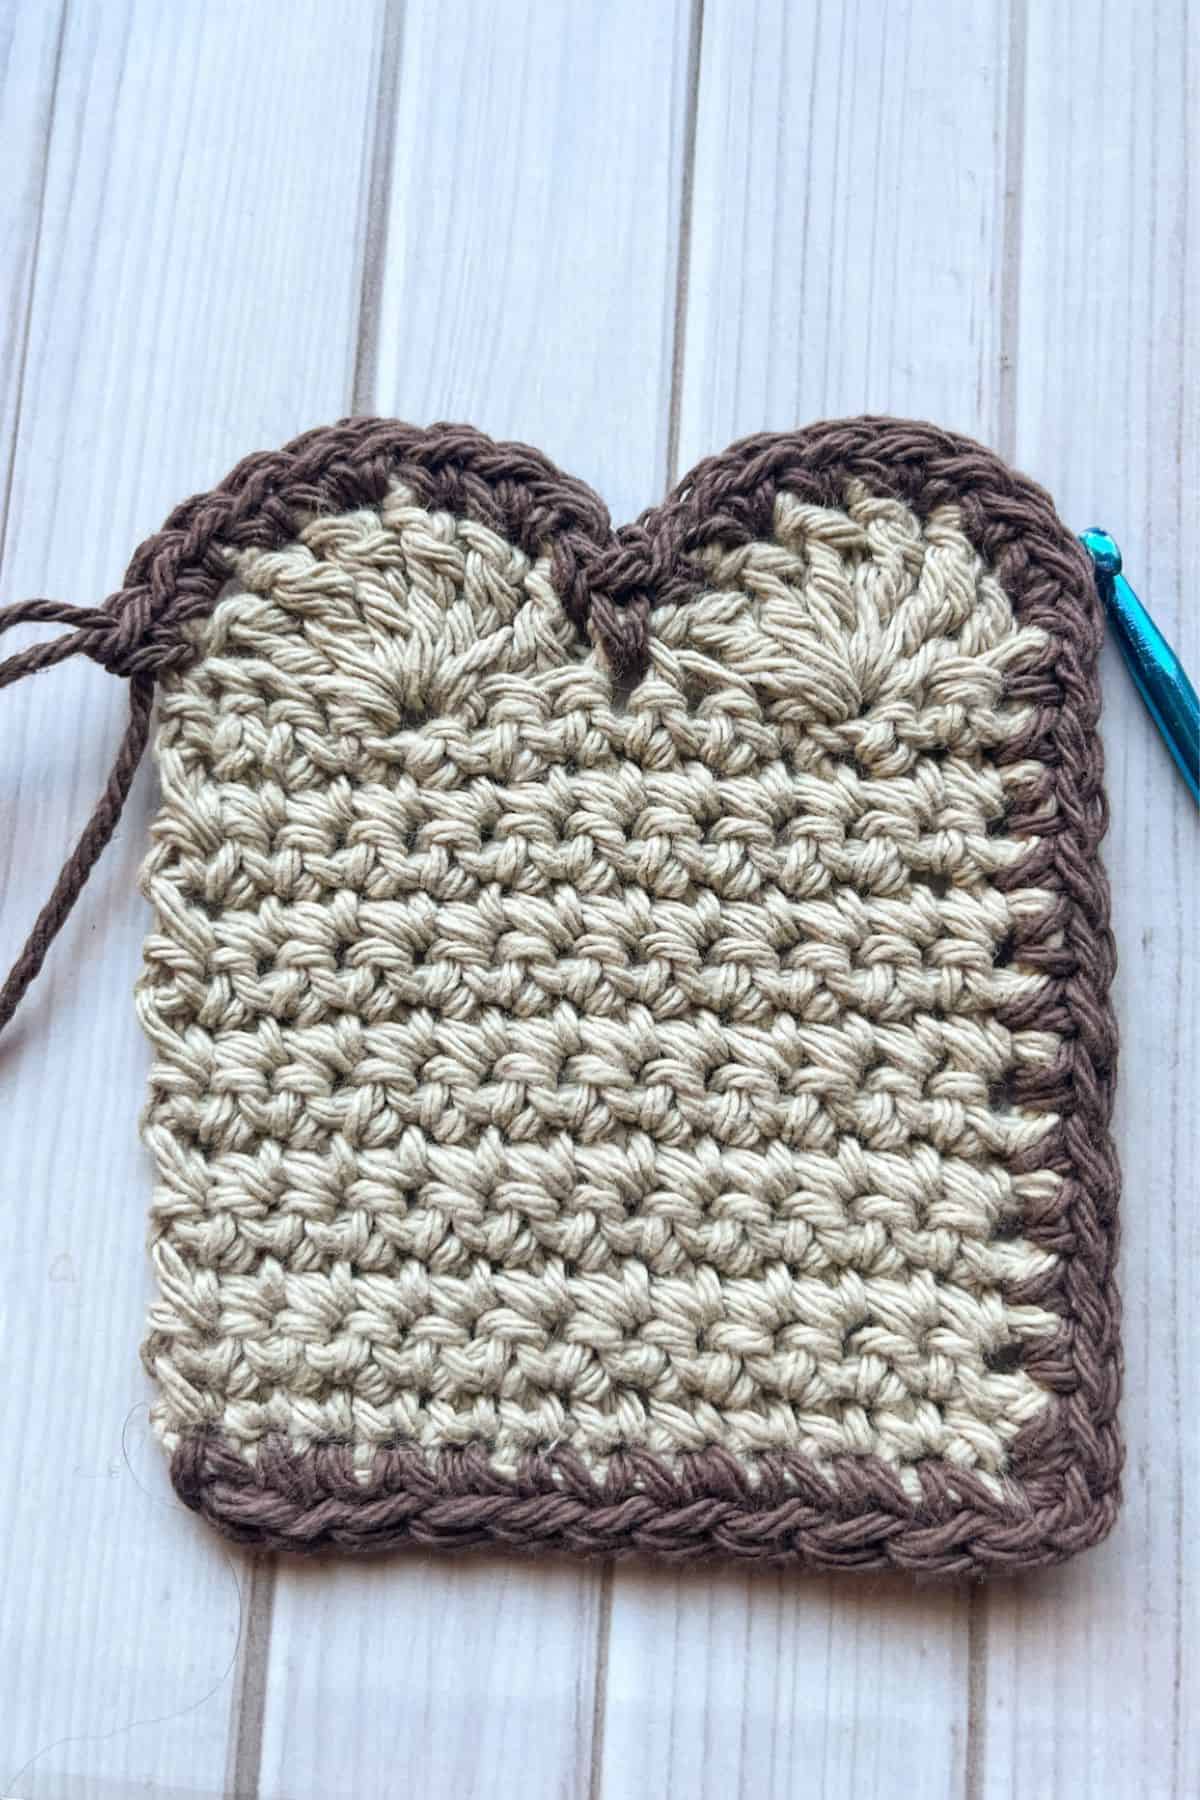

For the toast crust, join the darker brown to the edge of the toast - anywhere is fine. Then sc around the entire edge. For the raw edges on the sides, the rule is 1 sc per row, then the corners of the toast at the bottom get 3 sc per corner stitch.
When you go over the bumps of the toast, 1 sc per tr stitch should be enough, but if it starts to curl up on you, you can add more sc increases in a few of the stitches to have it lay flat.
When you get to the middle point between the 2 top bumps of the crochet toast, make a sl st into the sl st.
Fasten off the yarn and weave in any ends.
Crochet Butter:
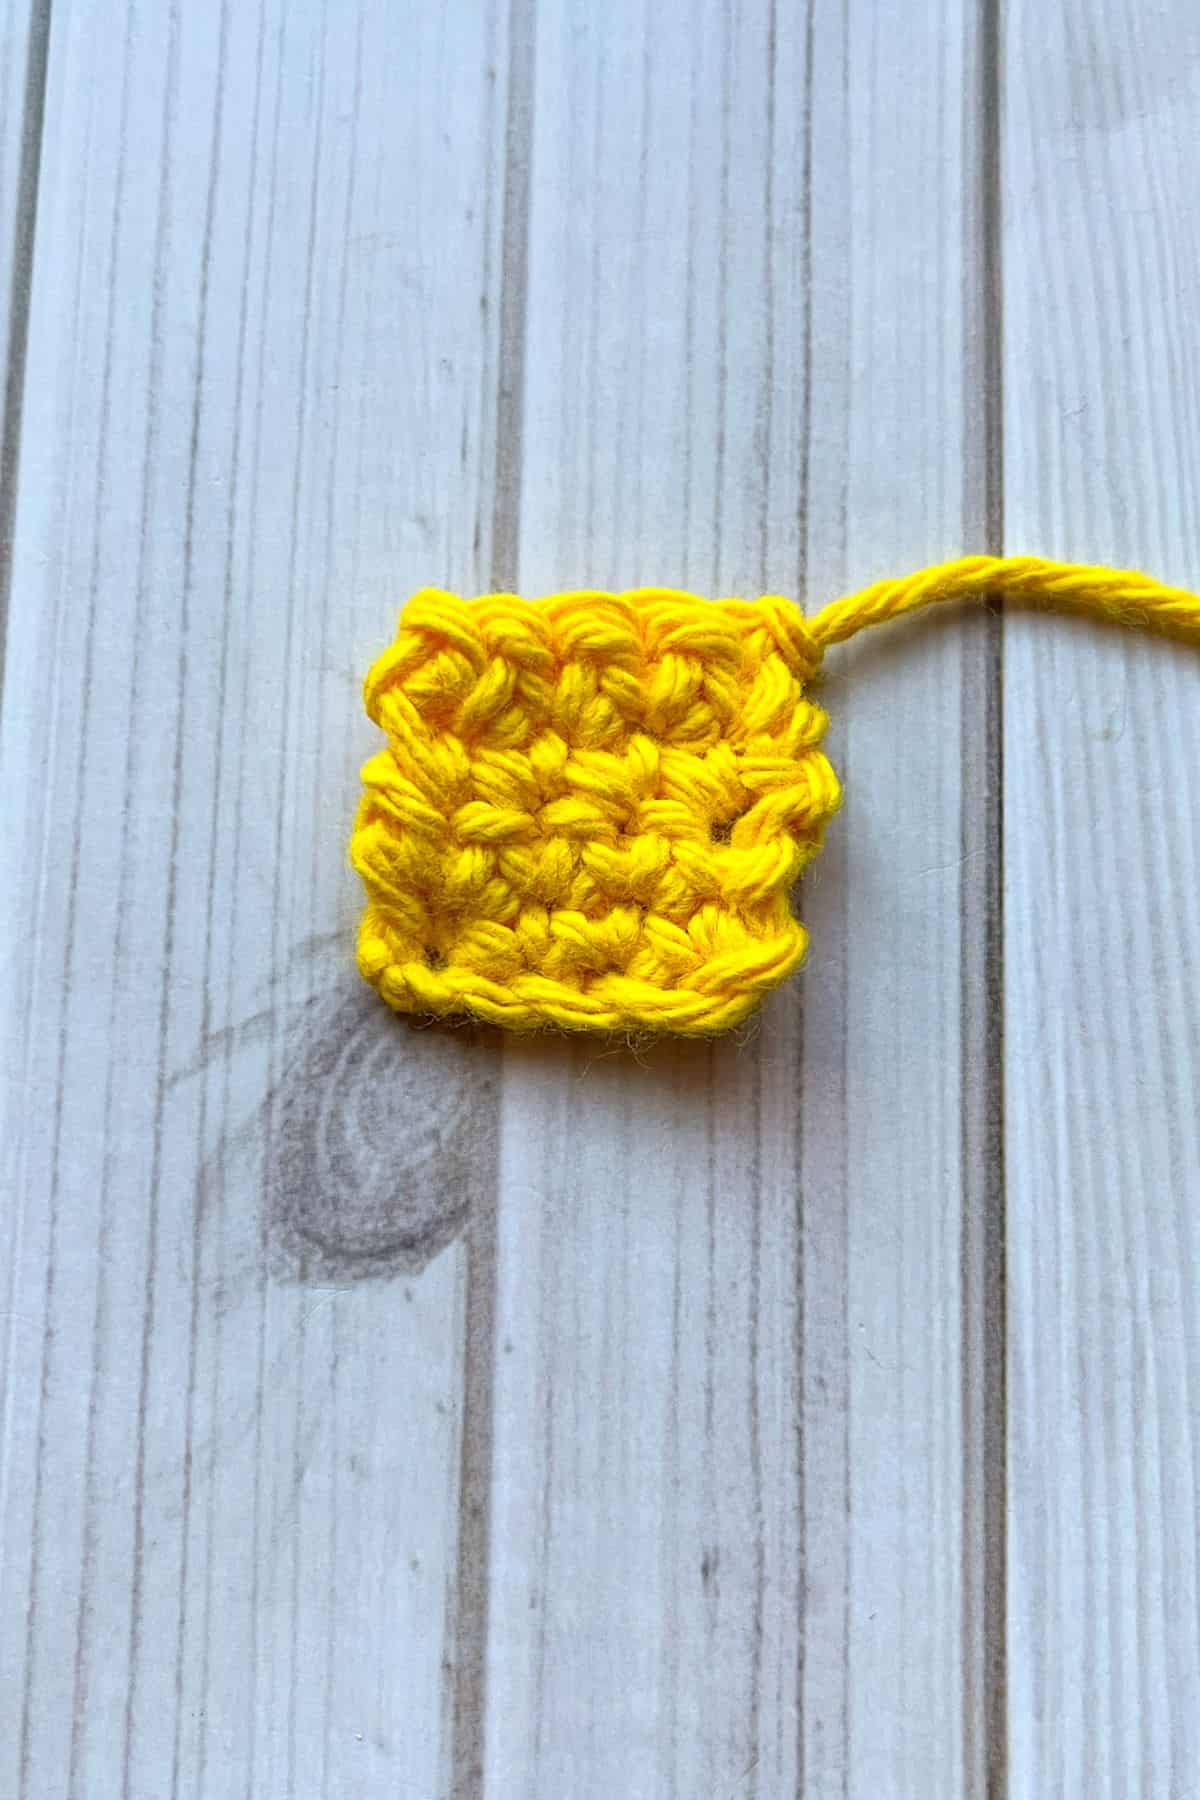

Row 1: For the optional crochet butter, use the yellow yarn and ch x5.
Row 2: In the second ch from the hook make a sc. Then sc for the rest of the row (4). Then ch x1 and turn.
Row 3-5: Sc in every stitch (4). After the last row, fasten off but leave a tail for sewing.
Sew the butter to the top of the toast.
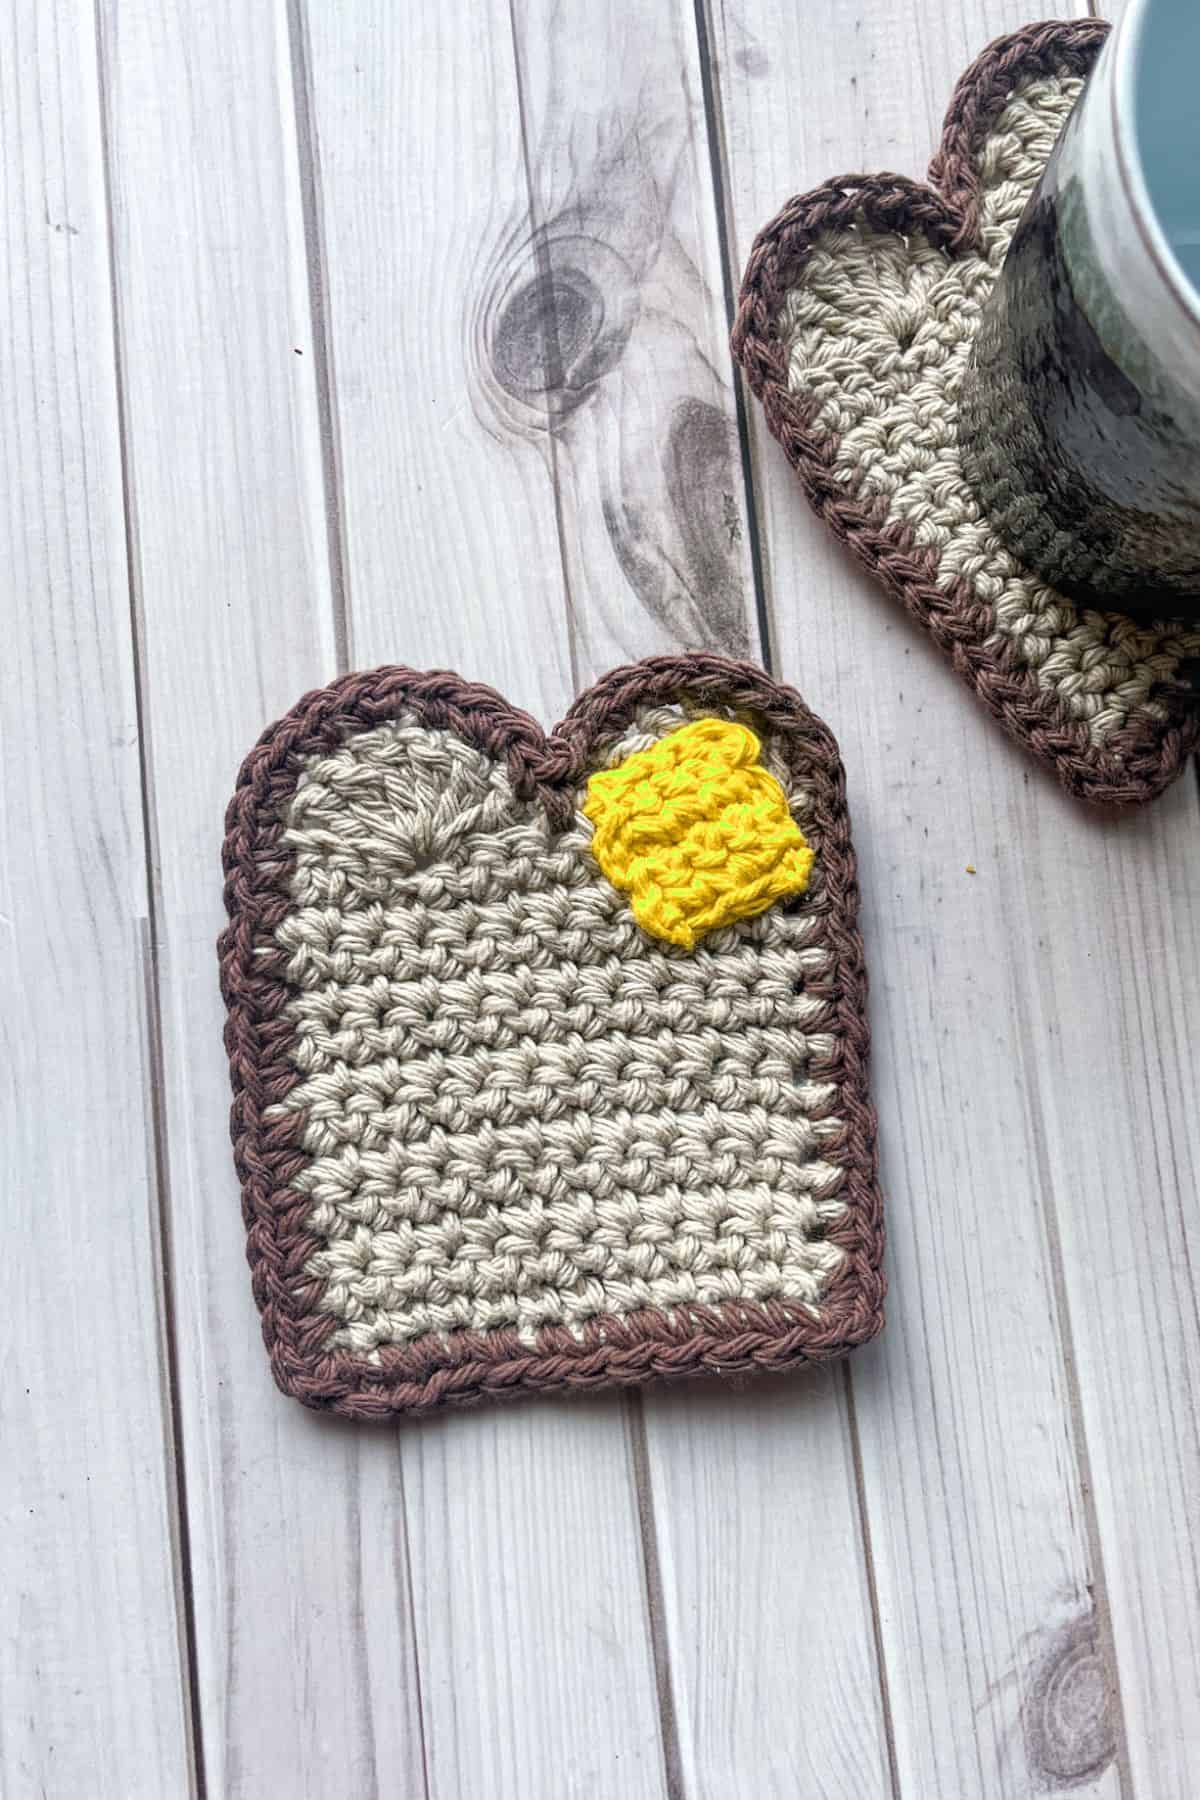
Now your crochet toast coaster is done! Thank you for crocheting along with me with my crochet toast coaster pattern!
I hope you enjoyed making these adorable toast coasters as much as I did. Whether you're using them to brighten up your coffee table or gifting them to someone special, they’re sure to bring a smile to anyone who sees them.
If you have any extra jute and warm brown cotton yarn, you can make my crochet capybara coaster pattern or my crochet bear coaster pattern.
If you are wanting to add a delicious addition to your crochet food coasters, check out my crochet watermelon coaster pattern for an easy and fun pattern.
Don’t forget to share your creations on social media and tag me @TheCaffeinatedSnail on Instagram, I’d love to see your unique styles and colors! Keep crocheting, stay cozy, and happy crafting!
🐌Expert Tips
- Choose the Right Yarn: For the best results, use a medium-weight yarn (like worsted weight) for a sturdy and durable coaster. Cotton yarn is also a great option, as it absorbs moisture well and holds its shape over time.
- Tight Stitches: To ensure your coasters have a firm structure and can handle cups and mugs without stretching, make sure your stitches are tight and even. A tighter tension will give your coaster a more professional look and feel.
- Finishing Touches: When sewing in your ends, take the time to weave them securely, especially along the edges of the coaster. This will prevent any fraying and help your coasters last longer.
- Blocking: For a neat, crisp finish, lightly block your coasters by dampening them and pinning them into shape. This helps even out any wonky stitches and gives the coaster a polished, professional appearance.
🧵Pattern FAQs
For best results, use medium-weight yarn (like worsted weight) in cotton. Cotton yarn is great for coasters as it’s absorbent and durable, but feel free to experiment with other yarns based on your preferences.
To create a crochet toast pouch, crochet two toasts as you normally would, then stitch them together along the edges, leaving the top open. You can sew a button or crochet a simple chain for a closure.
Depending on your skill level and crochet speed, you can expect to finish one coaster in about an hour or two. It’s a quick project, perfect for gifts or a fun afternoon craft session!
For longevity, hand wash your coasters gently or machine wash on a delicate cycle. Lay flat to dry to preserve their shape. Avoid wringing them out, as this can stretch the yarn.
🧶More Crochet Coaster Patterns

If you tried this Crochet Toast Coaster Pattern (or any other pattern on my website), please let me know how it went in the 📝 comments below. I'd love to hear from you!

Crochet Toast Coaster Pattern
Materials
Abbreviations (US terms)
- Chains - ch
- Single crochet - sc
- Triple crochet - tr
- Slip stitch - sl st
Notes
- Skill Level: The toast crochet pattern is perfect for beginners and works up quickly, making it ideal for those new to crochet or anyone seeking a fun, simple project. It’s an easy pattern that yields satisfying results in no time!
- Materials: All you need are basic crochet supplies: yarn, a crochet hook, and a yarn needle to weave in the ends. For the most authentic look, choose yarn in warm, toast-like shades, but feel free to get creative with your color choices!
- Size: The crochet toast coaster pattern is designed to create a coaster-sized piece, but you can adjust it easily by changing the yarn or modifying the stitch count. This makes it a versatile pattern, whether you want larger coasters or different shapes for other creative uses.
Instructions
- For this crochet toast coaster pattern, we will be working in rows.
- Row 1: Ch x13 with the light brown yarn.
- Row 2: In the second ch from the hook, make a sc. Then sc for the rest of the row (12). Finally, ch x1 and turn.
- Row 3-13: Sc in every stitch (12). At the end of row 13, do not chain 1, instead just turn.
- Row 14: This row is going to be forming the top of the bread that has the bumps.
- In the 3rd stitch from the end of the row, tr x8 into one stitch to create a tr shell. Then in the 3rd stitch from the stitch you worked in, make a sl st. You just made the first bump of the crochet toast. Now you are going to make the second bump.
- In the 3rd stitch from the stitch you worked in last, tr x8 to create the second triple crochet shell stitch. Then sl st to the final stitch in the row. Fasten off your yarn and then weave in any ends.
Crochet Crust:
- For the toast crust, join the darker brown to the edge of the toast - anywhere is fine. Then sc around the entire edge. For the raw edges on the sides, the rule is 1 sc per row, then the corners of the toast at the bottom get 3 sc per corner stitch.
- When you go over the bumps of the toast, 1 sc per tr stitch should be enough, but if it starts to curl up on you, you can add more sc increases in a few of the stitches to have it lay flat.
- When you get to the middle point between the 2 top bumps of the crochet toast, make a sl st into the sl st.
- Fasten off the yarn and weave in any ends.
Crochet Butter:
- Row 1: For the optional crochet butter, use the yellow yarn and ch x5.
- Row 2: In the second ch from the hook make a sc. Then sc for the rest of the row (4). Then ch x1 and turn.
- Row 3-5: Sc in every stitch (4). After the last row, fasten off but leave a tail for sewing.
- Sew the butter to the top of the toast.
- Now your crochet toast coaster is done! Thank you for crocheting along with me with my crochet toast coaster pattern!


Leave a Reply