
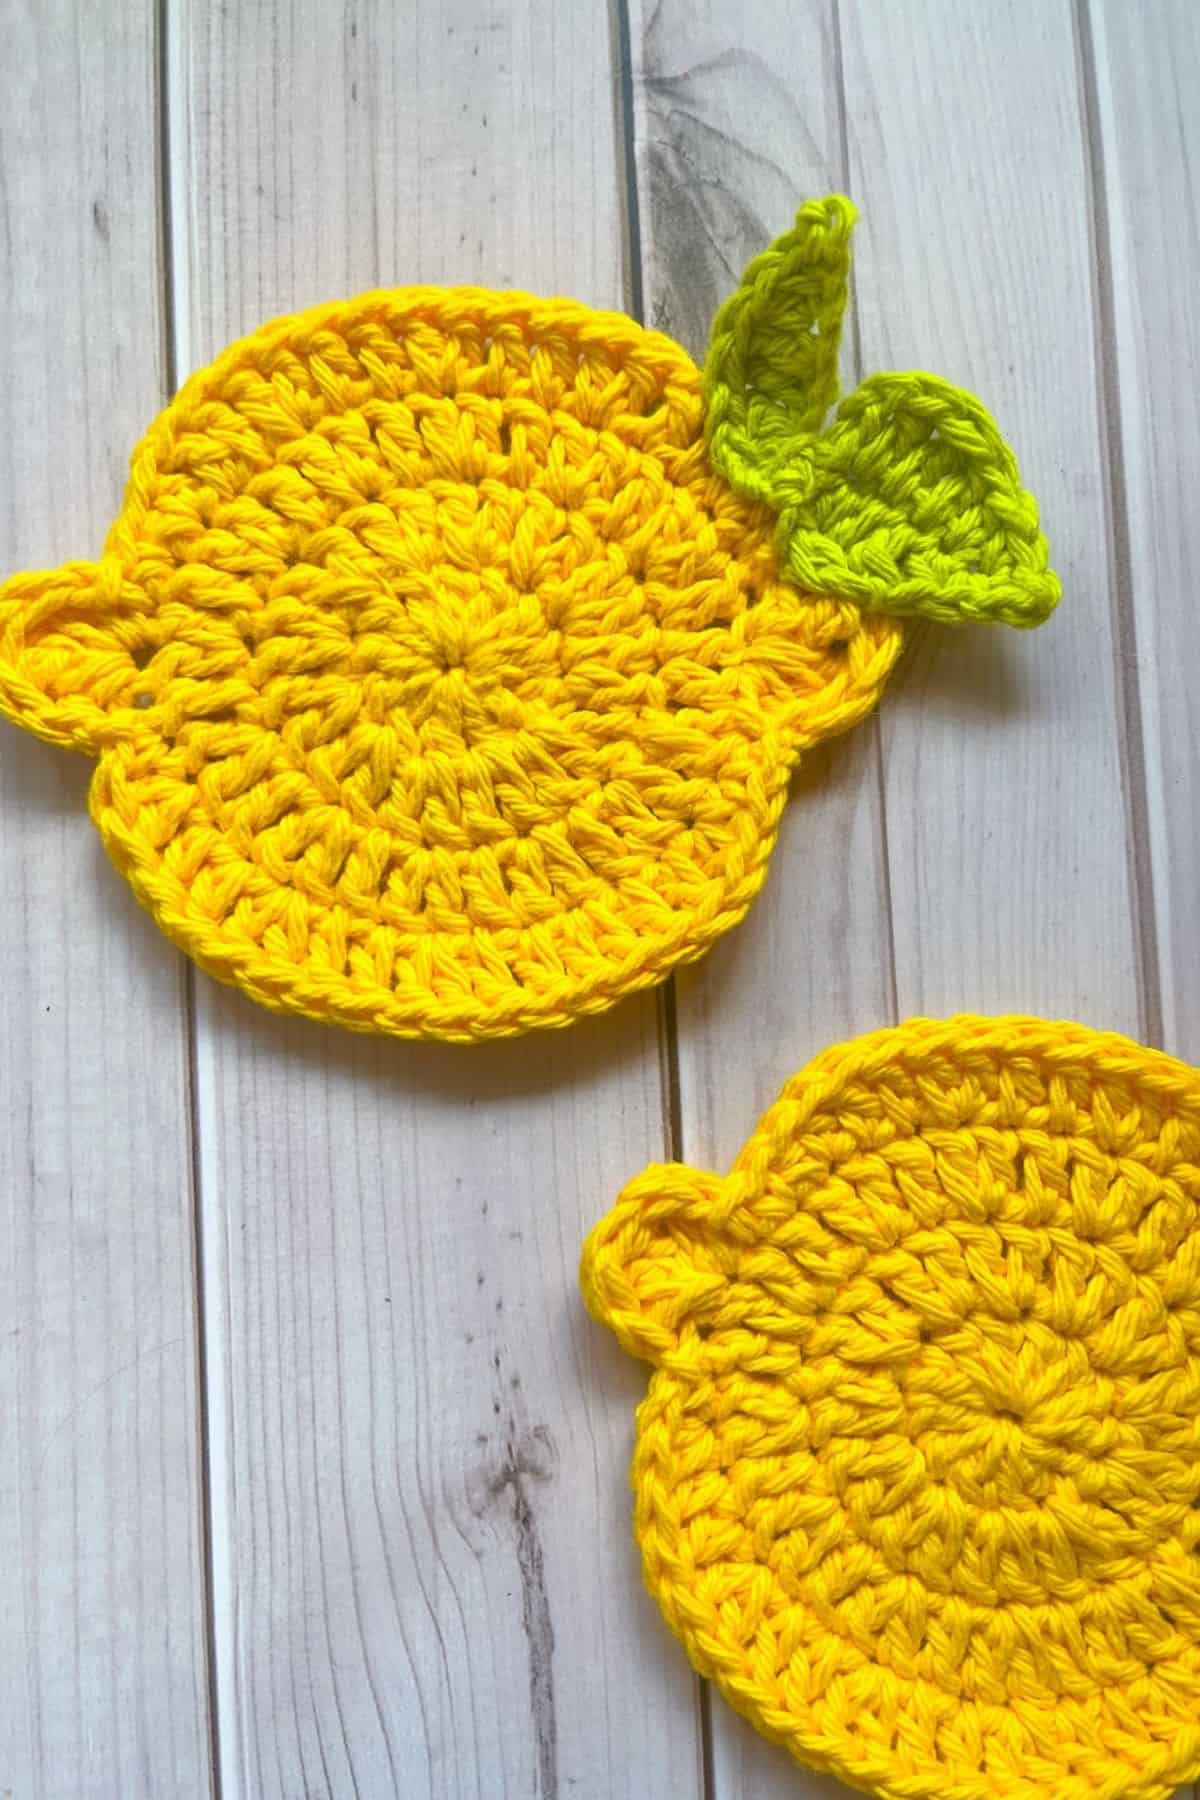
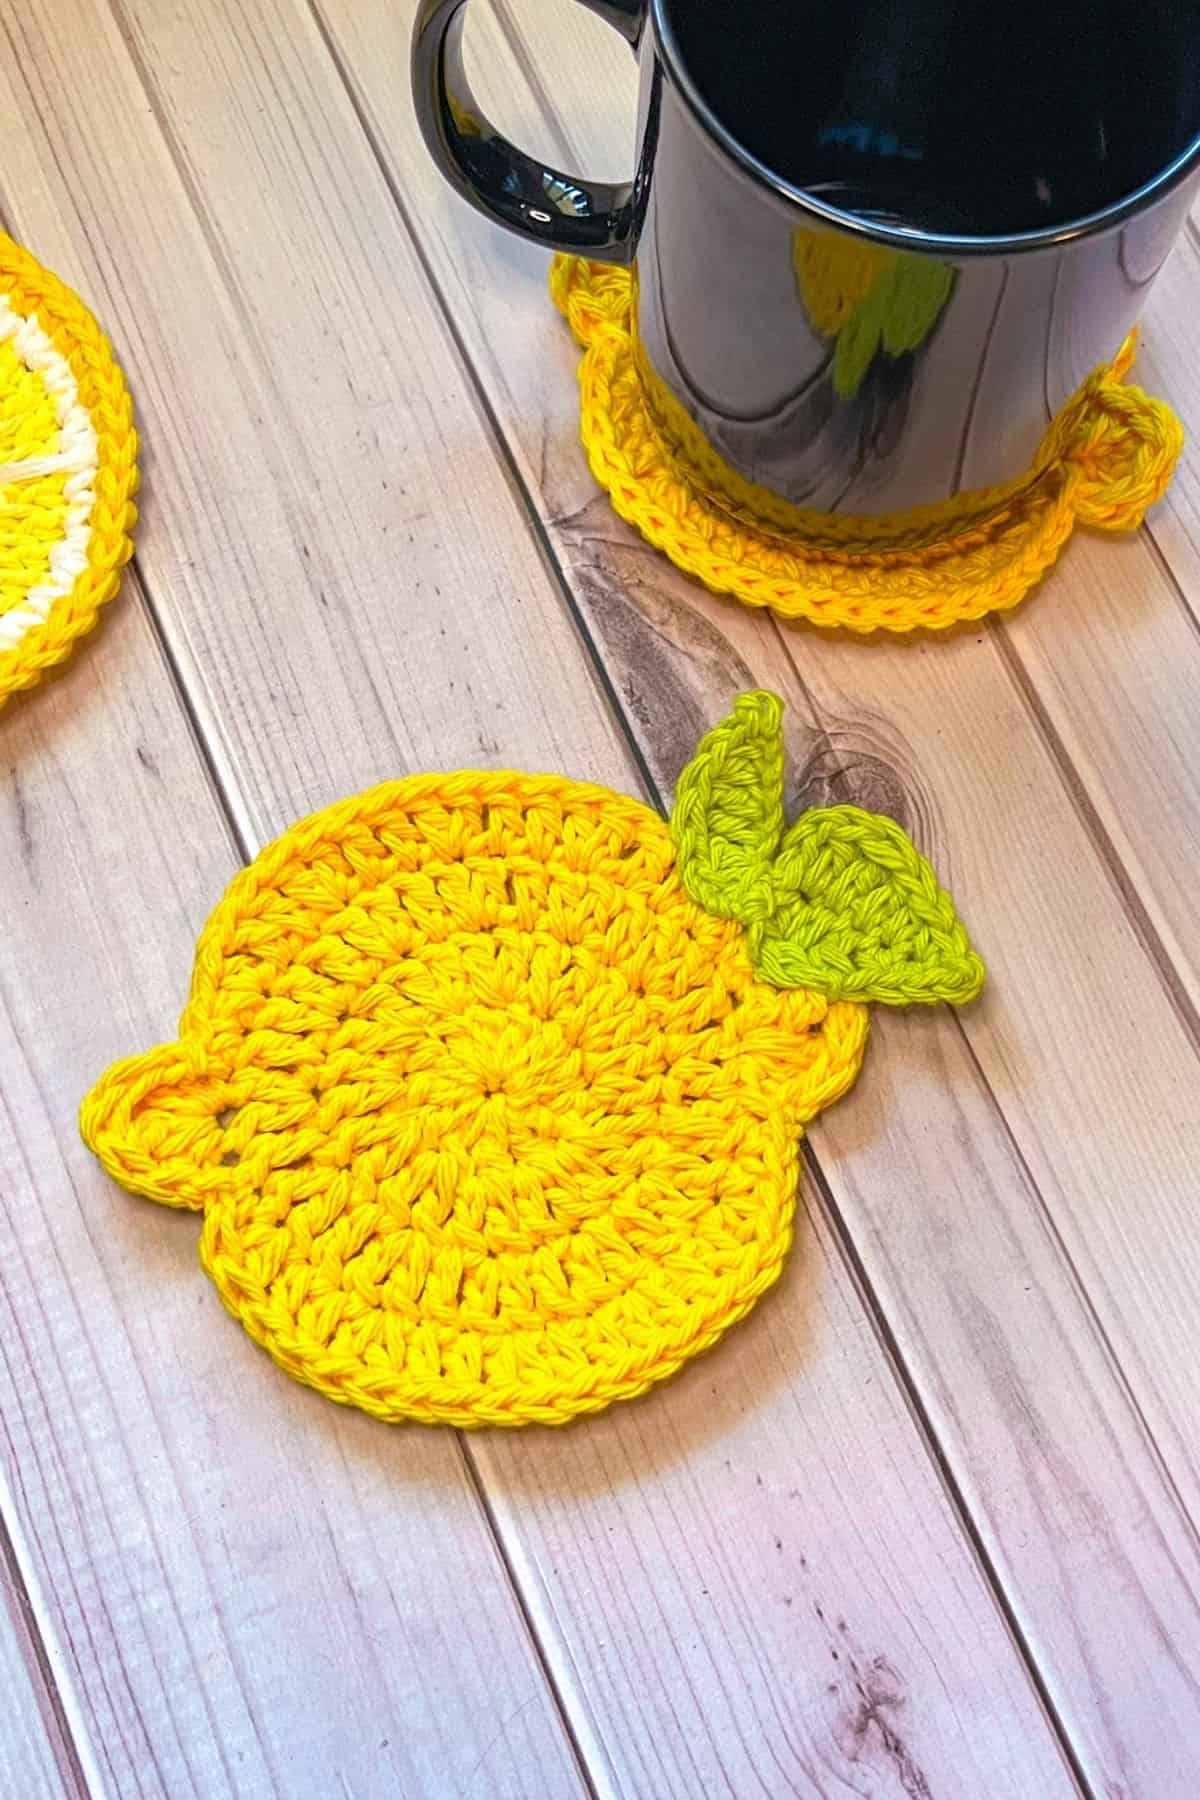
This Crochet Lemon Coaster Pattern is a simple, stylish way to accessorize your home for summer. Quick and easy to make, each coaster takes less than 30 minutes to complete!
This lemon crochet coaster pattern is perfect for those that are new to crochet and are familiar with the foundational stitches. This crochet fruit coaster pattern is also perfect for last minute gifts for Christmas, housewarming gifts, baby showers etc.
The crochet lemon pattern is also perfect for selling at markets or online if you want to sell the finished product (not the pattern of course).
The crochet lemon coaster pattern uses cotton yarn. It is imperative that you use cotton yarn for coasters. Cotton yarn is a great fiber of choice because of how breathable it is, and absorbent.
I love working with cotton yarn and even have a few crochet patterns that use it like my Crochet Duck Hat Pattern, Crochet Spa Set, and Sunflower Coaster Crochet Pattern. Cotton yarn is great for summer hats, wash rags, and coasters because of the aforementioned qualities in its fiber.
If you are looking for other crochet citrus patterns regardless of yarn type and yarn project, I do have an Orange Crochet Bag Pattern and an Easy Crochet Lemon Pattern.
Jump to:
✏️ Things To Note:
- Use Cotton Yarn. For this pattern, cotton yarn is essential. If you use acrylic yarn instead, the coasters can become cute lemon appliques, perfect for blankets and decorative pieces where absorbency isn’t required. Pair it with my Crochet Strawberry Blanket Pattern for a strawberry lemonade theme!
- Beginner-Friendly. The crochet lemon coaster pattern is perfect for beginners looking to learn how to crochet coasters. It is worked in the round and requires only 4 rounds.
- Size Adjustments. The finished lemon coaster measures about 4.5 inches wide. To make it larger or smaller, simply adjust the hook size.
💭Abbreviations to Remember (US terms)
- Magic ring - mr
- Single crochet - sc
- Half double crochet - hdc
- Double crochet - dc
- Triple crochet - tr
- Slip stitch - sl st
- Increase - inc, mostly seen as "dc inc" for a double crochet increase
* The ch x2 at the beginning of each round does not count as a stitch. Skip over it and sl st to the first dc you made.
* If you see a stitch abbreviation with "x" after it, it means how many times you do that stitch in the following amount of stitches. For example: sc x6 would mean you make a single crochet in the next 6 stitches. Inc x2 means you make an inc in the next 2 stitches.
🍵Instructions Crochet Lemon Coaster Pattern
The crochet lemon coaster pattern is made in rounds.
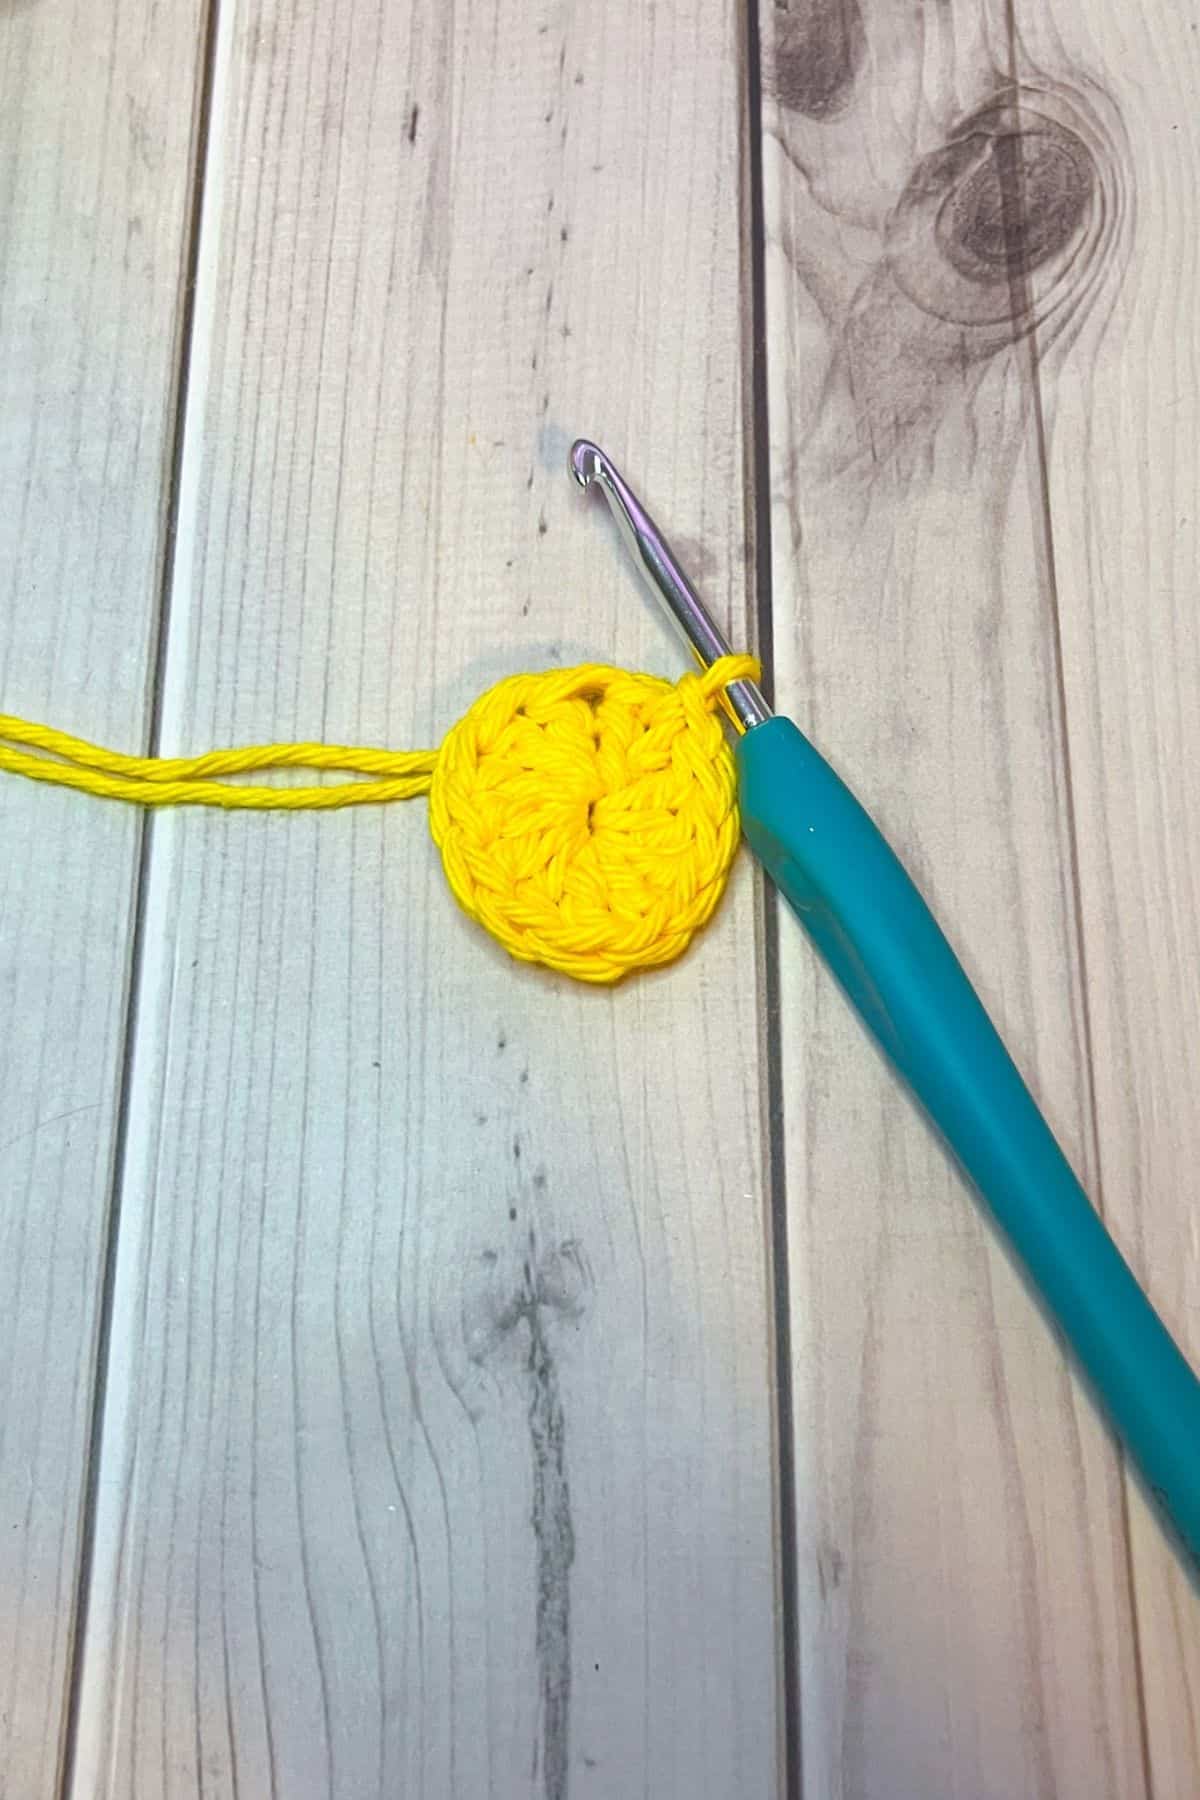
Round 1: Using yellow, make a magic ring and immediately chain 2 (does not count as a stitch). Then dc x12 into the magic ring. To secure the round, sl st to the 1st dc in the round (12).

Round 2: Ch x2, then dc inc in every stitch from the previous round. Then sl st to the first dc in the round (24).

Round 3: Ch x2, then dc inc, dc and repeat for the rest of the round. Then sl st to the first dc in the round (36).

Round 4: This is the last round for the lemon and will help create the overall lemon shape.
In the first stitch of the round: dc, tr x3, and dc. There should be 5 stitches. Then immediately make a sl st in the following stitch.
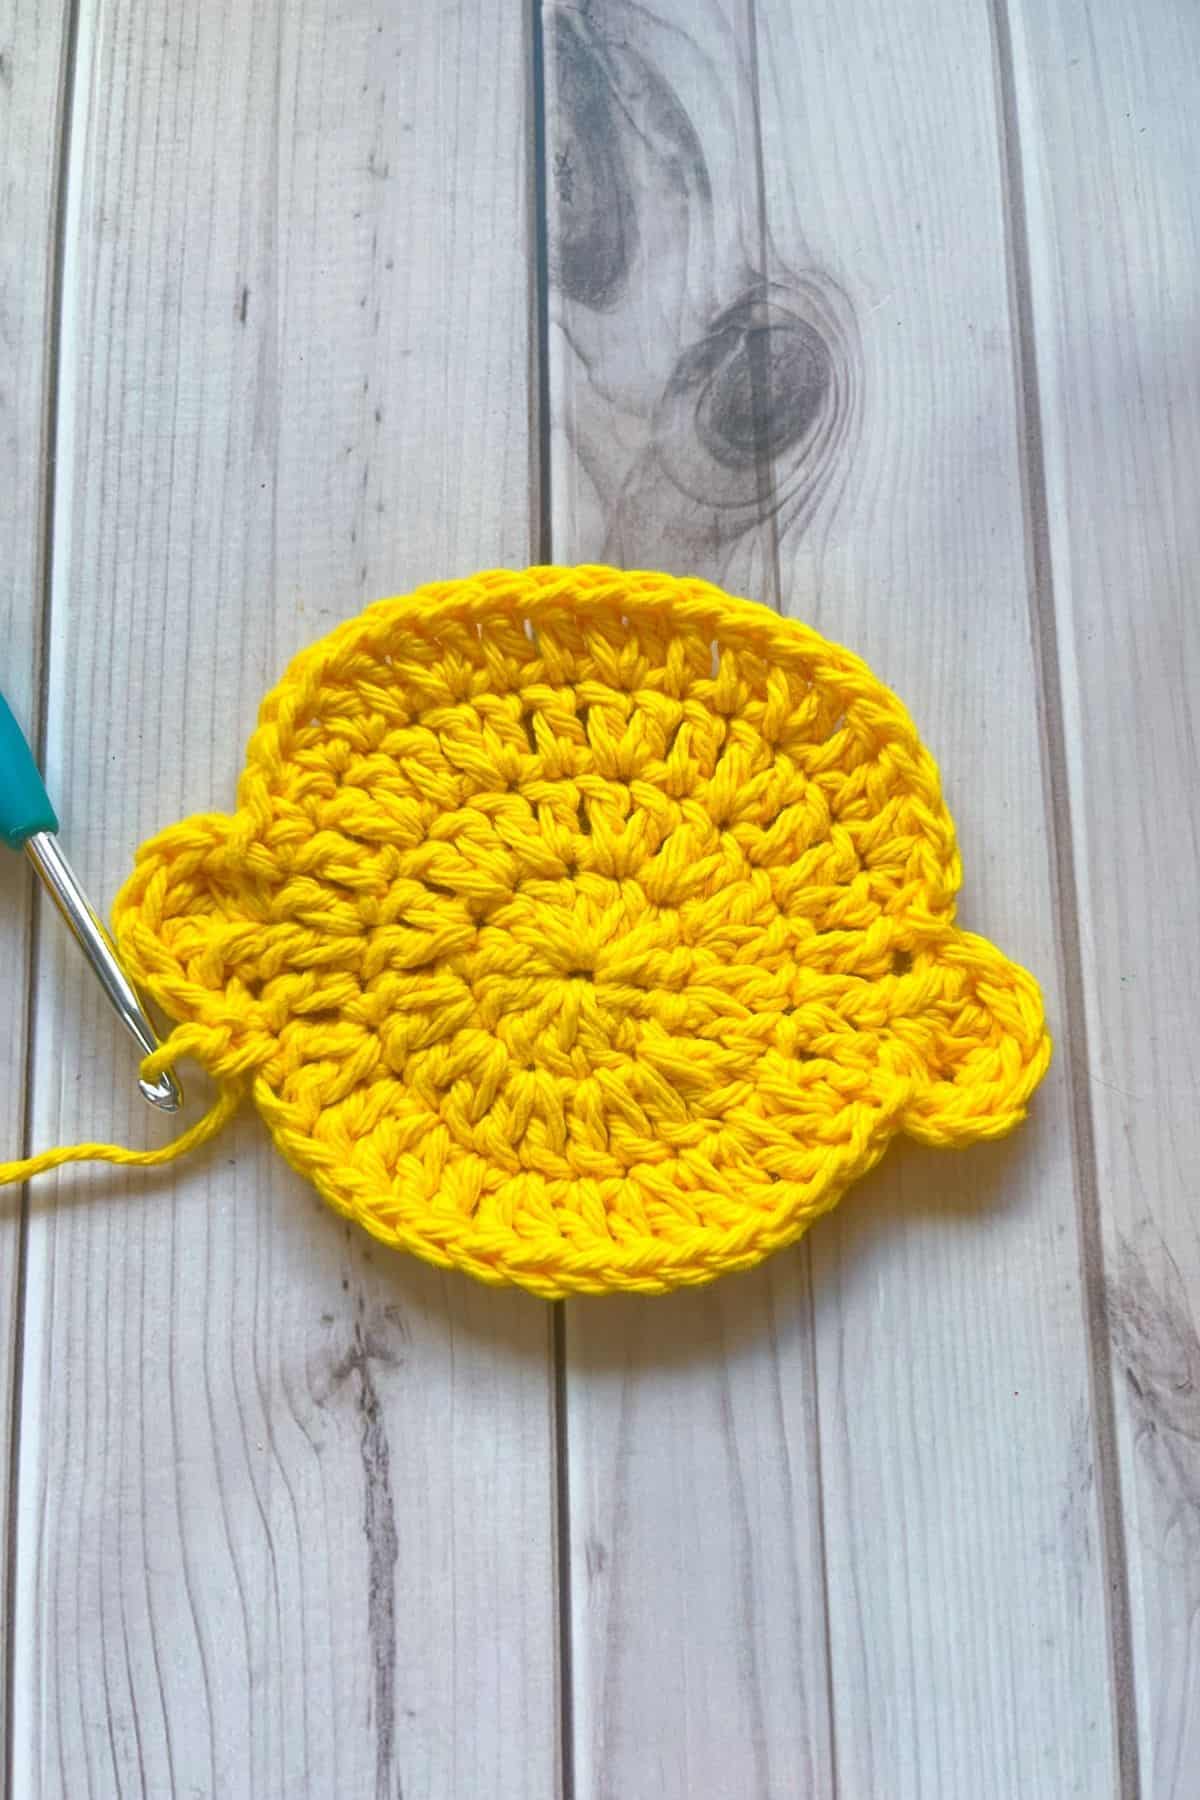
Sc, hdc inc, (dc x 2, dc inc) x3, dc x2, hdc inc, sc, and sl st.
In the next stitch, make a second lemon bump by making a dc, tr x3, and dc in the same stitch.

Then sl st, sc, hdc inc, (dc x2, dc inc) x3, dc x2, hdc inc, sc, and sl st to the beginning of the round. Finally fasten off the yarn and weave in any ends.
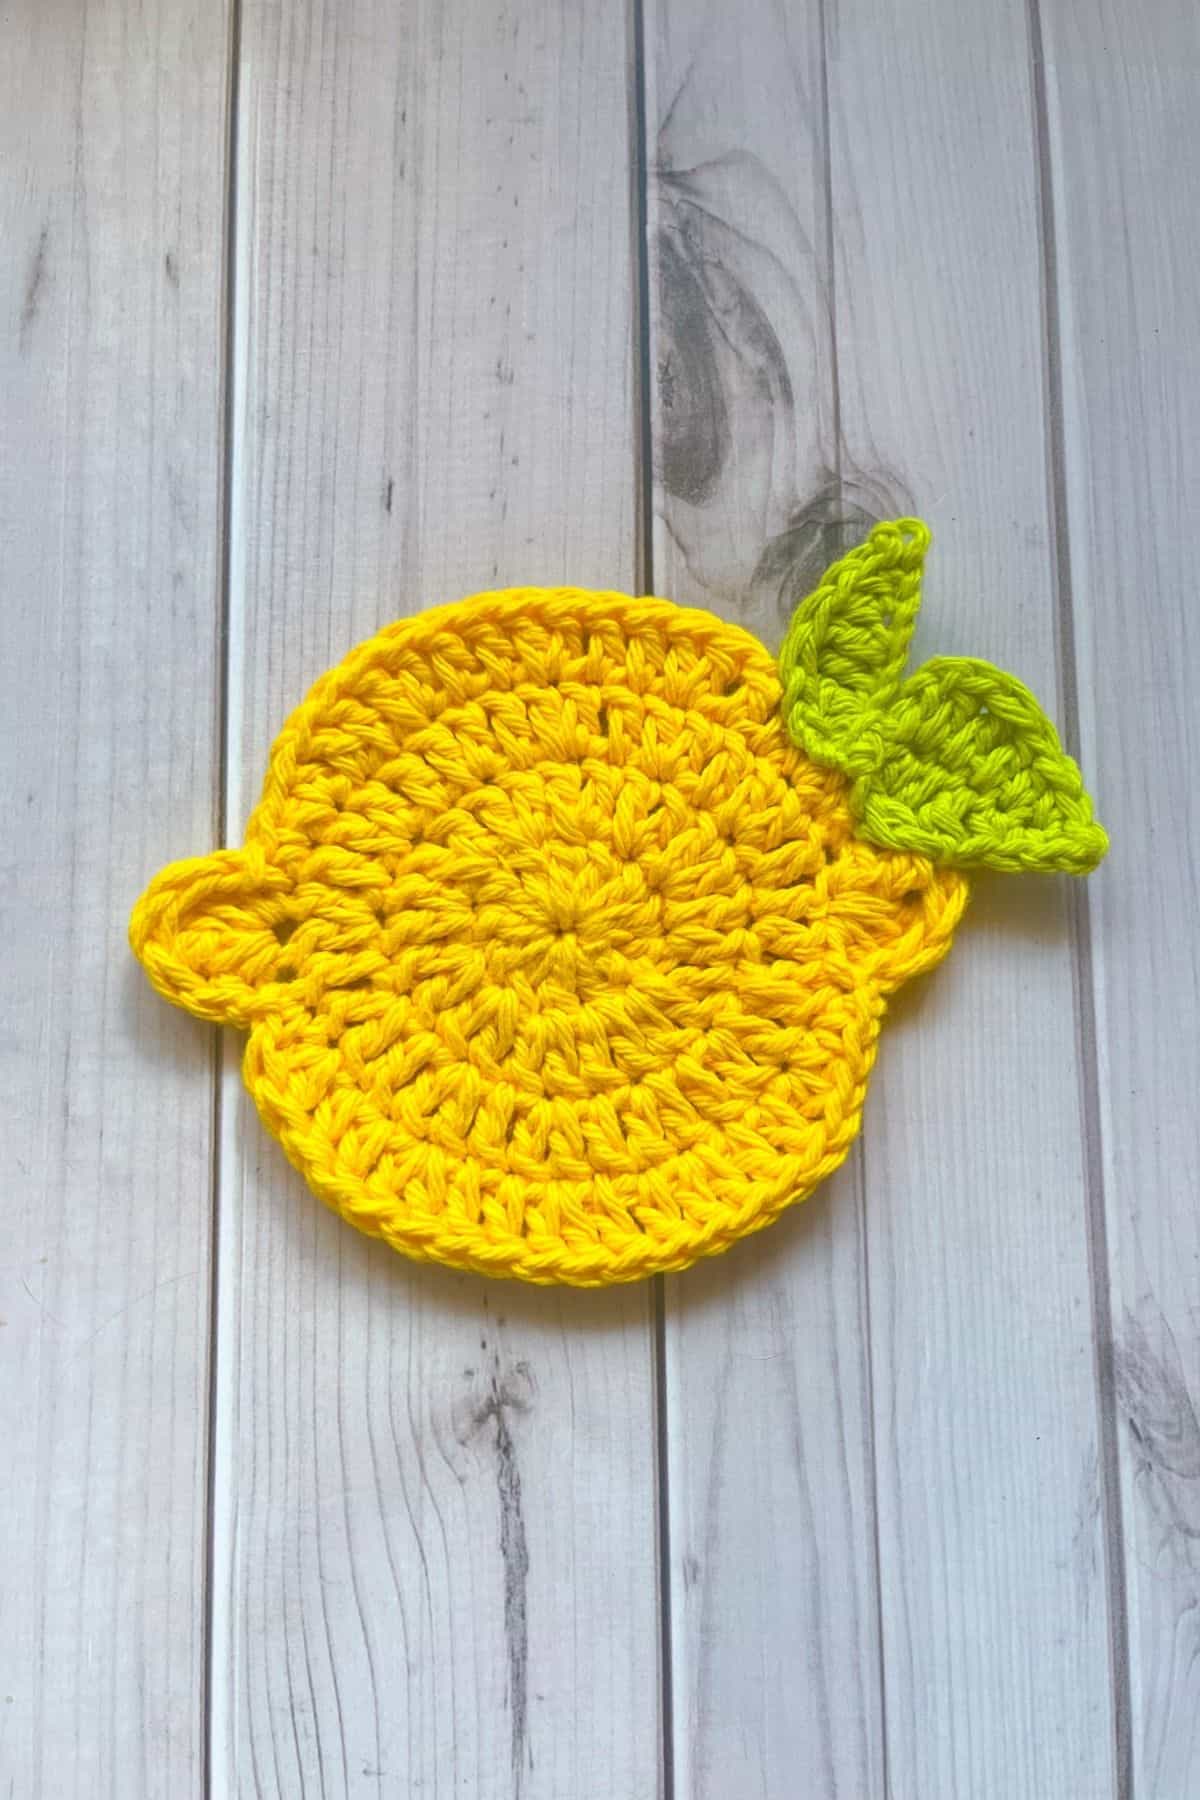
Crochet Lemon Leaf:

Ch x8, in the 3rd chain from the hook and make a dc. In the following chains make this stitch sequence: tr, dc, hdc, sc, sl st. Then make a ch and flip to the other side of the chain that hasn't been worked on.
On the unworked side of the chain, do the following sequence of stitches: sl st, sc, hdc, dc, tr, dc, ch x2 and sl st to the last stitch on the chain.
Immediately ch x7, and in the second stitch from the hook make a sl st, then sc, hdc, dc, tr, dc, in the remainder of the chain stitches. Then ch x2 and sl st to the last stitch. Fasten off and leave a tail for sewing.
Finishing:
Sew the leaf to the right side of the lemon near the first lemon bump we made.
Optionally, if you wanted you can create faces on the lemon by using black yarn and embroidering happy faces or sour faces on the middle part of the lemon.
And now you have a finished lemon coaster made from my crochet lemon coaster pattern! Pair it with the Citrus Crochet Coaster Pattern for crochet whole lemons and crochet sliced lemons.
🐌Expert Tips
- Maintain Loose Tension. Keep the tension loose in both the coaster and leaf sections. Tight stitches may cause curling.
- Secure Your Embroidery. When adding faces or details, make sure to secure the yarn well at the back to prevent unraveling. Consider sliding the yarn under existing stitches to keep the back neat.
- Customizing Sizes. Experiment with different hook sizes or yarn weights for coasters of varied sizes. Thicker yarns will make a larger coaster, while thinner ones will create a more delicate design.
🧵Pattern FAQs
The best yarn for crocheting coasters is generally cotton because it is durable, absorbent, holds up well to heat, and is easy to wash.
Crochet coasters tend to curl if there is a variation in tension. Aim to maintain uniform stitch sizes for the best results.
Crochet coasters are equally effective as those made from cork, felt, stone, or other materials found in stores. The distinct advantage of crochet coasters is that they are handmade, offering a wider variety in design.
🧶More Crochet Coaster Patterns


If you tried this Crochet Lemon Coaster Pattern (or any other pattern on my website), please let me know how it went in the 📝 comments below. I'd love to hear from you!

Crochet Lemon Coaster Pattern
Materials
Abbreviations (US terms)
- Magic ring - mr
- Single crochet - sc
- Half double crochet - hdc
- Double crochet - dc
- Triple crochet - tr
- Slip stitch - sl st
- Increase - inc
Notes
- Use cotton yarn for the crochet lemon pattern, if you use acrylic yarn, you can turn the coasters into a cute crochet lemon applique. Perfect for blankets and other decorative elements that don't require the piece to be absorbent.
- This pattern is perfect to learn how to crochet coasters for beginners because it is in the round and only 4 rounds.
- The finished lemon crochet coaster is roughly 4.5 inches wide, you can always alter the hook size if you want the lemon crochet coaster bigger or smaller
Instructions
- This pattern is made in rounds.
- Round 1: Using yellow, make a magic ring and immediately chain 2 (does not count as a stitch). Then dc x12 into the magic ring. To secure the round, sl st to the 1st dc in the round (12).
- Round 2: Ch x2, then dc inc in every stitch from the previous round. Then sl st to the first dc in the round (24).
- Round 3: Ch x2, then dc inc, dc and repeat for the rest of the round. Then sl st to the first dc in the round (36).
- Round 4: This is the last round for the lemon and will help create the overall lemon shape.
- In the first stitch of the round: dc, tr x3, and dc. There should be 5 stitches. Then immediately make a sl st in the following stitch.
- Sc, hdc inc, (dc x 2, dc inc) x3, dc x2, hdc inc, sc, and sl st. In the next stitch, make a second lemon bump by making a dc, tr x3, and dc in the same stitch. Then sl st, sc, hdc inc, (dc x2, dc inc) x3, dc x2, hdc inc, sc, and sl st to the beginning of the round. Finally fasten off the yarn and weave in any ends.
Lemon Leaf:
- Ch x8, in the 3rd chain from the hook and make a dc. In the following chains make this stitch sequence: tr, dc, hdc, sc, sl st. Then make a ch and flip to the other side of the chain that hasn't been worked on.
- On the unworked side of the chain, do the following sequence of stitches: sl st, sc, hdc, dc, tr, dc, ch x2 and sl st to the last stitch on the chain.
- Immediately ch x7, and in the second stitch from the hook make a sl st, then sc, hdc, dc, tr, dc, in the remainder of the chain stitches. Then ch x2 and sl st to the last stitch. Fasten off and leave a tail for sewing.
Finishing:
- Sew the leaf to the right side of the lemon near the first lemon bump we made.
- Optionally, if you wanted you can create faces on the lemon by using black yarn and embroidering happy faces or sour faces on the middle part of the lemon.
- And now you have a finished lemon crochet coaster!


Leave a Reply