
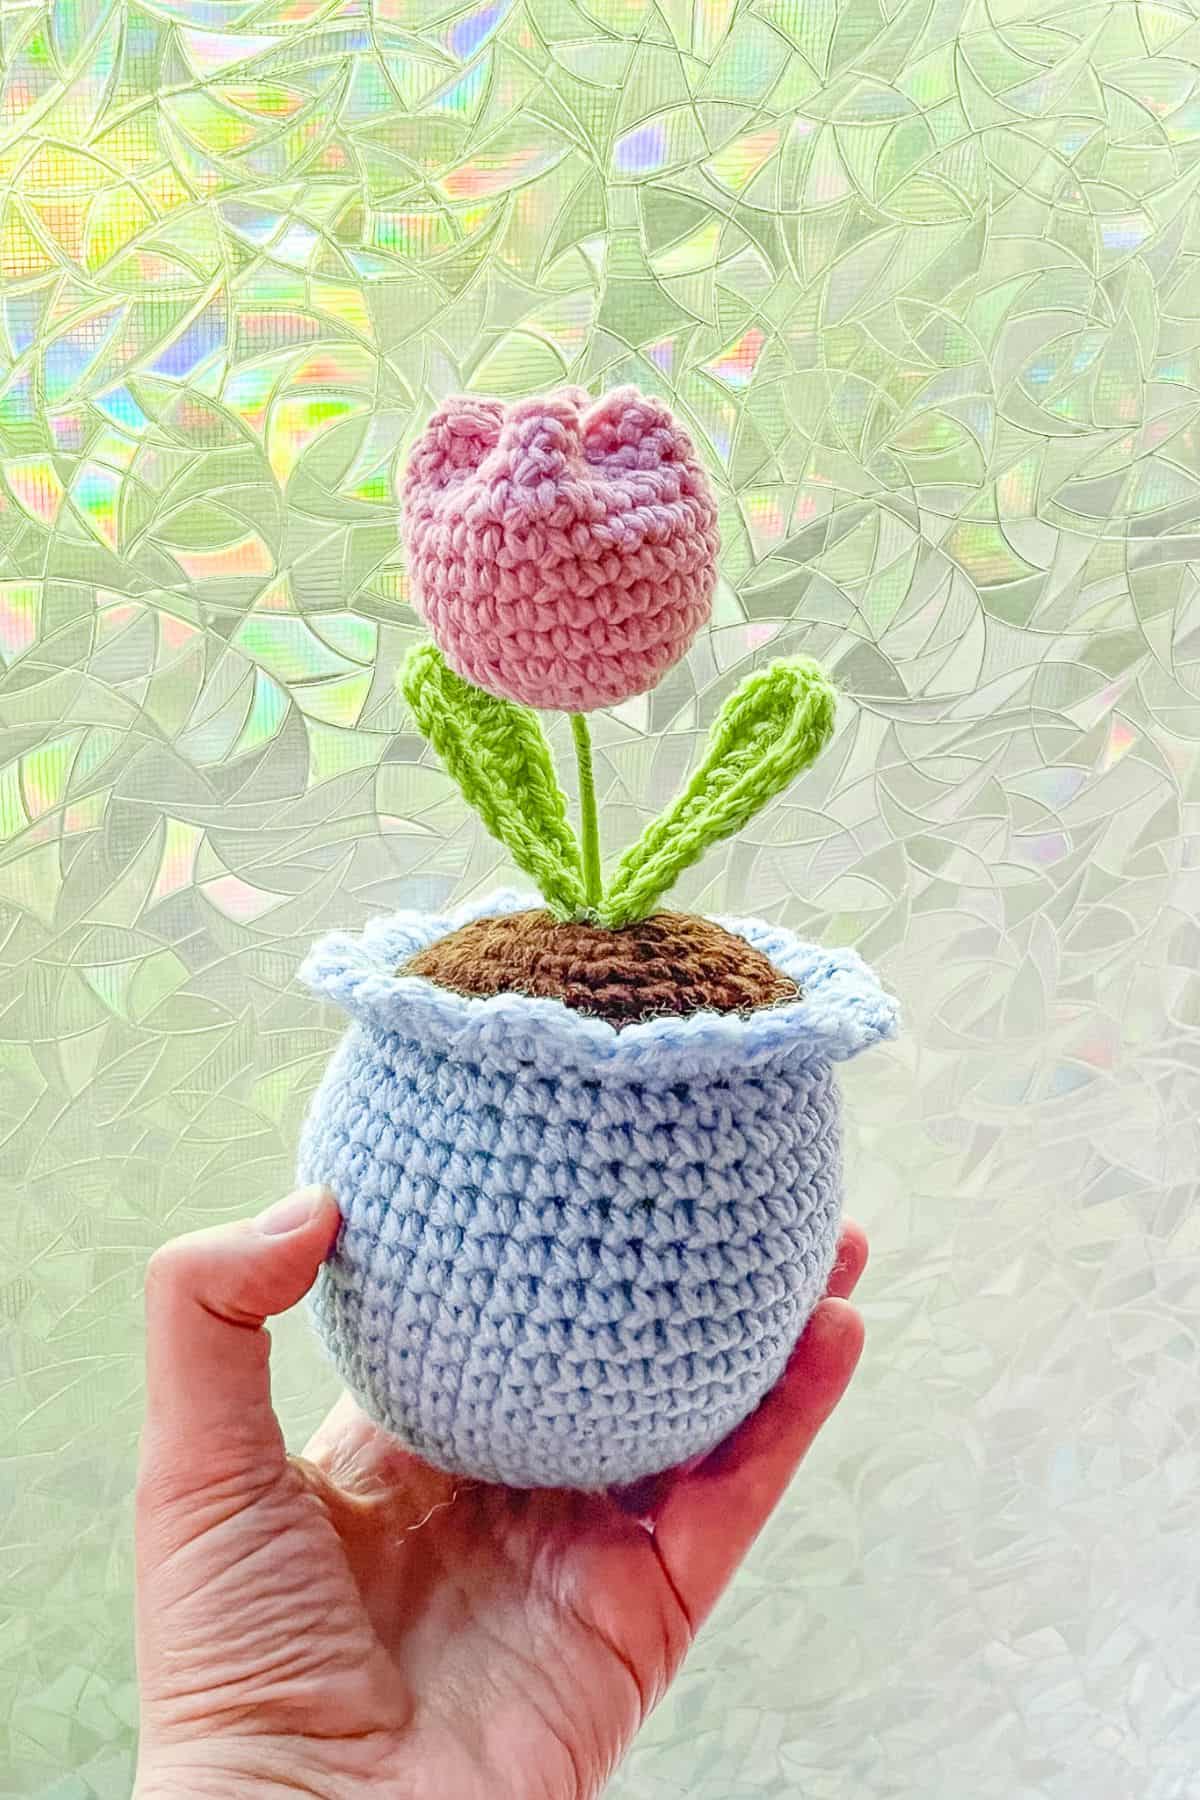
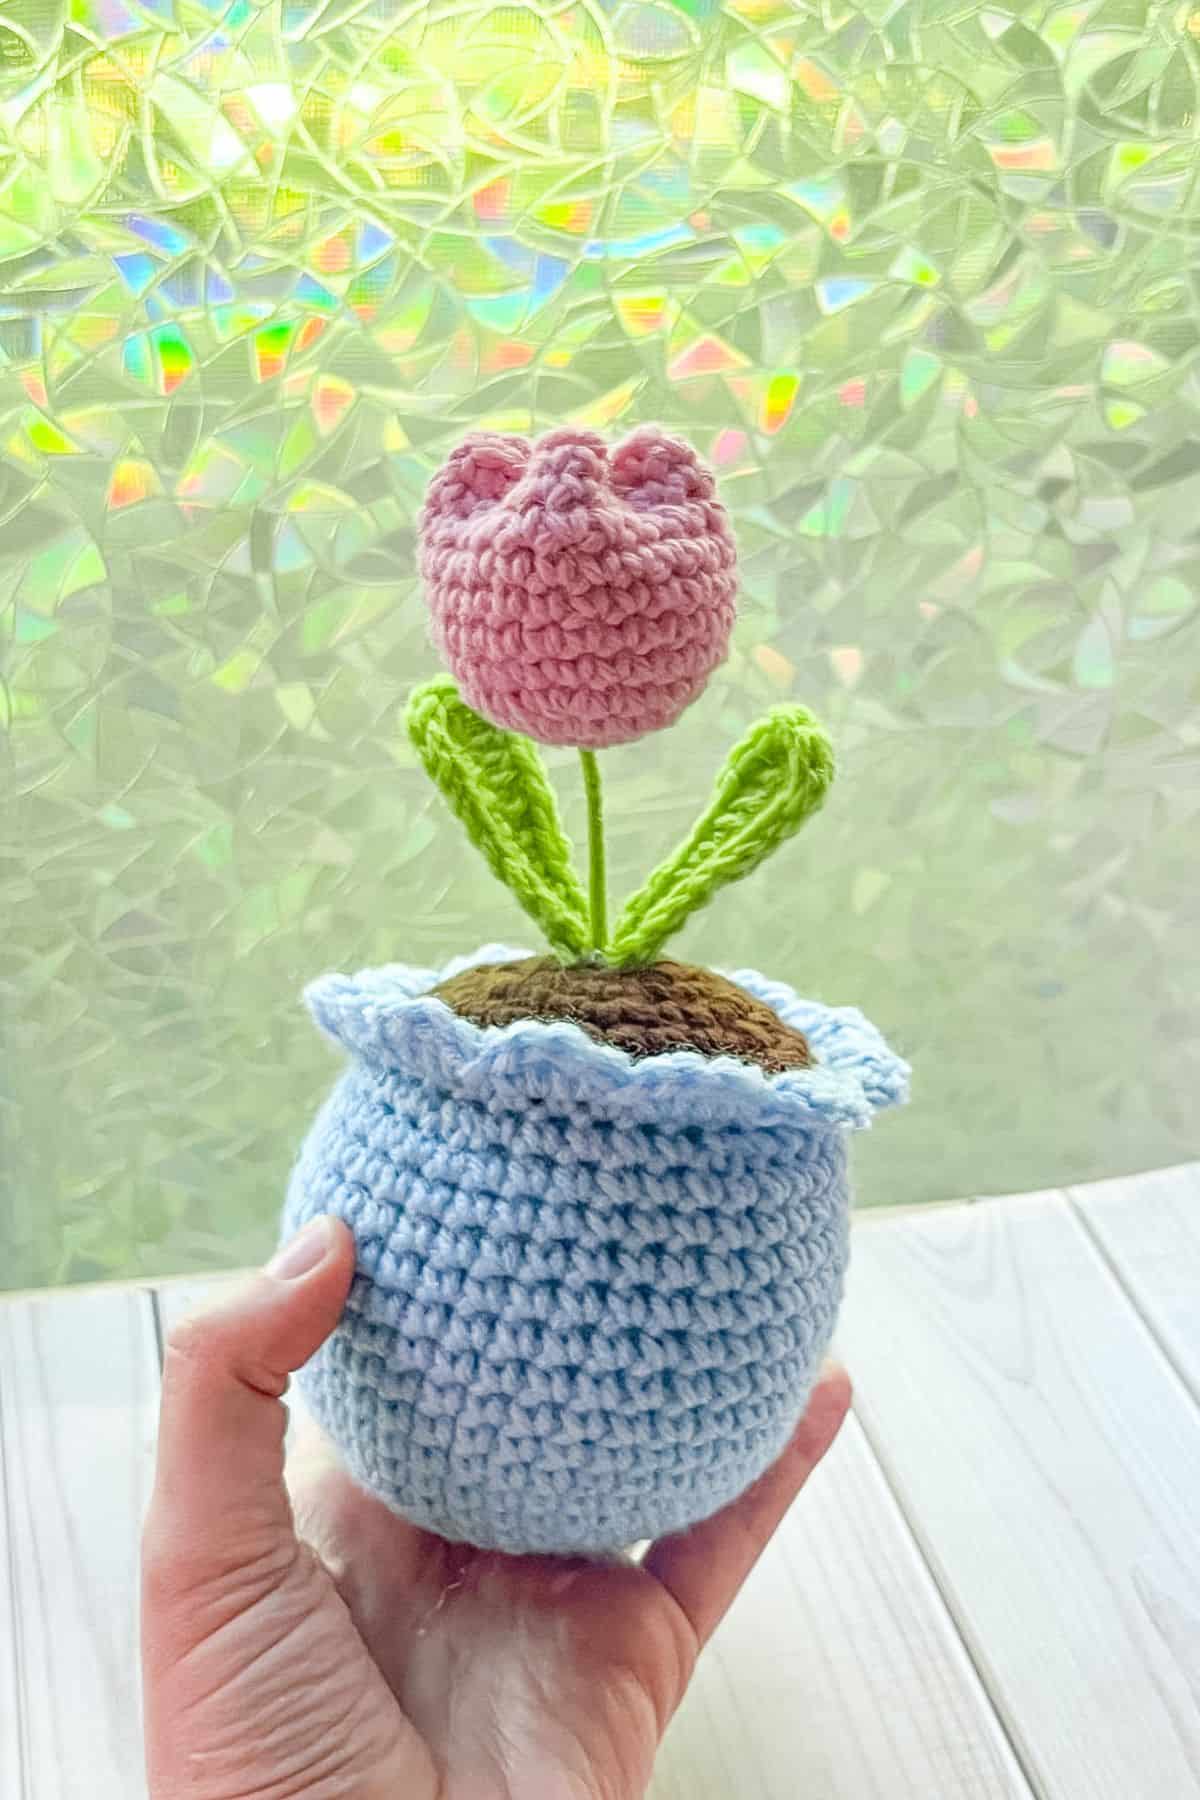
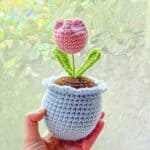
This Crochet Tulip Pot Pattern is a tribute to spring and new beginnings. Whether you’re brand new to crocheting flowers or already love creating handmade blooms, this pattern is designed to be simple, beginner-friendly, and fun to make.
This sweet little crochet potted plant also makes for the perfect handmade gift. Create a crochet tulip pot for Mother’s Day, surprise someone special on Valentine’s Day, or make one “just because” to brighten a friend’s day. You can even make a few and try selling them at markets!
With just a few basic stitches, you’ll have an adorable crochet potted flower that looks beautiful displayed on a desk, shelf, or bedside table.
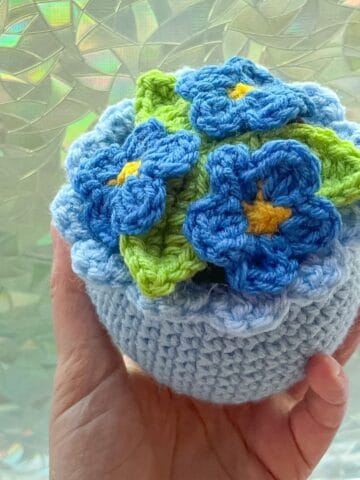
If you’ve been looking for other crochet flower ideas to pair with this lovely crochet tulip flower pot, be sure to check out my other flower patterns too, including the Crochet Forget Me Not Pot Pattern and Crochet Potted Rose Pattern for even more adorable potted flower creations!
Now let's get started making a crochet tulip pot pattern!
Jump to:
✏️ Things To Note:
- Yarn size: I used worsted weight for the crochet tulip pot pattern, but you can use any size yarn. It would be cute to use a chunky yarn and then add a face and some legs for a crochet jellycat inspired flower design.
- Finished size: The crochet tulip flower pattern is roughly 8 inches tall when completed.
- Increases: To create a slightly flatter bottom, I made the first 3 rounds of the pattern using an increase of 8 and then switched to an increase of 6 - so keep that in mind when making the crochet tulip pot pattern.
🪡 Materials Needed
- Red Heart Yarn - Light blue
- Red Heart Yarn - Spring green
- Red Heart Yarn - Coffee
- Red Heart Yarn - Perfect Pink (any color would work here)
- 4.5mm hook
- Polyfill
- Tapestry needle
- 26 gauge floral wire
- 16 gauge floral stem - 6 inches in length, you may need to cut longer ones to size
- Pliers
- Hot glue and glue gun
💭Abbreviations to Remember (US terms)
- Magic ring (mr)
- Single crochet (sc)
- Half double crochet (hdc)
- Double crochet (dc)
- Slip stitch (sl st)
- Increase (inc)
- Decrease (dec)
🧋Variations
Try making the crochet tulip pot in a variety of colors to create an eye-catching rainbow vase of flowers, or try adding some personality by adding a face and some legs.
🍵Instructions for Crochet Tulip Pot Pattern
Crochet Soil:

Round 1: With the brown yarn, make a mr and sc x6 into the circle. Pull tight.
Round 2: Inc in every stitch (12).
Round 3: Inc, sc. Then repeat for the rest of the round (18).
Round 4: Inc, sc x2. Then repeat for the rest of the round (24).
Round 5: Inc, sc x3. Then repeat for the rest of the round (30).
Round 6: Inc, sc x4. Then repeat for the rest of the round (36). Fasten off the yarn and weave in the end.
Crochet Flower Pot:

Round 1: With the light blue yarn, make a mr and sc x8 into the circle. Pull tight.
Round 2: Inc in every stitch (16).
Round 3: Inc, sc. Then repeat for the rest of the round (24).
Round 4: Inc, sc x3. Then repeat for the rest of the round (30).
Round 5: Inc, sc x4. Then repeat for the rest of the round (36).
Round 6: Inc, sc x5. Then repeat for the rest of the round (42).
Round 7-16: Sc in every stitch (42).
Round 17: Dec, sc x5. Then repeat for the rest of the round (36).
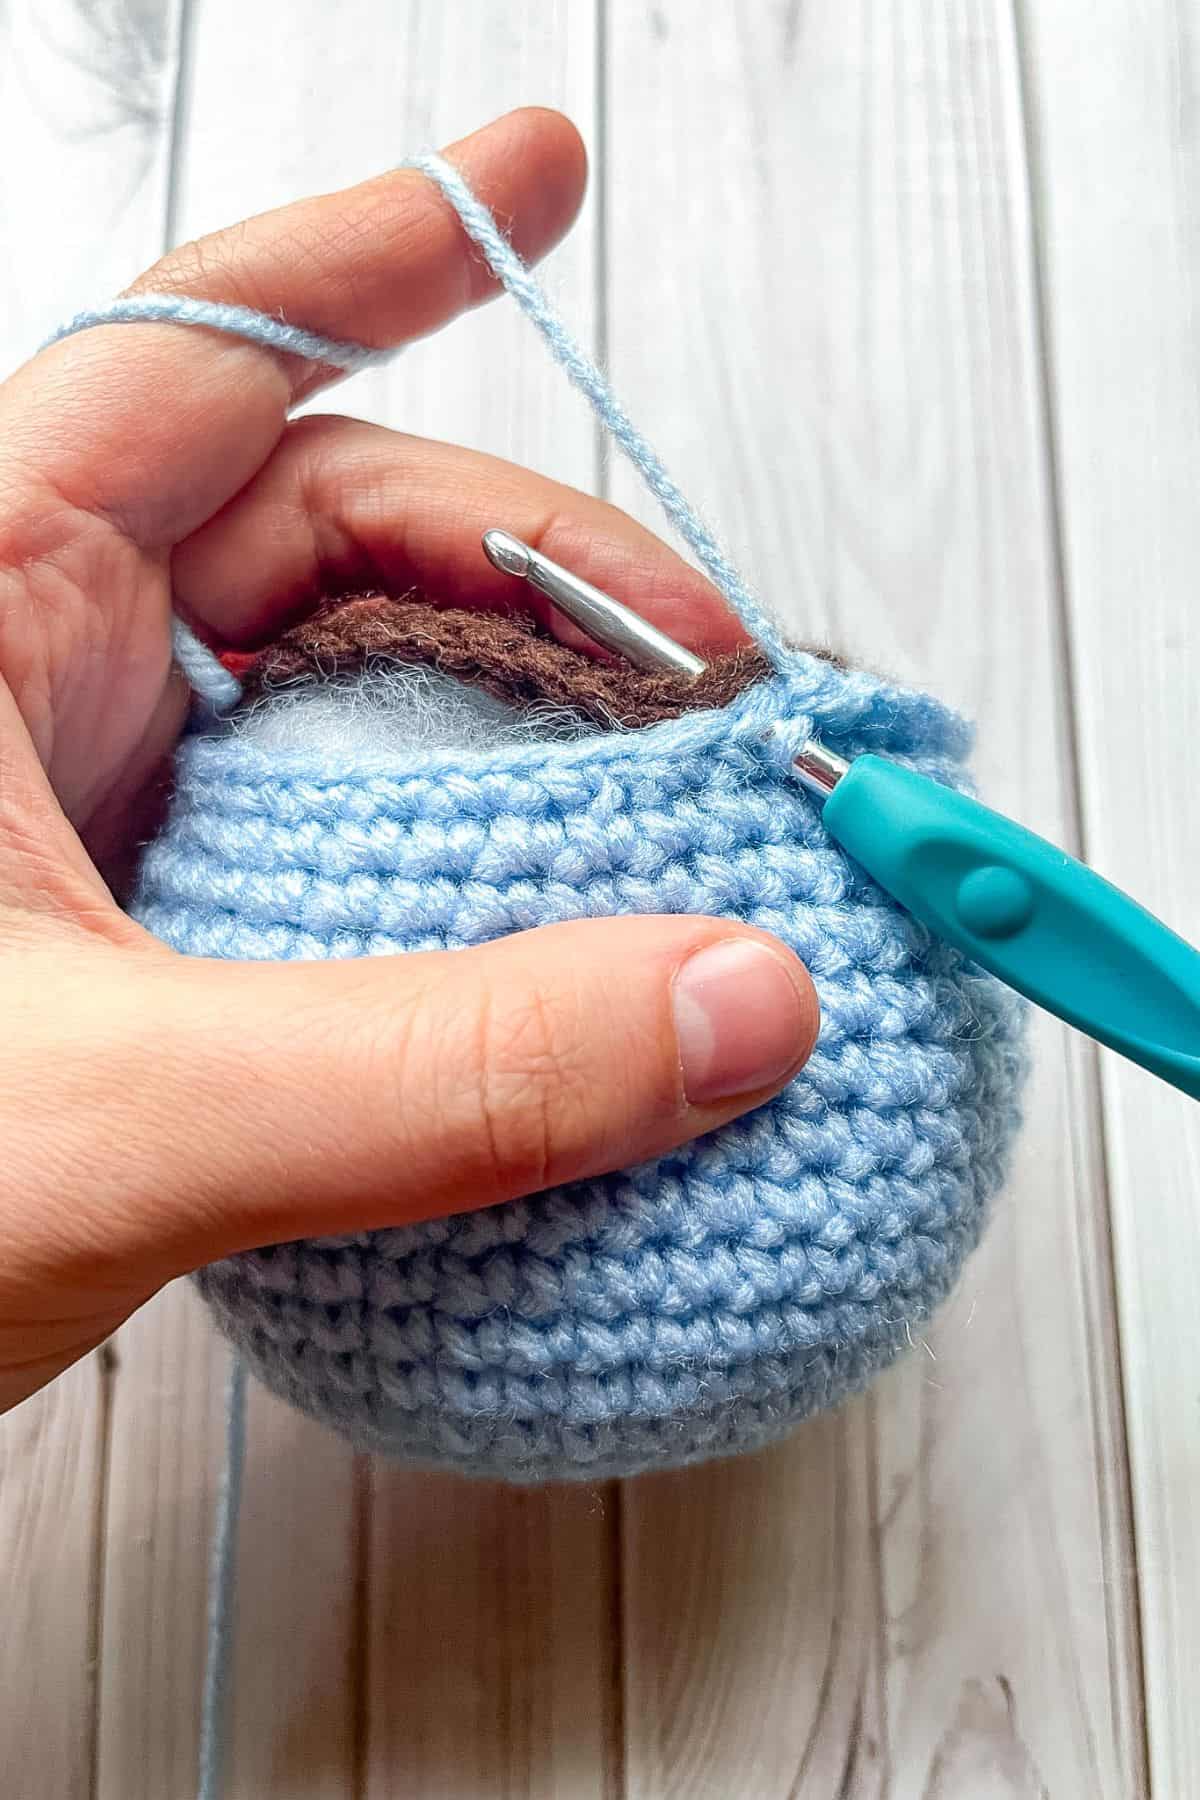
Round 18: This is where we will be crocheting the soil to the vase.
With the right side facing up on the soil, sc the vase and soil together by going through all 4 loops (the top 2 loops from each of the pieces) (36). Before crocheting the vase closed, make sure you stuff it with polyfill.
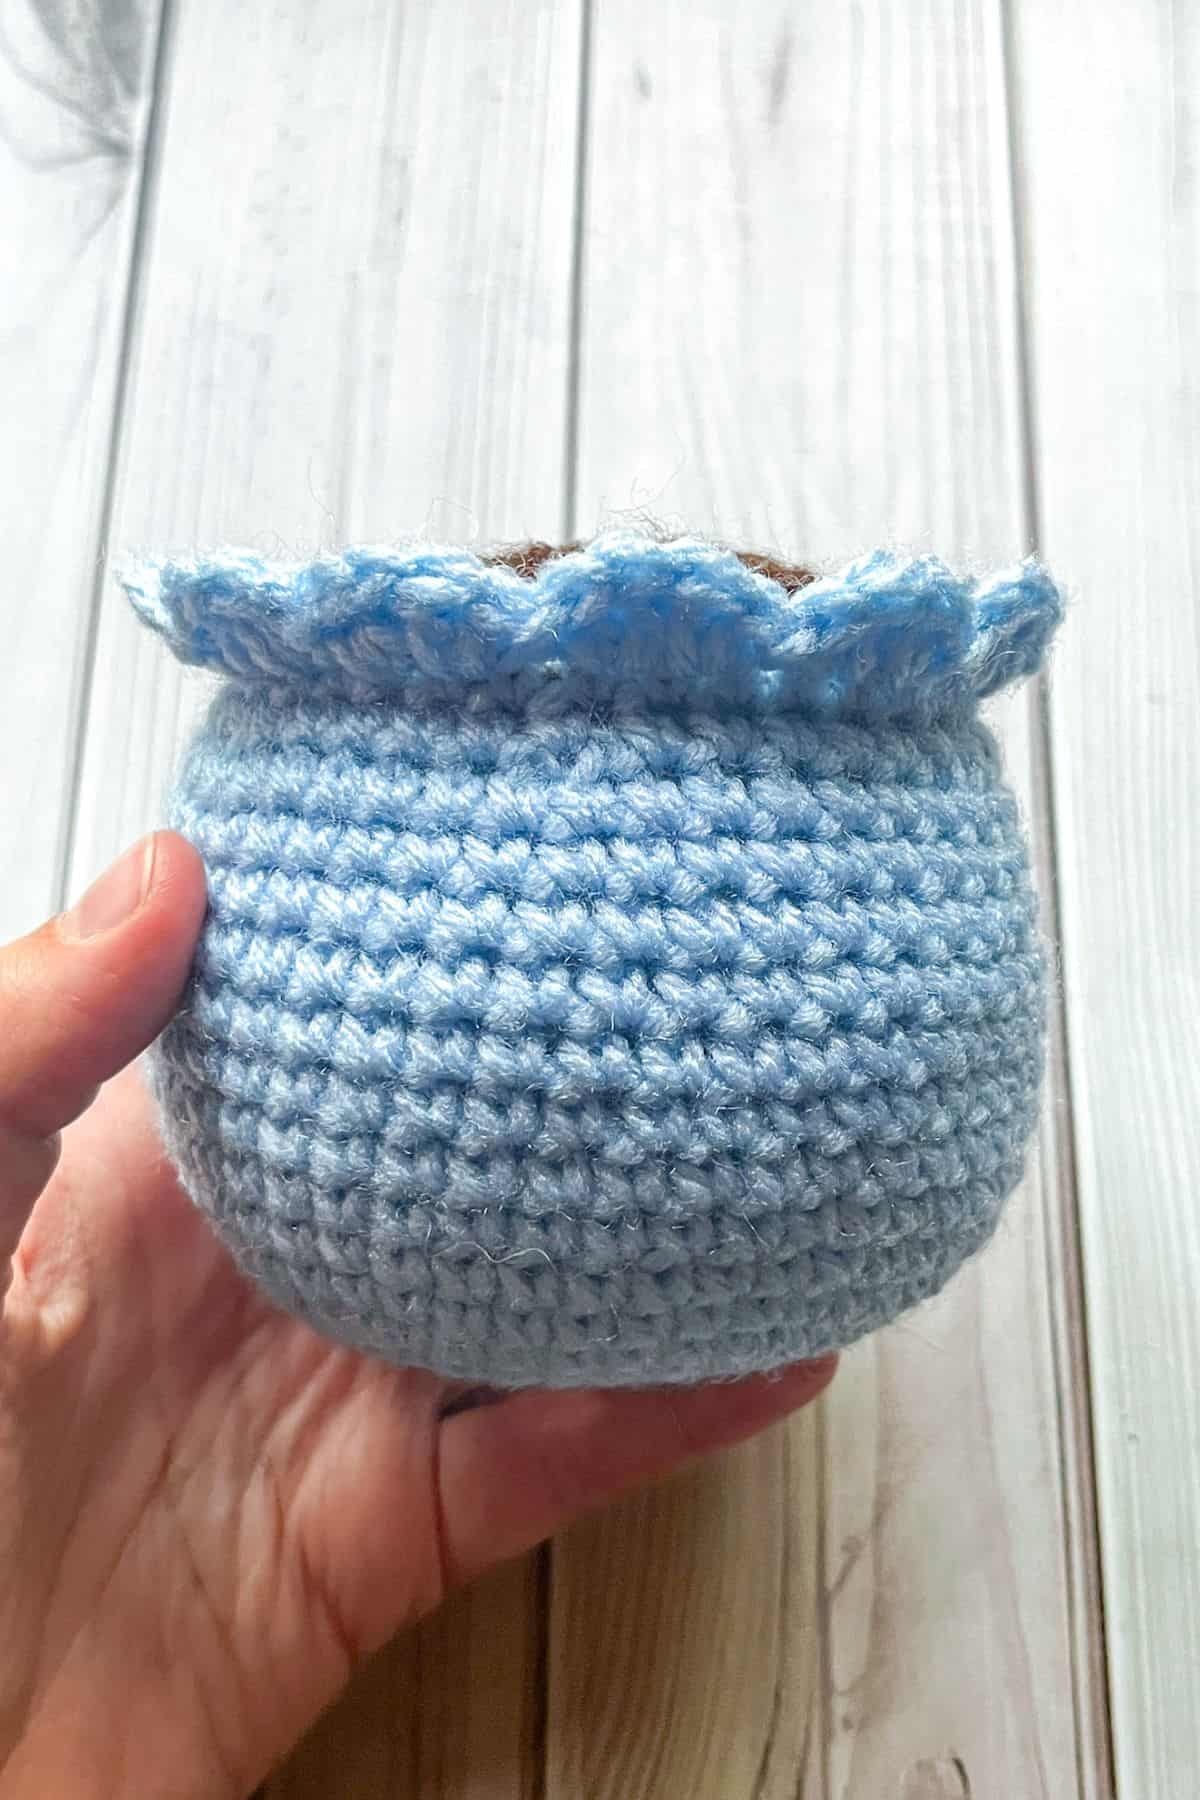
Round 19: This will create the frilly edge of the vase. Make a sl st, then *hdc + dc into the next stitch. Dc + hdc into the following stitch. Then sl st into the next. Repeat from * for the rest of the round. Make a sl st into the first sl st you made in the round.
Fasten off and then weave in the ends.
Crochet Tulip Leaves:
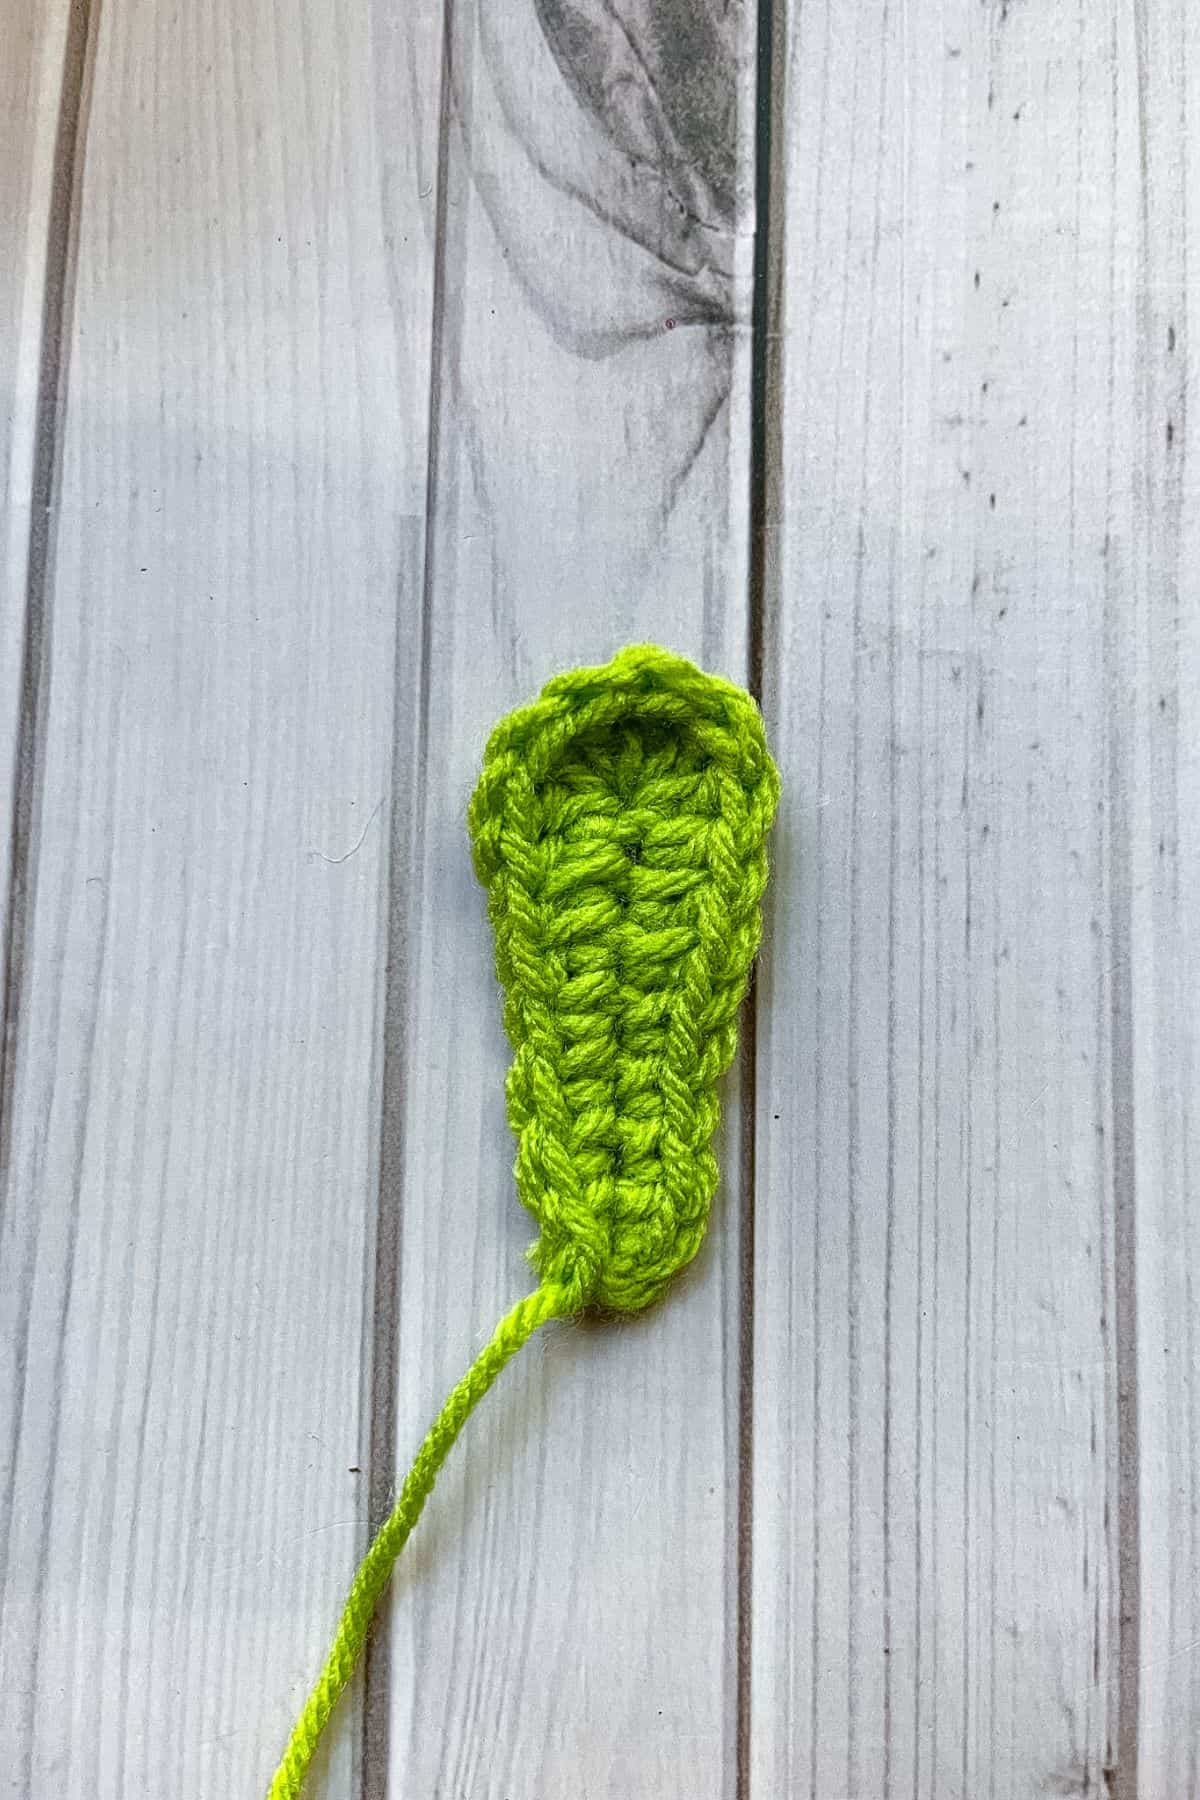
With the green yarn, ch x9. Before starting the next part,
With the 26 gauge wire underneath the stitches you create, follow this sequence of stitches, starting in the second ch from the hook: sc x4, hdc x3, and then in the last stitch dc x6 and turn to the unworked side of the chain. Hdc x3, sc x4. Then fasten off the yarn and the wire, leave an inch or so of wire, but a few inches of yarn.
Make 2 leaves.
How to Crochet a Tulip:
Round 1: With the pink yarn, make a mr and sc x6 into the circle. Pull tight.
Round 2: Inc in every stitch (12).
Round 3: Inc, sc. Then repeat for the rest of the round (18).
Round 4: Inc, sc x2. Then repeat for the rest of the round (24).
Round 5-11: Sc in every stitch (24). Fasten off the yarn but leave a tail for sewing.
Finishing the Tulip:
Before we can close the tulip, we need to attach the stem and leaves.
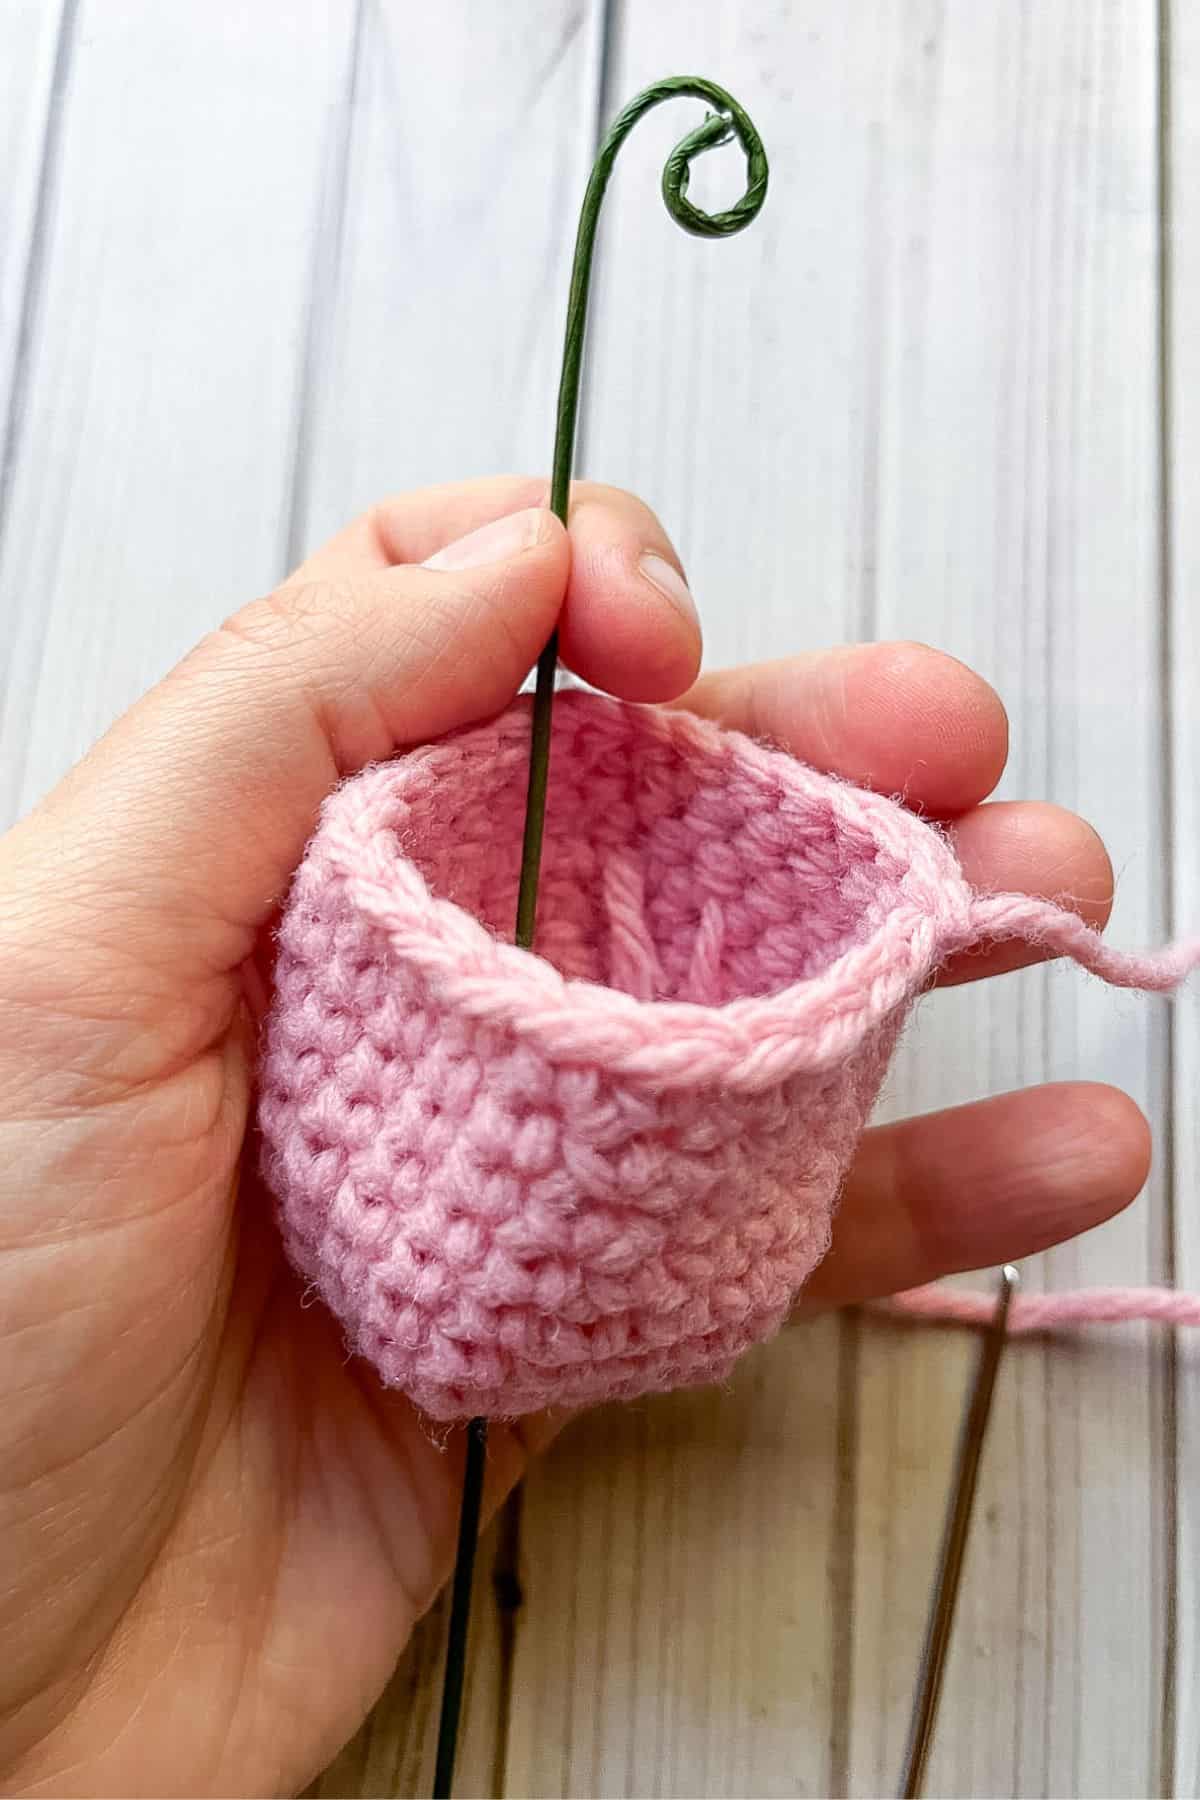
Step 1: Bend one end of the floral wire into a small curve, then insert it through the center of the tulip so the curved end stays hidden inside.
Secure the green yarn onto the closed circle of the floral wire.
Thread the green yarn onto your sewing needle and bring it through the bottom center of the tulip. Secure the yarn to the floral wire, and if needed, add a little glue to keep it from slipping.
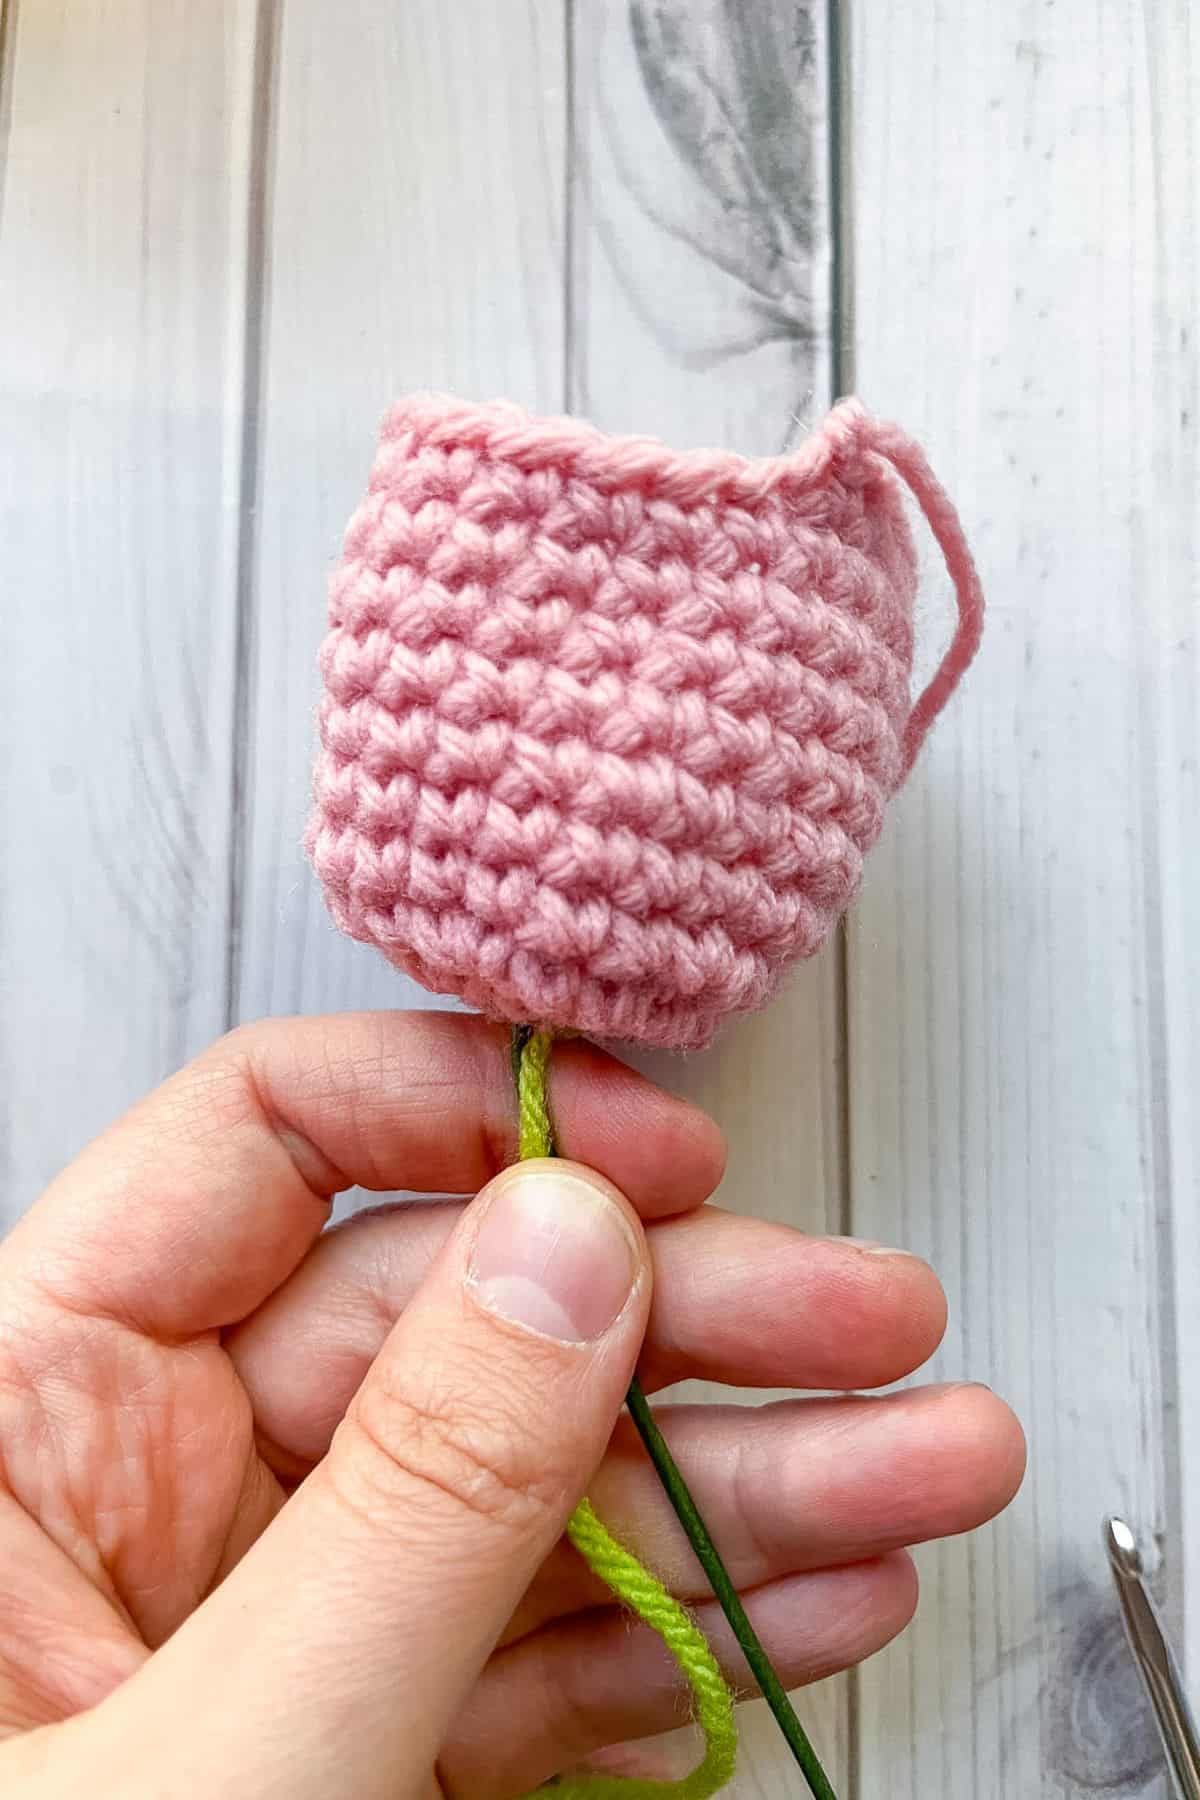
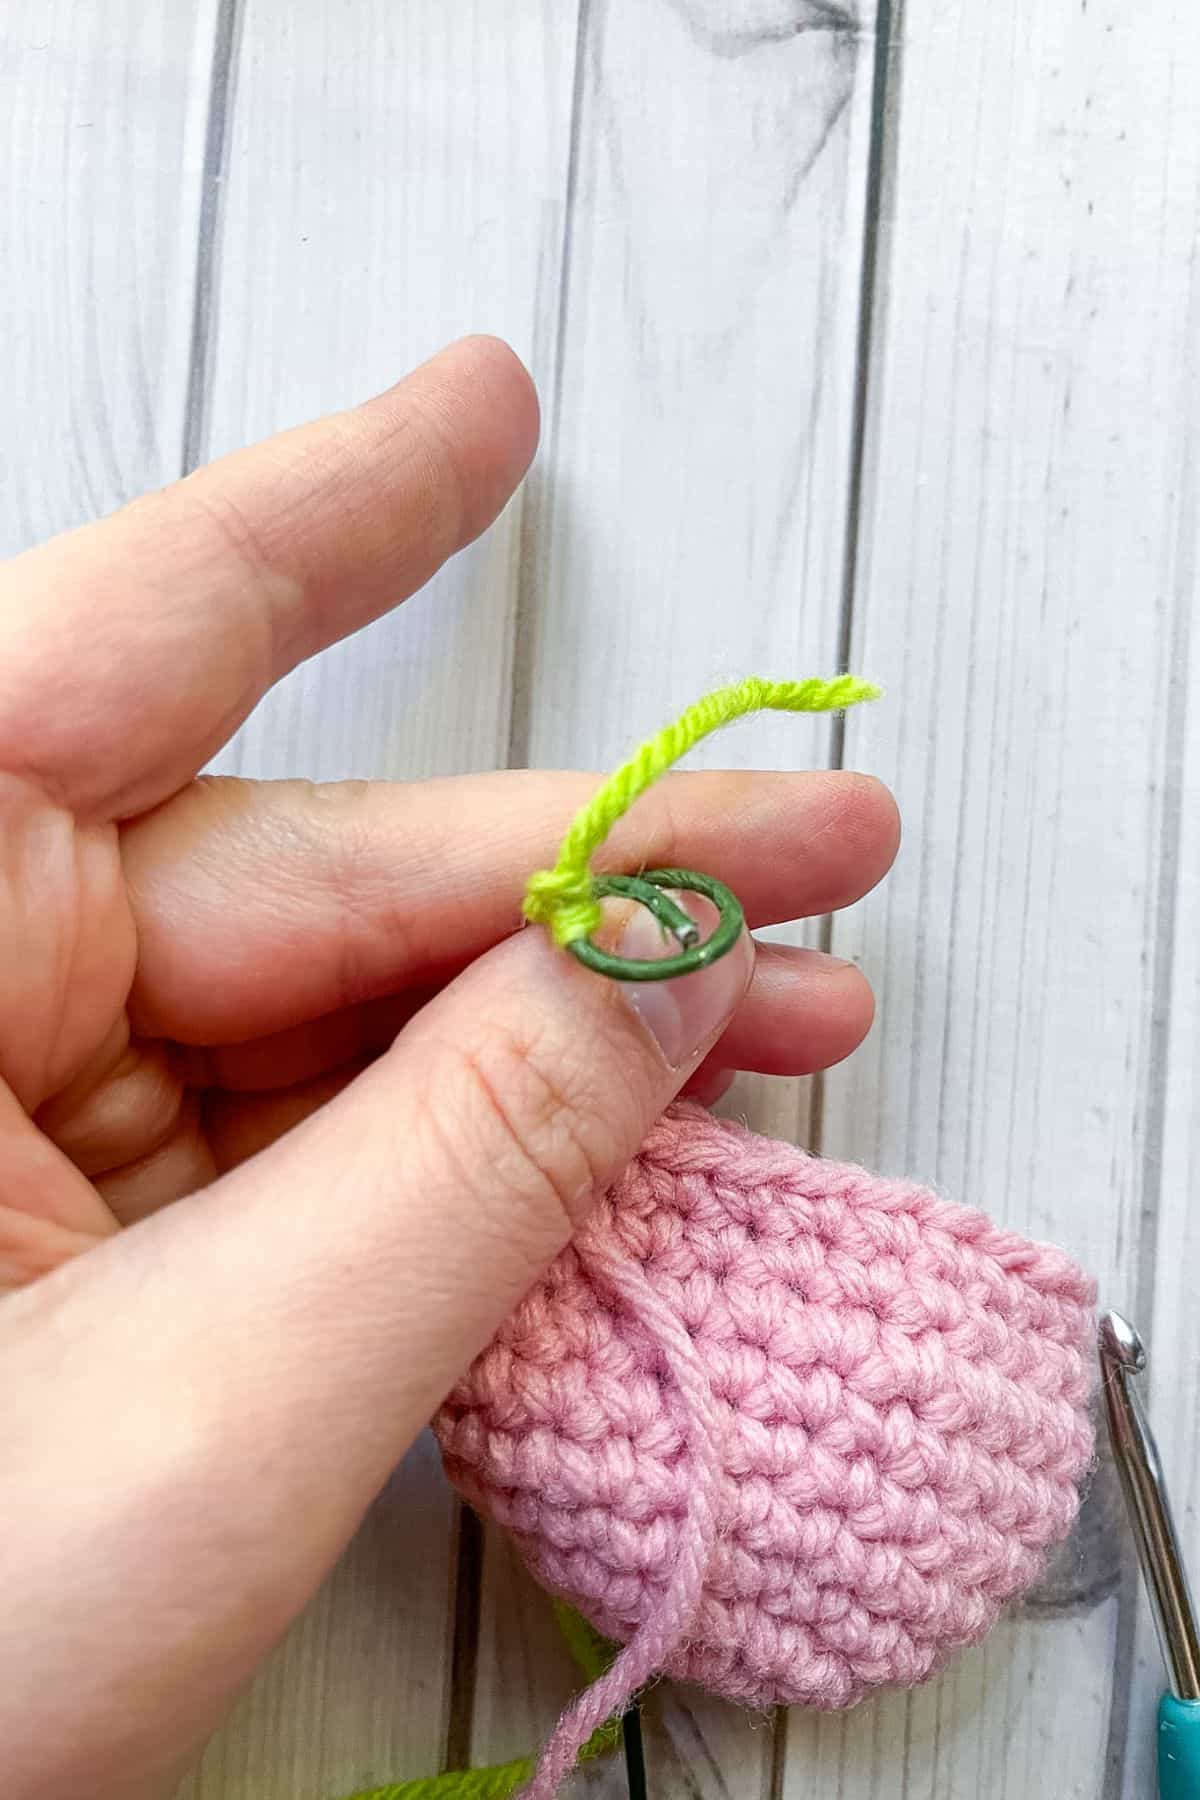
Step 2: Pull the yarn and wire down to the base inside the tulip. Begin wrapping the green yarn tightly around the floral wire. After wrapping about 2 inches, attach the leaves by twisting their wire around the stem. Continue wrapping the yarn over the leaf wire and down the rest of the stem until the floral wire is fully covered. Secure the yarn ends with hot glue.

Step 3: To finish the tulip, lightly fill it with polyfill stuffing. Using the pink yarn tail and your needle, pinch the top of the tulip into a plus-sign shape. Sew through the center point where all four sections meet, stitching in an “X” pattern to hold the shape in place.
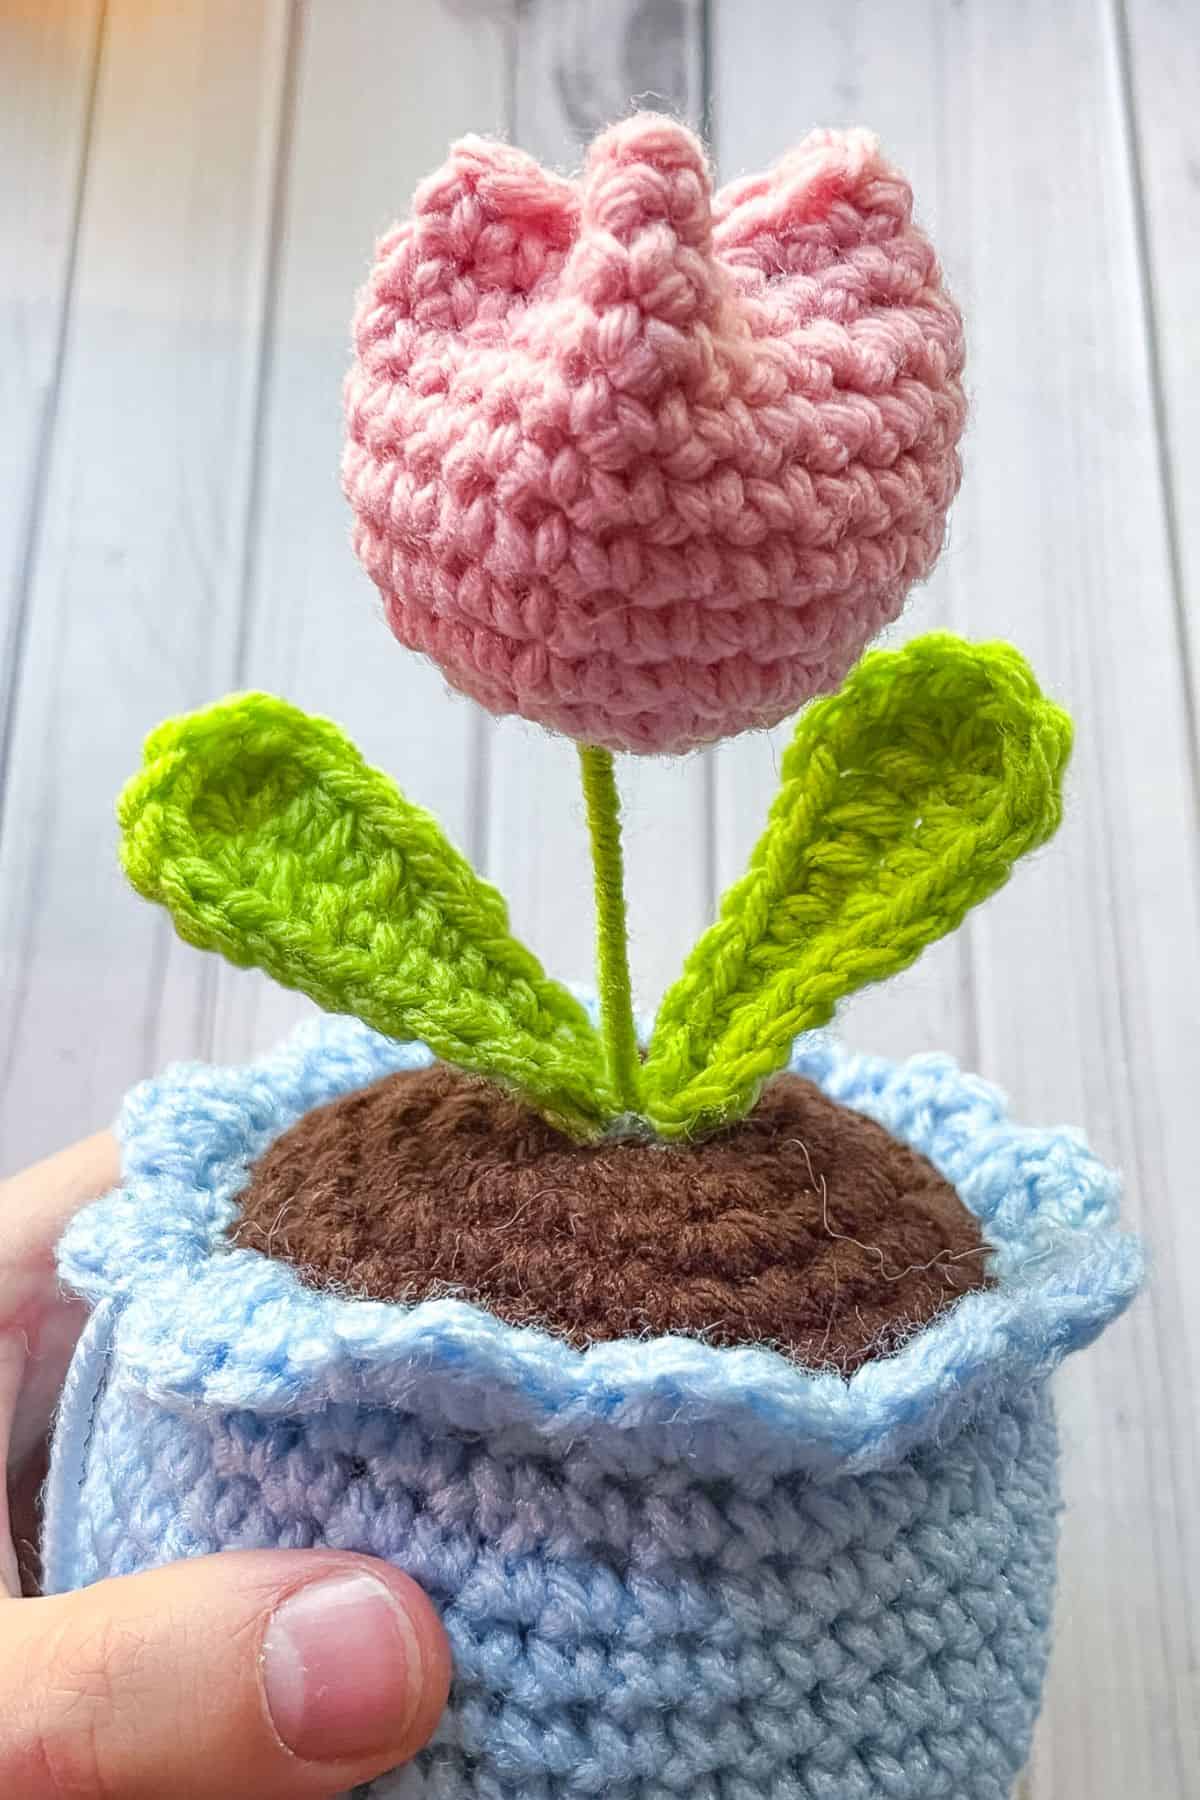
Step 4: Insert the tulip into the middle of the soil of the crochet pot. If you like you can add a small amount of hot glue to the end before pushing it through to secure the tulip to the vase.
And now you have a finished crochet tulip vase! I hope you enjoyed this free crochet tulip pot pattern and if you are looking for other flower patterns, check out my crochet tulip keychain pattern and my crochet rose keychain pattern.
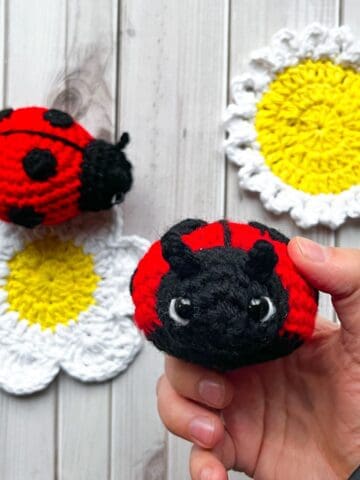
If you are looking for other springtime patterns check out my daisy crochet bag pattern, crochet ladybug pattern, or my crochet headphone sprout pattern.
🐌Expert Tips
- If your crochet stitches are loose and you see stuffing in the crochet ulip pot pattern, try going down a hook size next time, this will keep your stitches tight and the crochet plant amigurumi looking professional.
- Alternatively, to the point made above, instead of doing normal crochet stitches, you can crochet using the yarn under method. This naturally creates tighter stitches without having to change hook sizes if that isn't an option for you.
- Although sewing is always best, some patterns require using glue, anything that uses floral stems will largely need glue to hold the yarn in place so just keep that in mind when making the crochet tulip pot pattern and other patterns.
🧵Pattern FAQs
Before closing the vase with the soil, add a piece of cardboard to the inside at the bottom, then add something heavy like pebbles and marbles. Then stuff the rest with polyfill. This will add weight and stability to your crochet potted flower pattern.
The crochet tulip pot pattern is very forgiving and can be used with any type of yarn. Dk, chunky, cotton, acrylic etc.
No you don’t have to, but they do make the leaves more poseable and less floppy since they are so big.
🧶More Crochet Flower Patterns


If you tried this Crochet Tulip Pot Pattern (or any other pattern on my website), please let me know how it went in the 📝 comments below. I'd love to hear from you!
Crochet Tulip Pot Pattern
Materials
- Red Heart Yarn - Light blue
- Red Heart Yarn - Spring green
- Red Heart Yarn - Coffee
- Red Heart Yarn - Perfect Pink any color would work here
- 4.5 mm hook
- Polyfill
- Tapestry needle
- 26 gauge floral wire
- 16 gauge floral stem - 6 inches in length you may need to cut longer ones to size
- Pliers
- Hot glue and glue gun
Abbreviations (US terms)
- Magic ring - mr
- Single crochet - sc
- Half double crochet - hdc
- Double crochet - dc
- Slip stitch - sl st
- Increase - inc
- Decrease - dec
Notes
- Yarn size: I used worsted weight for the crochet potted tulip pattern, but you can use any size yarn. It would be cute to use a chunky yarn and then add a face and some legs for a crochet jellycat inspired flower design.
- Finished size: The crochet tulip flower pattern is roughly 8 inches tall when completed.
- Increases: To create a slightly flatter bottom, I made the first 3 rounds of the pattern using an increase of 8 and then switched to an increase of 6 - so keep that in mind when crocheting the pattern.
Instructions
Crochet Soil:
- Round 1: With the brown yarn, make a mr and sc x6 into the circle. Pull tight.
- Round 2: Inc in every stitch (12).
- Round 3: Inc, sc. Then repeat for the rest of the round (18).
- Round 4: Inc, sc x2. Then repeat for the rest of the round (24).
- Round 5: Inc, sc x3. Then repeat for the rest of the round (30).
- Round 6: Inc, sc x4. Then repeat for the rest of the round (36). Fasten off the yarn and weave in the end.
Crochet Flower Pot:
- Round 1: With the light blue yarn, make a mr and sc x8 into the circle. Pull tight.
- Round 2: Inc in every stitch (16).
- Round 3: Inc, sc. Then repeat for the rest of the round (24).
- Round 4: Inc, sc x3. Then repeat for the rest of the round (30).
- Round 5: Inc, sc x4. Then repeat for the rest of the round (36).
- Round 6: Inc, sc x5. Then repeat for the rest of the round (42).
- Round 7-16: Sc in every stitch (42).
- Round 17: Dec, sc x5. Then repeat for the rest of the round (36).
- Round 18: This is where we will be crocheting the soil to the vase.
- With the right side facing up on the soil, sc the vase and soil together by going through all 4 loops (the top 2 loops from each of the pieces) (36). Before crocheting the vase closed, make sure you stuff it with polyfill.
- Round 19: This will create the frilly edge of the vase. Make a sl st, then *hdc + dc into the next stitch. Dc + hdc into the following stitch. Then sl st into the next. Repeat from * for the rest of the round. Make a sl st into the first sl st you made in the round.
Crochet Tulip Leaves:
- With the green yarn, ch x9. Before starting the next part,
- With the 26 gauge wire underneath the stitches you create, follow this sequence of stitches, starting in the second ch from the hook: sc x4, hdc x3, and then in the last stitch dc x6 and turn to the unworked side of the chain. Hdc x3, sc x4. Then fasten off the yarn and the wire, leave an inch or so of wire, but a few inches of yarn.
- Make 2 leaves.
How to Crochet a Tulip:
- Round 1: With the pink yarn, make a mr and sc x6 into the circle. Pull tight.
- Round 2: Inc in every stitch (12).
- Round 3: Inc, sc. Then repeat for the rest of the round (18).
- Round 4: Inc, sc x2. Then repeat for the rest of the round (24).
- Round 5-11: Sc in every stitch (24). Fasten off the yarn but leave a tail for sewing.
Finishing the Tulip:
- Before we can close the tulip, we need to attach the stem and leaves.
- Step 1: Bend one end of the floral wire into a small curve, then insert it through the center of the tulip so the curved end stays hidden inside. Thread the green yarn onto your sewing needle and bring it up through the bottom center of the tulip. Secure the yarn to the floral wire, and if needed, add a little glue to keep it from slipping.
- Step 2: Pull the yarn and wire down to the base inside the tulip. Begin wrapping the green yarn tightly around the floral wire. After wrapping about 2 inches, attach the leaves by twisting their wire around the stem. Continue wrapping the yarn over the leaf wire and down the rest of the stem until the floral wire is fully covered. Secure the yarn ends with hot glue.
- Step 3: To finish the tulip, lightly fill it with polyfill stuffing. Using the pink yarn tail and your needle, pinch the top of the tulip into a plus-sign shape. Sew through the center point where all four sections meet, stitching in an “X” pattern to hold the shape in place.
- Step 4: Insert the tulip into the middle of the soil of the crochet pot. If you like you can add a small amount of hot glue to the end before pushing it through to secure the tulip to the vase.
- And now you have a finished crochet tulip vase! I hope you enjoyed this free crochet tulip pot pattern


Leave a Reply