
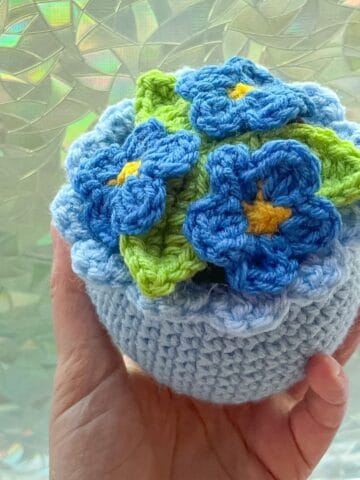
This Crochet Lily Pad Coaster Pattern brings a touch of freshness to your home! You can keep it simple or add a small flower for extra flair.

This lily pad crochet pattern is perfect for beginners familiar with basic stitches. It’s great for last-minute gifts like Christmas, housewarmings, and baby showers, or just for adding a cute touch to your breakfast table. People will love your handmade coasters, and you can even sell the finished products at markets or online.
This pattern uses cotton yarn, which is ideal because it’s breathable and absorbent. I love working with cotton yarn and have designed several patterns using it, like my Crochet Duck Hat Pattern and Crochet Spa Set.
Cotton works well for projects like summer hats, wash rags, and coasters, unlike acrylic, which isn’t absorbent.
For other crochet plant patterns, try my Crochet Headphone Sprout Pattern, or Crochet Cactus Pillow Pattern with Flower.
Jump to:
✏️ Things To Note:
- Use cotton yarn: If you use acrylic yarn, you can still create a cute lily pad applique, which is great for blankets and decorative elements that don’t need absorbency.
- Beginner-friendly: The crochet lily pad coaster pattern is ideal for learning how to crochet coasters because it’s worked in the round with just a few rows.
- Customizable Size: The finished lily pad coaster is roughly 4.5 inches wide, but you can change the hook size to make it bigger or smaller.
💭Abbreviations to Remember (US terms)
- Magic ring - mr
- Chain - ch
- Double crochet - dc
- Slip stitch - sl st
- Increase - inc
* The ch x2 at the beginning of each round does not count as a stitch. Skip over it and sl st to the first dc you made.
* If you see a stitch abbreviation with "x" after it, it means how many times you do that stitch in the following amount of stitches. For example: sc x6 would mean you make a single crochet in the next 6 stitches. Inc x2 means you make an inc in the next 2 stitches.
🍵Instructions for Crochet Lily Pad Coaster Pattern
The crochet lily pad pattern is made in rows. Not full rounds except the first round.

Round 1: Using the green yarn, make a magic ring and immediately chain 2 (does not count as a stitch). Then dc x10 into the magic ring. To secure the round, sl st to the 1st dc in the round (10).

Row 2: Ch x2, then dc inc in every stitch from the previous round (20). DO NOT SL ST TO THE FIRST STITCH IN THE ROUND. Instead, ch x2 and FLIP your work. You are going to be making rows now.

Row 3: In the last stitch worked (not the chains) dc, dc inc and repeat for the rest of the round. Then ch x2 and flip your work (30).

Row 4: Dc x2, then dc inc and repeat for the rest of the round (40). When you get to the end of the round, fasten off the yarn and weave in any ends.
Optional Crochet Lily Flower:

Ch x13,

in 2nd ch from the hook make a sl st, then sl st again in the next chain. (ch x3 and sl st into the next ch from the original 13 chains you created) x5. Then (ch x4 and sl st into the next ch from the original 13 chains you created) x5. Then fasten off the yarn but leave a tail for sewing.

Roll the flower up so the smaller petals are on the inside and the larger ones are on the outside. Using the flower tail secure the flower petals in place by going through the center a few times.

Then take a small length of the yellow yarn (like 12 inches) and go through the center of the flower and secure it to the lily pad base. This creates the yellow center of the crochet water lily flower, which is sewn to the crochet lily pad.
Once the flower is attached (on the edge so cups can sit flat) to the crochet coaster, you are all done! Weave in any loose ends!
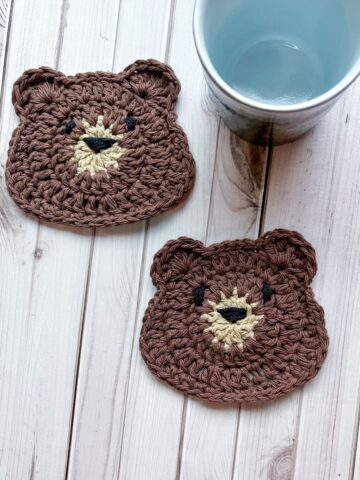
If you’re looking for more coaster designs, check out my Crochet Frog Coaster Pattern or crochet axolotl coaster pattern. Which would be a perfect accompaniment to the lily pad crochet coasters.

🐌Expert Tips
- Maintain Consistent Tension: If your coasters are curling, it might be due to inconsistent tension. Keep your stitches even for smooth results.
- Secure Embroidery Yarn: If adding a flower, avoid messy backs by weaving yarn under stitches instead of cutting and restarting. This keeps the coaster’s back neat.
- Play with Colors: Experiment with different shades of green for the lily pad or brighter colors for the flower to give a pop of contrast.
🧵Pattern FAQs
Cotton yarn is the best choice for crochet coasters because it’s absorbent, durable, and heat-resistant. I use it for all my coasters, even my crochet granny square coaster pattern.
Curling usually happens due to variations in tension. Make sure to keep your stitches uniform.
Yes! Handmade crochet coasters are as functional as those made from cork, felt, or other materials, and they offer unique design possibilities.

🧶More Coaster Crochet Patterns


If you tried this Crochet Lily Pad Coaster Pattern (or any other pattern on my website), please let me know how it went in the 📝 comments below. I'd love to hear from you!

Crochet Lily Pad Coaster Pattern
Materials
Abbreviations (US terms)
- Magic ring - mr
- Chain - ch
- Double crochet - dc
- Slip stitch - sl st
- Increase - inc
Notes
- Use cotton yarn for the crochet lily pad pattern; acrylic can be used for a cute lily pad applique for non-absorbent items.
- This pattern is great for beginners, as it’s worked in the round and consists of only 4 rounds.
- The finished lily pad coaster is about 4.5 inches wide; adjust the hook size for different dimensions.
Instructions
- This crochet lily pad coaster pattern is made in rows. Not full rounds except the first round.
- Round 1: Using the green yarn, make a magic ring and immediately chain 2 (does not count as a stitch). Then dc x10 into the magic ring. To secure the round, sl st to the 1st dc in the round (10).
- Round 2: Ch x2, then dc inc in every stitch from the previous round (20). DO NOT SL ST TO THE FIRST STITCH IN THE ROUND. Instead, ch x2 and FLIP your work. You are going to be making rows now.
- Round 3: In the last stitch worked (not the chains) dc, dc inc and repeat for the rest of the round. Then ch x2 and flip your work (30).
- Round 4: Dc x2, then dc inc and repeat for the rest of the round (40). When you get to the end of the round, fasten off the yarn and weave in any ends.
Optional Lily Flower:
- Ch x13, in 2nd ch from the hook make a sl st, then sl st again in the next chain. (ch x3 and sl st into the next ch from the original 13 chains you created) x5. Then (ch x4 and sl st into the next ch from the original 13 chains you created) x5. Then fasten off the yarn but leave a tail for sewing.
- Roll the flower up so the smaller petals are on the inside and the larger ones are on the outside. Using the flower tail secure the flower petals in place by going through the center a few times. Then take a small length of the yellow yarn (like 12 inches) and go through the center of the flower and secure it to the lily pad base. This creates the yellow center of the crochet water lily flower and sews it to the crochet lily pad.
- Once the flower is attached (on the edge so cups can sit flat) on the crochet coaster, you are all done! Weave in any loose ends!


Leave a Reply