
Welcome to my crochet stingray pattern tutorial! This design is a perfect blend of creativity and functionality – a crochet stingray bag pattern that doubles as a crochet stingray plushie pattern.
Inspired by a request from one of my followers, I was excited to take on the challenge of creating a crochet stingray pattern that was a bag. The best part? You can make it look like an adorable pancake stingray crochet pattern, or go for a more traditional coloring resembling a crochet manta ray pattern!
I've always dreamed of making a sea pancake crochet design, and this pattern brings that vision to life. Whether you’re making a cute phone bag or a plushie, the crochet stingray pattern design is super versatile and fun to crochet. You can adapt it to your preference, and it’s sure to be a unique and charming addition to your collection.
As I continue to develop more crochet designs this year, I hope to create more patterns based on your requests! Don’t forget to follow me on Instagram, TikTok, and YouTube to stay up to date with all the latest tutorials and crochet creations (as well as make your own pattern requests).
If you love this crochet stingray pattern, be sure to check out my other adorable crochet sea life bags, like my crochet orca bag pattern and crochet whale shark pattern. They’re perfect companions to this cute and functional crochet stingray bag!
Happy crocheting, and I can’t wait to see your finished creations!
Jump to:
✏️ Things To Note:
- Two-in-One: The crochet stingray pattern is great for creating both a crochet stingray bag pattern and a crochet stingray plushie pattern. Whether you need a cute, functional phone bag or a soft, huggable plushie, this design covers both!
- Skill Level: The crochet stingray pattern is suitable for intermediate crocheters, as it involves basic crochet stitches and some shaping techniques. Detailed instructions are provided to guide you through every step.
- Yarn: I used worsted weight for the crochet stingray pattern, but you can use any yarn weight depending if you want a smaller or larger bag.
🪡 Materials Needed
- Red Heart - Aran
- Red Heart - yellow
- Red Heart - brown
- Bernat - topaz
- 14mm safety eyes
- 5mm hook
- Tapestry needle
💭Abbreviations to Remember (US terms)
- Chains (ch)
- Single crochet (sc)
- Half double crochet (hdc)
- Double crochet (dc)
- Slip stitch (sl st)
- Increase (inc)
- Decrease (dec)
* The ch x1 at the end of each row does not count as a stitch in the row, it is a turning chain.
* If you see a stitch abbreviation with "x" after it, it means how many times you do that stitch in the following amount of stitches. For example: sc x6 would mean you make a single crochet in the next 6 stitches. Inc x2 means you make an inc in the next 2 stitches.
🧋Variations
- Colorful Stingray: Experiment with bright, vibrant colors to make your crochet stingray pattern pop. You can use rainbow colors for the body and tail, or create a multi-colored stingray with stripes or spots.
- Textured Finishes: Add texture to your crochet stingray by using different types of yarns, such as fluffy or variegated yarn. You could even use yarn with metallic or glitter accents to give it a sparkly, oceanic feel!
🍵Instructions for Crochet Stingray Pattern
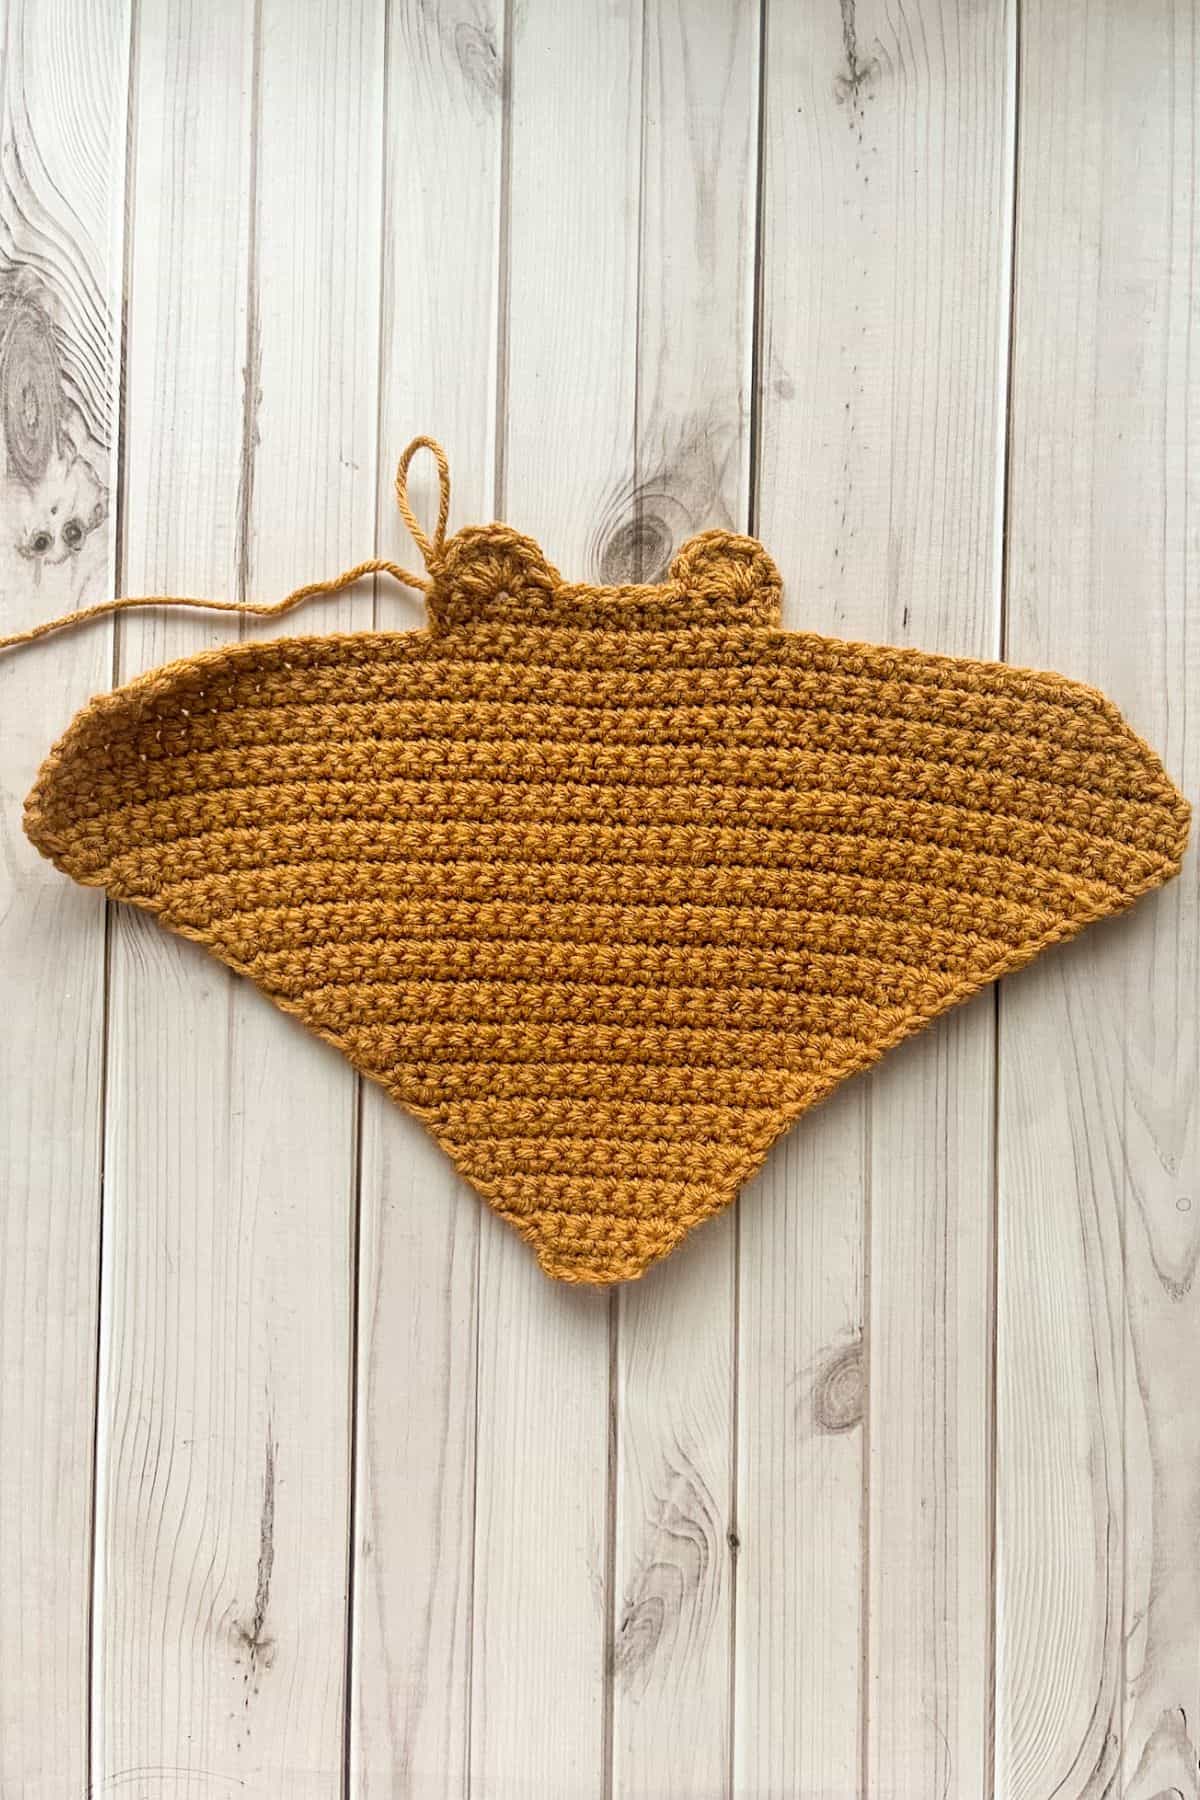
For this Crochet Stingray Pattern, we will be working in the rows. Make 1 in topaz and 1 in aran.
Row 1: Ch x5 and turn
Row 2: In the second chain from the hook make a sc, then sc for the rest of the row (4). Then ch x1 and turn.
Row 3: Sc inc, sc x 2, sc inc (6). Then ch x1 and turn.
Row 4: Sc inc, sc x 4, sc inc (8). Then ch x1 and turn.
Row 5: Sc inc, sc x 6, sc inc (10). Then ch x1 and turn.
Row 6: Sc inc, sc x 8, sc inc (12). Then ch x1 and turn.
Row 7: Sc in every stitch (12). Then ch x1 and turn.
Row 8: Sc inc, sc x 10, sc inc (14). Then ch x1 and turn.
Row 9: Sc in every stitch (14). Then ch x1 and turn.
Row 10: Sc inc, sc x 12, sc inc (16). Then ch x1 and turn.
Row 11: Sc inc, sc x 14, sc inc (18). Then ch x1 and turn.
Row 12: Sc inc, sc x 16, sc inc (20). Then ch x1 and turn.
Row 13: Sc inc, sc x 18, sc inc (22). Then ch x1 and turn.
Row 14: Sc inc, sc x 20, sc inc (24). Then ch x1 and turn.
Row 15: Sc inc, sc x 22, sc inc (26). Then ch x1 and turn.
Row 16: Sc inc, sc x 24, sc inc (28). Then ch x1 and turn.
Row 17: Sc inc, sc x 26, sc inc (30). Then ch x1 and turn.
Row 18: Sc inc, sc x 28, sc inc (32). Then ch x1 and turn.
Row 19: Sc inc, sc x 30, sc inc (34). Then ch x1 and turn.
Row 20: Sc inc, sc x 32, sc inc (36). Then ch x1 and turn.
Row 21: Sc inc, sc x 34, sc inc (38). Then ch x1 and turn.
Row 22: Sc inc, sc x 36, sc inc (40). Then ch x1 and turn.
Row 23: Sc inc, sc x 38, sc inc (42). Then ch x1 and turn.
Row 24: Sc inc, sc x 40, sc inc (44). Then ch x1 and turn.
Row 25: Sc inc, sc x 42, sc inc (46). Then ch x1 and turn.
Row 26: Sc inc, sc x 44, sc inc (48). Then ch x1 and turn.
Row 27: Sc in every stitch (48). Then ch x1 and turn.
Row 28: Sc dec, sc x 44, sc dec (46). Then ch x1 and turn.
Row 29: Sc dec, sc x 42, sc dec (44). Then ch x1 and turn.
Row 30: Sc dec, sc x 40, sc dec (42). Then ch x1 and turn.
Row 31: Sc dec, sc x 38, sc dec (40). Then ch x1 and turn.
Row 32: Sc dec, sc x 36, sc dec (38). Then ch x1 and turn.
Row 33: Sc dec, sc x 34, sc dec (36). Then fasten off and weave in the ends.
Row 34: Skip 11 stitches from the end and reattach the yarn. Sc x14 and then ch x1 and turn.
Row 35: Sc in every stitch from the last short row (14). Then turn, do not make a chain.
Row 36: Skip a stitch and dc x5 in 1 stitch. Then skip a stitch and make a sl st. St st 6 more times. Then skip a stitch and dc x5 in 1 stitch. Skip a stitch and sl st to the next stitch.
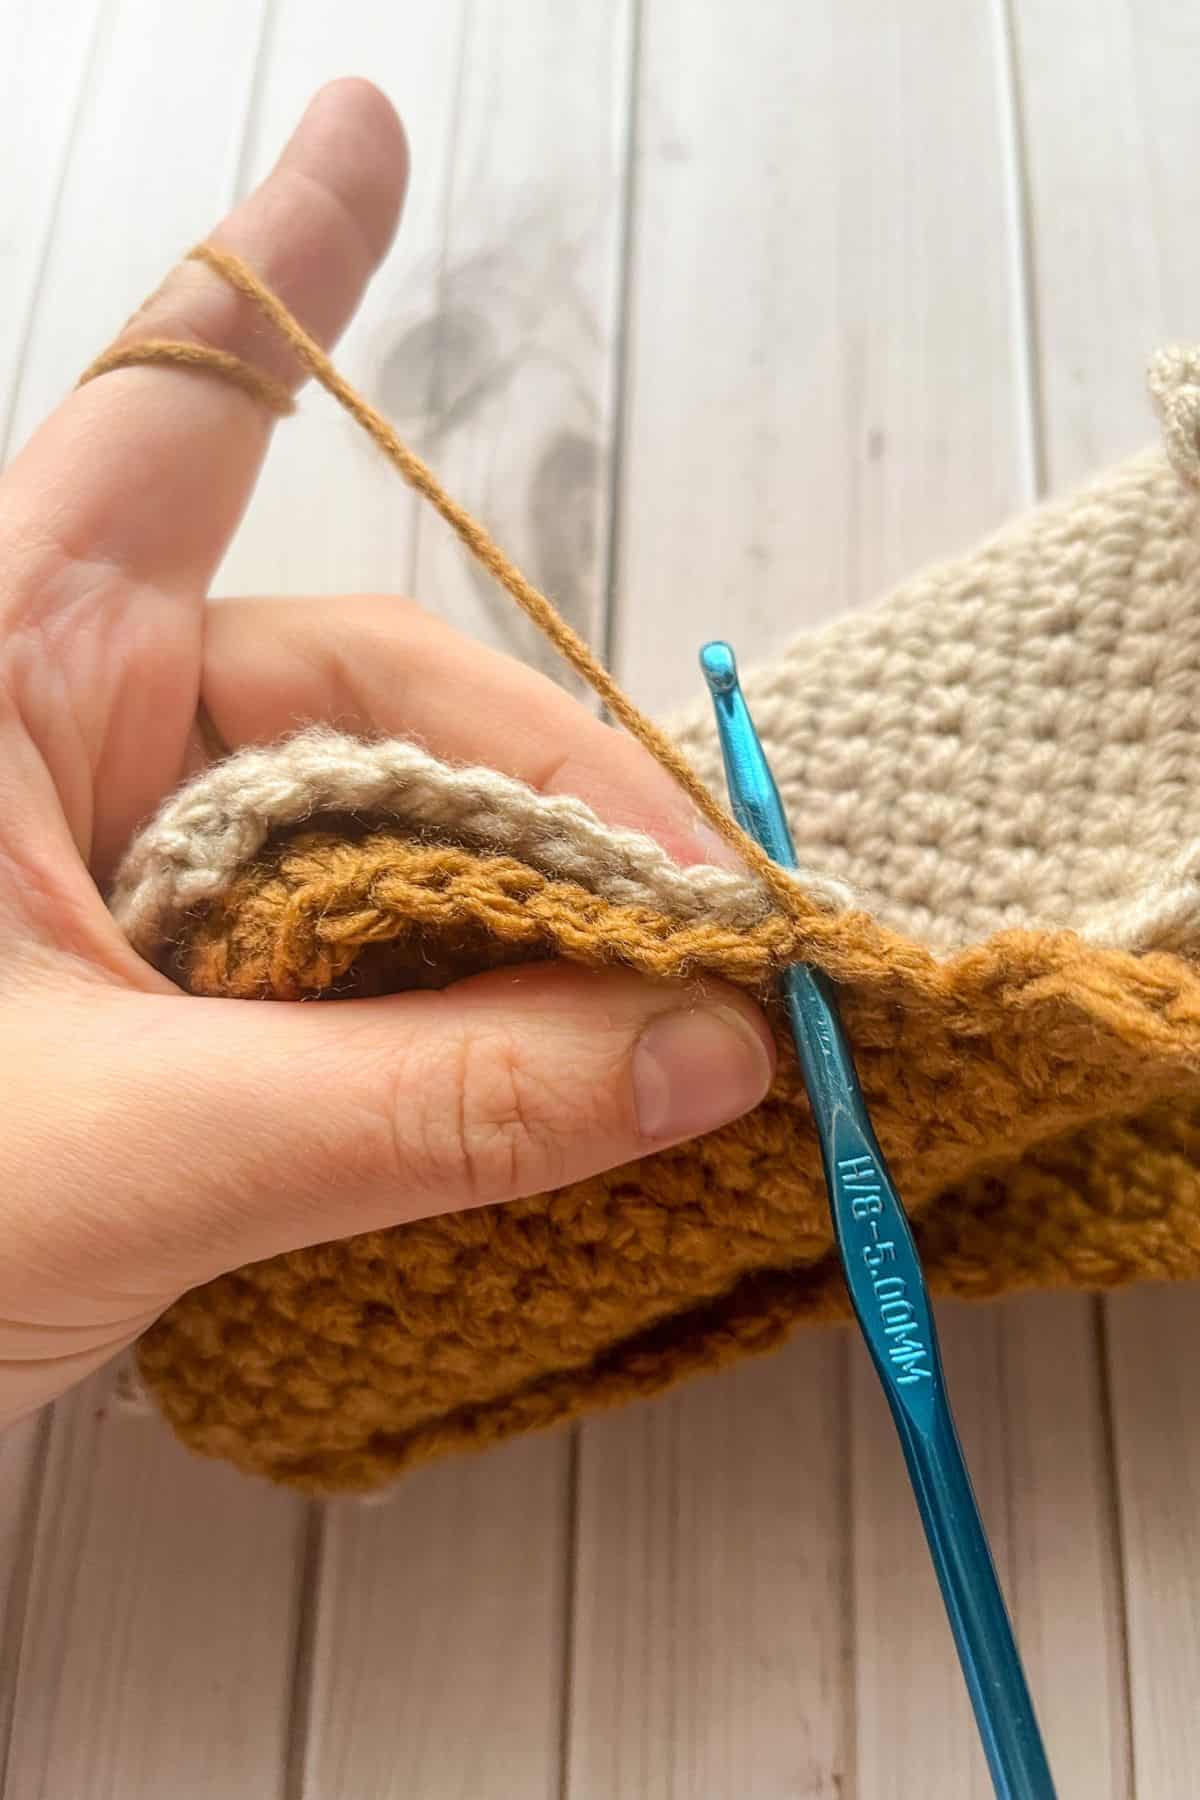
After making a brown one and a lighter colored one, you will crochet the 2 sides of the crochet stingray pattern together with the brown yarn.
You will start at the bottom of the eye socket area where you made the shell stitch, and then work your way down and around the sting ray. The tail will be added once this part is done, so don’t worry that we haven't made one yet.
You want to make 1 sc per row that you made and when you get to the curved bits at the bottom of the fins, you can add 2-3 stitches in the curved corners. This part is all dependent on tension, so if you have a tighter tension you may need more stitches etc. Just make sure the edge doesn't curl or look wavy.
Crochet Stingray Tail:

Using the brown yarn, attach yarn to the 2nd stitch at the bottom of the stingray and ch x22.
Then skip a stitch and sc x10, hdc x10, and dc x1. Then sl st to the 3rd stitch at the bottom of the crochet stingray to secure the tail to body. Then fasten off and weave in any ends.
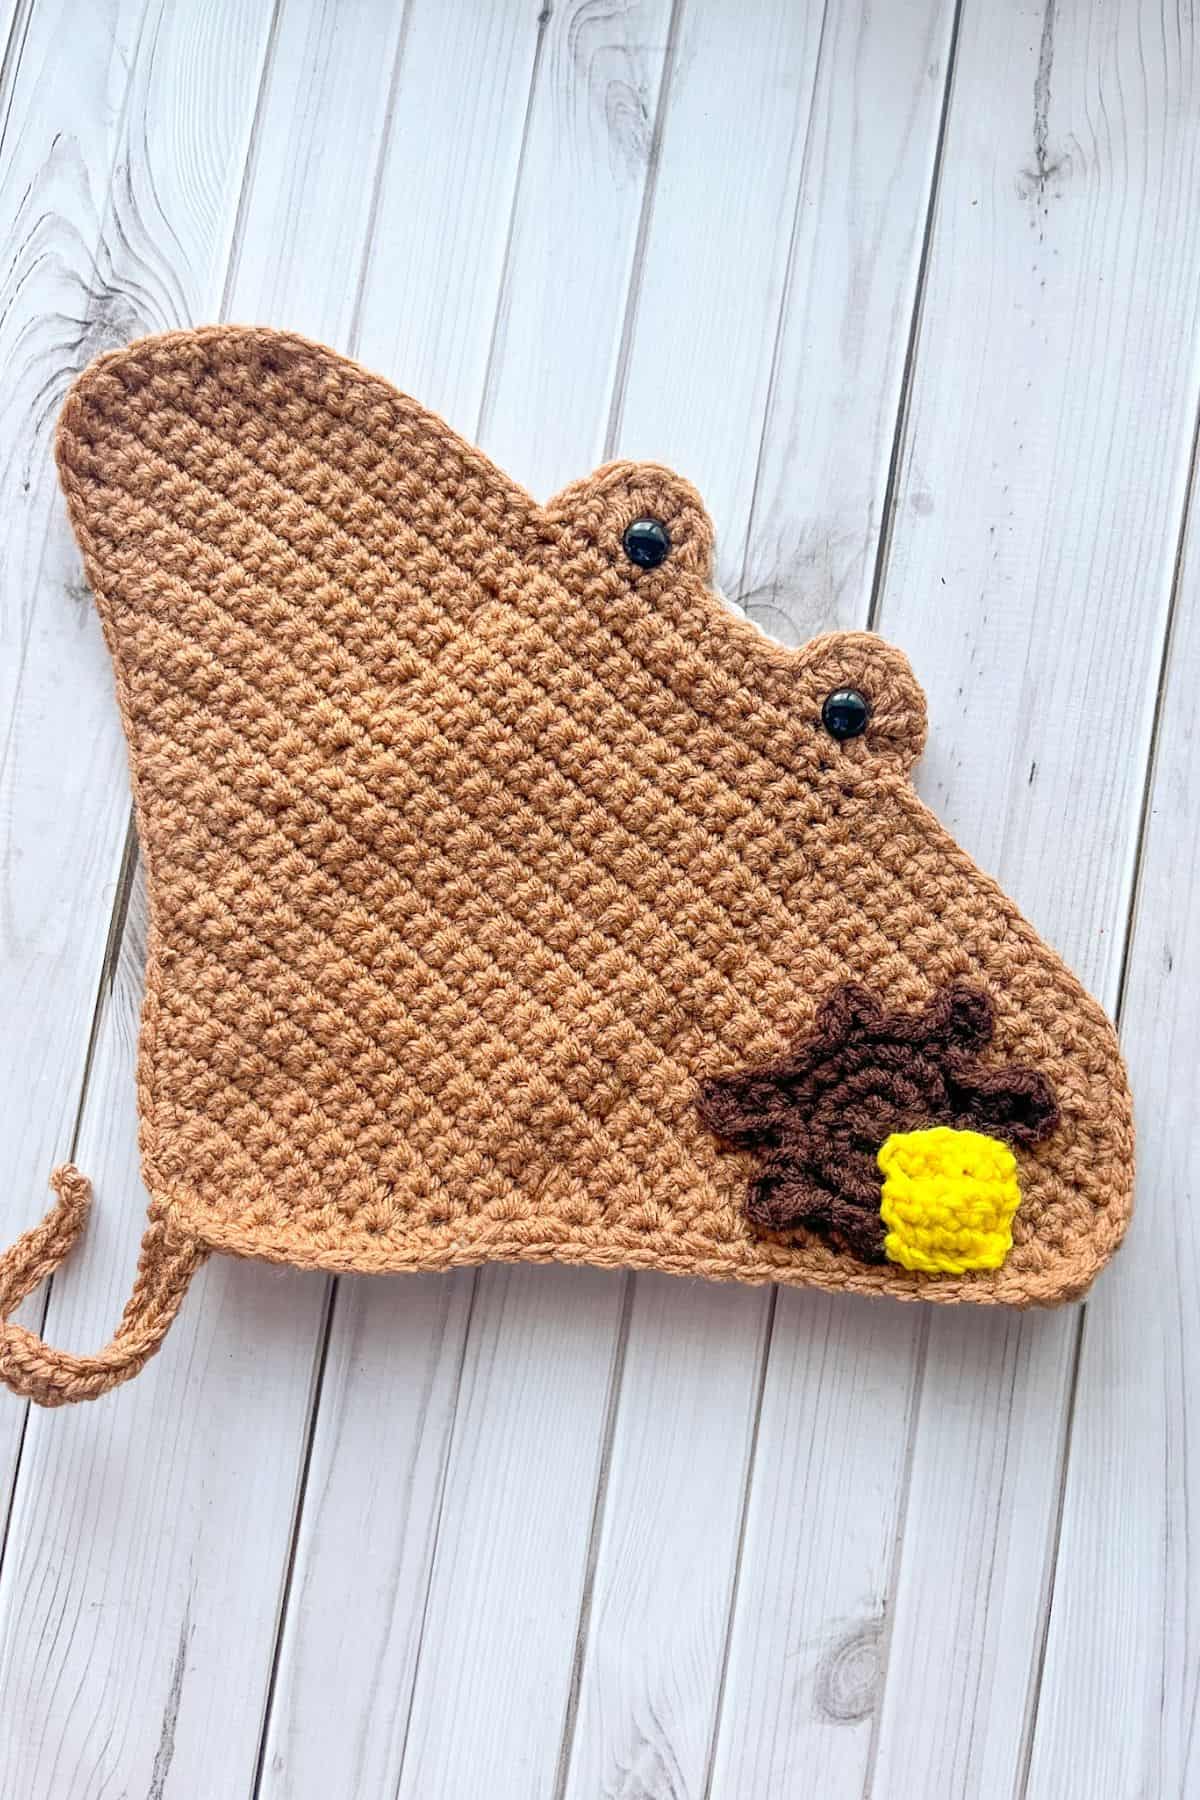
Crochet Syrup:
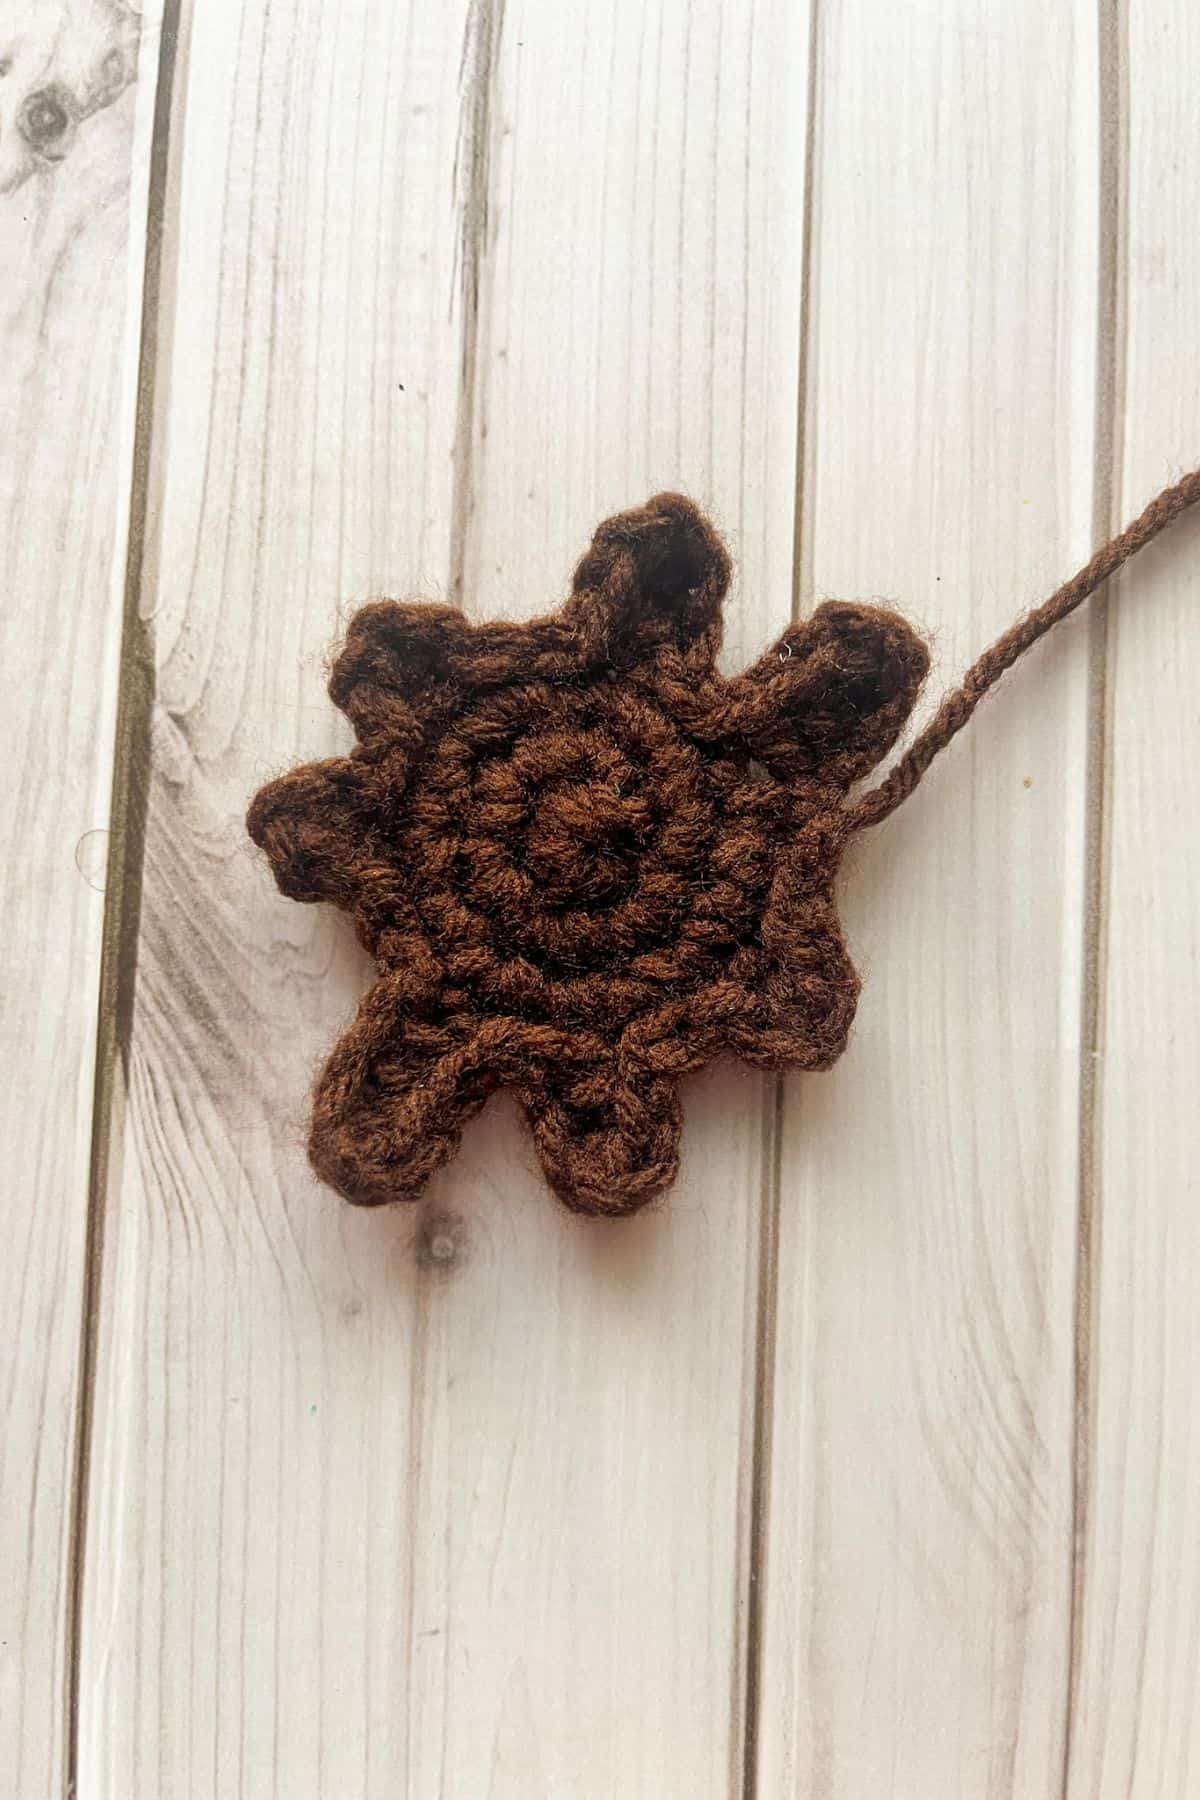
Round 1: Make a mr and the nsc x6 into it.
Round 2: Sc inc in every stitch (12).
Round 3: Sc inc, sc and then repeat for the rest of the round (18).
Round 4: This is the round we make the drips so if you want you can follow my steps exactly, or you can have fun and do a little freestyling.
Ch x4, then in 2nd ch from the hook make a hdc. Hdc x2, make a sl st in the next available stitch in the circle. Sl st again.
Ch x3, then in 2nd ch from the hook make a hdc. Hdc 1 more time in the next ch. Then make a sl st in the next available stitch in the circle. Sl st 2 more times.
Ch x2, then in the 2nd stitch make a hdc. Then make a sl st in the next available stitch in the circle. Then sl st 1 more time in the next stitch.
Ch x2, then in the 2nd stitch make a hdc. Then make a sl st in the next available stitch in the circle. Then sl st 2 more times in the next 2 stitches.
Ch x4, then in 2nd ch from the hook make a hdc. Hdc x2, make a sl st in the next available stitch in the circle. Sl st again.
Ch x3, then in 2nd ch from the hook make a hdc. Hdc 1 more time in the next ch. Then make a sl st in the next available stitch in the circle. Sl st 2 more times.
Ch x2, then in the 2nd stitch make a hdc. Then make a sl st in the next available stitch in the circle. Then sl st 1 more time in the next stitch.
Fasten off and leave a tail for sewing.
Crochet Butter:

Row 1: With the yellow yarn, ch x5 and then turn.
Row 2: In the second ch from the hook make a sc. Sc for the rest of the ch length. Then ch x1 and turn (4).
Row 3-5: Sc in every stitch (5). Then ch x1. After the 5th row fasten off and leave a tail for sewing.
Finishing:
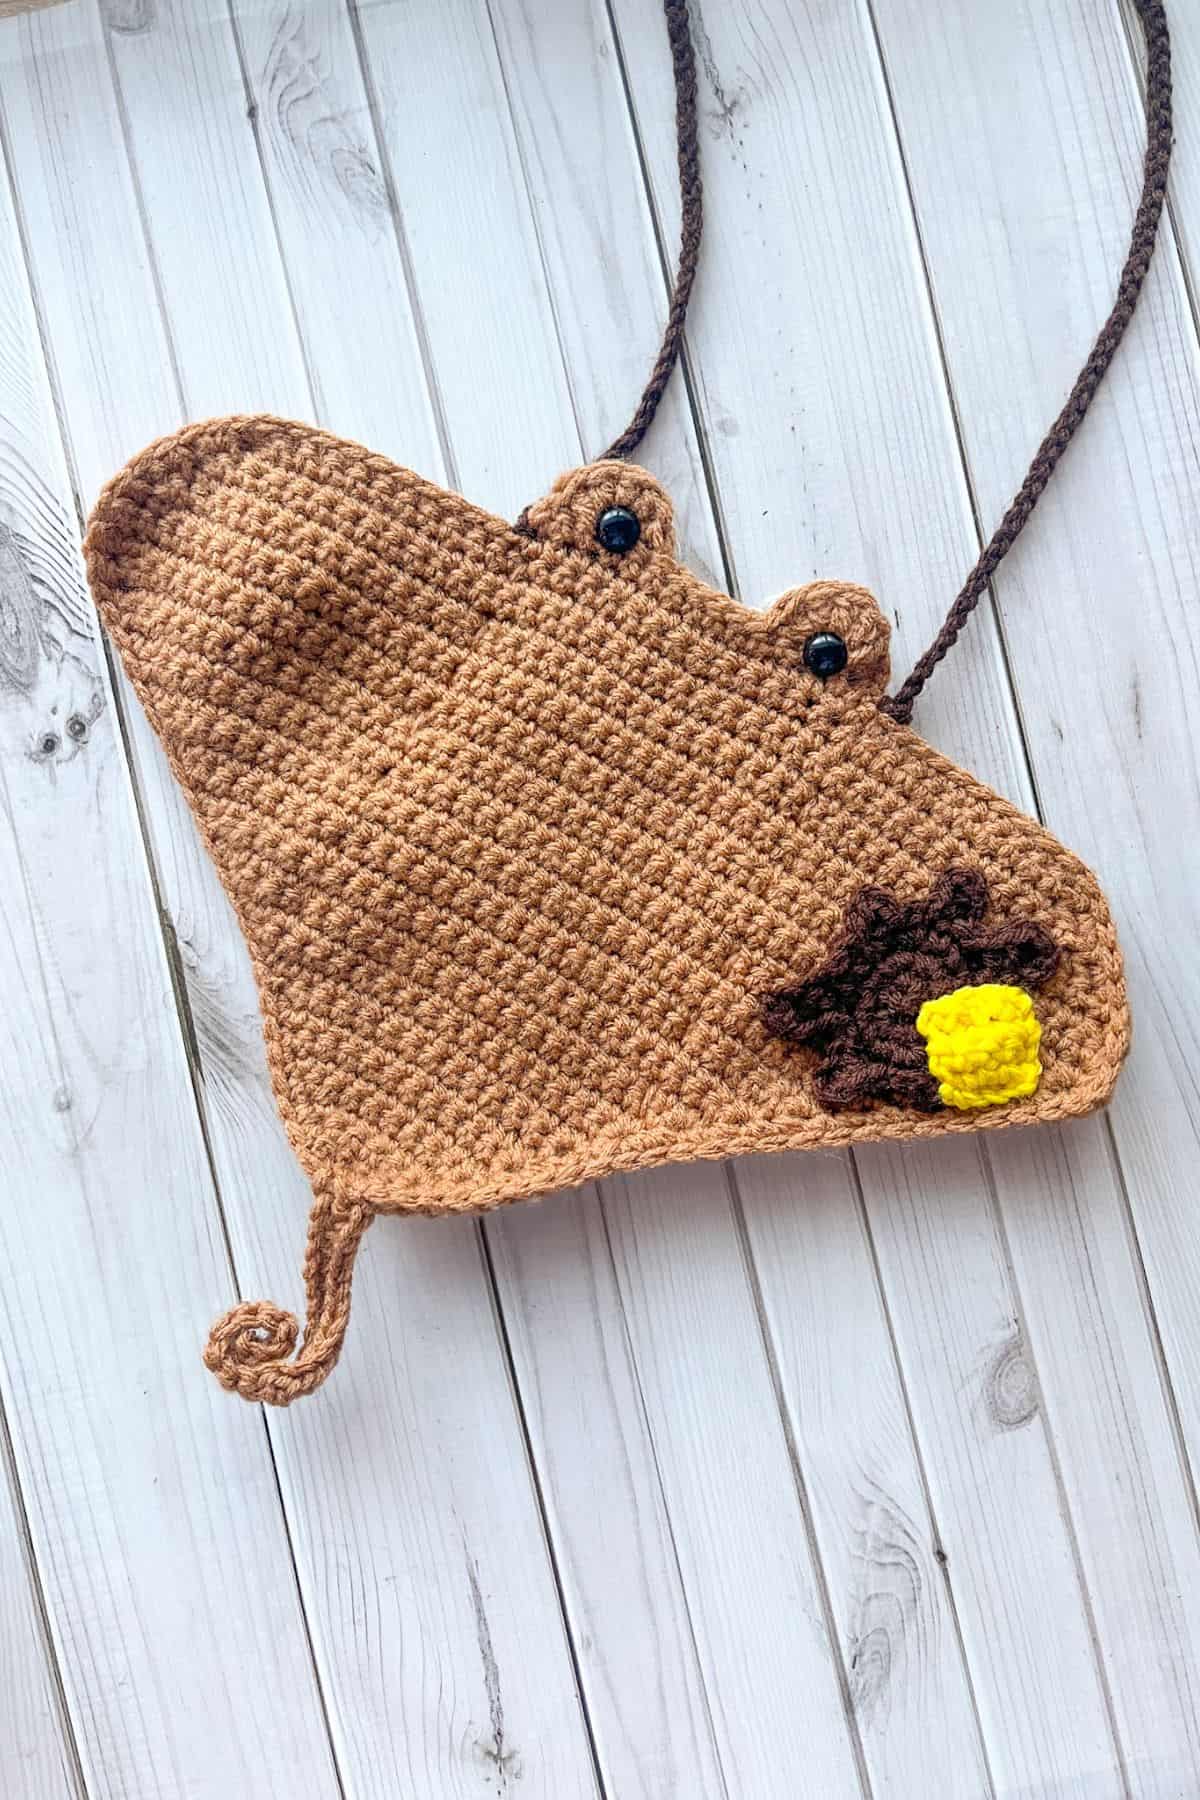
Sew the syrup and butter to the top of the crochet stingray pattern wherever you would like to put it.
If you are making a phone bag, I suggest taking some of the topaz brown yarn that you used for the top side of the sea pancake pattern to make a running stitch on the sides of the sting rays body to separate the wings from the body. Just make sure that the pocket you create is big enough for a phone (so make the running stitch on the outer edges of where the eye sockets are downwards.
Add safety eyes to the eye sockets.
Add a strap - you can optionally buy this or make it. If making it, attach any yarn to the top part of the stingray near its eye and ch x150 (more or less) and then join to the other side.
Fasten off the yarn and weave in any ends.
Thank you so much for following along with my crochet stingray pattern! I hope you had as much fun making your crochet sea pancake as I did designing it. Whether you’ve made it into a cute bag or a plushie, I’m sure it’s turned out adorable!
If you’re a fan of fun, food-themed crochet bags, be sure to check out some of my other sweet creations, like the crochet dumpling bag, crochet strawberry bag, and crochet banana bag. They’re perfect for adding a little extra whimsy to your crochet collection!
If you have any leftover brown yarn, you can make my crochet bear keychain pattern, which can use any shade of brown to accomplish. If you used brown cotton for this project, you can make my crochet toast coaster pattern or even my crochet bear coaster or crochet capybara coaster pattern.
Don’t forget to follow me on Instagram, TikTok, and YouTube to stay updated on more exciting patterns and crochet inspiration. I can’t wait to see your finished stingrays and all the other projects you create!
Happy crocheting!
🐌Expert Tips
- Tension Control: Make sure to maintain an even tension when making the crochet stingray pattern. Consistent tension helps your stitches look uniform and gives the crochet stingray pattern a smooth finish.
- Faux Fur or Textured Yarn for Depth: For a unique look, try using textured yarn (like boucle or faux fur) for the stingray’s body. This adds a fun depth and dimension to your project.
- Stuffing Tips: If you’re turning your crochet stingray pattern into a plushie, stuff it lightly to maintain its shape without making it too stiff. Use a soft stuffing material for a huggable feel.
- Block Your Finished Piece: Blocking the finished crochet stingray can help smooth out any uneven stitches and give your stingray its final shape. Simply steam it gently or pin it to shape and let it dry. This is if you are making it a bag and not a plushie.
🧵Pattern FAQs
You can use any medium-weight yarn (like worsted weight yarn) for this pattern. Choose a soft, durable yarn for a bag, or a plush yarn for a softer, huggable plushie.
Yes! You can adjust the size of the stingray by changing your yarn weight or hook size. A thicker yarn or larger hook will give you a bigger bag, while a thinner yarn or smaller hook will make it smaller.
Absolutely! If you want a more secure closure for your stingray bag, you can sew in a zipper or use a button closure. Just be sure to choose a zipper that fits the size of the bag.

🧶More Crochet Food Patterns


If you tried this Crochet Stingray Pattern (or any other pattern on my website), please let me know how it went in the 📝 comments below. I'd love to hear from you!

Crochet Stingray Pattern
Materials
Abbreviations (US terms)
- Chains - ch
- Single crochet - sc
- Half double crochet - hdc
- Double crochet - dc
- Slip stitch - sl st
- Increase - inc
- Decrease - dec
Notes
- Two-in-One: The crochet stingray pattern is great for creating both a crochet stingray bag pattern and a crochet stingray plushie pattern. Whether you need a cute, functional phone bag or a soft, huggable plushie, this design covers both!
- Skill Level: This pattern is suitable for intermediate crocheters, as it involves basic crochet stitches and some shaping techniques. Detailed instructions are provided to guide you through every step.
- Yarn: I used worsted weight for this project, but you can use any yarn weight depending if you want a smaller or larger bag.
Instructions
- For this Crochet Stingray Pattern, we will be working in the rows. Make 1 in topaz and 1 in aran.
- Row 1: Ch x5 and turn
- Row 2: In the second chain from the hook make a sc, then sc for the rest of the row (4). Then ch x1 and turn.
- Row 3: Sc inc, sc x 2, sc inc (6). Then ch x1 and turn.
- Row 4: Sc inc, sc x 4, sc inc (8). Then ch x1 and turn.
- Row 5: Sc inc, sc x 6, sc inc (10). Then ch x1 and turn.
- Row 6: Sc inc, sc x 8, sc inc (12). Then ch x1 and turn.
- Row 7: Sc in every stitch (12). Then ch x1 and turn.
- Row 8: Sc inc, sc x 10, sc inc (14). Then ch x1 and turn.
- Row 9: Sc in every stitch (14). Then ch x1 and turn.
- Row 10: Sc inc, sc x 12, sc inc (16). Then ch x1 and turn.
- Row 11: Sc inc, sc x 14, sc inc (18). Then ch x1 and turn.
- Row 12: Sc inc, sc x 16, sc inc (20). Then ch x1 and turn.
- Row 13: Sc inc, sc x 18, sc inc (22). Then ch x1 and turn.
- Row 14: Sc inc, sc x 20, sc inc (24). Then ch x1 and turn.
- Row 15: Sc inc, sc x 22, sc inc (26). Then ch x1 and turn.
- Row 16: Sc inc, sc x 24, sc inc (28). Then ch x1 and turn.
- Row 17: Sc inc, sc x 26, sc inc (30). Then ch x1 and turn.
- Row 18: Sc inc, sc x 28, sc inc (32). Then ch x1 and turn.
- Row 19: Sc inc, sc x 30, sc inc (34). Then ch x1 and turn.
- Row 20: Sc inc, sc x 32, sc inc (36). Then ch x1 and turn.
- Row 21: Sc inc, sc x 34, sc inc (38). Then ch x1 and turn.
- Row 22: Sc inc, sc x 36, sc inc (40). Then ch x1 and turn.
- Row 23: Sc inc, sc x 38, sc inc (42). Then ch x1 and turn.
- Row 24: Sc inc, sc x 40, sc inc (44). Then ch x1 and turn.
- Row 25: Sc inc, sc x 42, sc inc (46). Then ch x1 and turn.
- Row 26: Sc inc, sc x 44, sc inc (48). Then ch x1 and turn.
- Row 27: Sc in every stitch (48). Then ch x1 and turn.
- Row 28: Sc dec, sc x 44, sc dec (46). Then ch x1 and turn.
- Row 29: Sc dec, sc x 42, sc dec (44). Then ch x1 and turn.
- Row 30: Sc dec, sc x 40, sc dec (42). Then ch x1 and turn.
- Row 31: Sc dec, sc x 38, sc dec (40). Then ch x1 and turn.
- Row 32: Sc dec, sc x 36, sc dec (38). Then ch x1 and turn.
- Row 33: Sc dec, sc x 34, sc dec (36). Then fasten off and weave in the ends.
- Row 34: Skip 11 stitches from the end and reattach the yarn. Sc x14 and then ch x1 and turn.
- Row 35: Sc in every stitch from the last short row (14). Then turn, do not make a chain.
- Row 36: Skip a stitch and dc x5 in 1 stitch. Then skip a stitch and make a sl st. St st 6 more times. Then skip a stitch and dc x5 in 1 stitch. Skip a stitch and sl st to the next stitch.
- After making a brown one and a lighter colored one, you will crochet the 2 sides of the crochet stingray pattern together with the brown yarn. You will start at the bottom of the eye socket area where you made the shell stitch, and then work your way down and around the sting ray. The tail will be added once this part is done, so don’t worry that we haven't made one yet.
- You want to make 1 sc per row that you made and when you get to the curved bits at the bottom of the fins, you can add 2-3 stitches in the curved corners. This part is all dependent on tension, so if you have a tighter tension you may need more stitches etc. Just make sure the edge doesn't curl or look wavy.
Crochet Stingray Tail:
- Using the brown yarn, attach yarn to the 2nd stitch at the bottom of the stingray and ch x22.
- Then skip a stitch and sc x10, hdc x10, and dc x1. Then sl st to the 3rd stitch at the bottom of the crochet stingray to secure the tail to body. Then fasten off and weave in any ends.
Crochet Syrup:
- Round 1: Make a mr and the nsc x6 into it.
- Round 2: Sc inc in every stitch (12).
- Round 3: Sc inc, sc and then repeat for the rest of the round (18).
- Round 4: This is the round we make the drips so if you want you can follow my steps exactly, or you can have fun and do a little freestyling.
- Ch x4, then in 2nd ch from the hook make a hdc. Hdc x2, make a sl st in the next available stitch in the circle. Sl st again.
- Ch x3, then in 2nd ch from the hook make a hdc. Hdc 1 more time in the next ch. Then make a sl st in the next available stitch in the circle. Sl st 2 more times.
- Ch x2, then in the 2nd stitch make a hdc. Then make a sl st in the next available stitch in the circle. Then sl st 1 more time in the next stitch.
- Ch x2, then in the 2nd stitch make a hdc. Then make a sl st in the next available stitch in the circle. Then sl st 2 more times in the next 2 stitches.
- Ch x4, then in 2nd ch from the hook make a hdc. Hdc x2, make a sl st in the next available stitch in the circle. Sl st again.
- Ch x3, then in 2nd ch from the hook make a hdc. Hdc 1 more time in the next ch. Then make a sl st in the next available stitch in the circle. Sl st 2 more times.
- Ch x2, then in the 2nd stitch make a hdc. Then make a sl st in the next available stitch in the circle. Then sl st 1 more time in the next stitch.
- Fasten off and leave a tail for sewing.
Crochet Butter:
- Row 1: With the yellow yarn, ch x5 and then turn.
- Row 2: In the second ch from the hook make a sc. Sc for the rest of the ch length. Then ch x1 and turn (4).
- Row 3-5: Sc in every stitch (5). Then ch x1. After the 5th row fasten off and leave a tail for sewing.
Finishing:
- Sew the syrup and butter to the top of the crochet stingray pattern wherever you would like to put it.
- If you are making a phone bag, I suggest taking some of the topaz brown yarn that you used for the top side of the sea pancake pattern to make a running stitch on the sides of the sting rays body to separate the wings from the body. Just make sure that the pocket you create is big enough for a phone (so make the running stitch on the outer edges of where the eye sockets are downwards.
- Add safety eyes to the eye sockets.
- Add a strap - you can optionally buy this or make it. If making it, attach any yarn to the top part of the stingray near its eye and ch x150 (more or less) and then join to the other side.
- Fasten off the yarn and weave in any ends.
- Thank you so much for following along with my crochet stingray pattern! I hope you had as much fun making your sea pancake as I did designing it.

Nelly says
Thank you for the very nice and easy pattern of the stingray. It has became very nice.
Nelly