

This Daisy Crochet Bag Pattern just screams spring is HERE! This daisy bag is great for intermediate crocheters who like making granny squares but hate sewing them together.
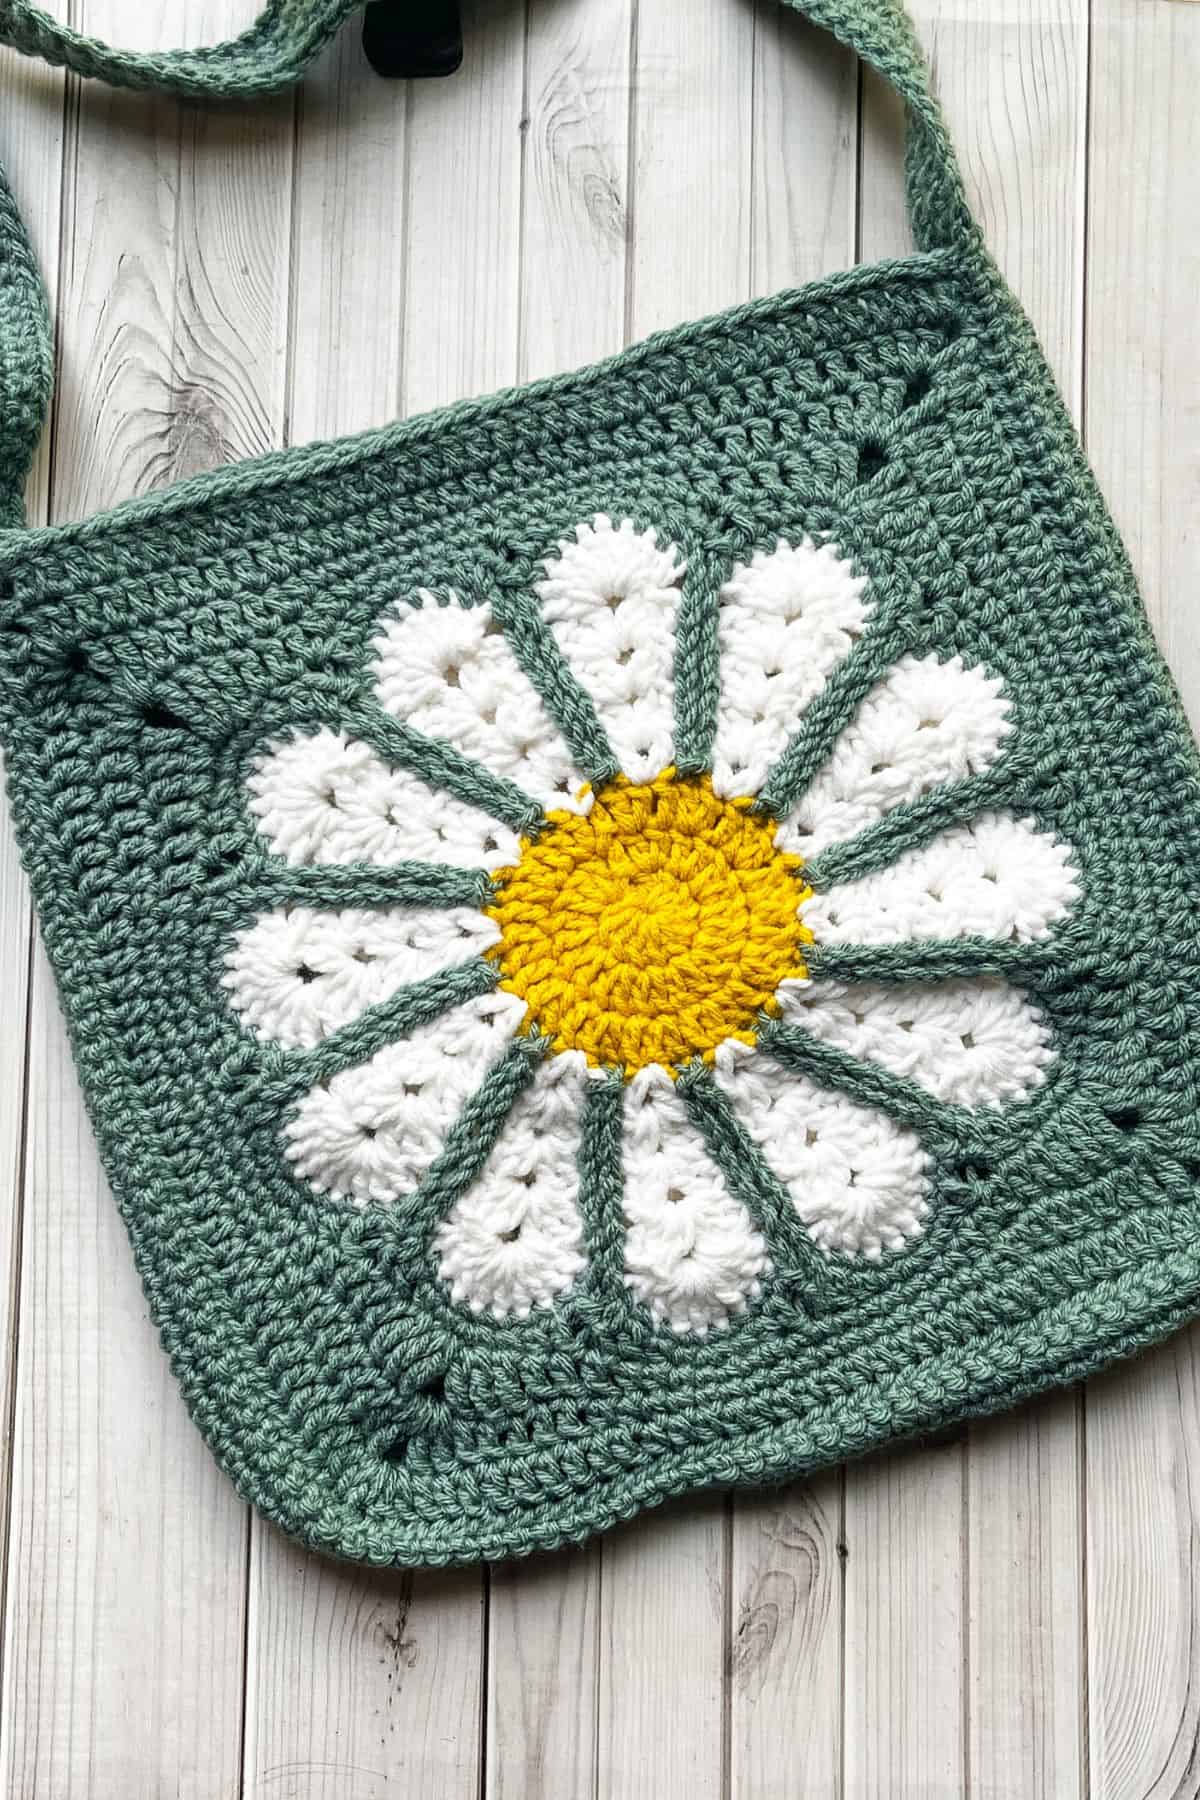
I have been a bit obsessed with flowers lately. So far this year I have been inspired by tulips, roses, daisies, and lavender! I am even teaching myself to make crochet flower bouquets, and started by making a crochet lavender pattern (more will be available soon!). I have also been sticking to crochet motifs like crochet daisy appliques, crochet rose granny squares and crochet African flower granny squares. Simple, fast and perfect for adding a touch of florals to any project.
Now, I have always wanted to make a crochet daisy bag, but I loathe sewing and I am currently working on a flower blanket using small daisy granny squares so I am trying to minimize my sewing elsewhere for the meantime. (And don’t worry, a pattern for the blanket will be coming soon!) But that is why this daisy granny square tote bag uses large daisy granny squares! In fact, I use these exact squares for my daisy crochet blanket pattern!
So grab your yarn and hook, and I’ll show you how to make a daisy crochet bag! Happy crocheting!
Jump to:
✏️ Things To Note:
- Time: Each square for the crochet daisy tote bag takes about an hour to complete. That might seem like a long time, but it does equal less sewing time so overall this daisy crochet bag pattern might be quicker for you to complete than a normal one with many little granny squares.
- Size: The finished daisy granny square is approximately 12–13 inches across, making it perfect for quick projects with fewer pieces to stitch together. You only need 2 squares to complete my daisy crochet bag pattern.
- Intermediate friendly: The crochet daisy granny square design may look intricate, but it’s super easy as long as you know foundational crochet stitches — the most challenging part is just counting your stitches.
🪡 Materials Needed
- Caron One Pound - White
- Caron One Pound - Sunflower
- Caron One Pound - Hosta
- 5mm hook
- Tapestry Needle
- Optional: Fabric for lining the bag
💭Abbreviations to Remember (US terms)
- Magic ring (mr)
- Chains (ch)
- Slip stitch (sl st)
- Single crochet (sc)
- Half double crochet (hdc)
- Double crochet (dc)
- Triple crochet (tr)
- Increase (inc)
- Double crochet decrease (dc2tog)
🧋Variations
- Try different colors of daisies or the main bag color to create a variety of bags! A teal bag with a light pink flower would look pretty!
- Add a lining if you want the bag to hold small items or to hold heavy items!
🍵Instructions for Daisy Crochet Bag Pattern
How to crochet a daisy granny square:
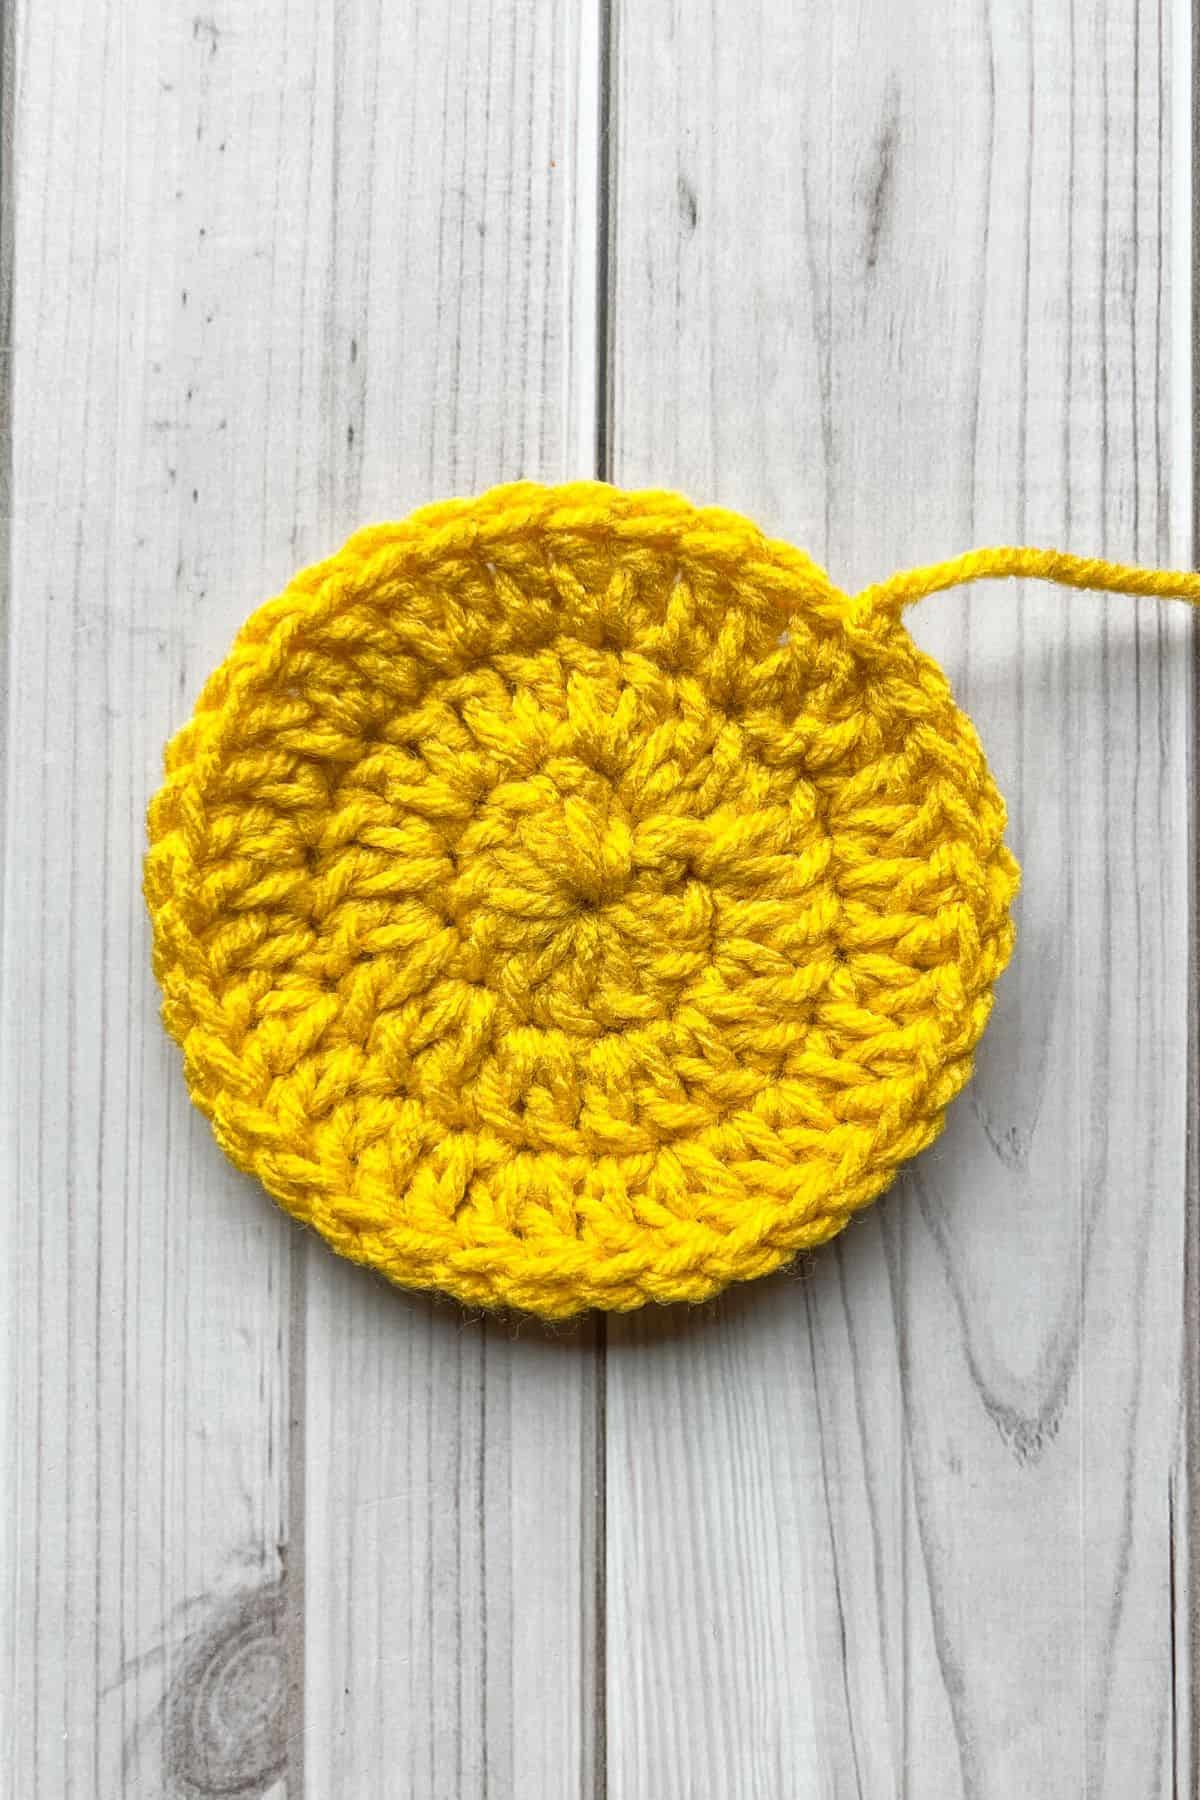
Round 1: Using the yellow yarn, make a mr and immediately ch x3 (counts as a dc). Then dc x11 into the mr. Pull tight and to secure the round, sl st to the beginning chains in the round (12).
Round 2: Ch x3, then dc into the sl st. Next, dc inc in every stitch from the previous round. Then sl st to the beginning chains (24).
Round 3: Ch x3, then dc into the sl st. *Dc into the next stitch then a dc inc in the following stitch. Repeat from * for the rest of the round. Then sl st to the beginning chains in the round (36). Fasten off the yellow yarn and join the white.
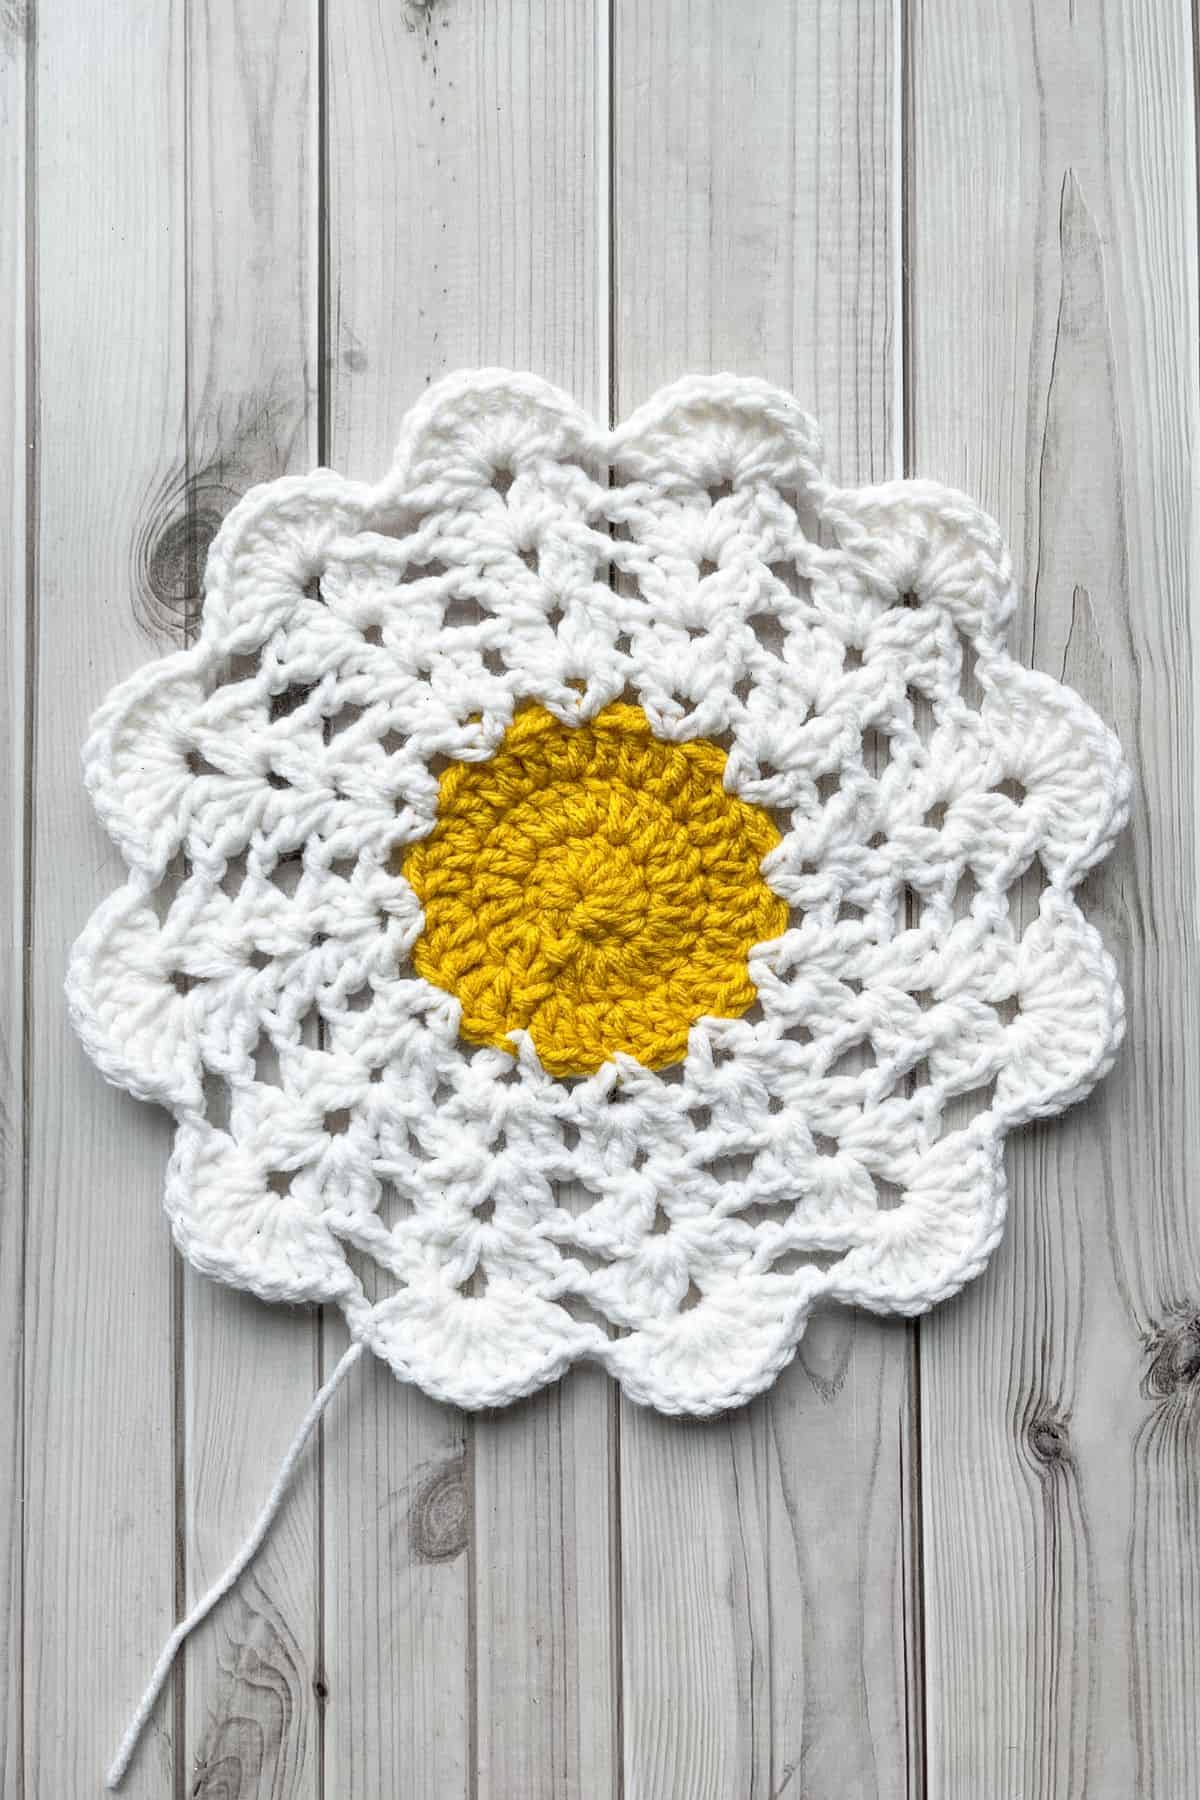
Round 4: Ch x4 (counts as a dc + ch), dc into the sl st you made to join the round. Then ch x1 and *skip 2 dc, (dc x1, ch x1, dc x1) into the next stitch. Next ch x1. Repeat from * for the rest of the round. Once you are done with the round, sl st to the 3rd ch you made at the beginning (12 groups of (1dc, ch 1, 1 dc)).
Round 5: Make a sl st into the ch x1 space (that 4th ch from the round before) as this will be your beginning point for this round. Ch x3 (counts as a dc), dc x1, ch x1, dc x2 into that ch space. Then ch x1, skip the next ch space and *(dc x2, ch x1, dc x2) into the next ch space (inside the v shape).
Next ch x1 and skip the next ch space. Repeat from * for the rest of the round. Sl st to the 3rd ch at the beginning to close the round (12 groups of ( 2 dc, ch 1, 2 dc)).
Round 6: Sl st into the dc and then the ch space in order to start this round. Then repeat round 5 (12 groups of ( 2 dc, ch 1, 2 dc)).
There might be some slight curling here- it should be completely flat after round 10.
Round 7: Sl st into the dc and then the ch space in order to start this round. Then ch x3, dc x2, ch x1, dc x3 into the ch space. Next ch x1, *skip the following ch space, and then in the ch space in the v shape - dc x3, ch x1, dc x3. Then ch x1. Repeat from * for the rest of the round. Sl st to the 3rd ch in the beginning (12 groups of ( 3 dc, ch 1, 3 dc)).
Round 8: Sl st into the dc stitches and then the ch space in order to start this round. Then ch x3 and dc x8. Ch x1 and then *skip the next ch space and dc x9 into the following ch space and then ch x1. Repeat from * for the rest of the round. Then sl st to the 3rd ch in the beginning (12 groups of (9 dc)).
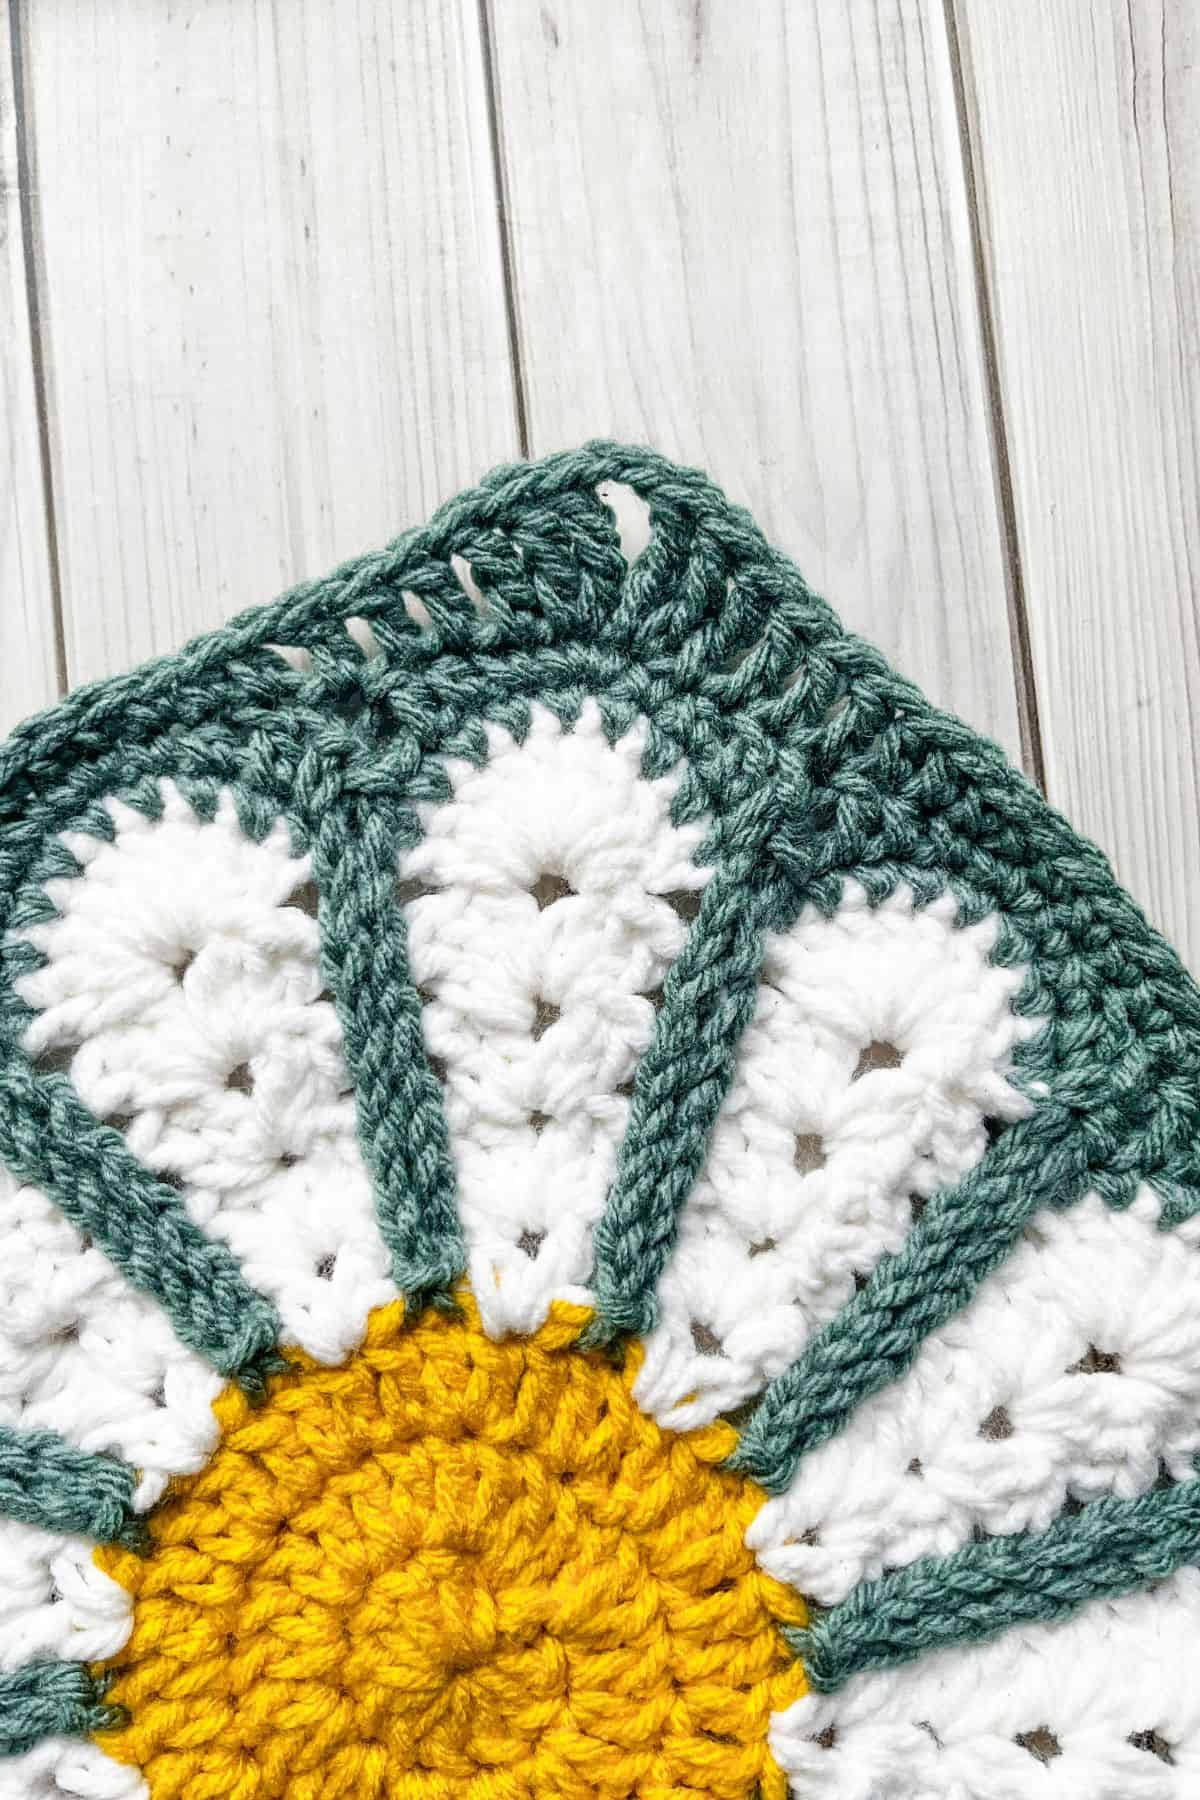
Fasten off the white and weave in the tail. The 9 dc shells are the top of our flower petals - there should be 12 of them.
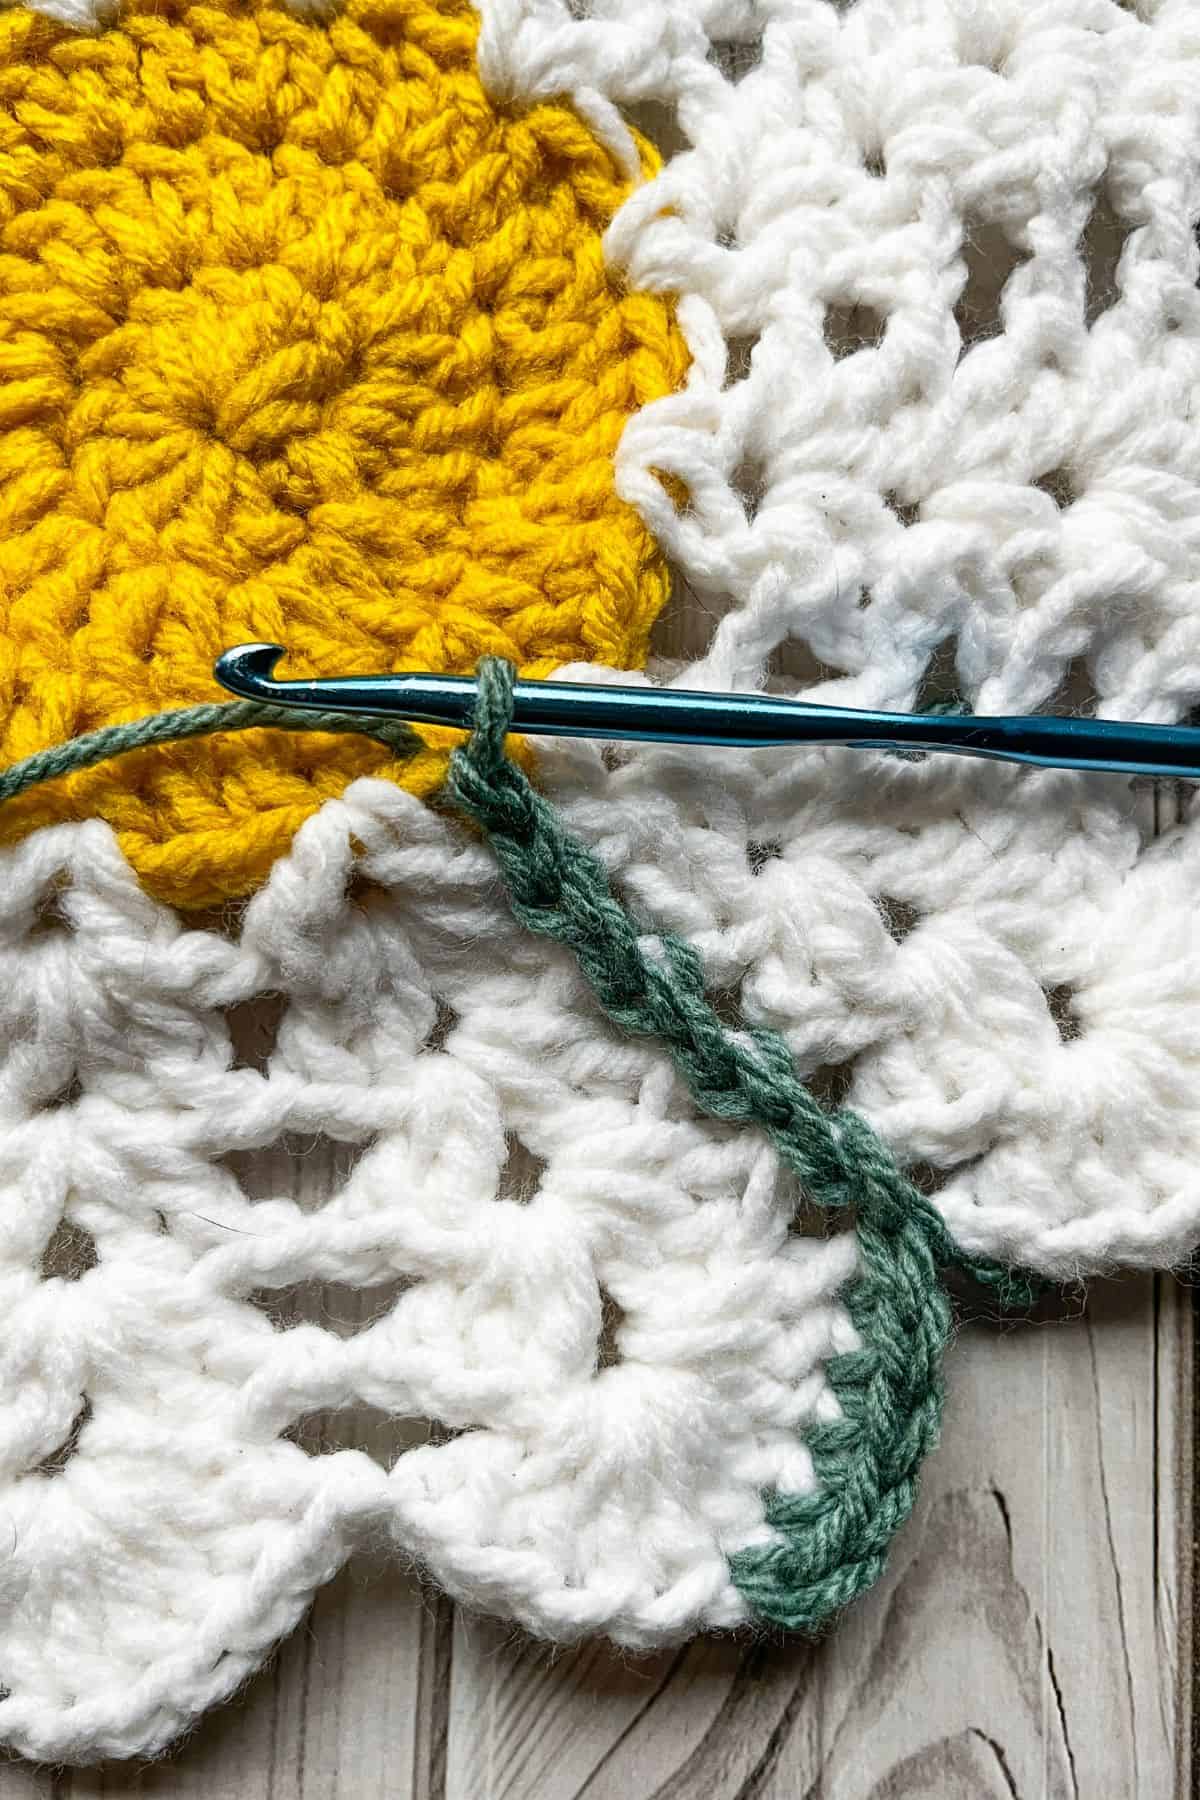
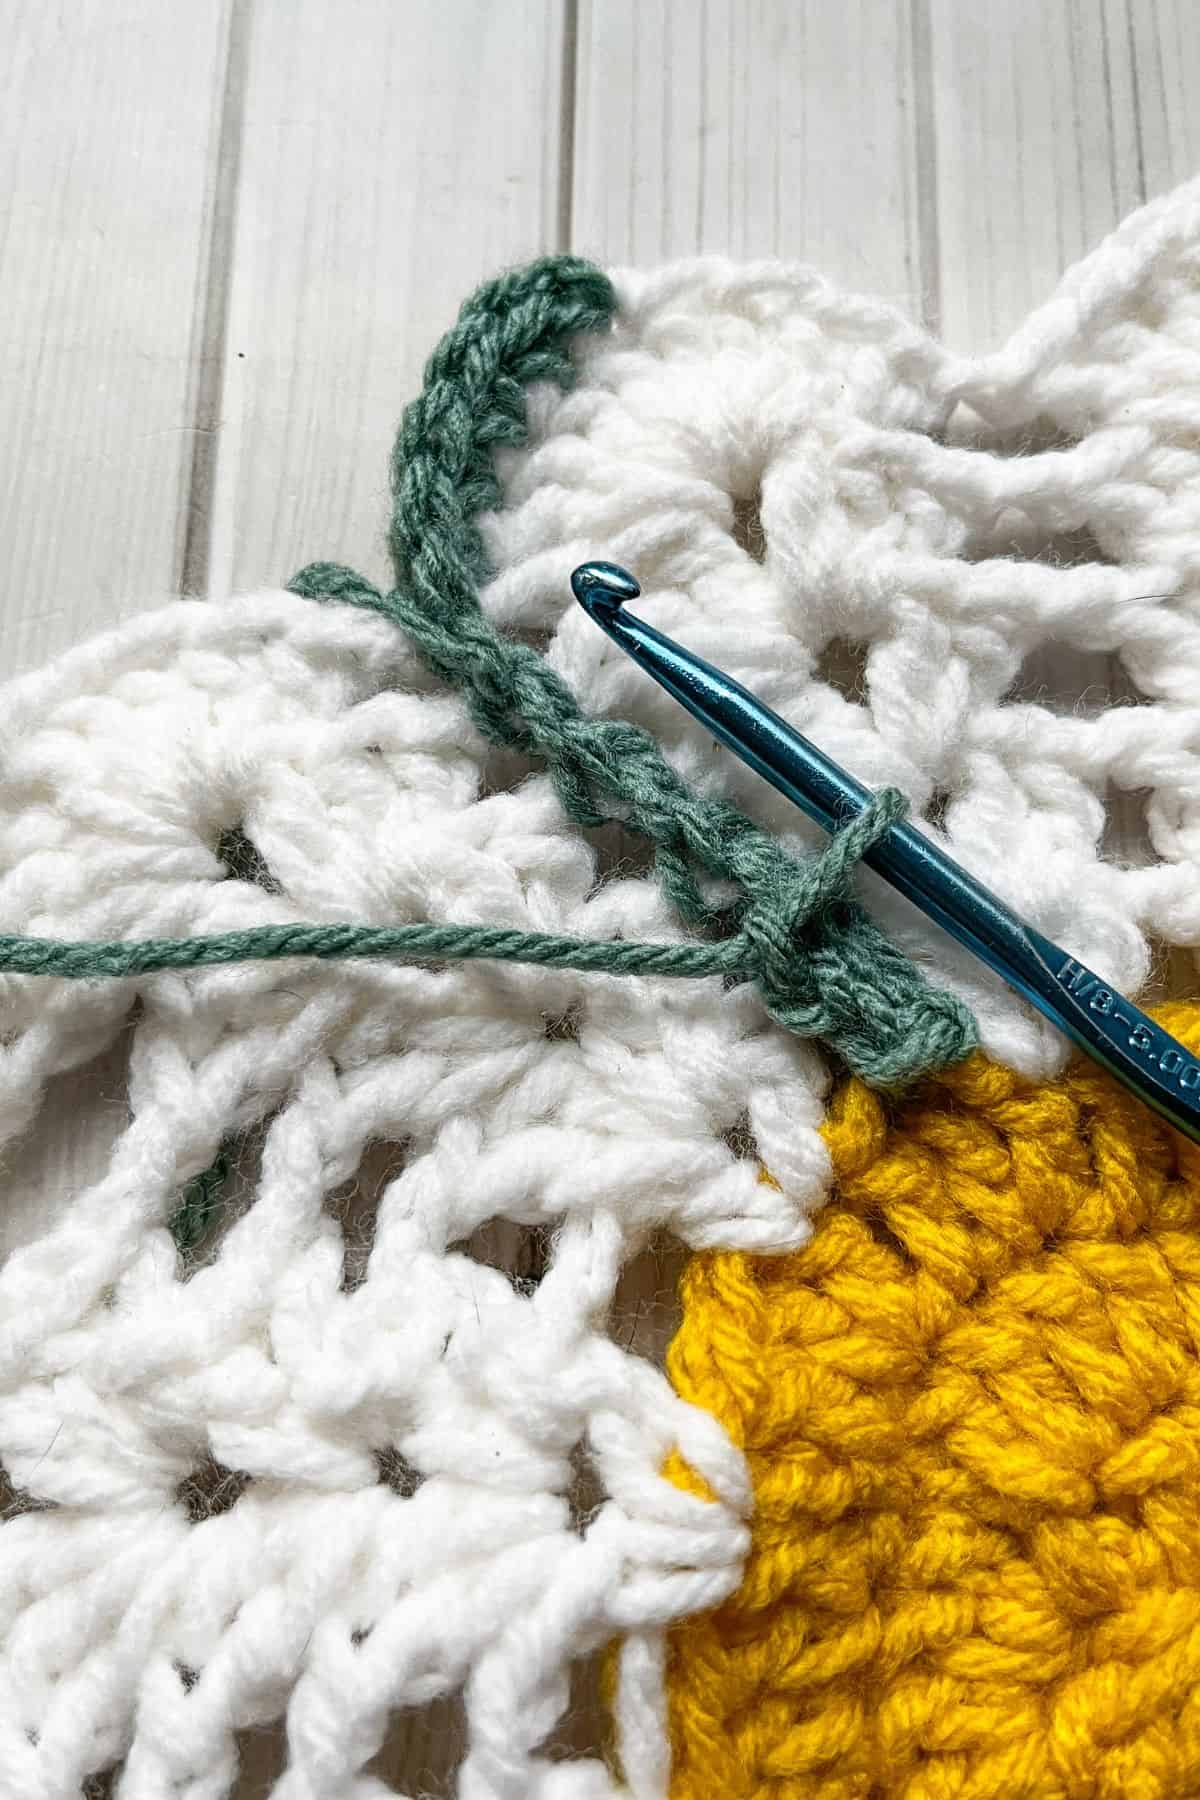
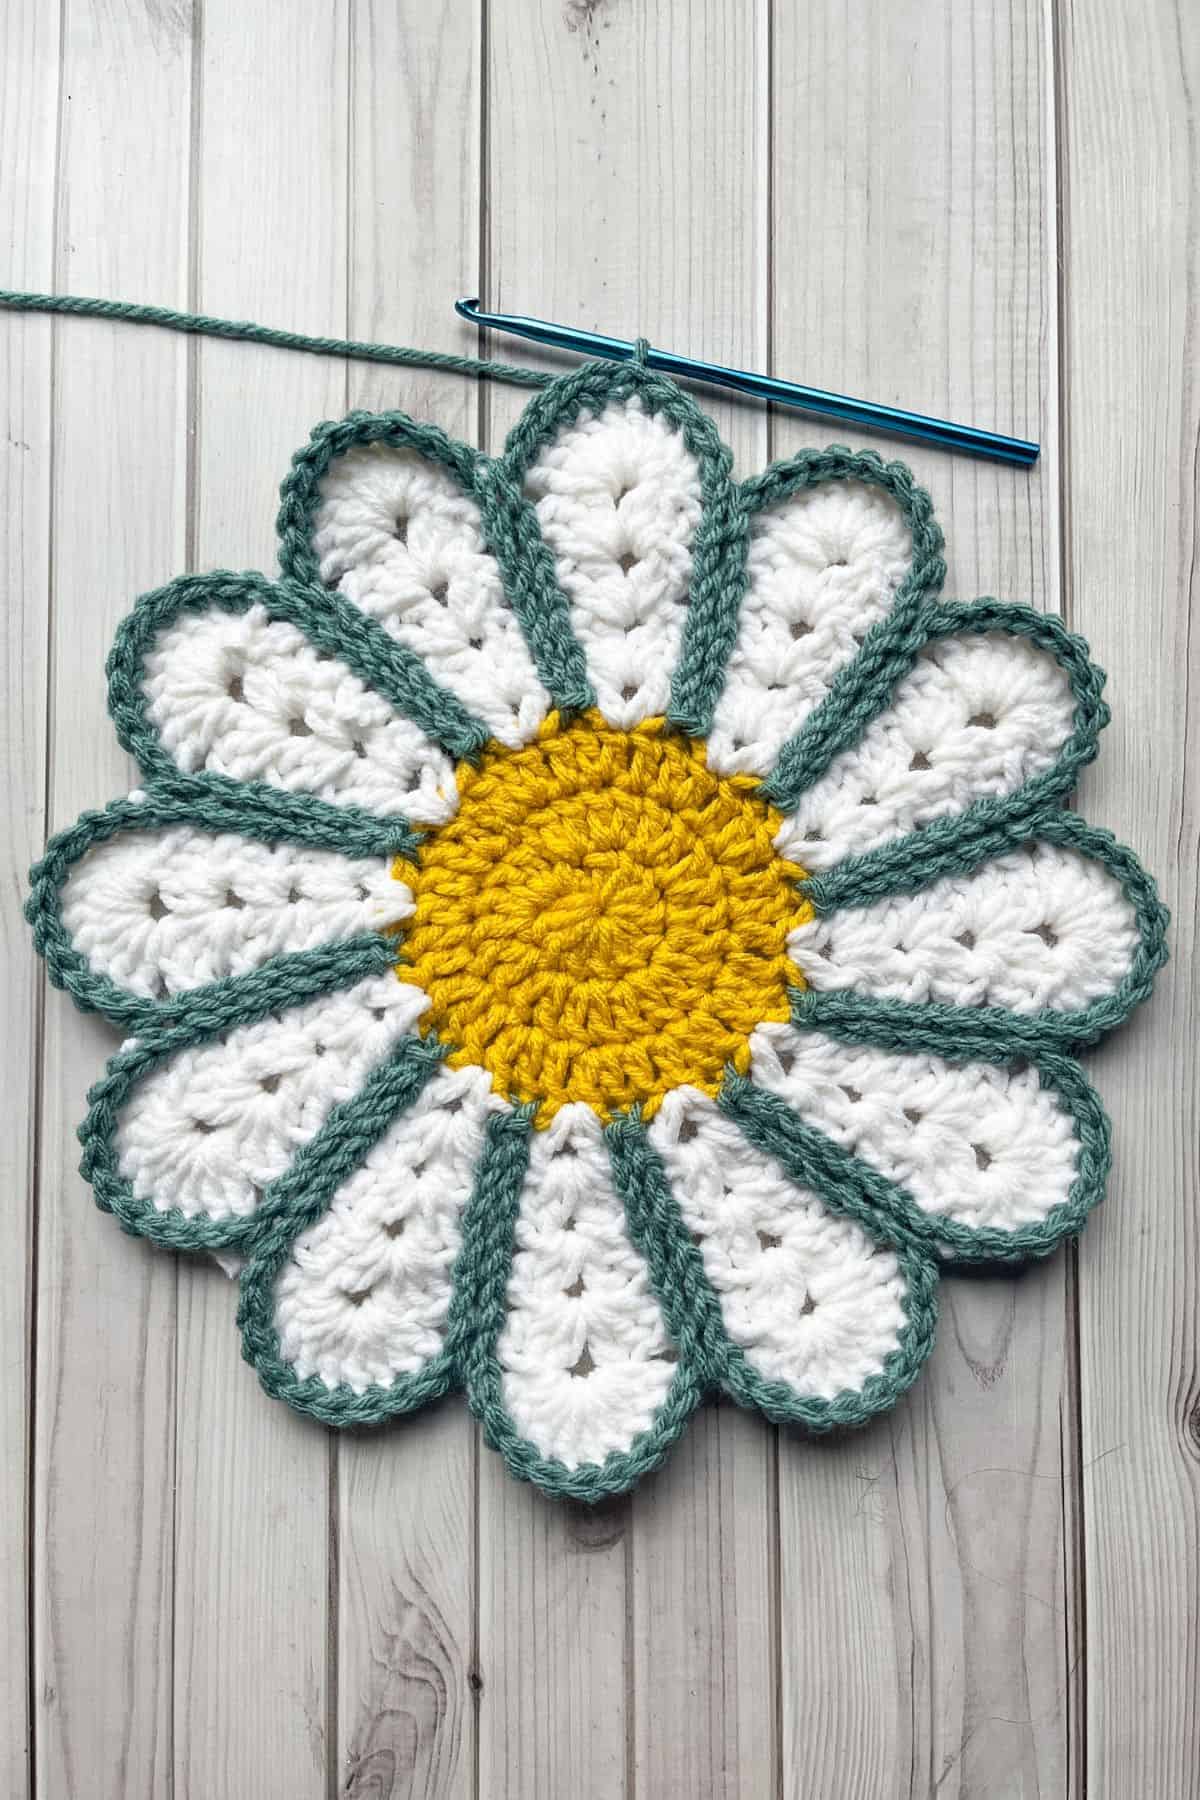
Round 9: Join your green yarn to any 5th stitch of a 9 dc shell. Once the yarn is joined, ch x1(counts as a sc). Sc x4, THEN *sl st to the ch space, rotate your piece to a comfortable angle and ch x1.
Begin working downward toward the center of the flower: Sl st to the ch space in the round below, ch x1 and repeat until you reach the yellow stitches. Sl st to the unworked yellow stitch on the left, then make a sl st in the other unworked stitch next to it. Now work back up the petal: Keep alternating ch x1 and sl st until you reach round 8. (Make sure you are making these stitches alongside the stitches you made on the way down.) Once you reach round 8, make your final sl st into the ch x1 space.
Continue with 9 single crochets across the next 9-dc shell. Repeat from * around the entire round. Make the last 4 sc stitches needed in the last shell and then sl st to the ch x1 at the beginning - make sure you do not accidentally work in the previous rounds sl st.
(I do not have final counts for this round as it is tricky to determine what stitches to count. Just make sure you have 9 sc in each top of the flower petals.)
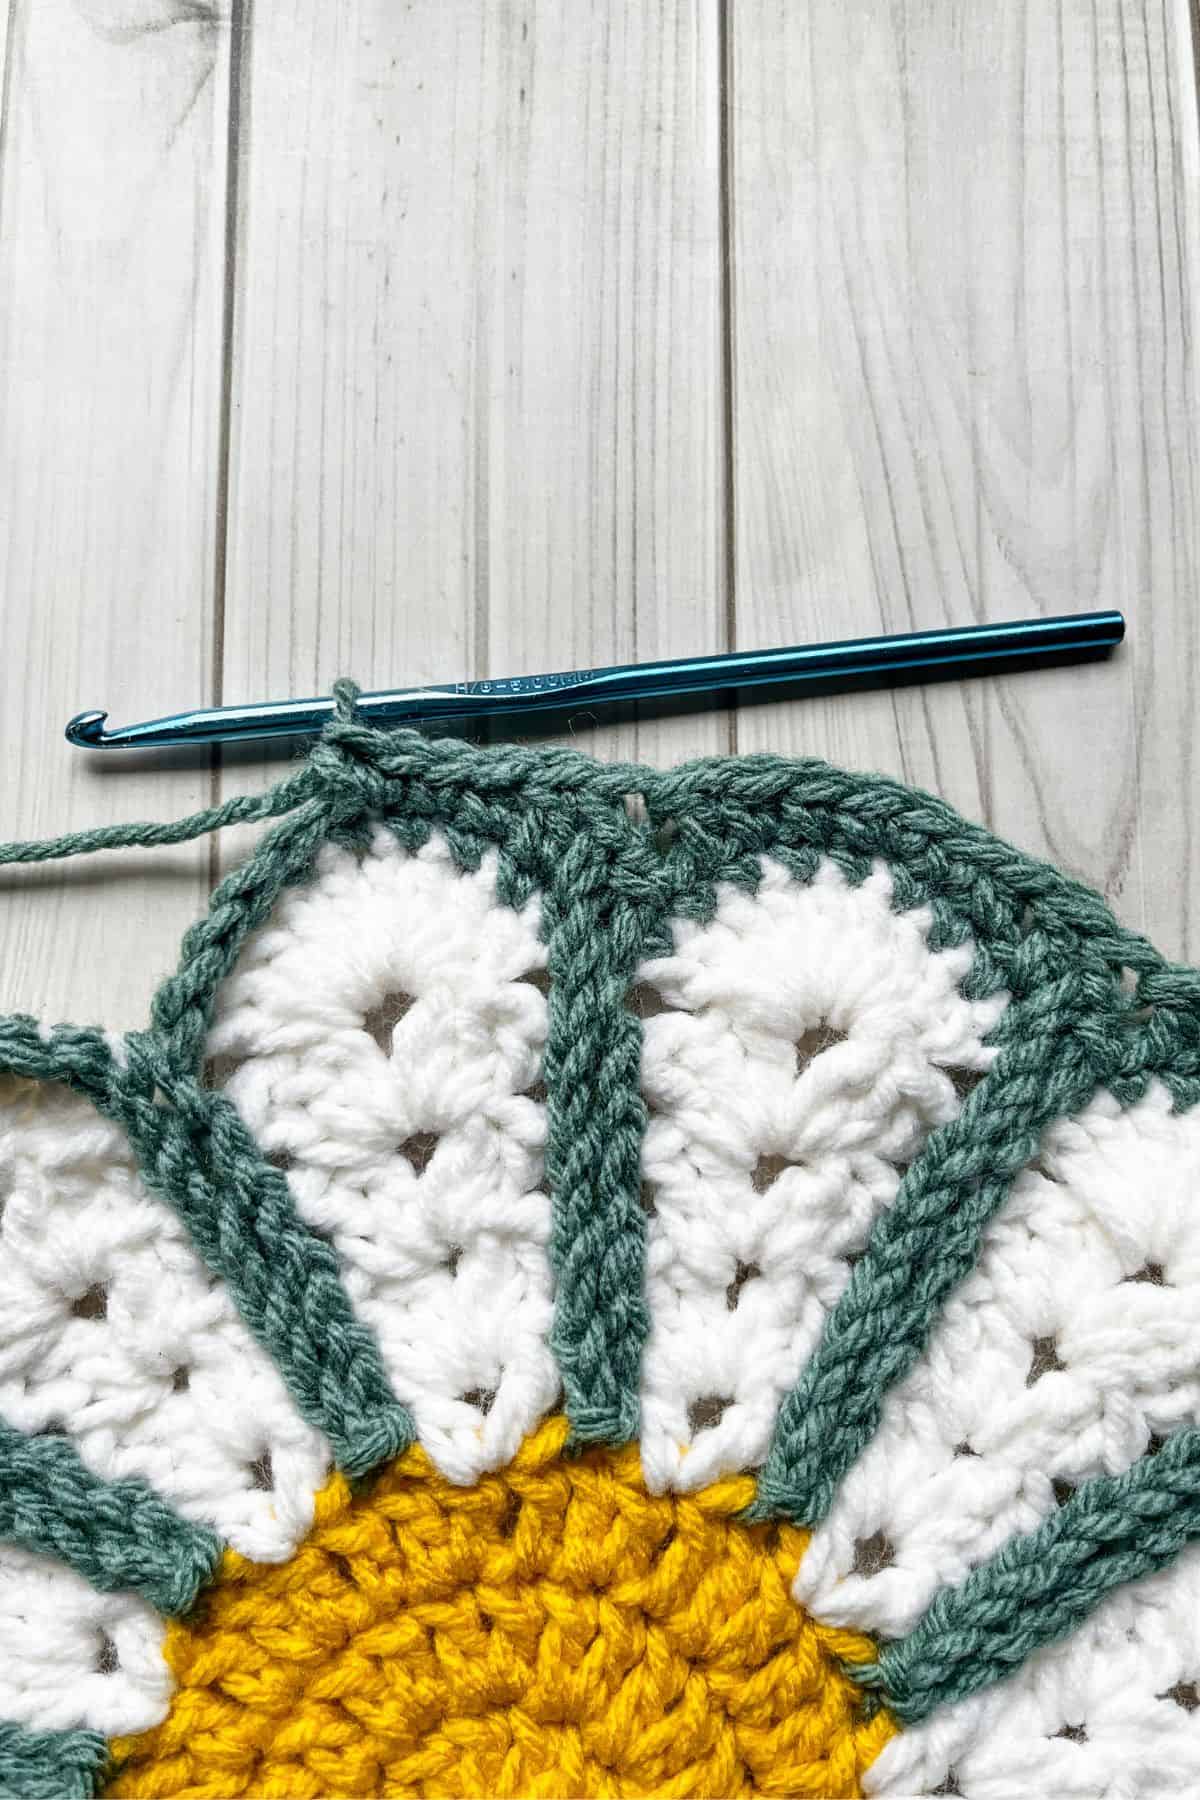
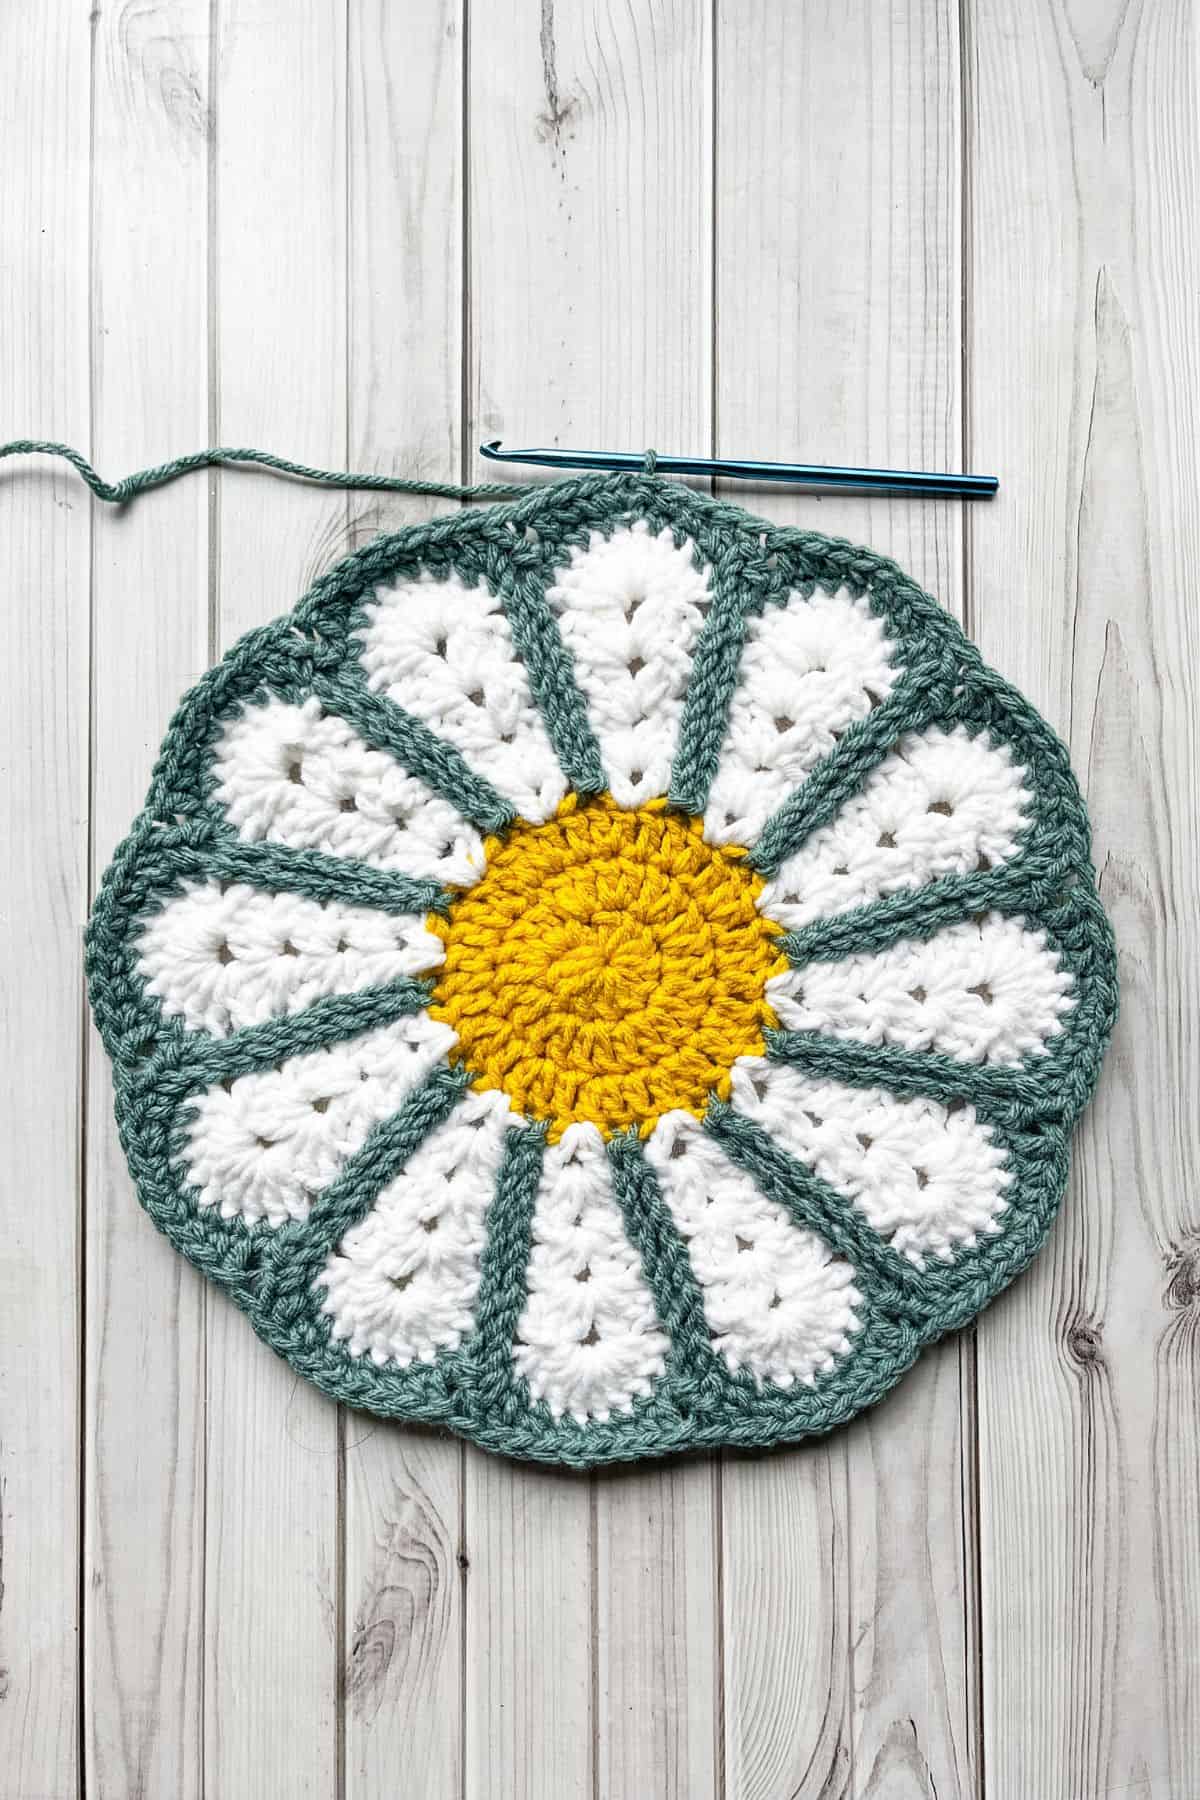
Round 10: This round we make our flower into a circle. Ch x1 then sc x1 into the same stitch you made the sl st in the previous round. Sc x1, hdc x1, dc x1 in the following stitches. *Dc2tog (dc dec) using the 9th sc of one petal and the 1st sc of the next petal. Dc x1, hdc x1, sc x1, inc x1, sc x1, hdc x1, dc x1 and repeat from * for the rest of the round. The last few stitches of the round should be a dc x1, hdc x1, sc x1, and then a sl st to the ch x1 from the beginning (108).
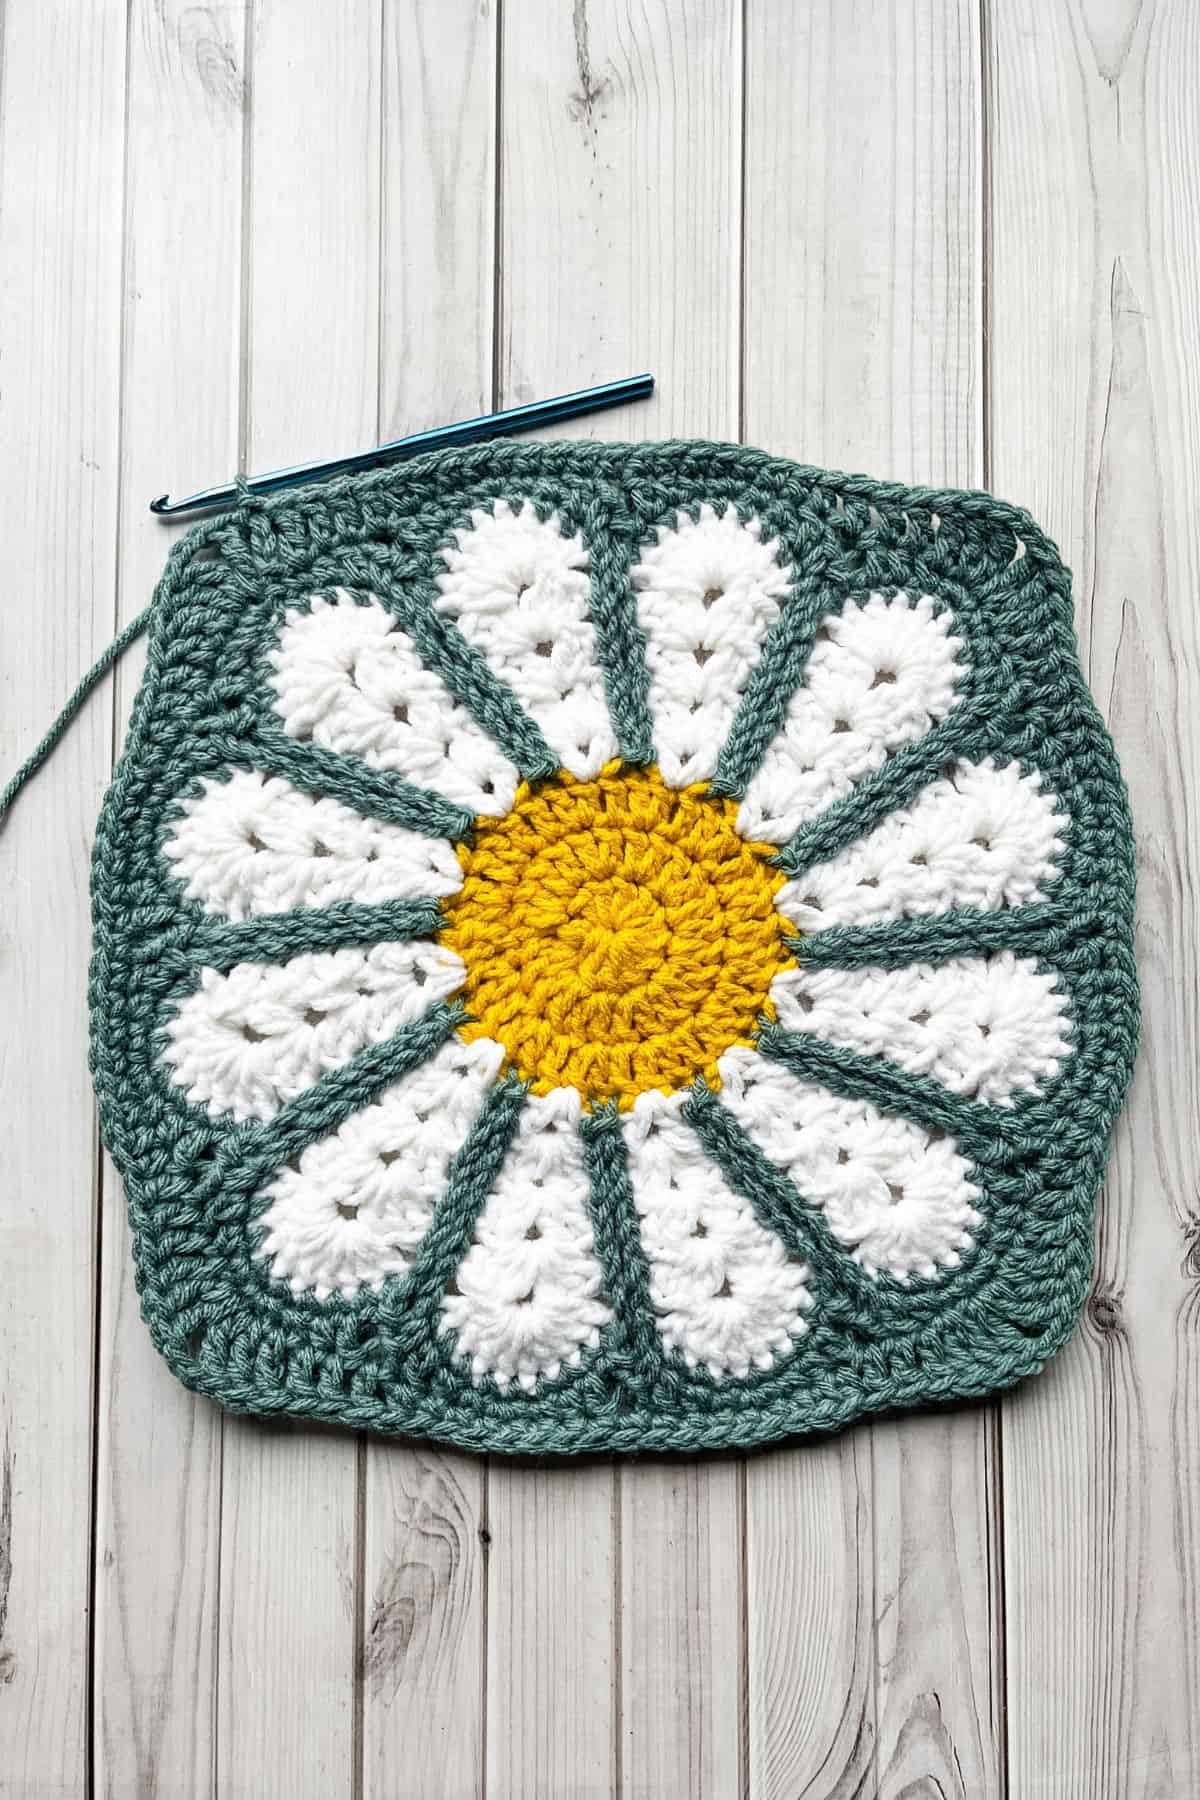
Round 11: Ch x4 + tr x1 into the same stitch you made the sl st, then ch x2 and in the next stitch tr x2. *Tr x1, dc x3, hdc x2, sc x13, hdc x2, dc x3, tr x1. Then make the corner in 2 stitches by doing tr x2, ch x2, and in the next stitch tr x2. The corner should be made in the sc increase from the round below. Repeat from * for the rest of the round. Sl st to the ch x4 at the beginning (116 + 4 ch x2 spaces).
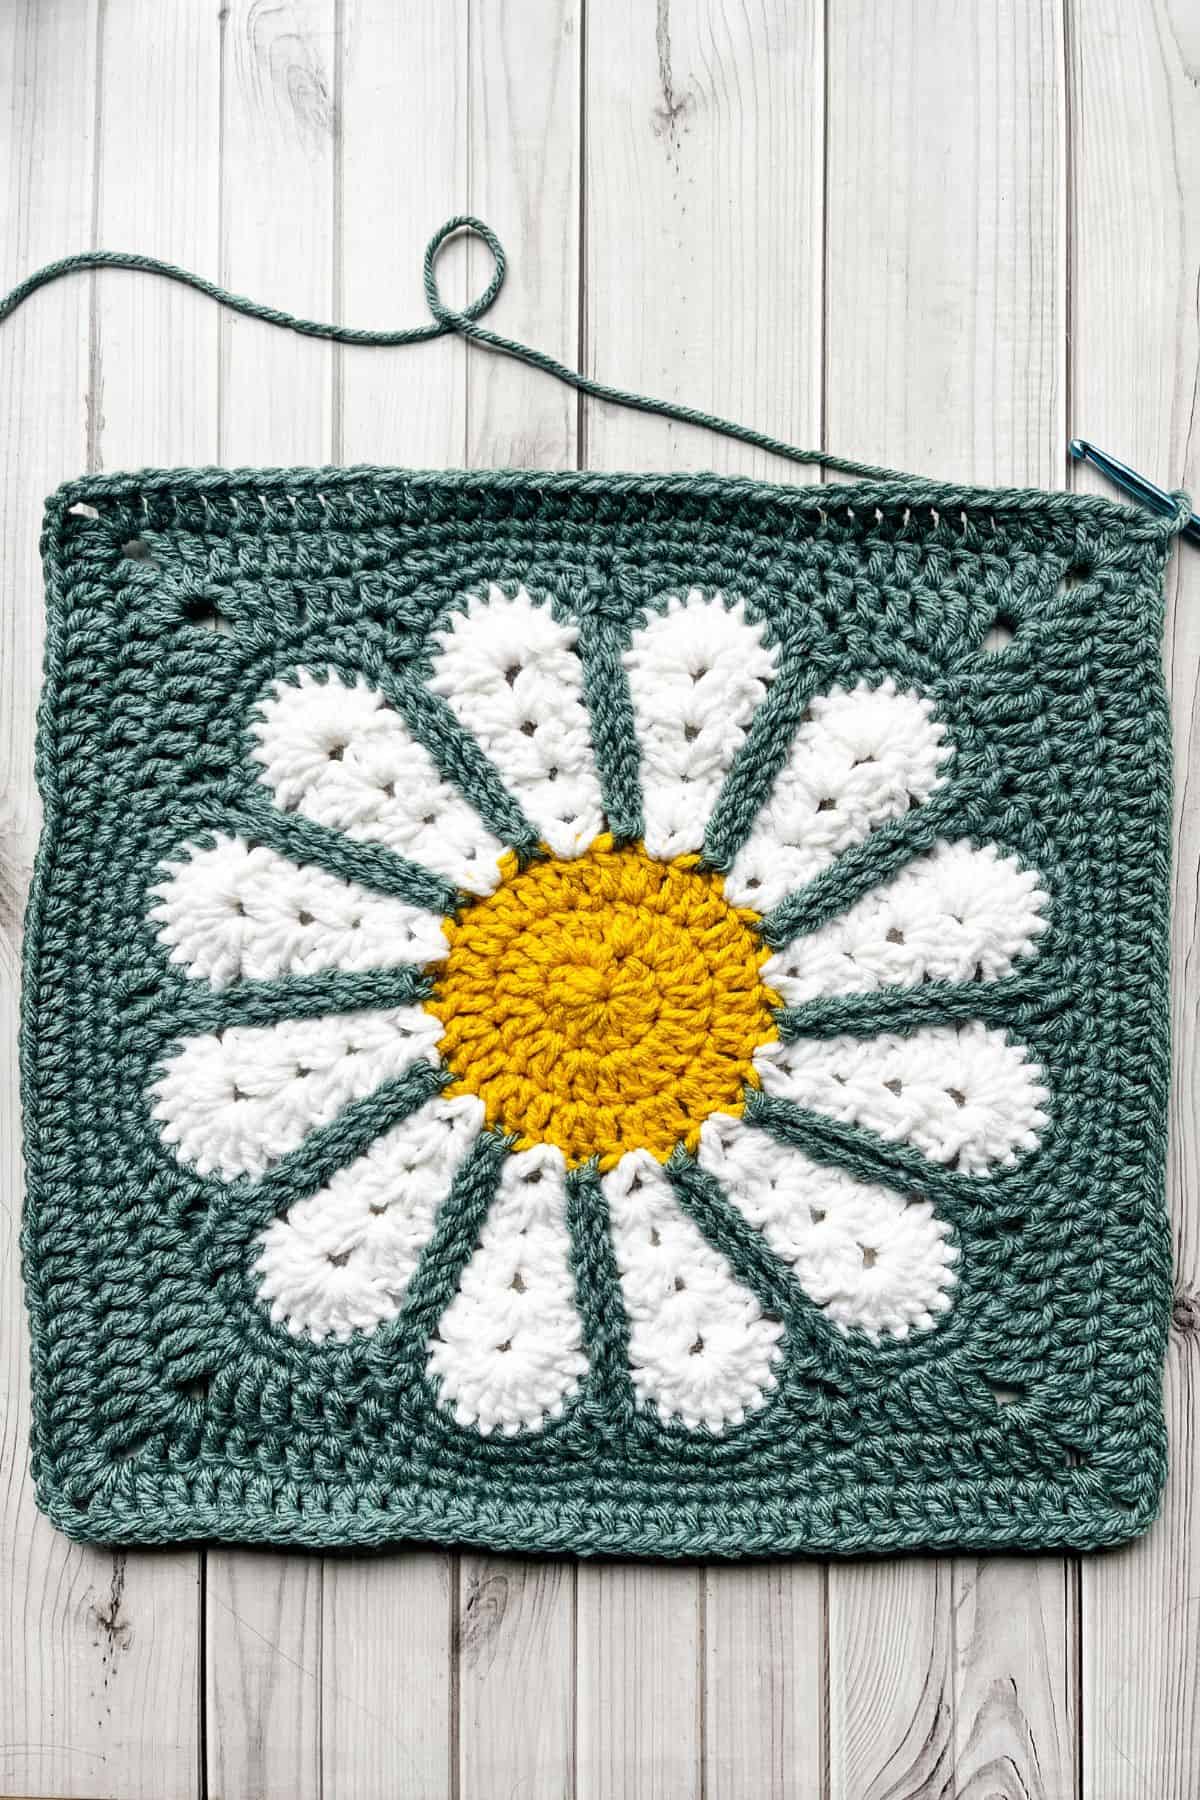
Round 12: Make sl st into the top of the tr stitch and then the ch x2 space, this will be our starting point. Ch x4, tr x1, ch x2 and tr x2 into the ch space from the round below. * dc x5, hdc x2, sc x15, hdc x2, dc x5. Make a corner by making a tr x2, ch x2, and tr x2 into the ch x2 space from the round below. Repeat from * for the rest of the round. Sl st to the ch x4 at the beginning (132 + 4 ch x2 spaces).
Round 13: Make sl st into the top of the tr stitch and then the ch x2 space, this will be our starting point. Ch x3, dc x1, ch x2, and dc x2 into the corner space. *Then dc x9, hdc x15, dc x9 and make a corner of dc x2, ch x2, dc x2 in the ch space. Repeat from * for the rest of the round. Sl st to the ch x3 at the beginning of the round. (148 + 4 ch x2 spaces).
You are going to do 2 additional crochet rows on just 1 side of each granny square (this will be the top).
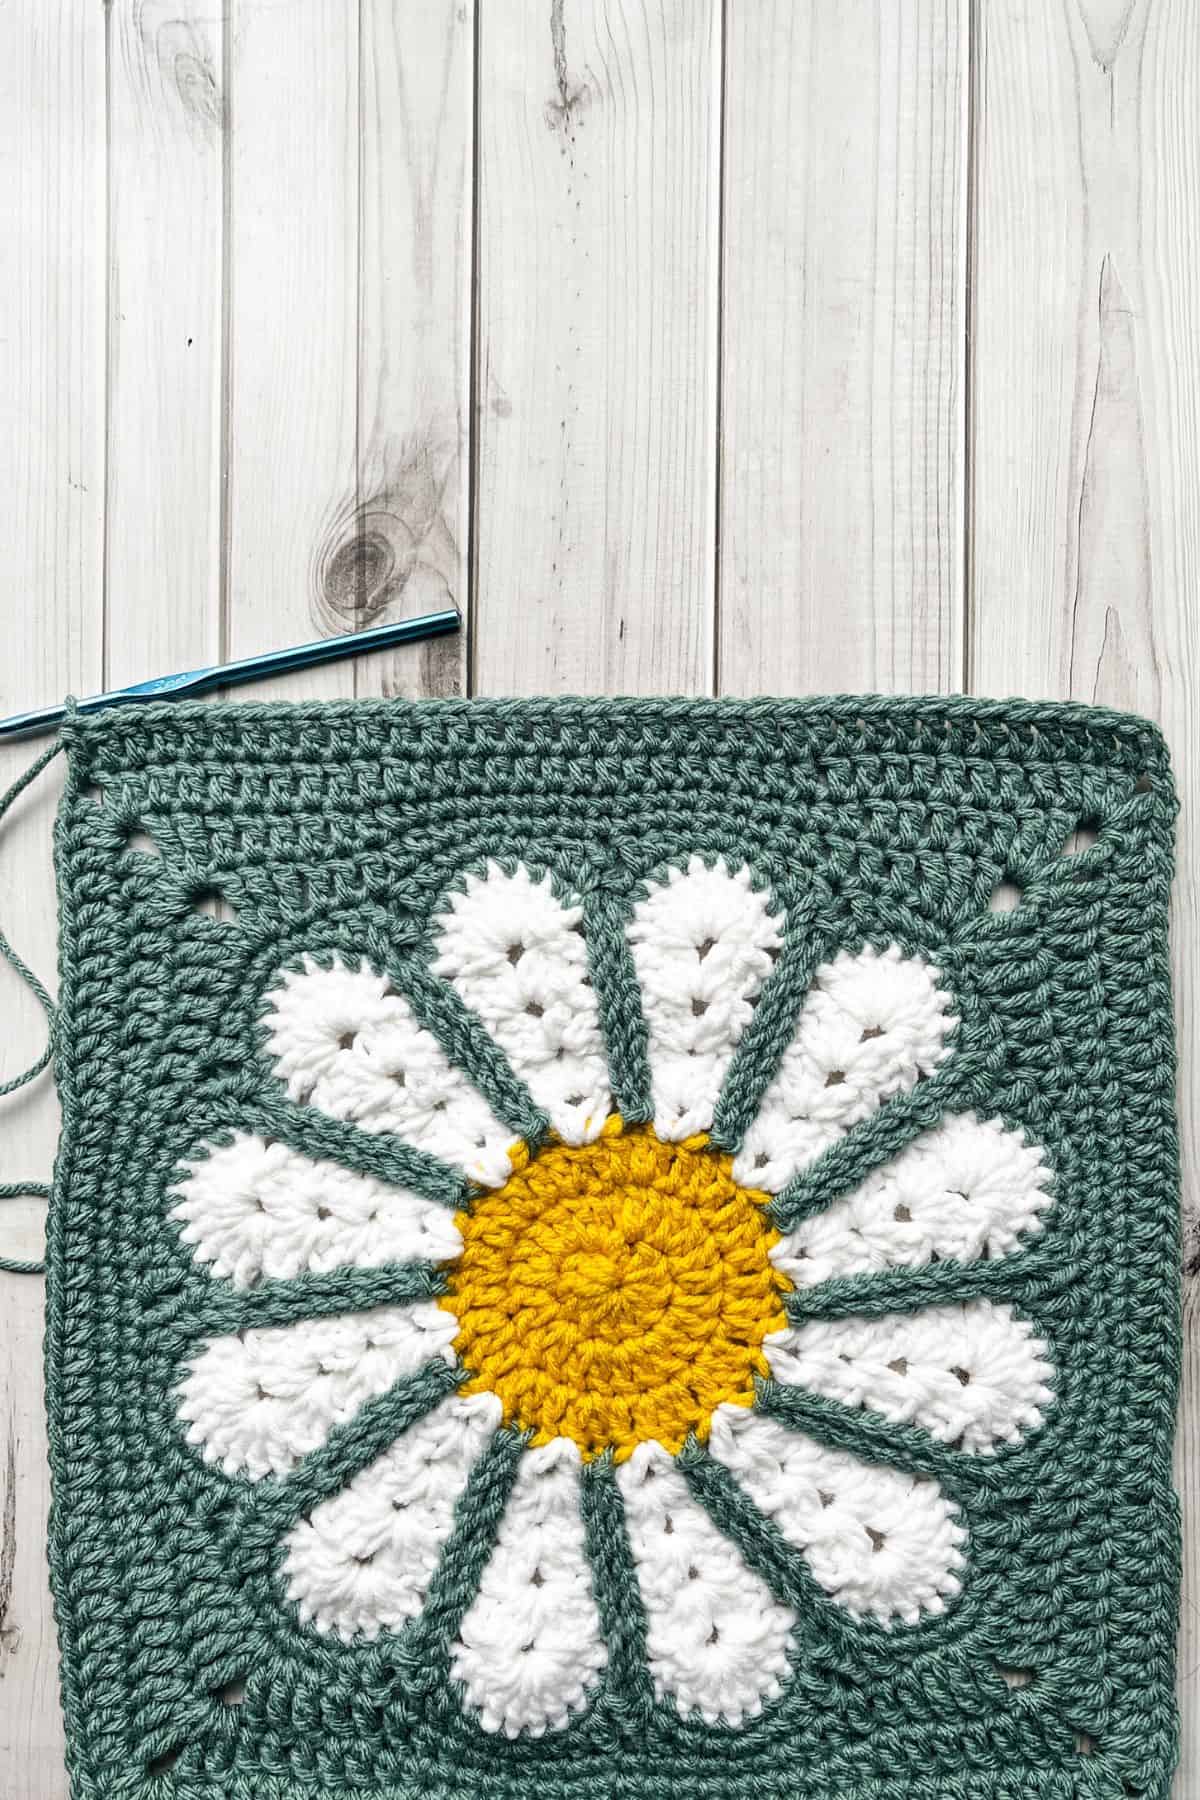
Make x2 or these for the daisy crochet bag.
Row 1: Join your green yarn into a ch x2 space. Then ch x3 and dc down one side of the granny square. Make the last dc into the next ch x2 space. Then ch x1 and turn.
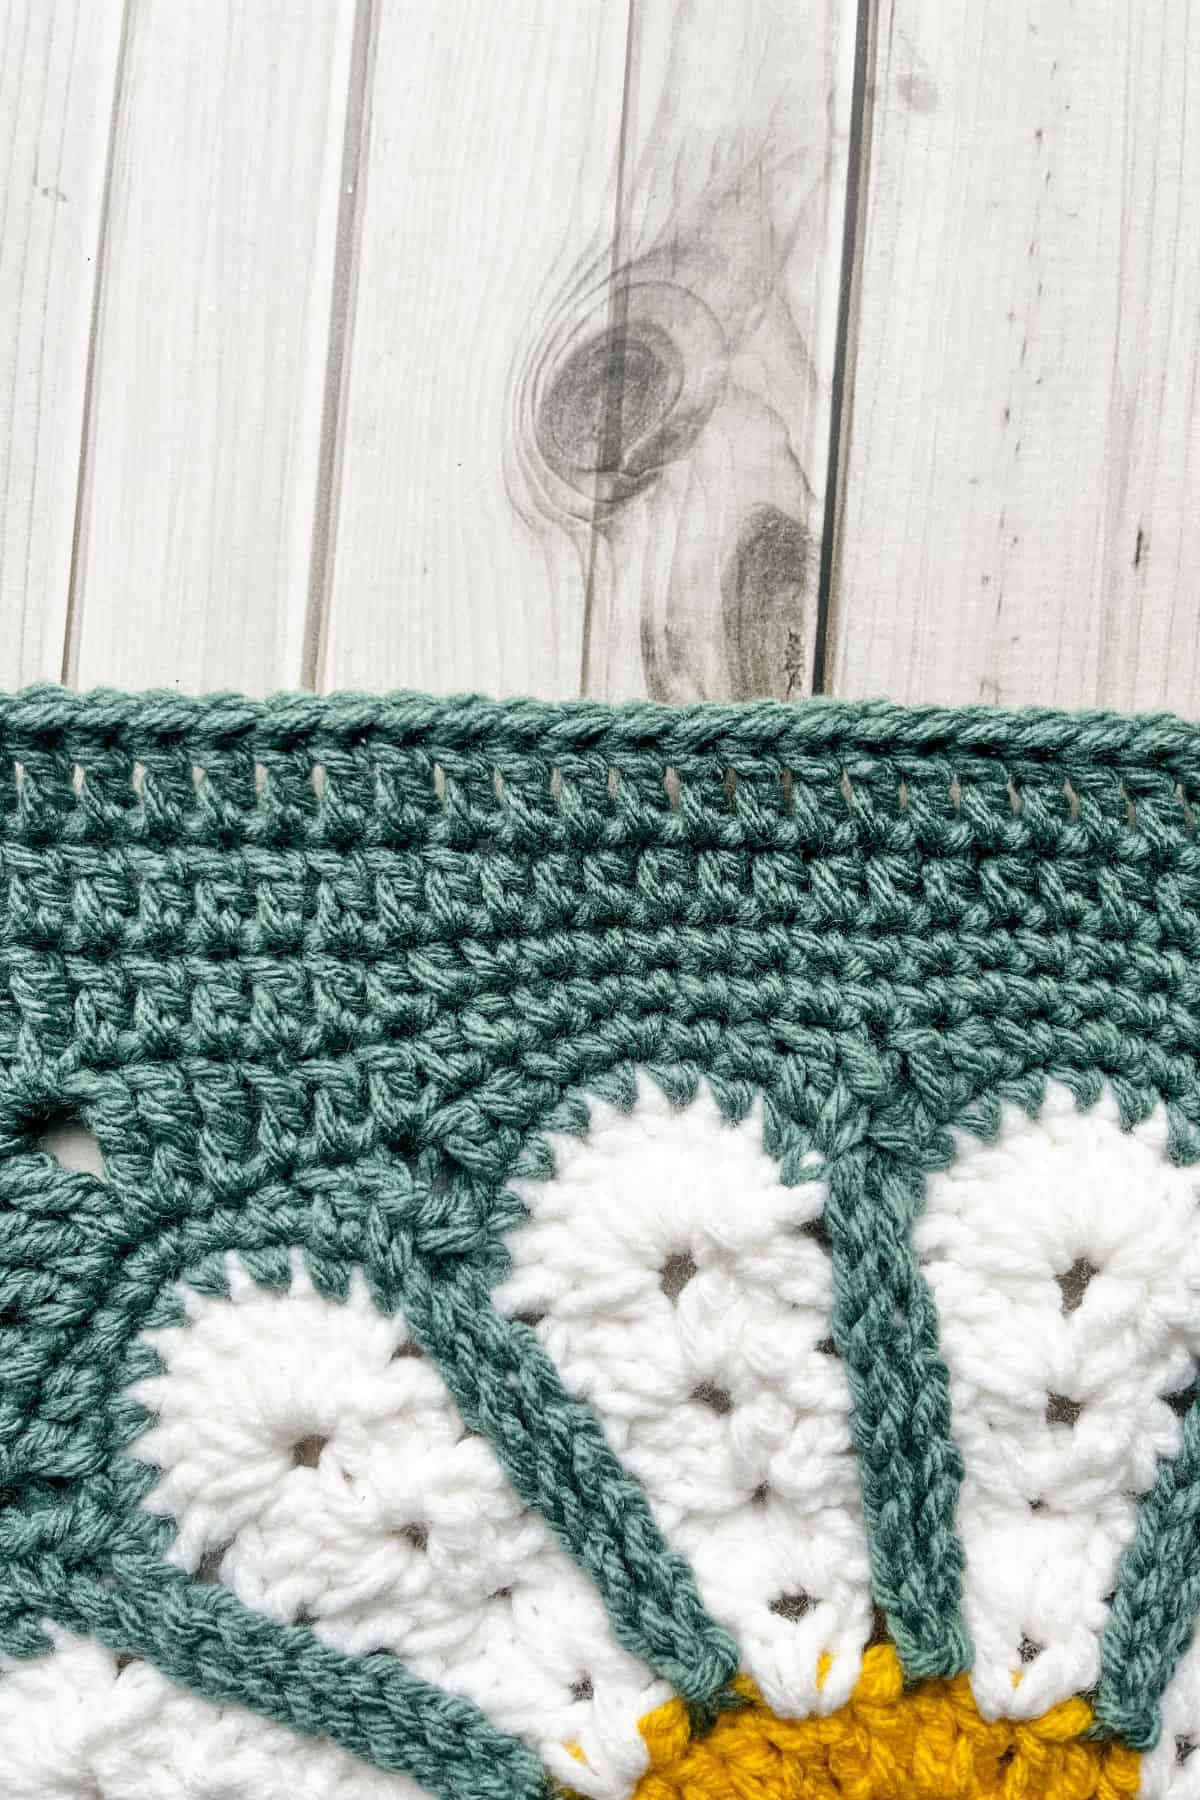
Row 2: Make a sl st into every stitch in this row. Then fasten off the yarn when you get to the end of the row. Make sure you weave in any ends.
And that's the base of the daisy crochet bag pattern!
Crochet Bag Strap:
This is also the middle part of the bag.

Row 1: With the green yarn, ch x225.
Row 2: Starting in the second ch from the hook, make a sc. Continue making sc stitches for the rest of the row (224). Ch x1 and turn.Row 3-5: Sc in every stitch, ch x1 and turn (224). THen after row 5, fasten off the yarn but leave a long tail for sewing.
Sewing:
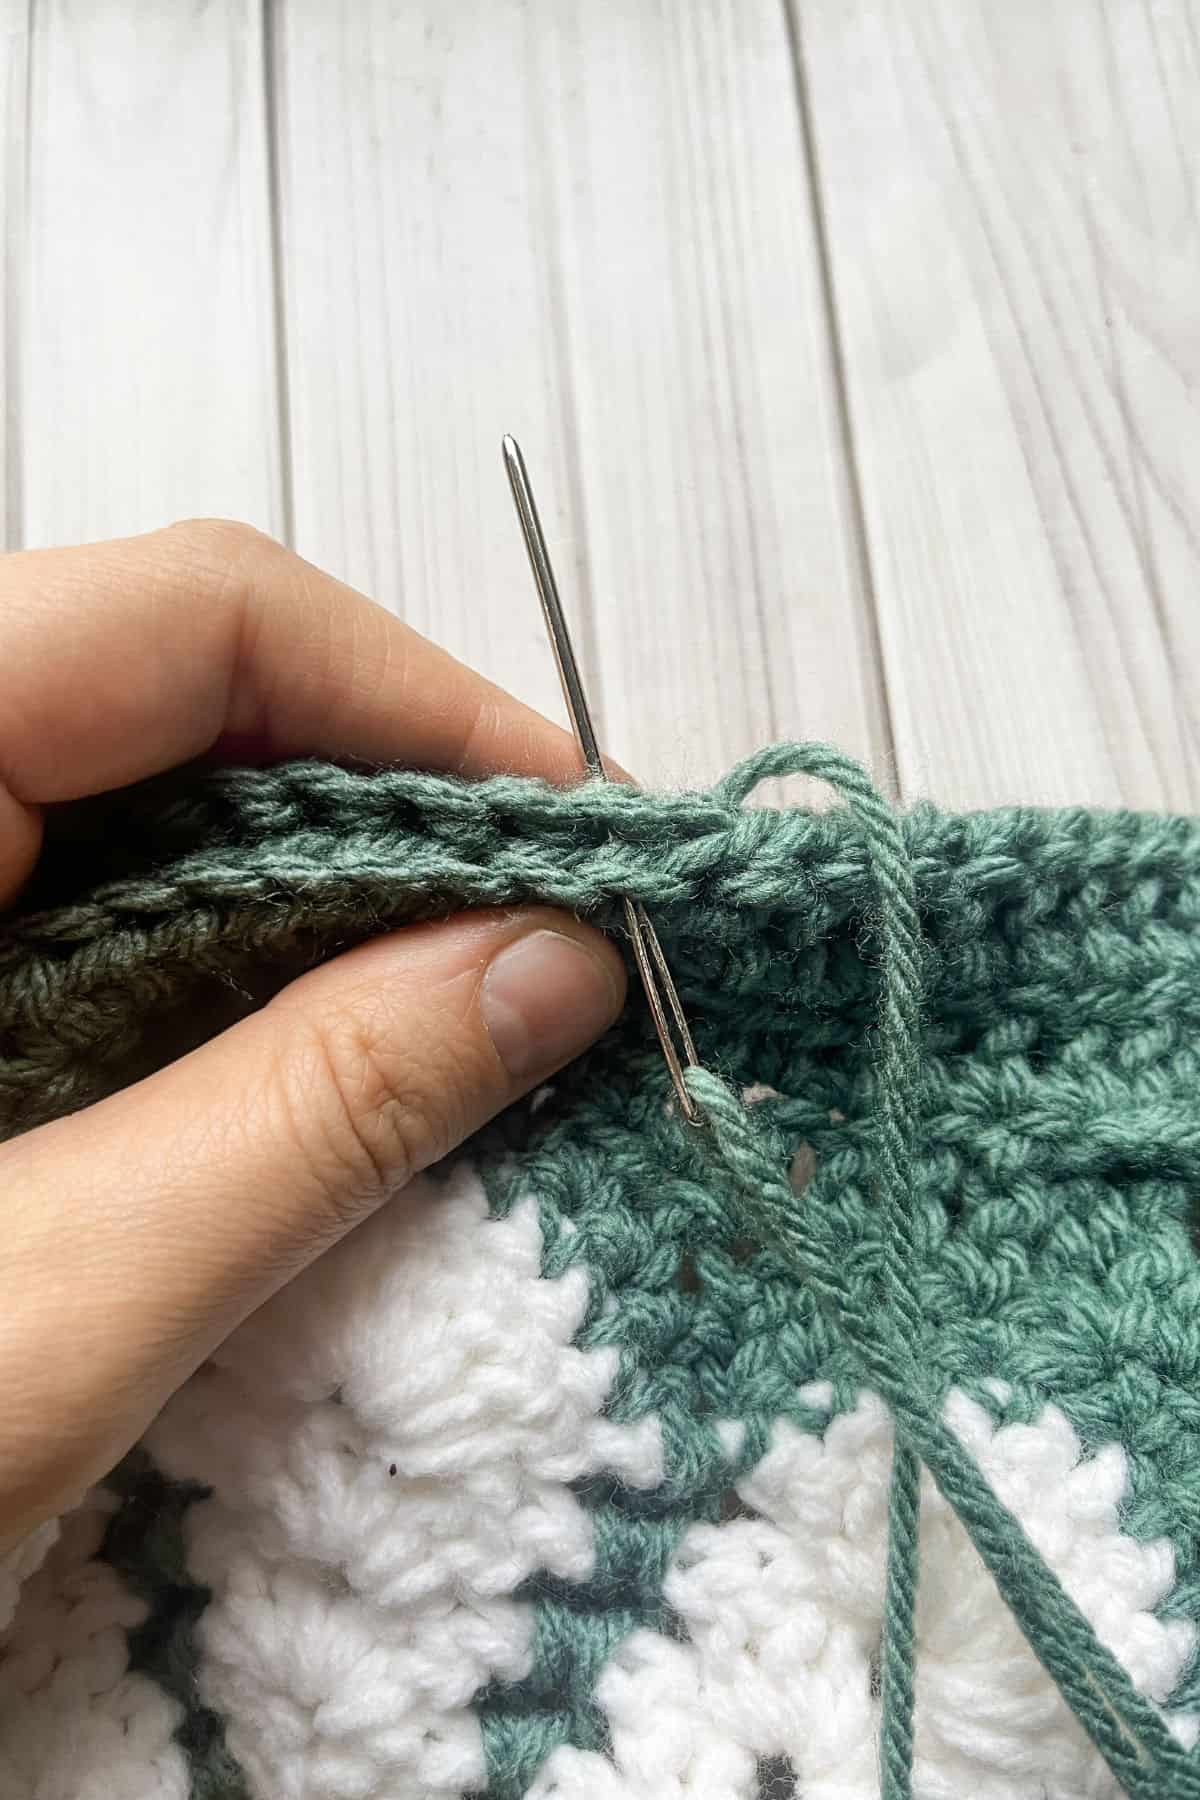
When it comes time to sew the squares to the middle-strap, make sure you have the sides that have the 2 extra rows facing the same direction.
With the long tail you left on the bag strap, sew each square to the strap. You want to start at one side of the opening and then work your way down, over, and up 3 sides of the bag. Then fasten off the yarn.
I just whip stitched the bag together by going through both loops of the granny square and the bag strap. I also made sure to do the sewing on what will be the inside of the bag.
To attach the other granny square of the daisy crochet bag, attach new yarn to the bag strap and repeat what you did before. Just make sure that you line the bag up to what has already been attached so it's easier to sew together. You can use pins, safety clips or anything else to make sure the 4 corners line up. Then begin sewing.
Once the squares have been attached, sew the loose end of the strap to the other side of the bag.
Weave in the ends.
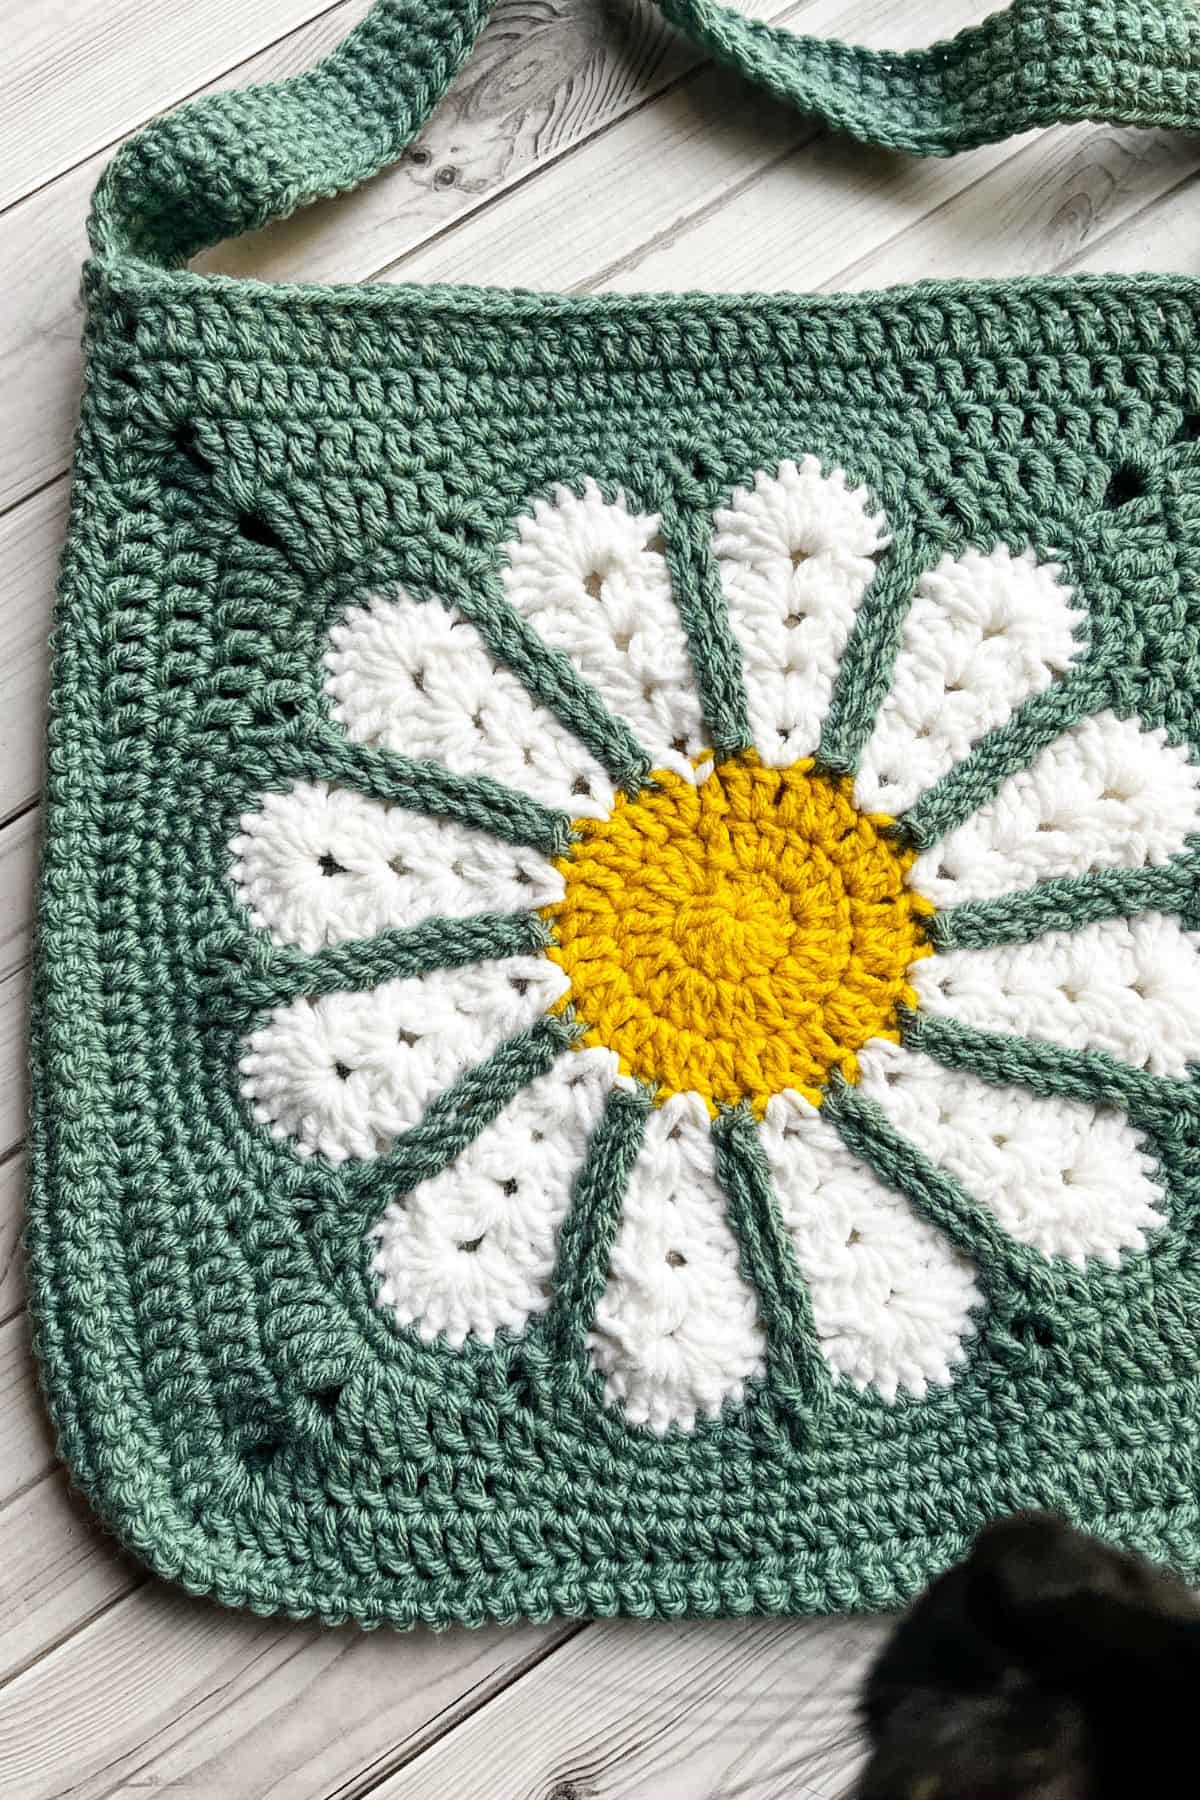
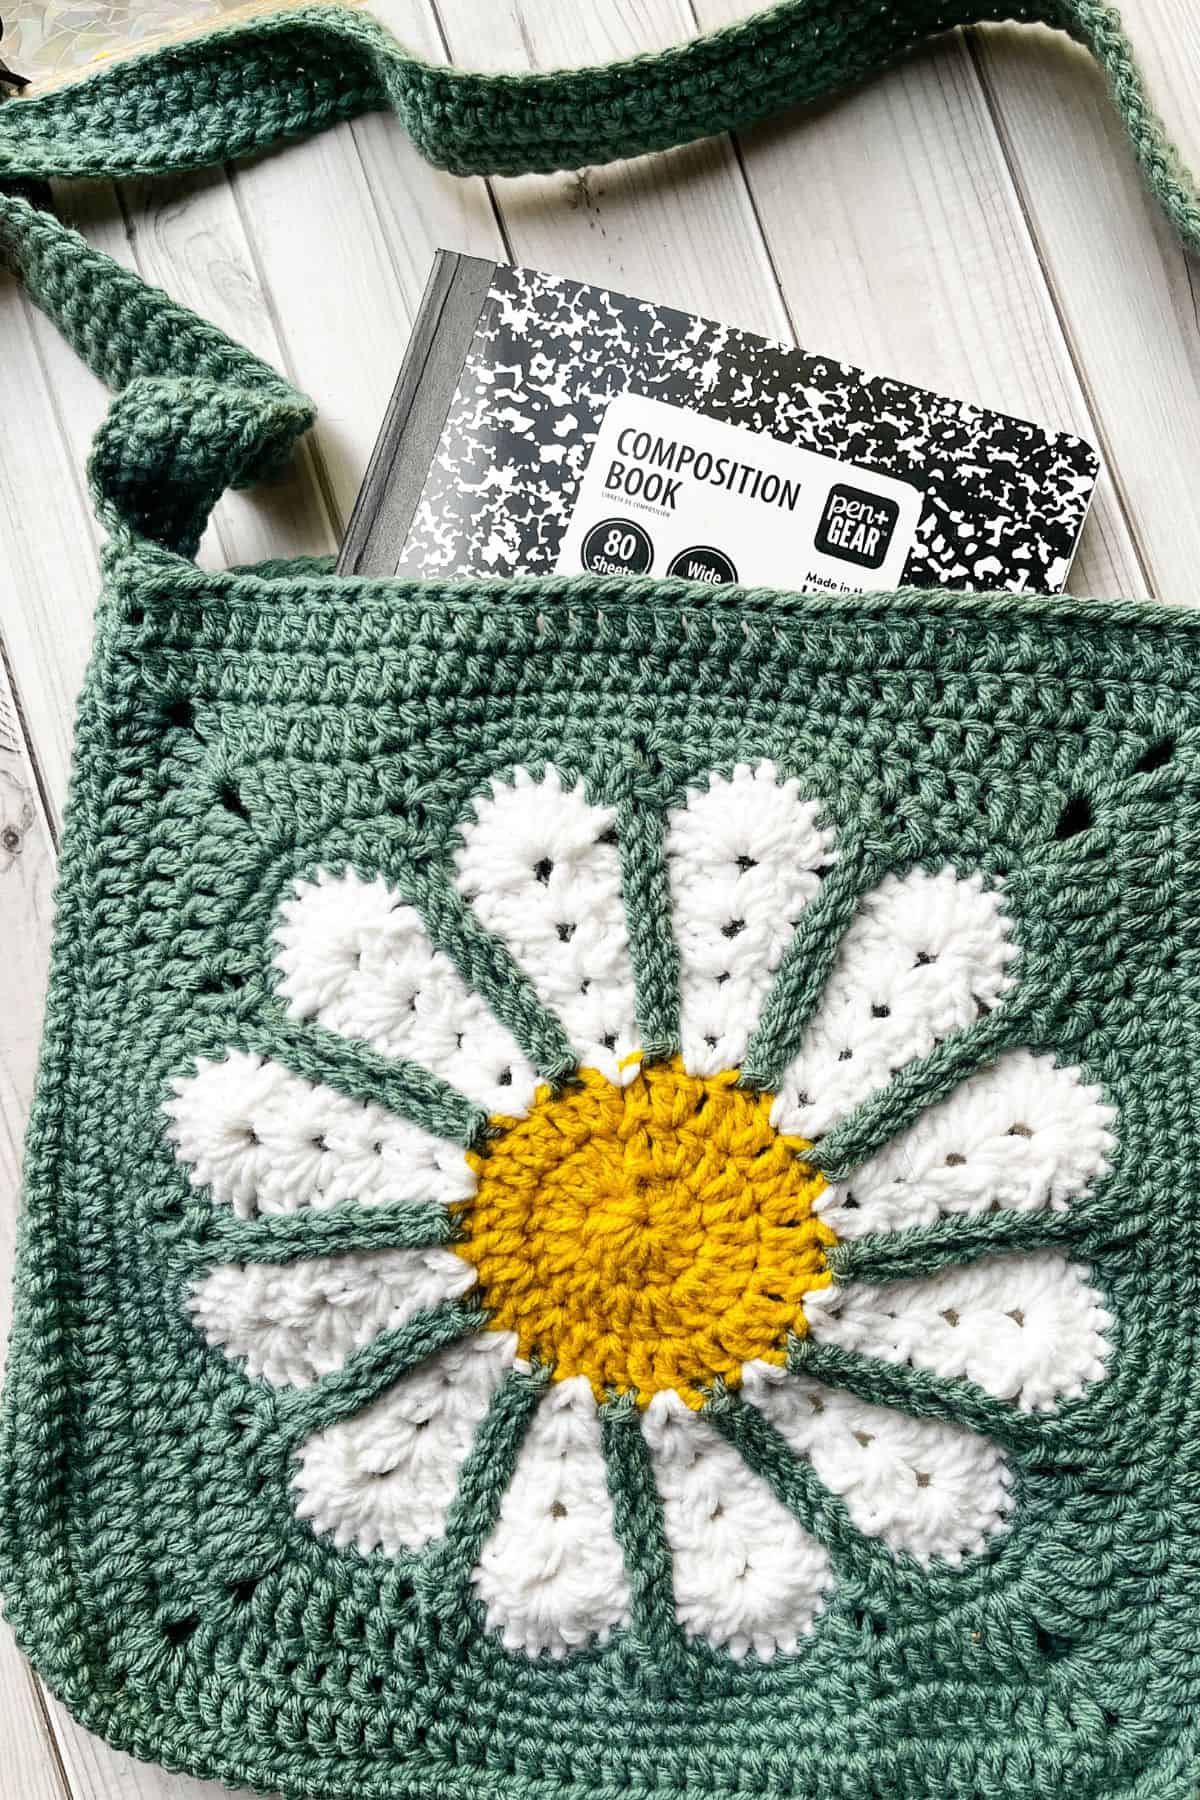
Now the daisy crochet bag pattern is done! I hope you enjoy your new daisy crochet bag, a labor of love but worth it!
If you are interested in making other crochet flower bag patterns, check out my crochet African flower bag pattern, although that pattern does require more sewing. My crochet sunflower bag pattern uses minimal sewing though!
If you are looking for any floral accessories to add to your bag check out my crochet daisy keychain pattern! A daisy bag with a daisy charm? Cute!!
Thanks again for visiting, and happy crocheting! Enjoy your new daisy crochet bag!
🐌Expert Tips
- It might curl at first — don’t panic!: The daisy crochet square may not lay flat during the early rounds, but by the time you finish Round 10, everything should settle beautifully.
- Count your stitches carefully: With so many petals and loops, it’s easy to miscount. Stitch markers can be your best friend here.
- Block your squares: Blocking helps your squares lay flat for the daisy crochet bag pattern and makes sewing them much easier. Steam blocking works well for acrylic yarn.
🧵Pattern FAQs
Adding a fabric lining can prevent the daisy crochet bag from stretching.
While the daisy crochet bag is made with just 2 granny squares, it's a little tricky to significantly reduce or enlarge the bag. My recommendations are to use thinner yarn and smaller hook for a smaller bag and larger yarn and hook for a bigger bag.
If you are unsure of how big you need the strap to be for the daisy crochet bag, you can always make the strap in short rows instead of long rows. Then if you need to add more or take rows off, you can measure it before sewing the end of the strap to the bag.
🧶More Crochet Bag Patterns

If you tried this Daisy Crochet Bag Pattern (or any other pattern on my website), please let me know how it went in the 📝 comments below. I'd love to hear from you!
Daisy Crochet Bag Pattern
Materials
- Caron One Pound - White
- Caron One Pound - Sunflower
- Caron One Pound - Hosta
- 5 mm hook
- Tapestry Needle
- Optional: Fabric for lining the bag
Abbreviations (US terms)
- Magic ring - mr
- Chains - ch
- Slip stitch - sl st
- Single crochet - sc
- Half double crochet - hdc
- Double crochet - dc
- Triple crochet - tr
- Increase - inc
- Double crochet decrease (dc2tog)
Notes
- Time: Each square for the crochet daisy tote bag takes about an hour to complete. That might seem like a long time, but it does equal less sewing time so overall this daisy crochet bag pattern might be quicker for you to complete than a normal one with many little granny squares.
- Size: The finished daisy granny square is approximately 12–13 inches across, making it perfect for quick projects with fewer pieces to stitch together. You only need 2 squares to complete my daisy crochet bag pattern.
- Intermediate friendly: The crochet daisy granny square design may look intricate, but it’s super easy as long as you know foundational crochet stitches — the most challenging part is just counting your stitches.
Instructions
How to crochet a daisy granny square:
- Round 1: Using the yellow yarn, make a mr and immediately ch x3 (counts as a dc). Then dc x11 into the mr. Pull tight and to secure the round, sl st to the beginning chains in the round (12).
- Round 2: Ch x3, then dc into the sl st. Next, dc inc in every stitch from the previous round. Then sl st to the beginning chains (24).
- Round 3: Ch x3, then dc into the sl st. *Dc into the next stitch then a dc inc in the following stitch. Repeat from * for the rest of the round. Then sl st to the beginning chains in the round (36). Fasten off the yellow yarn and join the white.
- Round 4: Ch x4 (counts as a dc + ch), dc into the sl st you made to join the round. Then ch x1 and *skip 2 dc, (dc x1, ch x1, dc x1) into the next stitch. Next ch x1. Repeat from * for the rest of the round. Once you are done with the round, sl st to the 3rd ch you made at the beginning (12 groups of (1dc, ch 1, 1 dc)).
- Round 5: Make a sl st into the ch x1 space (that 4th ch from the round before) as this will be your beginning point for this round. Ch x3 (counts as a dc), dc x1, ch x1, dc x2 into that ch space. Then ch x1, skip the next ch space and *(dc x2, ch x1, dc x2) into the next ch space (inside the v shape).
- Next ch x1 and skip the next ch space. Repeat from * for the rest of the round. Sl st to the 3rd ch at the beginning to close the round (12 groups of ( 2 dc, ch 1, 2 dc)).
- Round 6: Sl st into the dc and then the ch space in order to start this round. Then repeat round 5 (12 groups of ( 2 dc, ch 1, 2 dc)).
- There might be some slight curling here- it should be completely flat after round 10.
- Round 7: Sl st into the dc and then the ch space in order to start this round. Then ch x3, dc x2, ch x1, dc x3 into the ch space. Next ch x1, *skip the following ch space, and then in the ch space in the v shape - dc x3, ch x1, dc x3. Then ch x1. Repeat from * for the rest of the round. Sl st to the 3rd ch in the beginning (12 groups of ( 3 dc, ch 1, 3 dc)).
- Round 8: Sl st into the dc stitches and then the ch space in order to start this round. Then ch x3 and dc x8. Ch x1 and then *skip the next ch space and dc x9 into the following ch space and then ch x1. Repeat from * for the rest of the round. Then sl st to the 3rd ch in the beginning (12 groups of (9 dc)).
- Fasten off the white and weave in the tail. The 9 dc shells are the top of our flower petals - there should be 12 of them.
- Round 9: Join your green yarn to any 5th stitch of a 9 dc shell. Once the yarn is joined, ch x1(counts as a sc). Sc x4, THEN *sl st to the ch space, rotate your piece to a comfortable angle and ch x1.
- Begin working downward toward the center of the flower: Sl st to the ch space in the round below, ch x1 and repeat until you reach the yellow stitches. Sl st to the unworked yellow stitch on the left, then make a sl st in the other unworked stitch next to it. Now work back up the petal: Keep alternating ch x1 and sl st until you reach round 8. (Make sure you are making these stitches alongside the stitches you made on the way down.) Once you reach round 8, make your final sl st into the ch x1 space.
- Continue with 9 single crochets across the next 9-dc shell. Repeat from * around the entire round. Make the last 4 sc stitches needed in the last shell and then sl st to the ch x1 at the beginning - make sure you do not accidentally work in the previous rounds sl st.
- (I do not have final counts for this round as it is tricky to determine what stitches to count. Just make sure you have 9 sc in each top of the flower petals.)
- Round 10: This round we make our flower into a circle. Ch x1 then sc x1 into the same stitch you made the sl st in the previous round. Sc x1, hdc x1, dc x1 in the following stitches. *Dc2tog (dc dec) using the 9th sc of one petal and the 1st sc of the next petal. Dc x1, hdc x1, sc x1, inc x1, sc x1, hdc x1, dc x1 and repeat from * for the rest of the round. The last few stitches of the round should be a dc x1, hdc x1, sc x1, and then a sl st to the ch x1 from the beginning (108).
- Round 11: Ch x4 + tr x1 into the same stitch you made the sl st, then ch x2 and in the next stitch tr x2. *Tr x1, dc x3, hdc x2, sc x13, hdc x2, dc x3, tr x1. Then make the corner in 2 stitches by doing tr x2, ch x2, and in the next stitch tr x2. The corner should be made in the sc increase from the round below. Repeat from * for the rest of the round. Sl st to the ch x4 at the beginning (116 + 4 ch x2 spaces).
- Round 12: Make sl st into the top of the tr stitch and then the ch x2 space, this will be our starting point. Ch x4, tr x1, ch x2 and tr x2 into the ch space from the round below. * dc x5, hdc x2, sc x15, hdc x2, dc x5. Make a corner by making a tr x2, ch x2, and tr x2 into the ch x2 space from the round below. Repeat from * for the rest of the round. Sl st to the ch x4 at the beginning (132 + 4 ch x2 spaces).
- Round 13: Make sl st into the top of the tr stitch and then the ch x2 space, this will be our starting point. Ch x3, dc x1, ch x2, and dc x2 into the corner space. *Then dc x9, hdc x15, dc x9 and make a corner of dc x2, ch x2, dc x2 in the ch space. Repeat from * for the rest of the round. Sl st to the ch x3 at the beginning of the round. (148 + 4 ch x2 spaces).
- You are going to do 2 additional crochet rows on just 1 side of each granny square (this will be the top).
- Row 1: Join your green yarn into a ch x2 space. Then ch x3 and dc down one side of the granny square. Make the last dc into the next ch x2 space. Then ch x1 and turn.
- Row 2: Make a sl st into every stitch in this row. Then fasten off the yarn when you get to the end of the row. Make sure you weave in any ends.
- And that's the base of the daisy crochet bag pattern!
- Make x2 or these for the daisy crochet bag.
Crochet Bag Strap:
- This is also the middle part of the bag.
- Row 1: With the green yarn, ch x225.
- Row 2: Starting in the second ch from the hook, make a sc. Continue making sc stitches for the rest of the row (224). Ch x1 and turn.
- Row 3-5: Sc in every stitch, ch x1 and turn (224). THen after row 5, fasten off the yarn but leave a long tail for sewing.
Sewing:
- When it comes time to sew the squares to the middle-strap, make sure you have the sides that have the 2 extra rows facing the same direction.
- With the long tail you left on the bag strap, sew each square to the strap. You want to start at one side of the opening and then work your way down, over, and up 3 sides of the bag. Then fasten off the yarn. I just whip stitched the bag together by going through both loops of the granny square and the bag strap. I also made sure to do the sewing on what will be the inside of the bag.
- To attach the other granny square of the daisy crochet bag, attach new yarn to the bag strap and repeat what you did before. Just make sure that you line the bag up to what has already been attached so it's easier to sew together. You can use pins, safety clips or anything else to make sure the 4 corners line up. Then begin sewing.
- Once the squares have been attached, sew the loose end of the strap to the other side of the bag.
- Weave in the ends.
- Now the daisy crochet bag pattern is done! I hope you enjoy your new daisy crochet bag, a labor of love but worth it!
- Thanks again for visiting, and happy crocheting! Enjoy your new daisy crochet bag!


Leave a Reply