
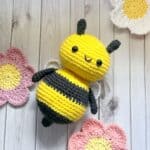
My BEE-autiful Crochet Bee Plushie is the perfect bee pattern for any skill level! As long as you can single crochet in the round, this free honey bee crochet pattern should not be a problem for you to tackle!

I love bees—who doesn’t? Bees are essential for our survival, so why not show them a bit of love by making a crochet bee amigurumi?
Bees are great for any occasion—birthdays, school events, baby showers—the list is endless. And the recipient of this crochet bee plushie will think of them as un-BEE-lievably cute.
If you're considering making this crochet bee plushie pattern for a baby shower, you can pair it with my crochet honeycomb blanket, which is more like a lovey and can be a wonderful addition to a bee-themed baby shower gift!
Other cute blankets you can pair the crochet amigurumi bee with are my crochet strawberry blanket and crochet grit stitch blanket.
Jump to:
✏️ Things To Note:
- Yarn Choices: I used acrylic yarn for the crochet bee pattern, but any yarn type can work for the pattern, including cotton yarn. If you use cotton and have leftover yellow and white yarn, you could also make crochet daisy coasters.
- Safety Precautions: If the crochet bee plushie is for a child under three years of age, please do not use safety eyes, as they can pop off and become a choking hazard. Instead, embroider the eyes with yarn to the crochet bee plushie. I do this with my crochet giraffe pattern since it is also meant for small children as a crinkle toy.
- Finished Size: The finished crochet bee plushie is roughly 8 inches big once completed.
💭Abbreviations to Remember (US terms)
- Magic ring - mr
- Single crochet - sc
- Increase - inc
- Decrease - dec
🍵Instructions for Crochet Bee Plushie Pattern
For the crochet bee pattern, we will mostly be working in rounds.
Crochet Bee Plushie Head:


Round 1: Using the yellow yarn, make a mr and make sc x6 in the circle. If you find it difficult making a magic ring you can chain 2 and then crochet sc x6 in the second chain from the hook. (6)
Round 2: Inc in every sc. (12)
Round 3: Inc, sc. Then repeat until end of round (18)
Round 4: Inc, sc x2. Then repeat until end of round (24)
Round 5: Inc, sc x3. Then repeat until end of round (30)
Round 6: Inc, sc x4. Then repeat until end of round (36)
Round 7: Inc, sc x5. Then repeat until end of round (42)
Round 8-9: Sc x42 (42)
Round 10: Inc, sc x6. Then repeat until end of round (48)
Round 11-15: Sc x48 (48)
Round 16: Dec, sc x4. Then repeat until end of round (40)
Round 17: Dec, sc x3. Then repeat until the end of round (32) If you haven’t placed the safety eyes, now is a great time to do so.
Round 18: Dec, sc x2. Then repeat until end of round (24)
Round 19: Dec, sc. Then repeat until end of round (16)
Round 20: Dec in every stitch. (8) After this round fasten off the yarn and weave in any ends.
Crochet Bee Plushie Body:


Round 1: Using the black yarn, make a mr and make sc x6 in the circle (6).
Round 2: Inc, sc. Then repeat for the rest of the round (9).
Round 3-6: Sc in every stitch. (9)
Round 7: Inc, sc x2. Then repeat for the rest of the round (12).
Round 8: Inc, sc. Then repeat for the rest of the round (18).
Round 9: Inc, sc x2. Then repeat until end of round (24)
Round 10: Inc, sc x3. Then repeat until end of round (30)
Round 11: Inc, sc x4. Then repeat until end of round (36)
Round 12: Inc, sc x5. Then repeat until end of round (42)
Round 13: Inc, sc x6. Then repeat until the end of round (48). Fasten off the black yarn and switch the yarn color to yellow.
Round 14-18: Using the yellow yarn, sc in every stitch. (48) After the 18th round, fasten off the yellow yarn and then switch it to black.

Round 19: Sc in every stitch using the black yarn. (48)
Round 20: Dec, sc x6. Then repeat for the rest of the round. (42)
Round 21-22: Sc in every stitch. (42).
Round 23: Dec, sc x5. Then repeat for the rest of the round (36). After this round, fasten off the black yarn and rejoin the yellow yarn.
Round 24: Sc in every stitch (36). Proceed to stuff the bee body if you haven’t already.
Round 25: Dec, sc x4. Then repeat for the rest of the round (30).
Round 26: Dec, sc x3. Then repeat for the rest of the round (24). Then fasten off the yellow yarn but leave a long enough tail to sew the body and head together.
Crochet Bee Wings:

Round 1: Using the white yarn, make a mr and make sc x6 in the circle. (6)
Round 2: Inc in every sc. (12)
Round 3: Inc, sc. Then repeat until end of round (18).
Round 4: Inc, sc x2. Then repeat until end of round (24).
Round 5: Sc in every stitch (24).
Round 6: Sc x20, then dec 4 together. This helps create a pointy-ish end that will be sewn to the middle of the bee's back.
Then fasten off the yarn and leave a tail for sewing.
Crochet Bee Arms:

Make 2.
Round 1: Using the black yarn, make a mr and make sc x6 in the circle (6).
Round 2: Inc, sc, and repeat for the rest of the round (9).
Round 3-9: Sc in every stitch. (9) Fasten off the yarn but then leave a long enough tail to sew to the body of the bee.
Crochet Antennas:

Make x2.
Round 1: Using the black yarn, make a mr and make sc x6 in the circle (6).
Round 2-4: Sc in every stitch. (6)
Round 5: Dec, sc x2 (4). Then fasten off the yarn and then leave a tail for sewing to the top of the bee's head.
Finishing:
Sew the body to the head, the antennas to the head, the arms to the body, and the wings to the bees back. After that, embroider a smiley face to the bee’s head. Then trim up any loose yarn ends, and you’re finished!
And now you have a really cute crochet bee plushie! I hope you liked my crochet bee plushie pattern!
If you have a lot of extra black and white yarn after creating the crochet bee amigurumi, you can use the leftovers to make a crochet orca bag as well as a crochet linen scarf.

🐌Expert Tips
- Secure Your Pieces. Use long pins or holding sticks to keep pieces of your crochet bee amigurumi together while you sew them.
- Add an Interactive Element. Consider adding a small bell inside the bee's body for a fun touch that makes it more interactive for children.
- Experiment with Sizes. Experiment with different sizes by adjusting the yarn weight and hook size for a range of plushie sizes.
- Practice First. If you're new to crochet, practice making a few small circles before starting on the bee to get comfortable with single crochet in the round.
🧵Pattern FAQs
They can be - they can be simple or more intricate like this one.
I use long needles to pin them in place, I know others use skewers.
You can use cotton filling, as well as yarn scraps (no one will even notice!).

🧶More Crochet Animal Patterns


If you tried this Crochet Bee Plushie Pattern (or any other pattern on my website), please let me know how it went in the 📝 comments below. I'd love to hear from you!
Crochet Bee Plushie Pattern
Materials
Abbreviations (US terms)
- Magic ring - mr
- Single crochet - sc
- Increase - inc
- Decrease - dec
Notes
- I used acrylic yarn, but any yarn type, including cotton, works.
- Leftover cotton yarn (yellow and white) can be used for crochet daisy coasters.
- For children under 3, avoid safety eyes—embroider the eyes with yarn instead.
- I embroider eyes on my crochet giraffe crinkle toy for safety.
- The finished bee plushie is about 8 inches.
Instructions
- For this pattern, we will mostly be working in rounds.
Crochet Bee Plushie Head:
- Round 1: Using the yellow yarn, make a mr and make sc x6 in the circle. If you find it difficult making a magic ring you can chain 2 and then crochet sc x6 in the second chain from the hook. (6)
- Round 2: Inc in every sc. (12)
- Round 3: Inc, sc, inc, sc and repeat until end of round (18)
- Round 4: Inc, sc x2, inc, sc x2. Then repeat until end of round (24)
- Round 5: Inc, sc x3, inc, sc x3. Then repeat until end of round (30)
- Round 6: Inc, sc x4, inc, sc x4. Then repeat until end of round (36)
- Round 7: Inc, sc x5, inc, sc x5. Then repeat until end of round (42)
- Round 8-9: Sc x42 (42)
- Round 10: Inc, sc x6, inc, sc x6. Then repeat until end of round (48)
- Round 11-15: Sc x48 (48)
- Round 16: Dec, sc x4, dec, sc x4. Then repeat until end of round (40)
- Round 17: Dec, sc x3, dec, sc x3. Then repeat until the end of round (32) If you haven’t placed the safety eyes, now is a great time to do so.
- Round 18: Dec, sc x2, dec, sc x2. Then repeat until end of round (24)
- Round 19: Dec, sc, dec, sc. Then repeat until end of round (16)
- Round 20: Dec in every stitch. (8) After this round fasten off the yarn and weave in any ends.
Crochet Bee Plushie Body:
- Round 1: Using the black yarn, make a mr and make sc x6 in the circle (6).
- Round 2: Inc, sc, and repeat for the rest of the round (9).
- Round 3-6: Sc in every stitch. (9)
- Round 7: Inc, sc x2, and repeat for the rest of the round (12).
- Round 8: Inc, sc, and repeat for the rest of the round (18).
- Round 9: Inc, sc x2. Then repeat until end of round (24)
- Round 10: Inc, sc x3. Then repeat until end of round (30)
- Round 11: Inc, sc x4. Then repeat until end of round (36)
- Round 12: Inc, sc x5. Then repeat until end of round (42)
- Round 13: Inc, sc x6. Then repeat until the end of round (48). Fasten off the black yarn and switch the yarn color to yellow.
- Round 14-18: Using the yellow yarn, sc in every stitch. (48) After the 18th round, fasten off the yellow yarn and switch it to black.
- Round 19: Sc in every stitch using the black yarn. (48)
- Round 20: Dec, sc x6. Then repeat for the rest of the round. (42)
- Round 21-22: Sc in every stitch. (42).
- Round 23: Dec, sc x5. Then repeat for the rest of the round (36). After this round, fasten off the black yarn and rejoin the yellow yarn.
- Round 24: Sc in every stitch (36). Proceed to stuff the bee body if you haven’t already.
- Round 25: Dec, sc x4. Then repeat for the rest of the round (30).
- Round 26: Dec, sc x3. Then repeat for the rest of the round (24). Fasten off the yellow yarn, but leave a long enough tail to sew the body and head together.
Bee Arms: Make x2
- Round 1: Using the black yarn, make a mr and make sc x6 in the circle (6).
- Round 2: Inc, sc, and repeat for the rest of the round (9).
- Round 3-9: Sc in every stitch. (9) Fasten off the yarn but leave a long enough tail to sew to the body of the bee.
Antennas: Make x2
- Round 1: Using the black yarn, make a mr and make sc x6 in the circle (6).
- Round 2-4: Sc in every stitch. (6)
- Round 5: Dec, sc x2 (4). Then fasten off the yarn and leave a tail for sewing to the top of the bee's head.
Bee Wings:
- Round 1: Using the white yarn, make a mr and make sc x6 in the circle. (6)
- Round 2: Inc in every sc. (12)
- Round 3: Inc, sc. Then repeat until end of round (18).
- Round 4: Inc, sc x2. Then repeat until end of round (24).
- Round 5: Sc in every stitch (24).
- Round 6: Sc x20, then dec 4 together. This helps create a pointy-ish end that will be sewn to the middle of the bee's back.
Finishing:
- Sew the body to the head, the antennas to the head, the arms to the body, and the wings to the bees back. After that, embroider a smiley face to the bee’s head. Trim up any loose yarn ends, and you’re finished!
- And now you have a really cute bee! I hope you liked the pattern!


Leave a Reply