
Welcome to my Crochet Possum Bag Pattern! If you're looking for a fun, quirky project that adds a touch of whimsy to your crochet creations, you're in the right place.
This crochet possum bag pattern starts with an easy and versatile crochet tote bag, perfect for beginners and experts alike. But what really makes this project stand out is the addition of a crochet possum applique, which brings a bit of playful charm to your bag!
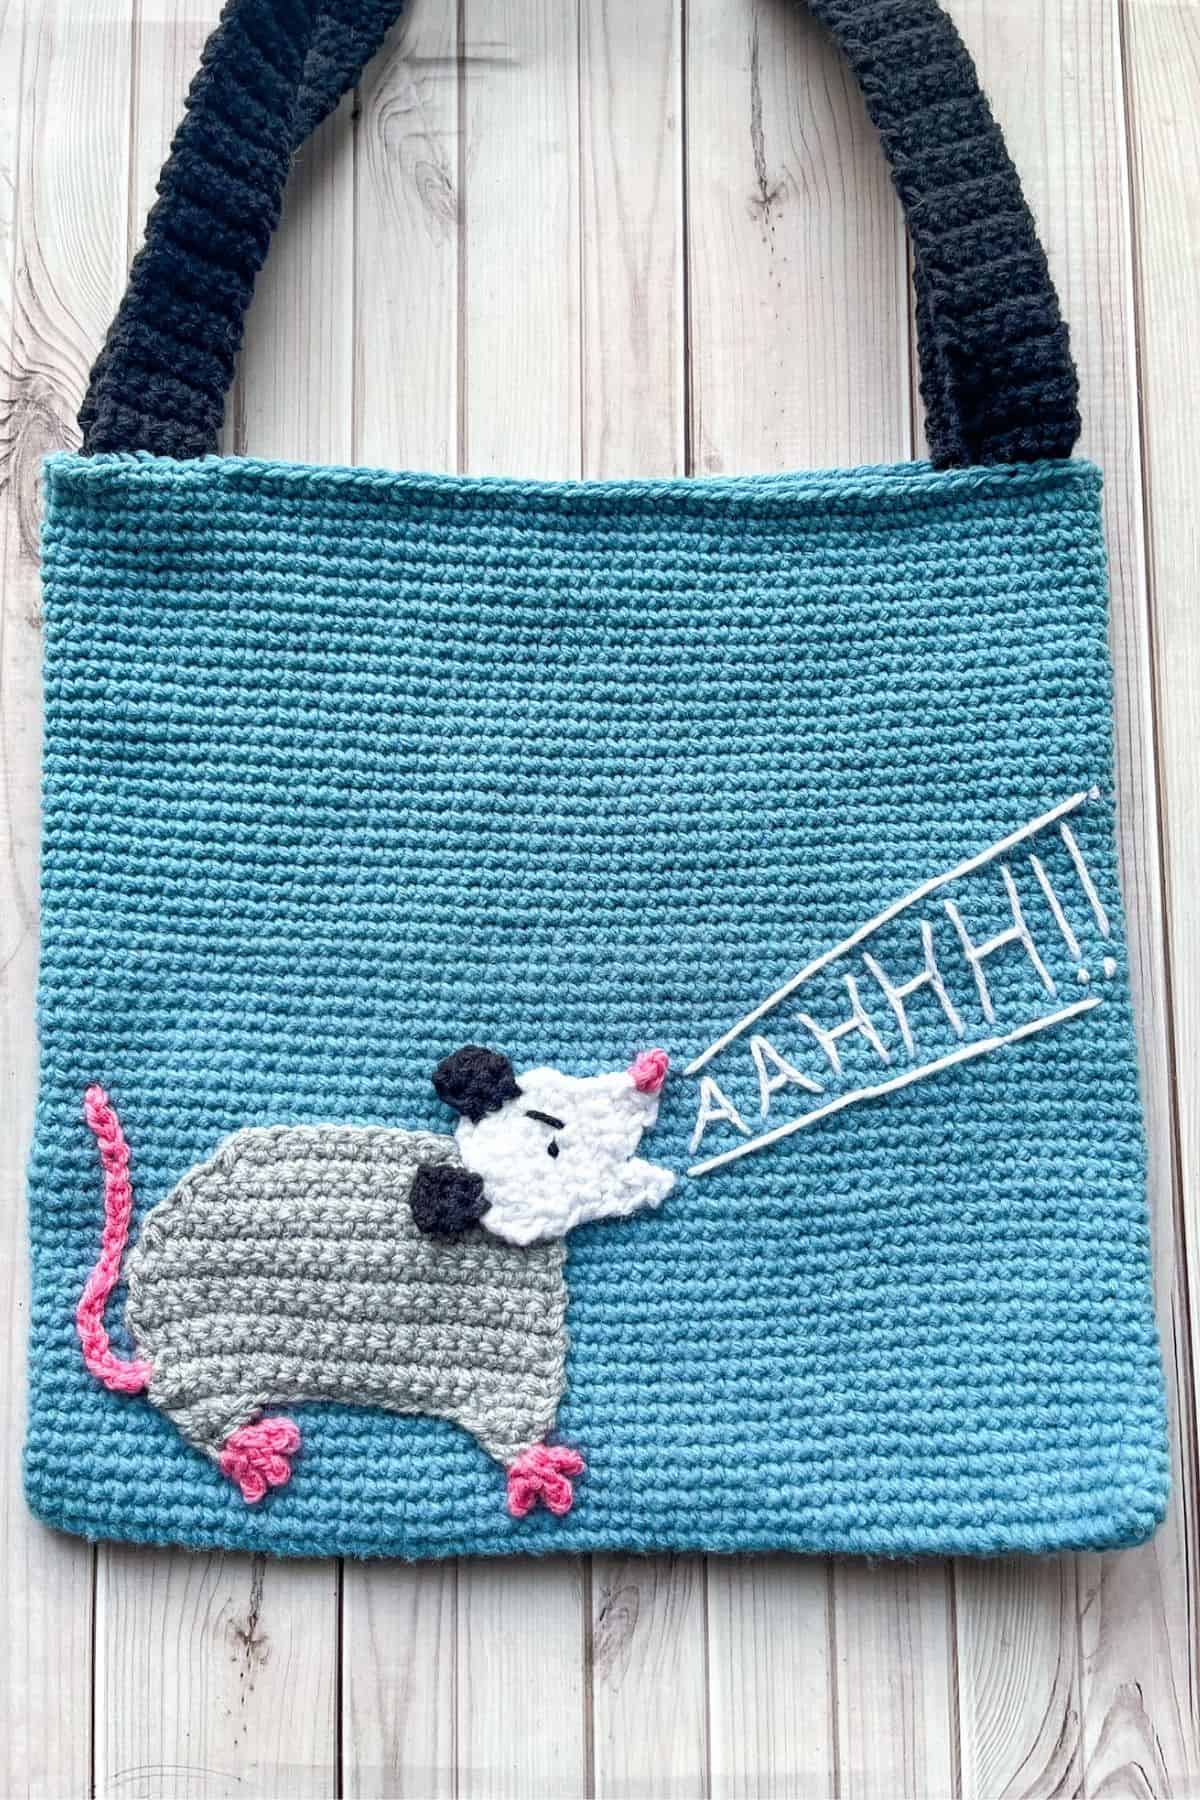
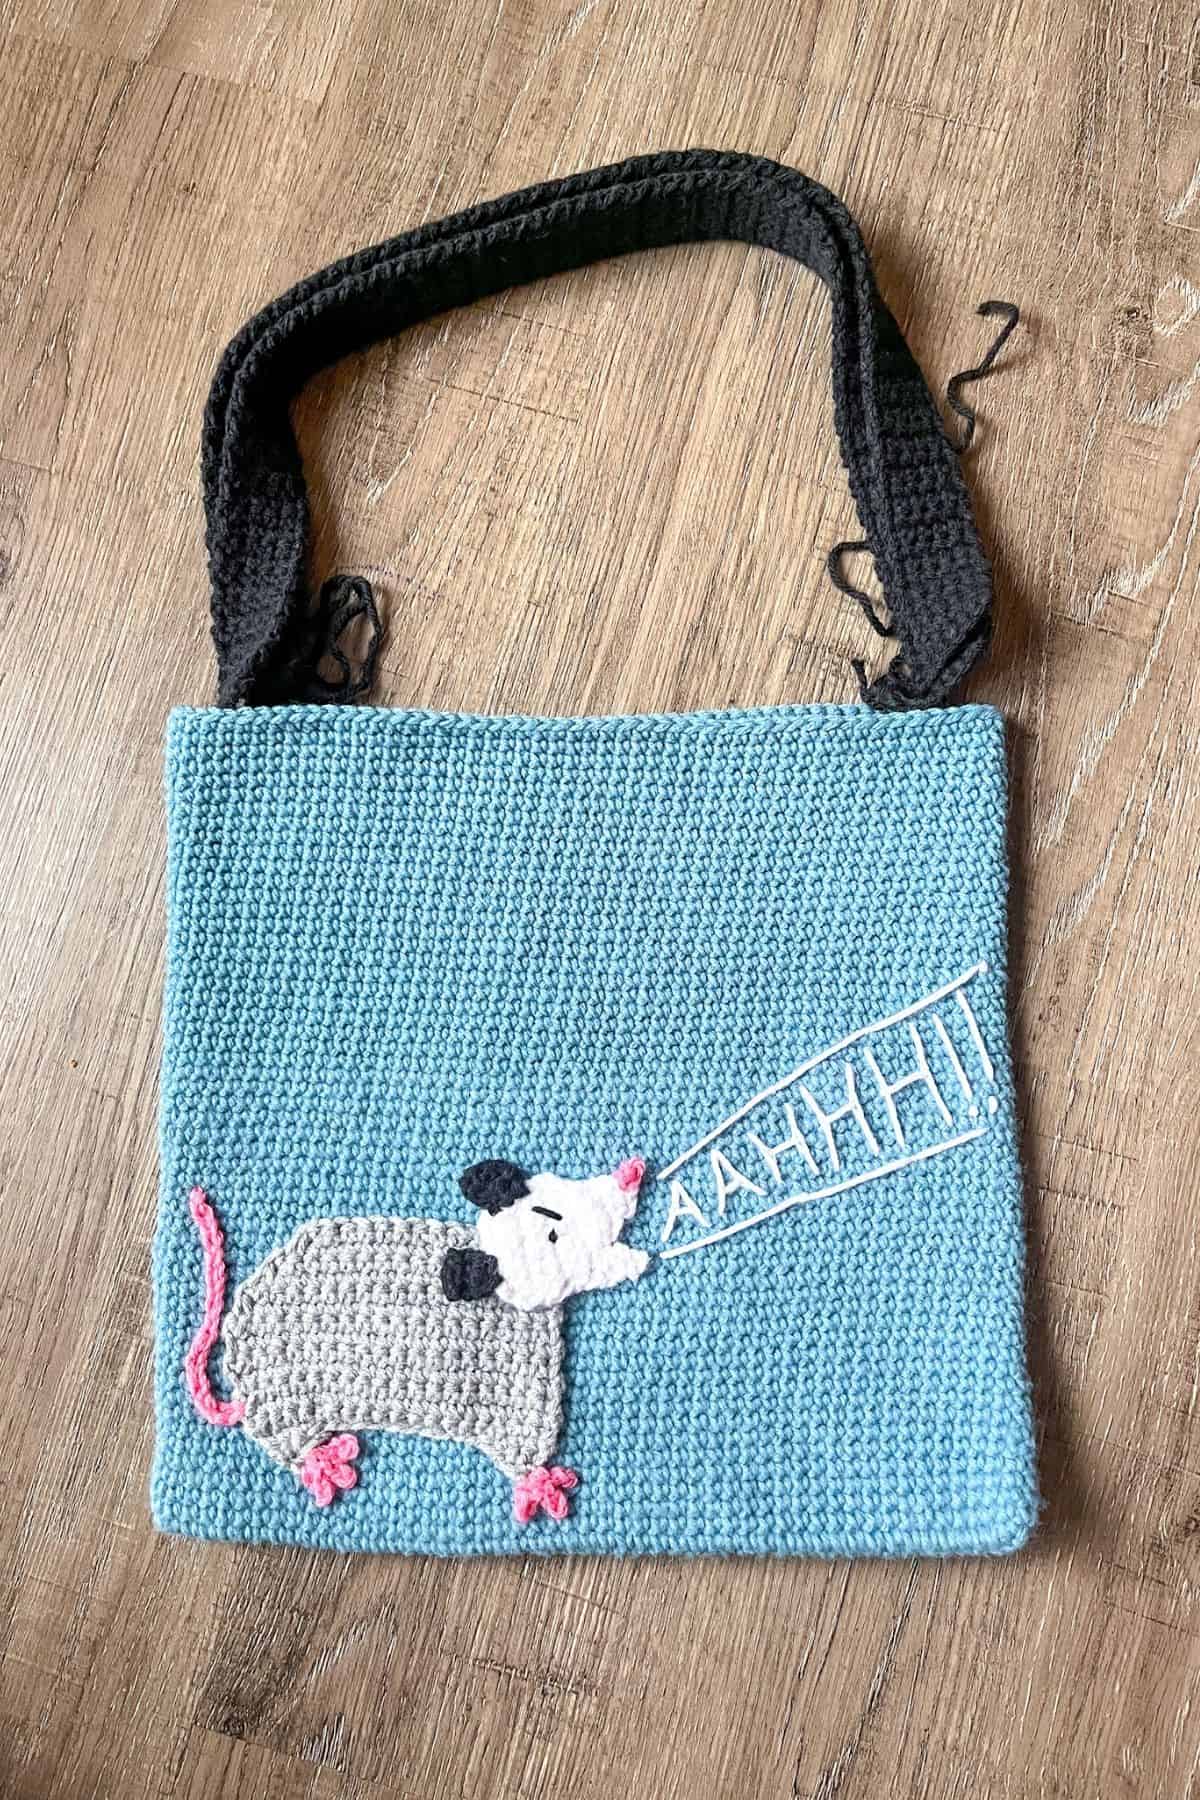
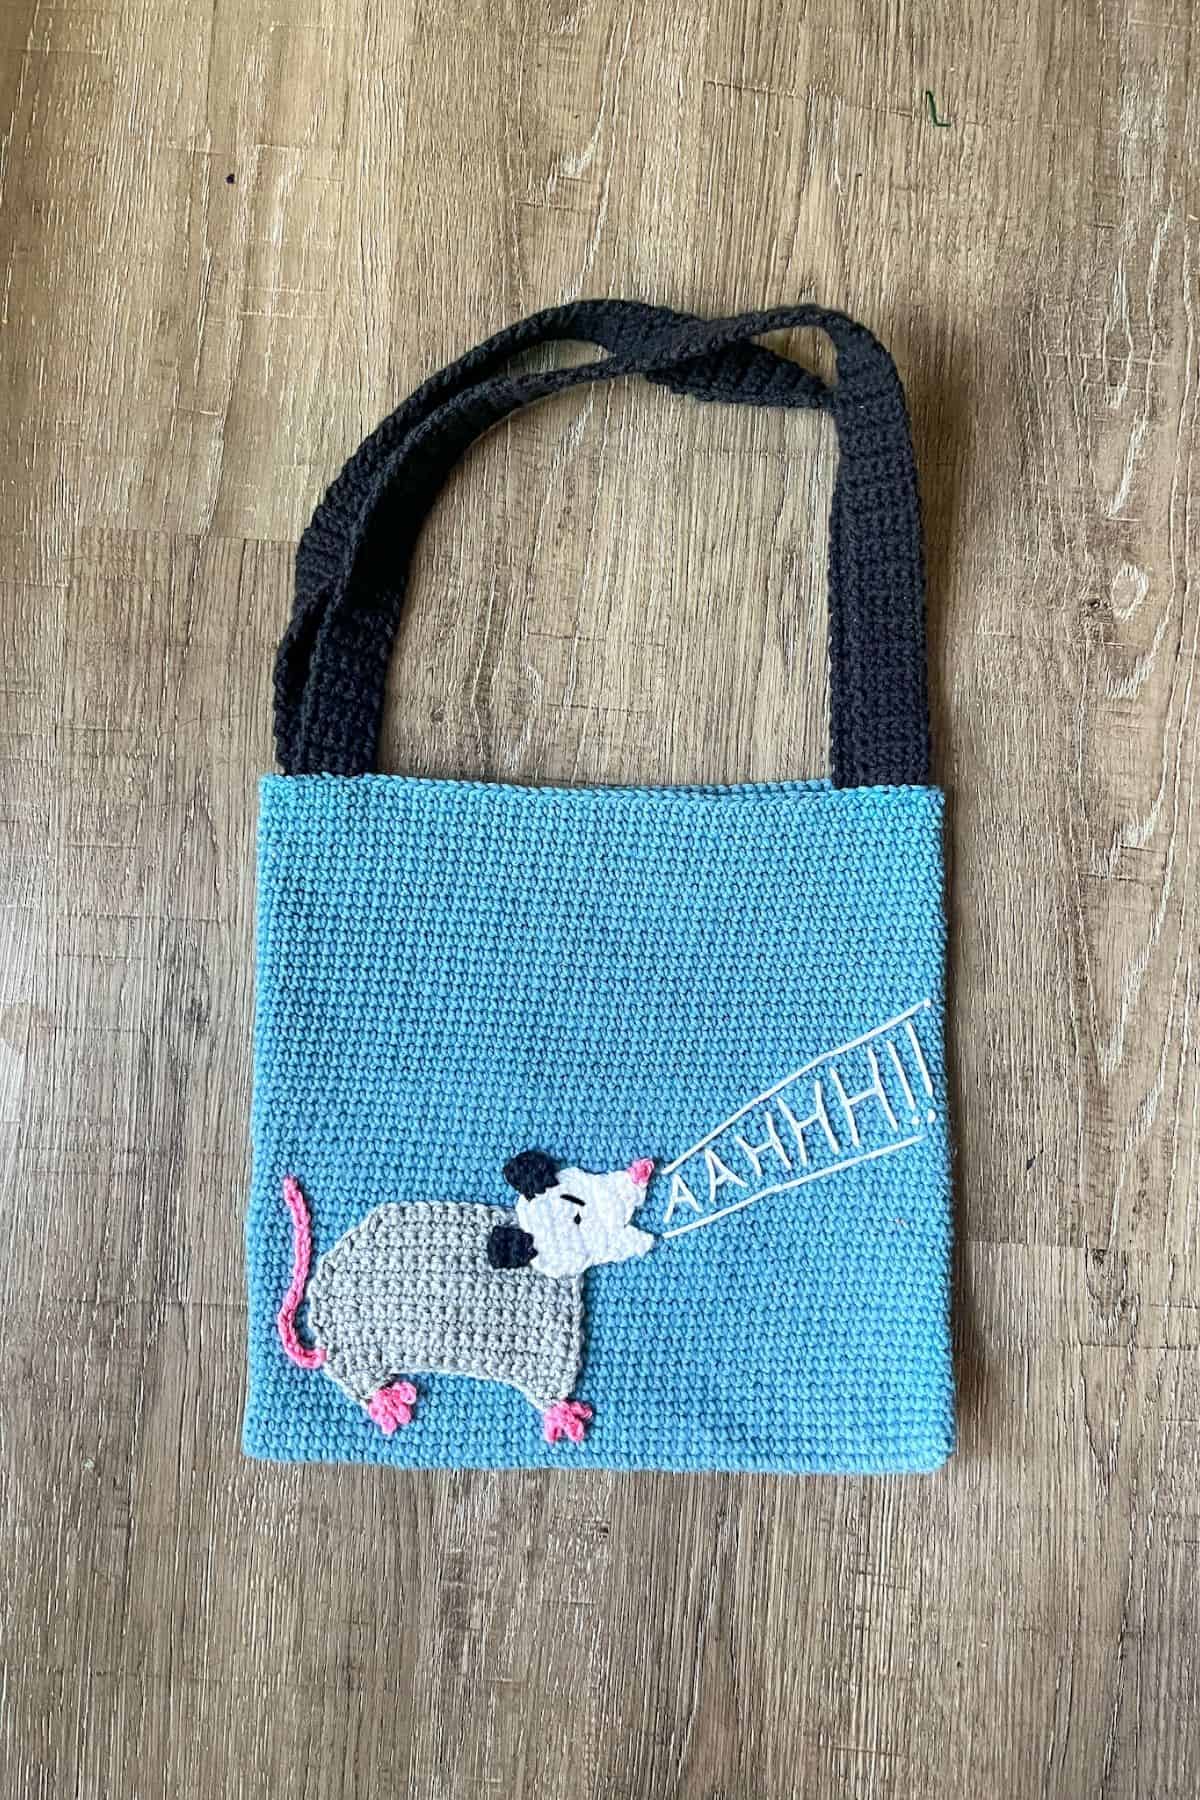
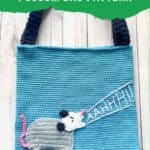
The inspiration for this crochet possum design came from a friend who always mentions screaming possums, and I thought, why not capture that hilarious moment in crochet? So, I created a screaming crochet possum applique and attached it to the bottom of the bag, complete with an embroidered "AAHHH!" for maximum effect. It's a fun, customizable piece that you can adapt to your own tastes by changing up the embroidery text—make it as personal and funny as you want!
This isn't the kind of crochet I usually do, which is exactly why I find this project so exciting and out of the ordinary. If you're in the mood to make something a bit different, this crochet possum bag pattern is a great way to dive into fun and unexpected designs. And if you're looking for more unusual crochet bag ideas, be sure to check out my Crochet Emoji Bag Pattern or Crochet Strawberry Bag Pattern for even more creativity.
Ready to start making your own crochet possum bag? Let’s get stitching!
Jump to:
✏️ Things To Note:
- Skill Level: This crochet possum bag pattern is beginner-friendly for the basic tote bag, but the crochet possum applique and embroidery add a fun challenge for those looking to expand their skills.
- Yarn Choices: The crochet possum bag pattern works best with medium-weight yarn, but feel free to experiment with different yarn types to create a bag with unique texture or a different look. Just keep in mind that the overall size of your bag may change depending on the yarn and hook size you use.
- Not Your Typical Crochet Project: This crochet possum bag pattern is a bit of a departure from the usual crochet designs, and that's exactly what makes it so fun! Whether you're new to crochet or a seasoned pro, it’s a delightful way to create something unexpected.
🪡 Materials Needed
- Caron One Pound Yarn - canal blue
- Caron One Pound Yarn - white
- Caron One Pound Yarn - black
- Caron One Pound Yarn - soft gray
- Caron One Pound Yarn - pink
- 4mm crochet hook
- 5mm crochet hook
- Tapestry needle
💭Abbreviations to Remember (US terms)
- Chains (ch)
- Single crochet (sc)
- Slip stitch (sl st)
- Increase (inc)
- Decrease (dec)
* If you see a stitch abbreviation with "x" after it, it means how many times you do that stitch in the following amount of stitches —unless otherwise noted. For example: sc x6 would mean you make a single crochet in the next 6 stitches. Inc x2 means you make an inc in the next 2 stitches.
🧋Variations
- Customization: You can adjust the size of the crochet possum bag by simply changing the number of stitches or rows you crochet for the body of the tote. Want a bigger bag? Just add more stitches! Want a smaller one? Skip a few!
- Versatility: The beauty of this design is in its versatility. You can easily modify the embroidery on the screaming crochet possum to fit your style or make it more personal. Try different phrases or even add extra details to the applique! You can even add extra appliques like my crochet butterfly applique to give it some juxtaposed joy.
🍵Instructions for Crochet Possum Bag Pattern
Crochet Tote Bag Pattern:
USE THE 5MM HOOK
Round 1: With the blue yarn, ch 51 and turn.
Round 2: In the second ch from the hook make a sc inc. Continue to make sc in each ch. When you get to the last ch, sc 3 times into the last chain. You should now be on the unworked side of the chain - now sc in each ch. When you get to the end of the chain, make a sc in the same chain you made a sc inc in (102).
Round 3-54: Sc in every stitch (102). When you are done with round 54, fasten off and weave in any ends.
Crochet Handles:
Row 1: With the black yarn ch x6. When making your slip knot, leave about 10 inches of yarn before making the knot so you have a tail to sew the strap to the bag.
Row 2: In the second chain from the hook make a sc. Then sc the rest of the row of chains. Then ch x1 and turn (5).
Row 3-100: Sc in every stitch. Then ch x1 and turn (100). Fasten off and leave a tail for sewing.
Make 2 handles.
Crochet Possum Applique:
USE THE 4MM HOOK.


First Leg (1):
Row 1: With gray yarn, ch x2
Row 2: Sc inc in the second ch from the hook (2). Then ch x1 and turn.
Row 3: Sc, sc inc (3). Then fasten off.
Second Leg (1):
Row 1: With gray yarn, ch x2
Row 2: Sc inc in the second ch from the hook (2). Then ch x1 and turn.
Row 3: Sc, sc inc (3). Now we are moving onto the body.
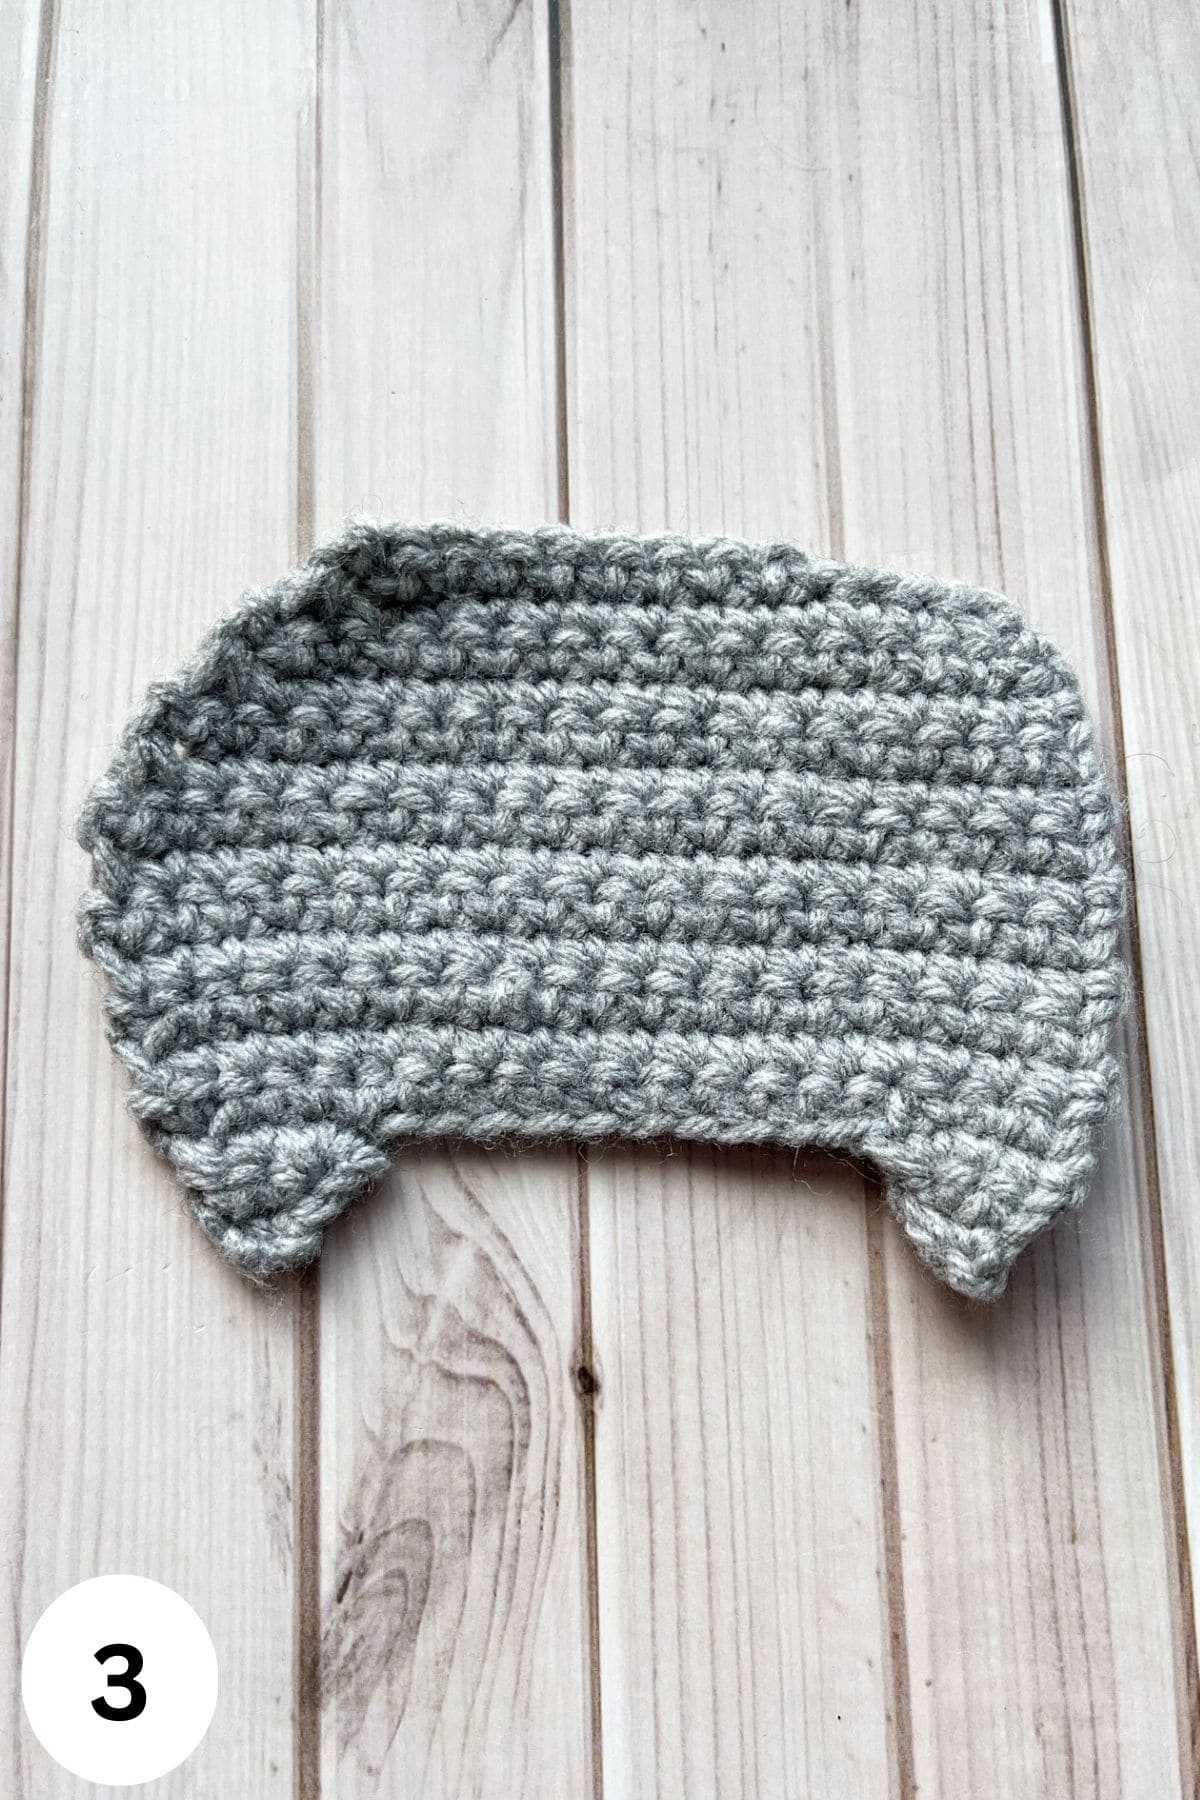
Crochet Possum Body (2 and 3):
Row 4: Sc x 2, sc inc, then ch x10 and sc inc in the first stitch of the 3rd row of the first foot we made. Then sc in the next 2 stitches. Your possum feet should be connected into one piece because of the chain (18). Then ch x1 and turn.
Row 5: Sc inc, sc x17. The end with the sc inc is the tail end of the possum - use a stitch marker if you can’t remember what side is which (19).
Row 6-11: Sc in every stitch, then ch x1 and turn (19).
Row 12: Sc x17, dec (18). The decrease should be on the tail end side of the possum applique. Then ch x1 and turn.
Row 13: Sc x18 (18). Then ch x1 and turn.
Row 14: Sc x16, dec (17). Then ch x1 and turn.
Row 15: Dec, sc x13, dec (15). Then ch x1 and turn.
Row 16: Dec, sc x11, dec (13). Then ch x1 and turn.
Row 17: Dec, sc x7, sl st x4 (12). The sl st should be made at the head side of the crochet possum pattern. Then fasten off and leave a long tail for sewing.
Crochet Possum Head:
Lower Jaw (4):
Row 1: With white yarn, ch x2.
Row 2: In the second ch from the hook, make a sc (1). Then ch x1 and turn.
Row 3: Sc inc (2). Then ch x1 and turn.
Row 4: Sc x2 (2). Then fasten off the yarn.
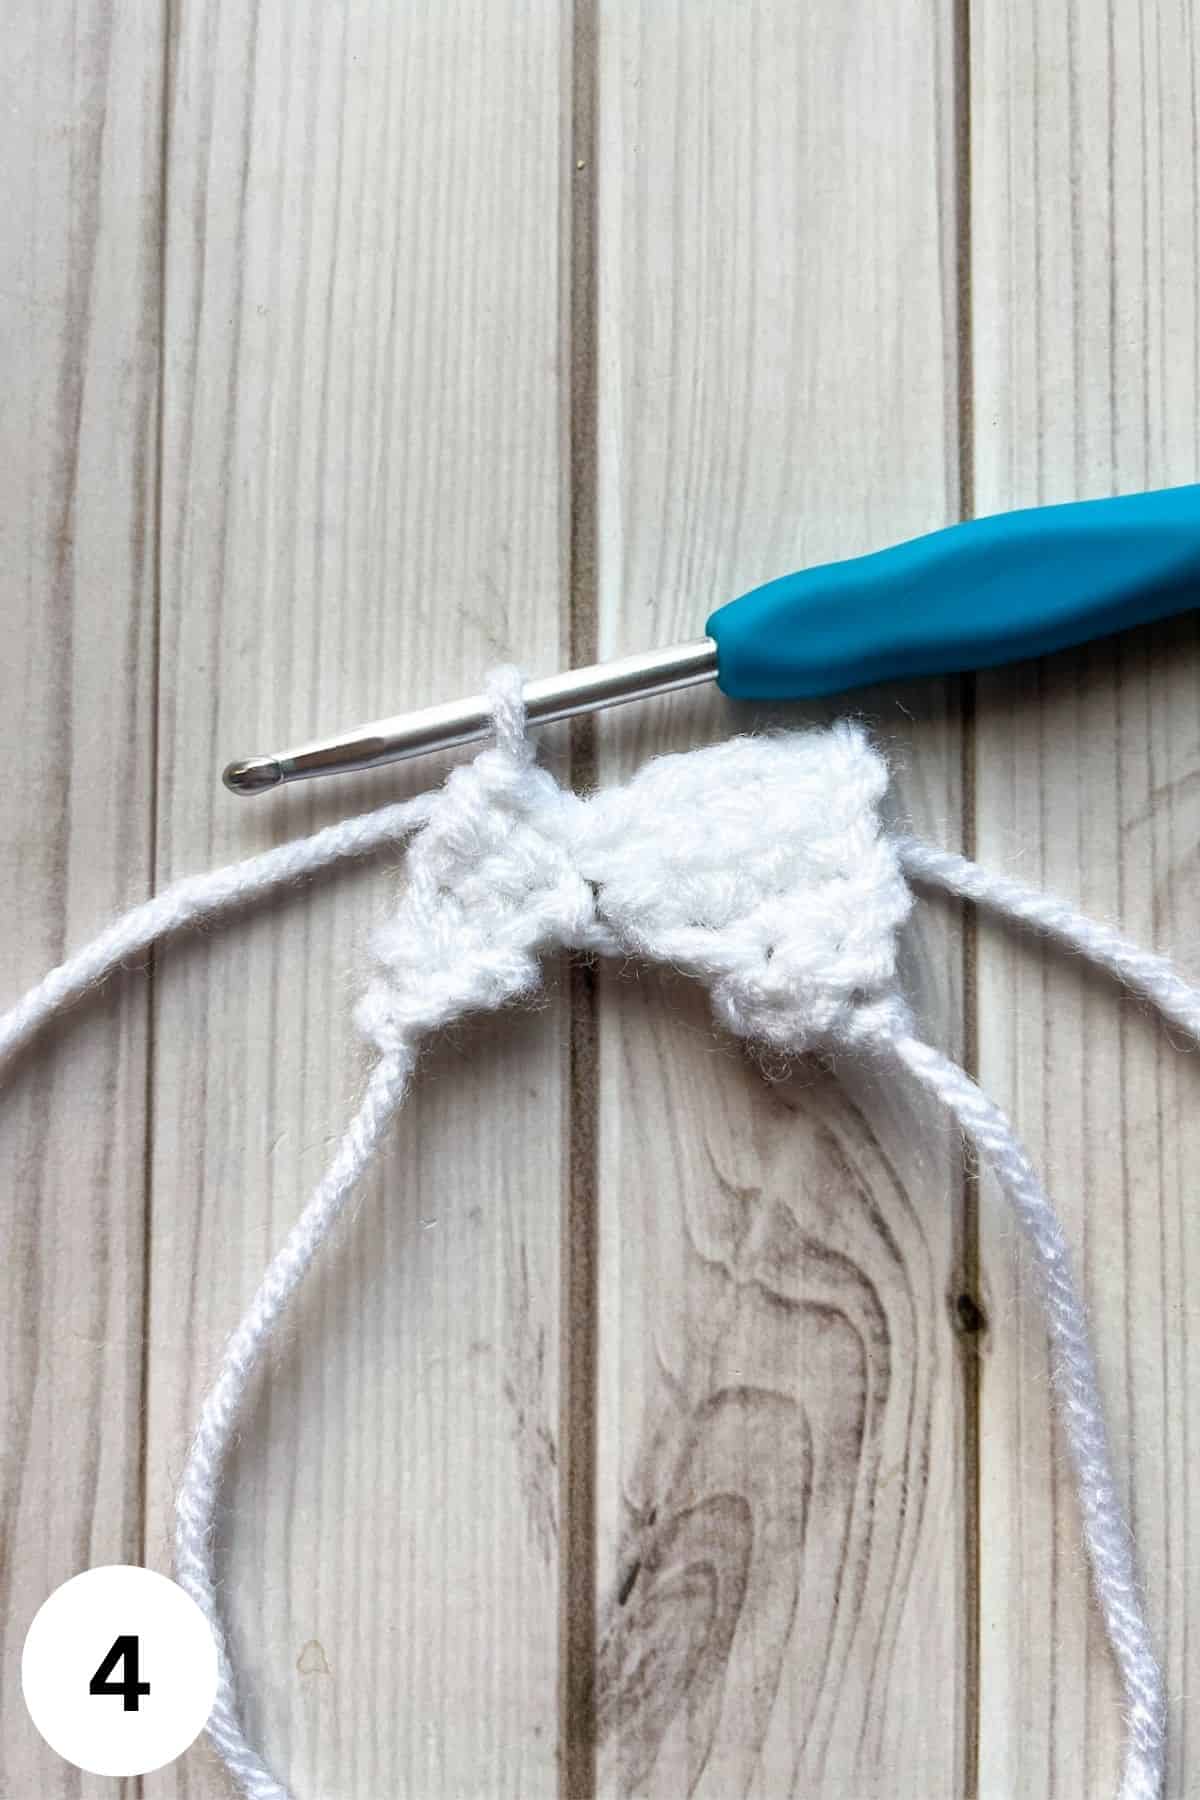
Upper Jaw (4):
Row 1: Ch x3.
Row 2: In the second ch from the hook make a sc. Then make another sc in the next ch (2). Then ch x1 and turn.
Row 3: Sc, sc inc (3). Then ch x1 and turn.
Row 4: Sc inc, sc x2 (4). Then ch x1 and turn.
Row 5: Sc x4, then join the lower jaw by making a sc in each of its top stitches (6). Then ch x1 and turn.
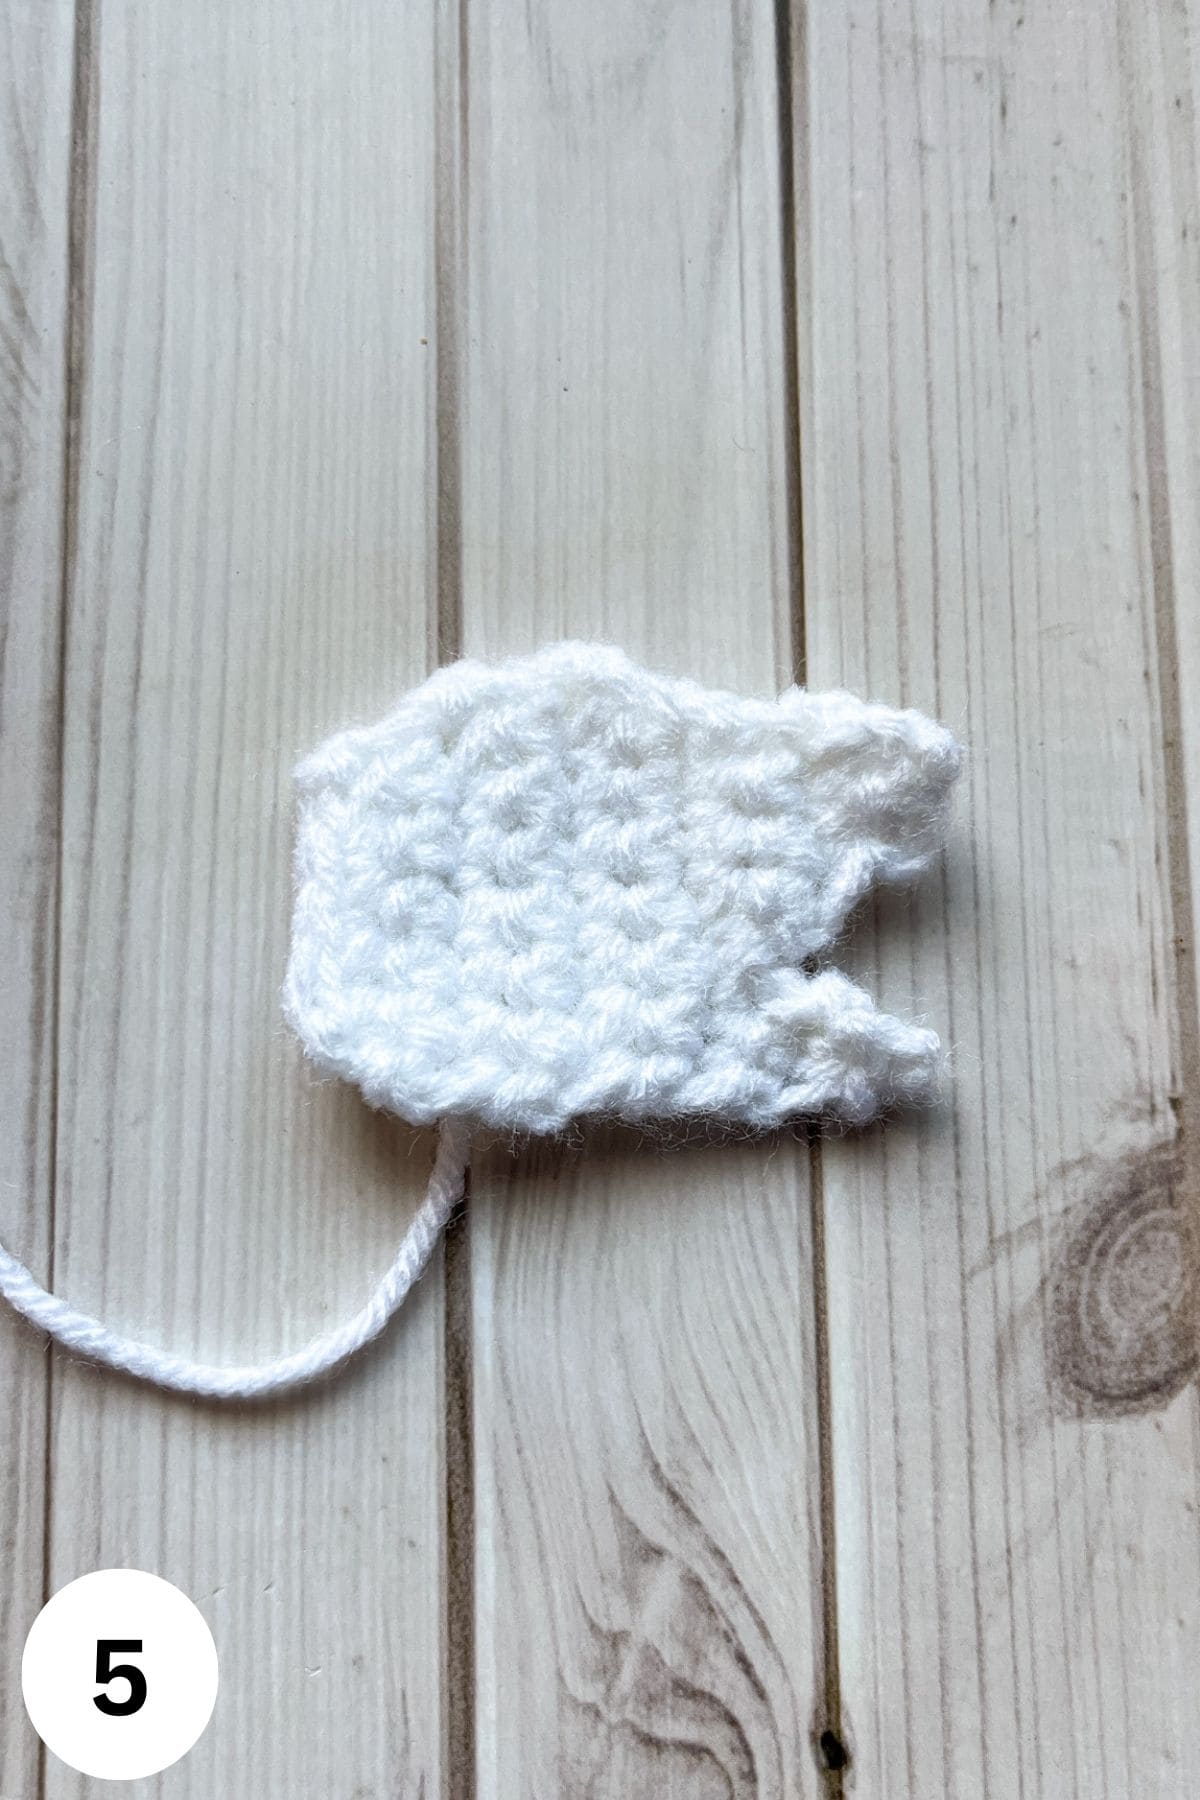
The Rest of the Head (5):
Row 6: Sc x5, sc inc (7). Then ch x1 and turn.
Row 7: Sc x7 (7). Then ch x1 and turn.
Row 8: Dec, sc x5 (6). Then ch x1 and turn.
Row 9: Sc x6 (6). Then ch x1 and turn.
Row 10: Dec, sc x2, dec (4). Then fasten off the yarn and leave a tail for sewing.
Other Possum Body Parts:
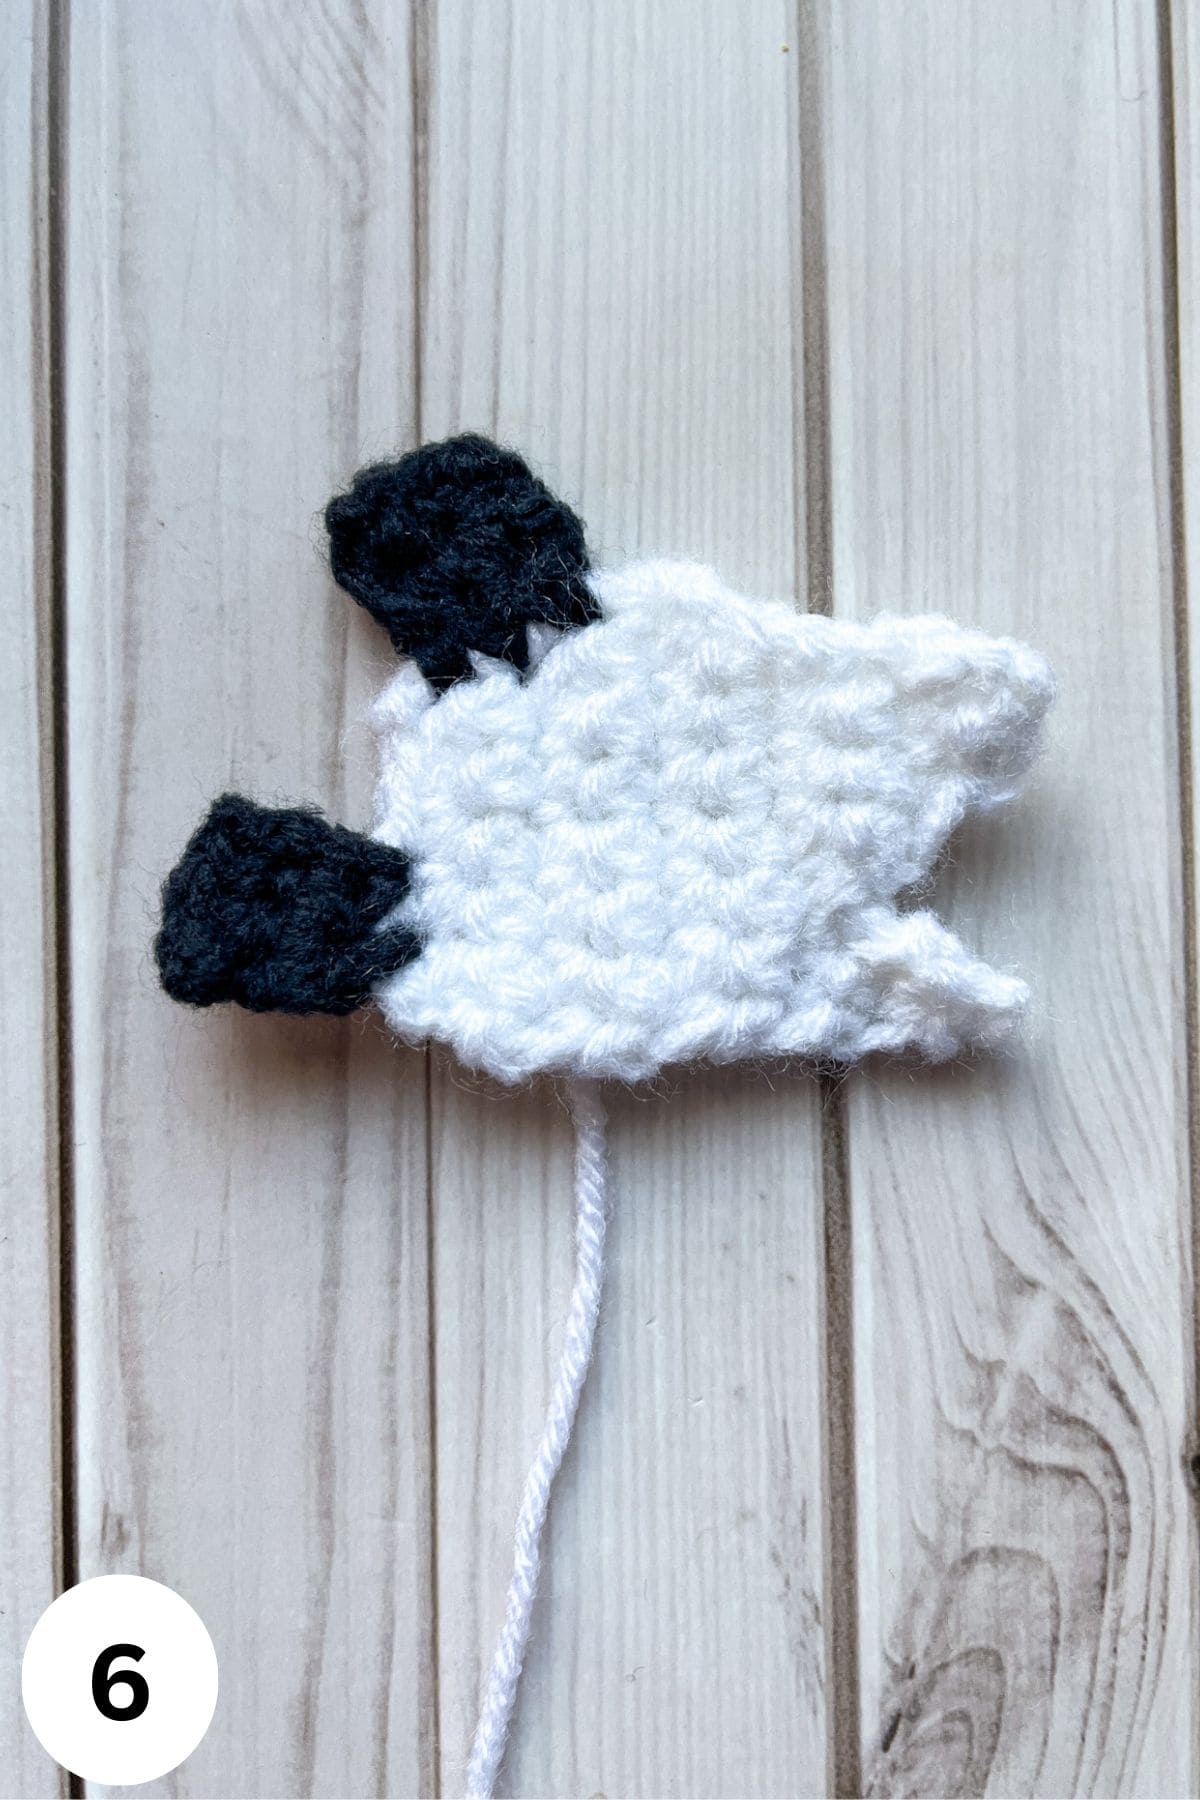
Top Ear (6):
Flip the white possum head so the mouth is facing left. Join the black yarn to the last row’s raw edge.
Row 1: Sc x3, 1 sc for each row. You aren't working in sc tops so this might be a little tricky as this is the raw edge you will be working in (3). Then ch x1 and turn.
Row 2: Sc x3 (3). Then ch x1 and turn.
Row 3: Sc, dec (2). Then fasten off the yarn and weave in any ends.
Lower Ear (6):
With the mouth facing right again, rotate the face so the last white row worked is on top, and the top ear is on the right. Join the black yarn into the 3rd stitch from the right.
Row 1: Sc x2 (2). Then ch x1 and turn.
Row 2: Sc inc, sc (3). Then ch x1 and turn.
Row 3: Sc x3 (3). Then fasten off and weave in any ends.
Weave in any ends.
Now is a good time to sew the top of the head to the body. You can arrange the head however you like on the front side of the possum - I tilted mine upwards so it looks like its yelling into the void.
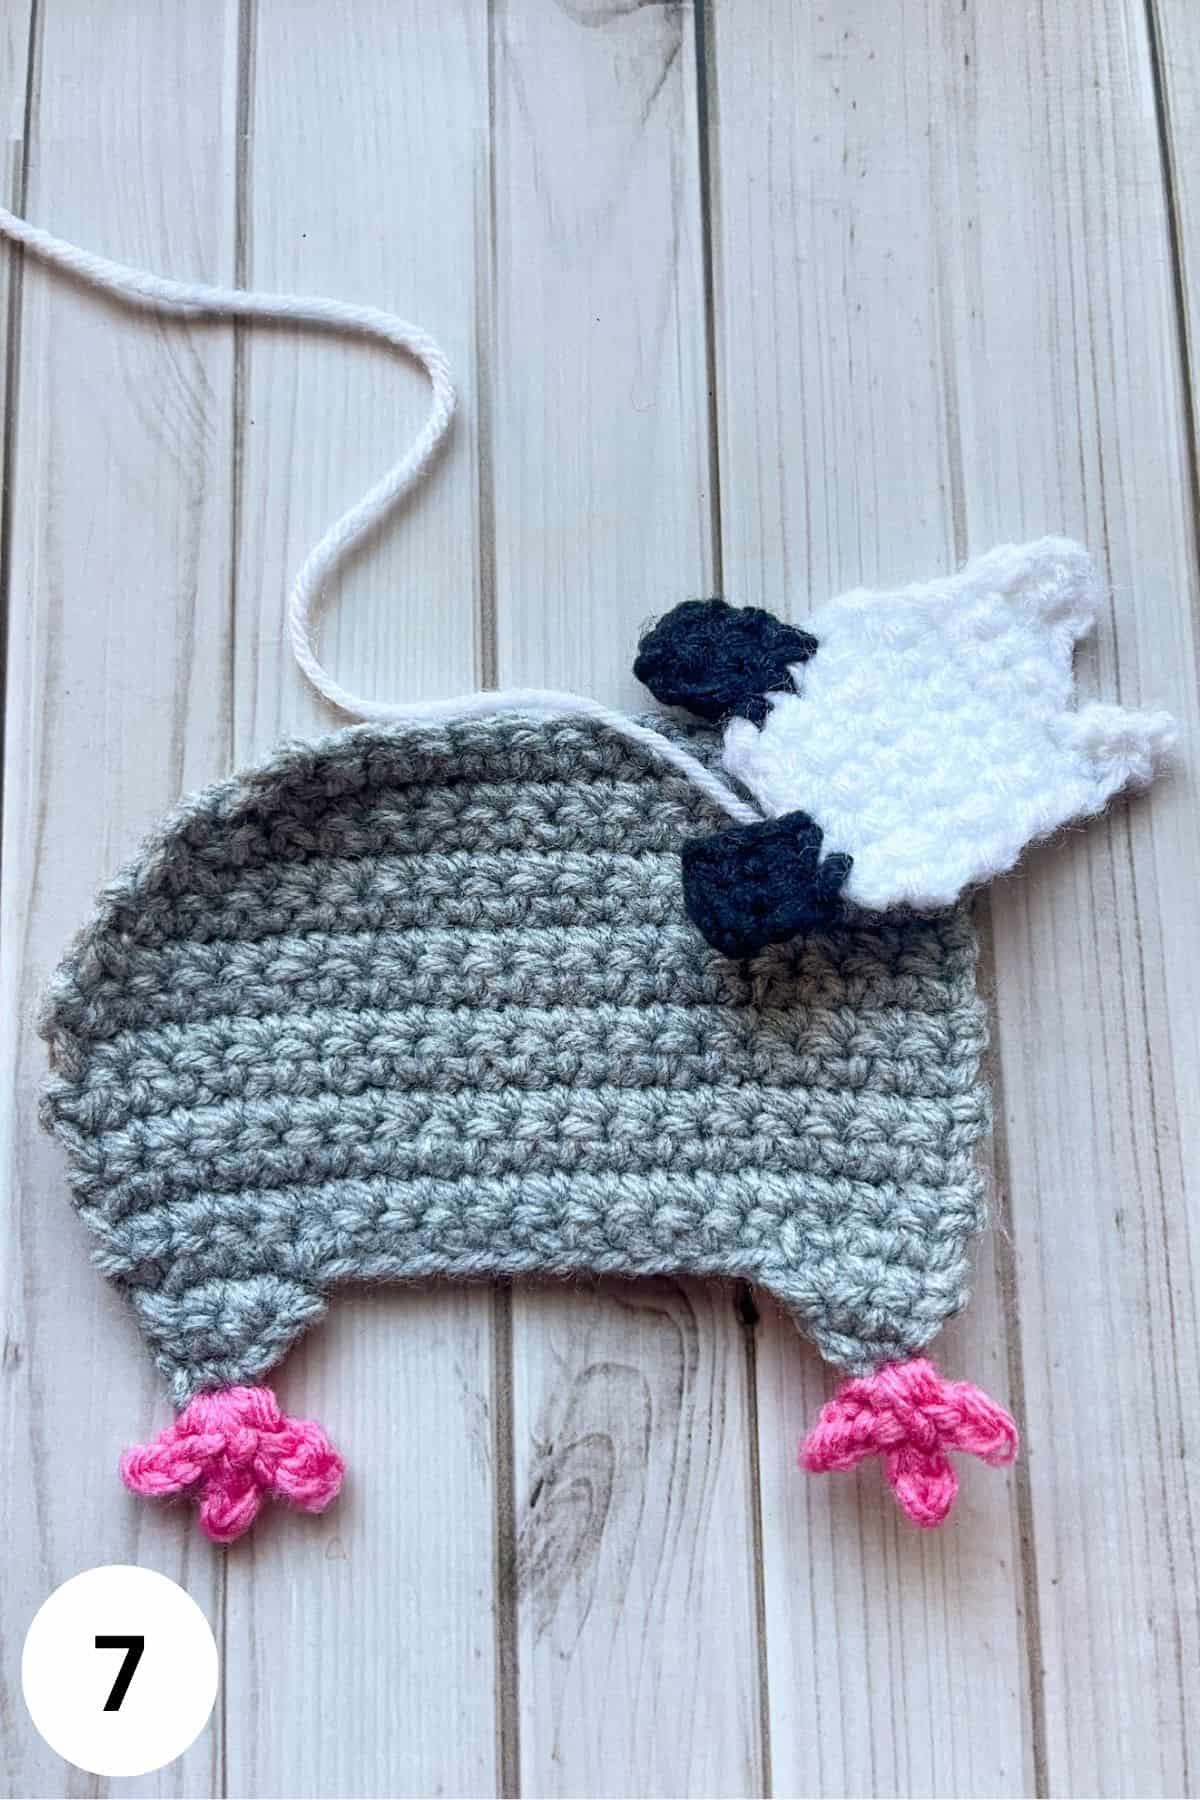
Crochet Possum Feet (7):
Using the pink yarn, join the yarn at the bottom of the possum legs.
*Ch x3, and then in the second ch from the hook make a sl st. Make a sl st in the following ch, then sl st to where you joined the yarn.
Repeat * 2 more times.
Do this for both feet. Leave a tail for sewing.
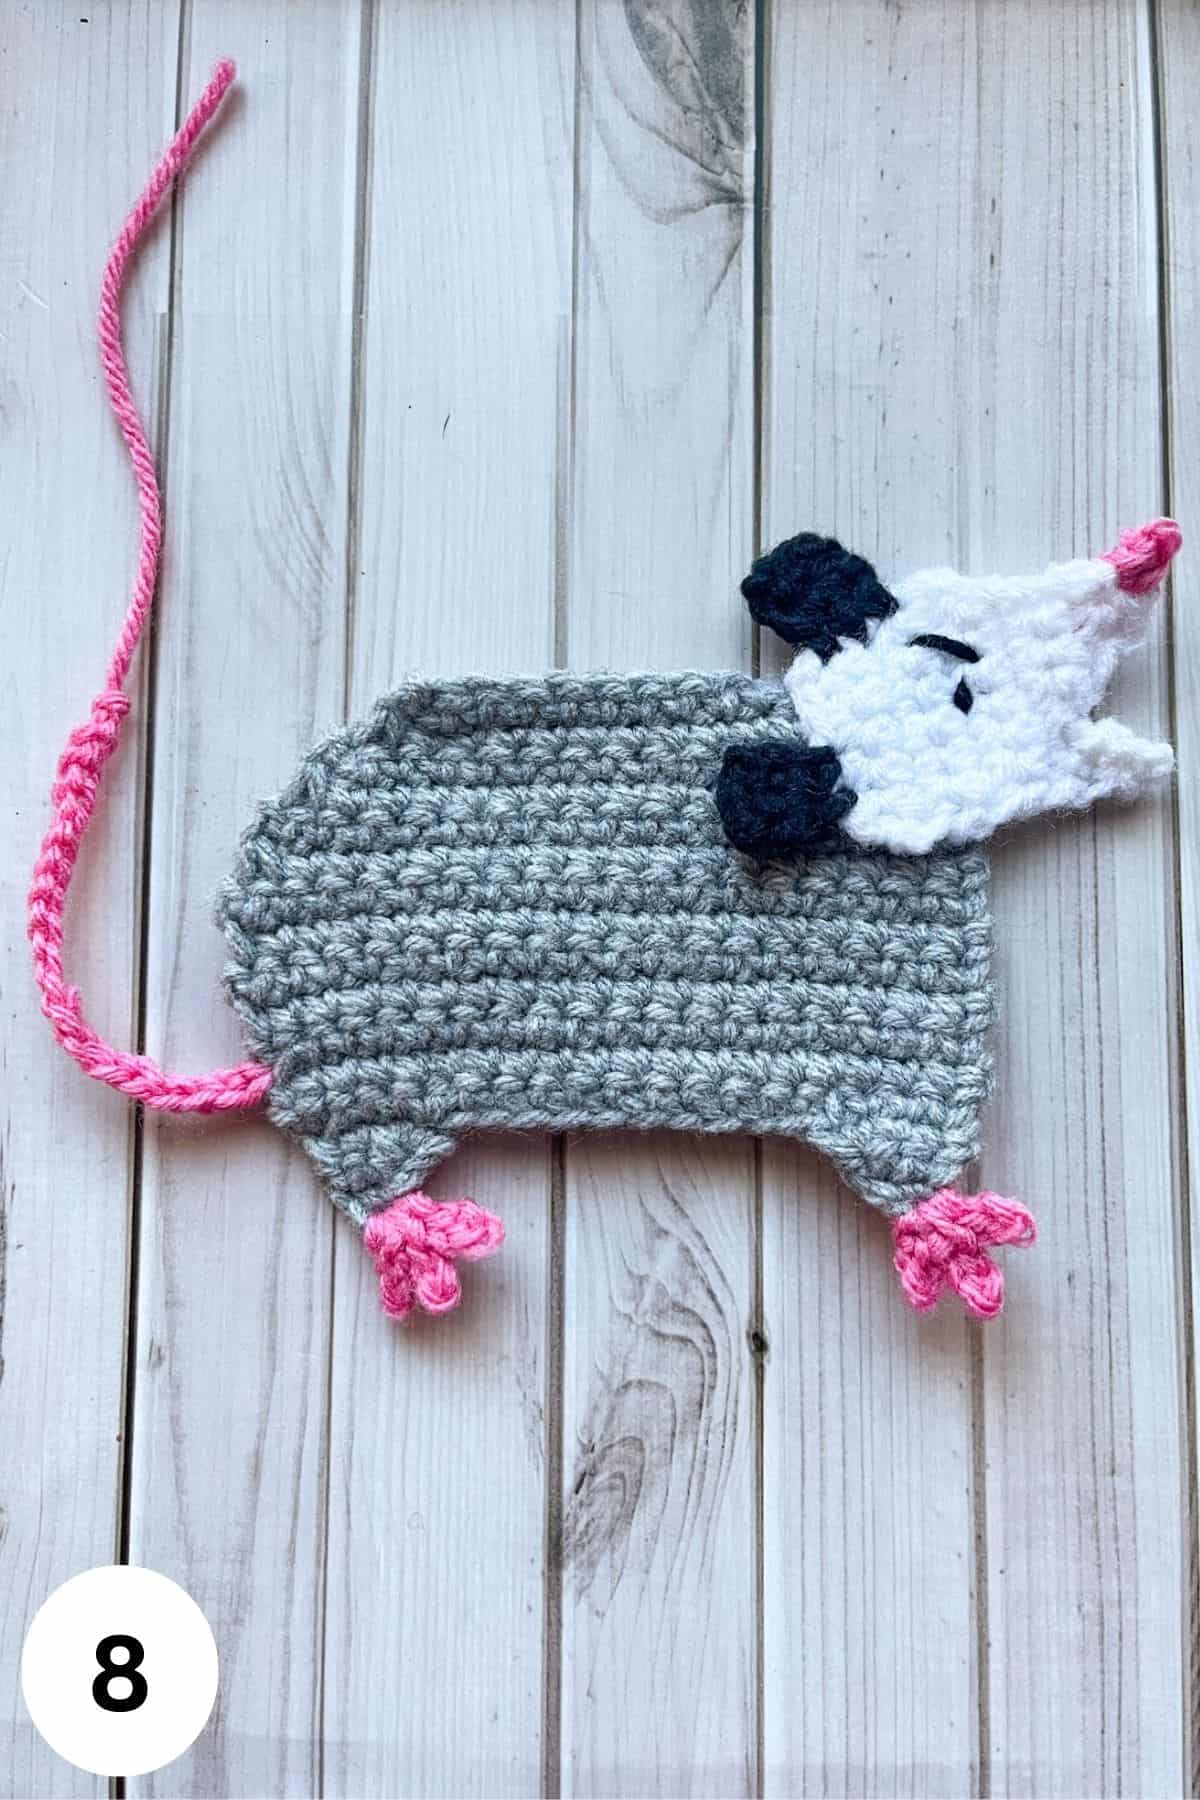
Crochet Possum Tail (8):
Join the pink yarn to row 5 of the leg/body portion of the pattern. Then ch x20 and fasten off. Remember to leave a tail for sewing.
Crochet Possum Nose (8):
Join the pink yarn to where the tip of the nose area on the possum face. Then sc and sl st into the same place you joined the yarn. Then fasten off and weave in any ends.
Possum Face (8):
Using black yarn, embroider the possum face. I added an angry eyebrow slant and a dot for the eye between the ears near the middle of the face. You can choose to do this face or another face.
Sewing/Embroidery:


Sewing:
Sew the Possum to the bottom left of the crochet tote bag. You can manipulate the possum legs to a sitting, laying down, or standing position if you want.
Sew the tote handles to the top of the bag - 1 handle per side of the bag.
Embroidering:
This is where you can really let your creativity shine, as there are plenty of blank spaces on the bag to personalize! You can keep it simple like mine with just a bold shout, or add your own flair with extra embroidery. My sister, for example, plans to add a dumpster-on-fire applique when she makes this bag—so the possibilities are endless!
For my own "AAHHH!!" shout, I kept it simple and used just white yarn. To start, I created the shouting lines, which helped me figure out where the letters would fit. I began by drawing lines radiating from the mouth, making them smaller near the mouth and gradually getting wider as they moved outward. This gave me a guide for how the embroidery would change length as it extended further away from the mouth.
To make the lines, I used basic line embroidery and went back over them, tacking them down to create a continuous look for the shouting lines. For the "AAHHH!!" itself, I chose simple letter shapes that could be completed with small, easy line strokes. I also made sure to leave a small space (about the width of a single crochet stitch) between each letter, keeping it neat and consistent.
Optional: Sew a liner to the inside of the bag so the bag doesn't stretch out when in use.
And that's it—your very own Possum Bag made from my crochet possum bag pattern is ready to show off!
Looking for an additional fun crochet pattern that has a similar vibe? Check out my crochet F bomb pattern - small enough that you can use as desk decoration or as a keychain if you go down a hook size to make the pattern.
Whether you keep it simple with a bold shout or add your own creative twists, this fun and quirky bag is sure to bring a smile to anyone who sees it.
If you have any extra blue yarn, try making my crochet Japanese Knot Bag Pattern.
If you're loving the animal-themed designs, be sure to check out my other fun crochet bag patterns, like the Crochet Frog Bag or the Crochet Stingray Bag. They're just as playful and unique, perfect for adding some charm to your crochet collection!
Happy crocheting, and I can't wait to see your creations!
🐌Expert Tips
- Tension Control: Make sure to maintain consistent tension throughout the crochet possum bag pattern, especially for the body of the bag. This will ensure your stitches are even and the finished bag has a neat appearance.
- Use Stitch Markers: For keeping track of stitch counts or where to start your appliqué, stitch markers are incredibly helpful. They’ll help keep your work neat and prevent you from losing your place.
- Embroidery Tips: For the "AAHHH!" or any other text you want to add, try using a contrasting yarn color to make sure it pops! You can use basic backstitch or even experiment with different stitch types for the embroidery to give it more flair.
- Finishing Touches: After finishing the crochet possum bag pattern, consider adding a lining to the inside of your tote for extra durability and a polished finish. You can also add a button or zipper if you prefer a more secure closure.
🧵Pattern FAQs
The crochet possum bag pattern is beginner-friendly for the main tote bag part. However, the crochet possum applique and embroidery details add a bit more challenge, making it a fun project for both beginners and intermediate crocheters.
Yes! You can easily adjust the size of the bag by changing the number of foundation chains or adding more rows to the body of the bag. If you want a larger bag, increase your stitch count, or for a smaller one, reduce it.
Definitely! The crochet possum bag pattern is highly customizable, and changing up the colors for the body, the possum applique, or the embroidery can give it a completely different look. Feel free to get creative with your color choices!
🧶More Crochet Bag Patterns

If you tried this Crochet Possum Bag Pattern (or any other pattern on my website), please let me know how it went in the 📝 comments below. I'd love to hear from you!

Crochet Possum Bag Pattern
Materials
Abbreviations (US terms)
- Chains - ch
- Single crochet - sc
- Slip stitch - sl st
- Increase - inc
- Decrease - dec
Notes
- Skill Level: The crochet possum bag pattern is beginner-friendly for the basic tote bag, but the crochet possum applique and embroidery add a fun challenge for those looking to expand their skills.
- Yarn Choices: The crochet possum bag pattern works best with medium-weight yarn, but feel free to experiment with different yarn types to create a bag with unique texture or a different look. Just keep in mind that the overall size of your bag may change depending on the yarn and hook size you use.
- Not Your Typical Crochet Project: This bag is a bit of a departure from the usual crochet designs, and that's exactly what makes it so fun! Whether you're new to crochet or a seasoned pro, it’s a delightful way to create something unexpected.
Instructions
Crochet Tote Bag Pattern:
- USE THE 5MM HOOK
- Round 1: With the blue yarn, ch 51 and turn.
- Round 2: In the second ch from the hook make a sc inc. Continue to make sc in each ch. When you get to the last ch, sc 3 times into the last chain. You should now be on the unworked side of the chain - now sc in each ch. When you get to the end of the chain, make a sc in the same chain you made a sc inc in (102).
- Round 3-54: Sc in every stitch (102). When you are done with round 54, fasten off and weave in any ends.
Crochet Handles:
- Row 1: With the black yarn ch x6. When making your slip knot, leave about 10 inches of yarn before making the knot so you have a tail to sew the strap to the bag.
- Row 2: In the second chain from the hook make a sc. Then sc the rest of the row of chains. Then ch x1 and turn (5).
- Row 3-100: Sc in every stitch. Then ch x1 and turn (100). Fasten off and leave a tail for sewing.
- Make 2 handles.
Crochet Possum Applique:
- USE THE 4MM HOOK
First Leg:
- Row 1: With gray yarn, ch x2
- Row 2: Sc inc in the second ch from the hook (2). Then ch x1 and turn.
- Row 3: Sc, sc inc (3). Then fasten off.
Second Leg:
- Row 1: With gray yarn, ch x2
- Row 2: Sc inc in the second ch from the hook (2). Then ch x1 and turn.
- Row 3: Sc, sc inc (3). Now we are moving onto the body.
Crochet Possum Body:
- Row 4: Sc x 2, sc inc, then ch x10 and sc inc in the first stitch of the 3rd row of the first foot we made. Then sc in the next 2 stitches. Your possum feet should be connected into one piece because of the chain (18). Then ch x1 and turn.
- Row 5: Sc inc, sc x17. The end with the sc inc is the tail end of the possum - use a stitch marker if you can’t remember what side is which (19).
- Row 6-11: Sc in every stitch, then ch x1 and turn (19).
- Row 12: Sc x17, dec (18). The decrease should be on the tail end side of the possum applique. Then ch x1 and turn.
- Row 13: Sc x18 (18). Then ch x1 and turn.
- Row 14: Sc x16, dec (17). Then ch x1 and turn.
- Row 15: Dec, sc x13, dec (15). Then ch x1 and turn.
- Row 16: Dec, sc x11, dec (13). Then ch x1 and turn.
- Row 17: Dec, sc x7, sl st x4 (12). The sl st should be made at the head side of the crochet possum pattern. Then fasten off and leave a long tail for sewing.
Crochet Possum Head:
Lower Jaw:
- Row 1: With white yarn, ch x2.
- Row 2: In the second ch from the hook, make a sc (1). Then ch x1 and turn.
- Row 3: Sc inc (2). Then ch x1 and turn.
- Row 4: Sc x2 (2). Then fasten off the yarn.
Upper Jaw:
- Row 1: Ch x3.
- Row 2: In the second ch from the hook make a sc. Then make another sc in the next ch (2). Then ch x1 and turn.
- Row 3: Sc, sc inc (3). Then ch x1 and turn.
- Row 4: Sc inc, sc x2 (4). Then ch x1 and turn.
- Row 5: Sc x4, then join the lower jaw by making a sc in each of its top stitches (6). Then ch x1 and turn.
The Rest of the Head:
- Row 6: Sc x5, sc inc (7). Then ch x1 and turn.
- Row 7: Sc x7 (7). Then ch x1 and turn.
- Row 8: Dec, sc x5 (6). Then ch x1 and turn.
- Row 9: Sc x6 (6). Then ch x1 and turn.
- Row 10: Dec, sc x2, dec (4). Then fasten off the yarn and leave a tail for sewing.
Top Ear:
- Flip the white possum head so the mouth is facing left. Join the black yarn to the last row’s raw edge.
- Row 1: Sc x3, 1 sc for each row. You aren't working in sc tops so this might be a little tricky as this is the raw edge you will be working in (3). Then ch x1 and turn.
- Row 2: Sc x3 (3). Then ch x1 and turn.
- Row 3: Sc, dec (2). Then fasten off the yarn and weave in any ends.
Lower Ear:
- With the mouth facing right again, rotate the face so the last white row worked is on top, and the top ear is on the right. Join the black yarn into the 3rd stitch from the right.
- Row 1: Sc x2 (2). Then ch x1 and turn.
- Row 2: Sc inc, sc (3). Then ch x1 and turn.
- Row 3: Sc x3 (3). Then fasten off and weave in any ends.
- Weave in any ends.
- Now is a good time to sew the top of the head to the body. You can arrange the head however you like on the front side of the possum - I tilted mine upwards so it looks like its yelling into the void.
Crochet Possum Feet:
- Using the pink yarn, join the yarn at the bottom of the possum legs.
- *Ch x3, and then in the second ch from the hook make a sl st. Make a sl st in the following ch, then sl st to where you joined the yarn.
- Repeat * 2 more times.
- Do this for both feet. Leave a tail for sewing.
Crochet Possum Tail:
- Join the pink yarn to row 5 of the leg/body portion of the pattern. Then ch x20 and fasten off. Remember to leave a tail for sewing.
Crochet Possum Nose:
- Join the pink yarn to where the tip of the nose area on the possum face. Then sc and sl st into the same place you joined the yarn. Then fasten off and weave in any ends.
Possum Face:
- Using black yarn, embroider the possum face. I added an angry eyebrow slant and a dot for the eye between the ears near the middle of the face. You can choose to do this face or another face.
Sewing:
- Sew the Possum to the bottom left of the crochet tote bag. You can manipulate the possum legs to a sitting, laying down, or standing position if you want.
- Sew the tote handles to the top of the bag - 1 handle per side of the bag.
Embroidering:
- This is where you can really let your creativity shine, as there are plenty of blank spaces on the bag to personalize! You can keep it simple like mine with just a bold shout, or add your own flair with extra embroidery. My sister, for example, plans to add a dumpster-on-fire applique when she makes this bag—so the possibilities are endless!
- For my own "AAHHH!!" shout, I kept it simple and used just white yarn. To start, I created the shouting lines, which helped me figure out where the letters would fit. I began by drawing lines radiating from the mouth, making them smaller near the mouth and gradually getting wider as they moved outward. This gave me a guide for how the embroidery would change length as it extended further away from the mouth.
- To make the lines, I used basic line embroidery and went back over them, tacking them down to create a continuous look for the shouting lines. For the "AAHHH!!" itself, I chose simple letter shapes that could be completed with small, easy line strokes. I also made sure to leave a small space (about the width of a single crochet stitch) between each letter, keeping it neat and consistent.
- Optional: Sew a liner to the inside of the bag so the bag doesn't stretch out when in use.
- And that's it—your very own Crochet Possum Bag is ready to show off!

Leave a Reply