
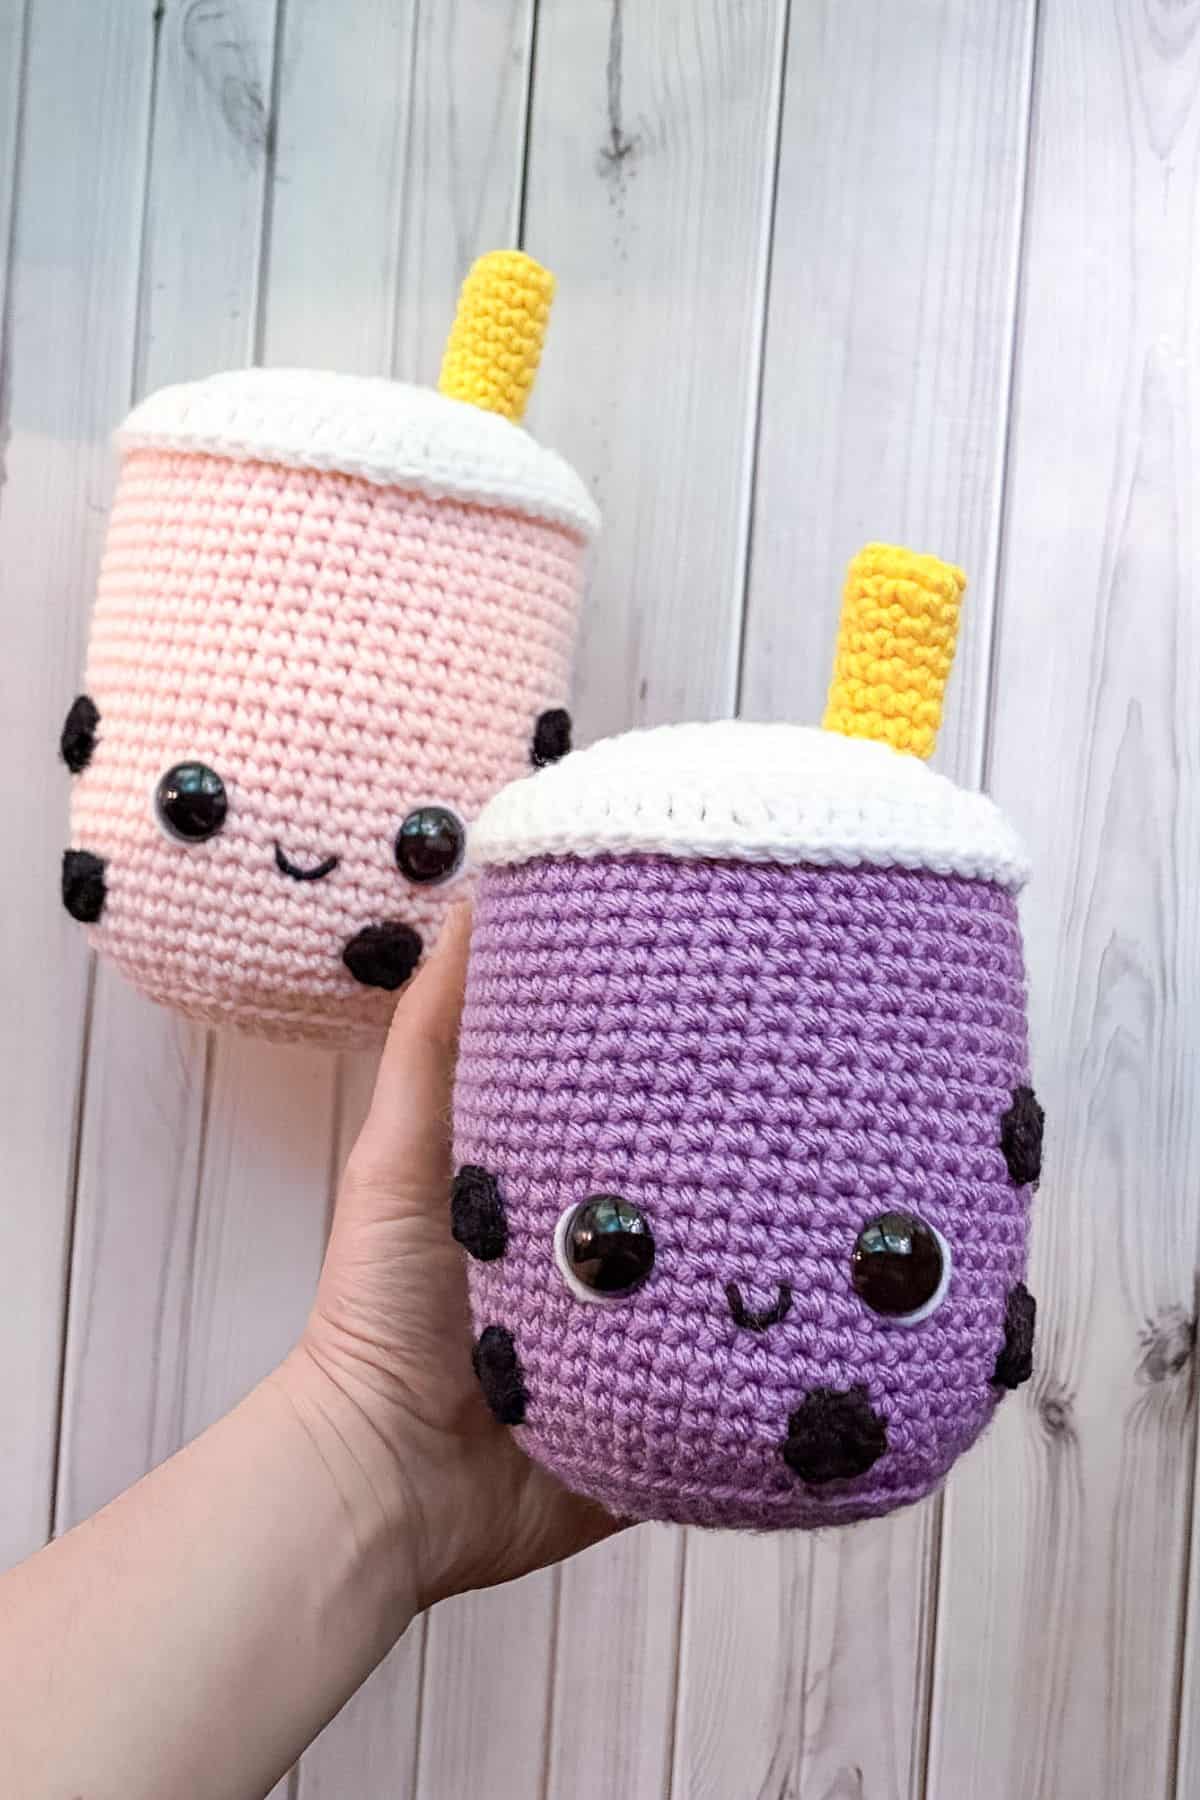
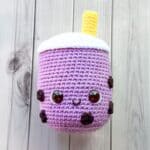
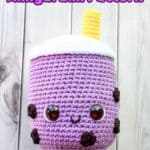
My Crochet Bubble Tea Amigurumi Pattern is perfect for boba tea lovers. Who wouldn’t love to have a squishable tea friend? A crochet bubble tea pal, if you will! I know I would cherish anything boba-related!
Bubble tea has taken the world by storm—and for good reason! It’s delicious! My family and I love bubble tea so much that we’ve started making it at home to fill the void between visits to our favorite boba tea spot. We mostly replicate the fruit smoothie flavors since they’re easier for us to make.
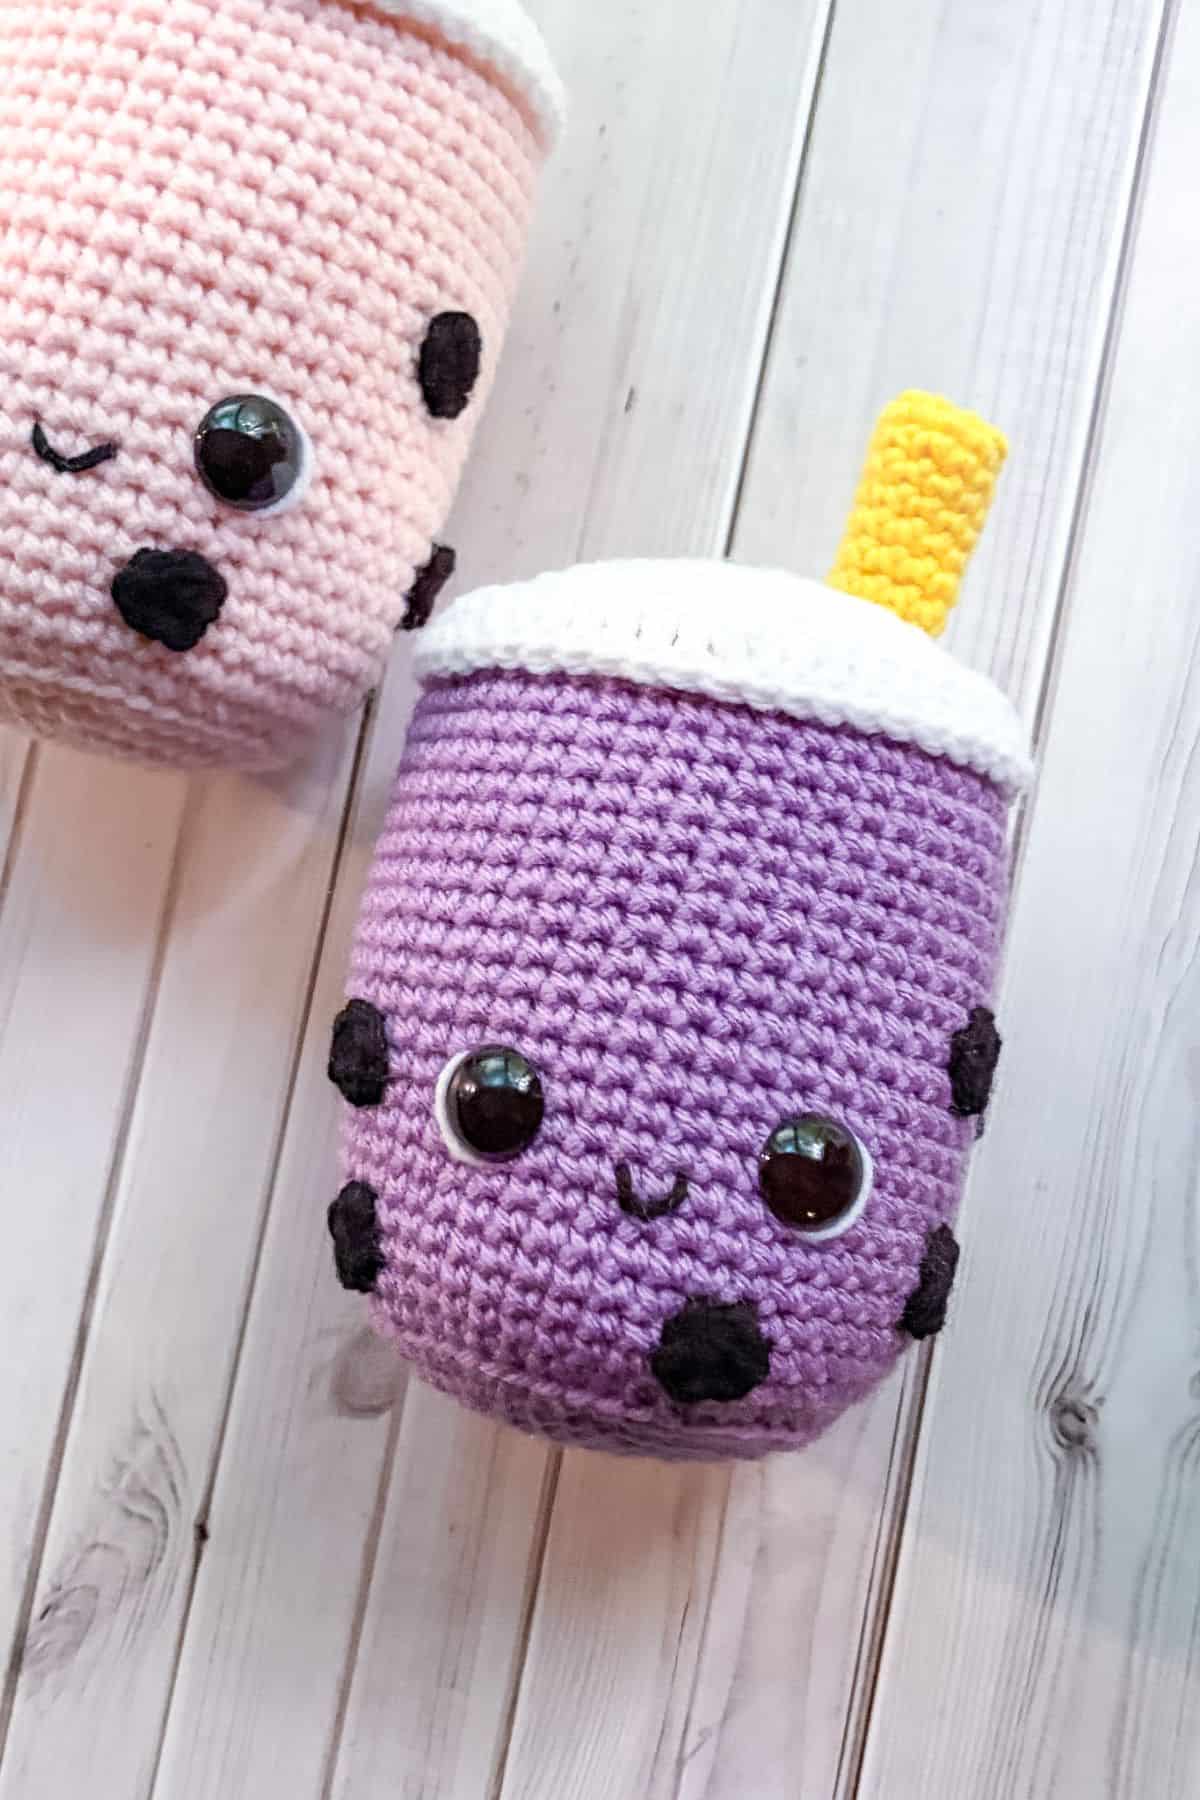
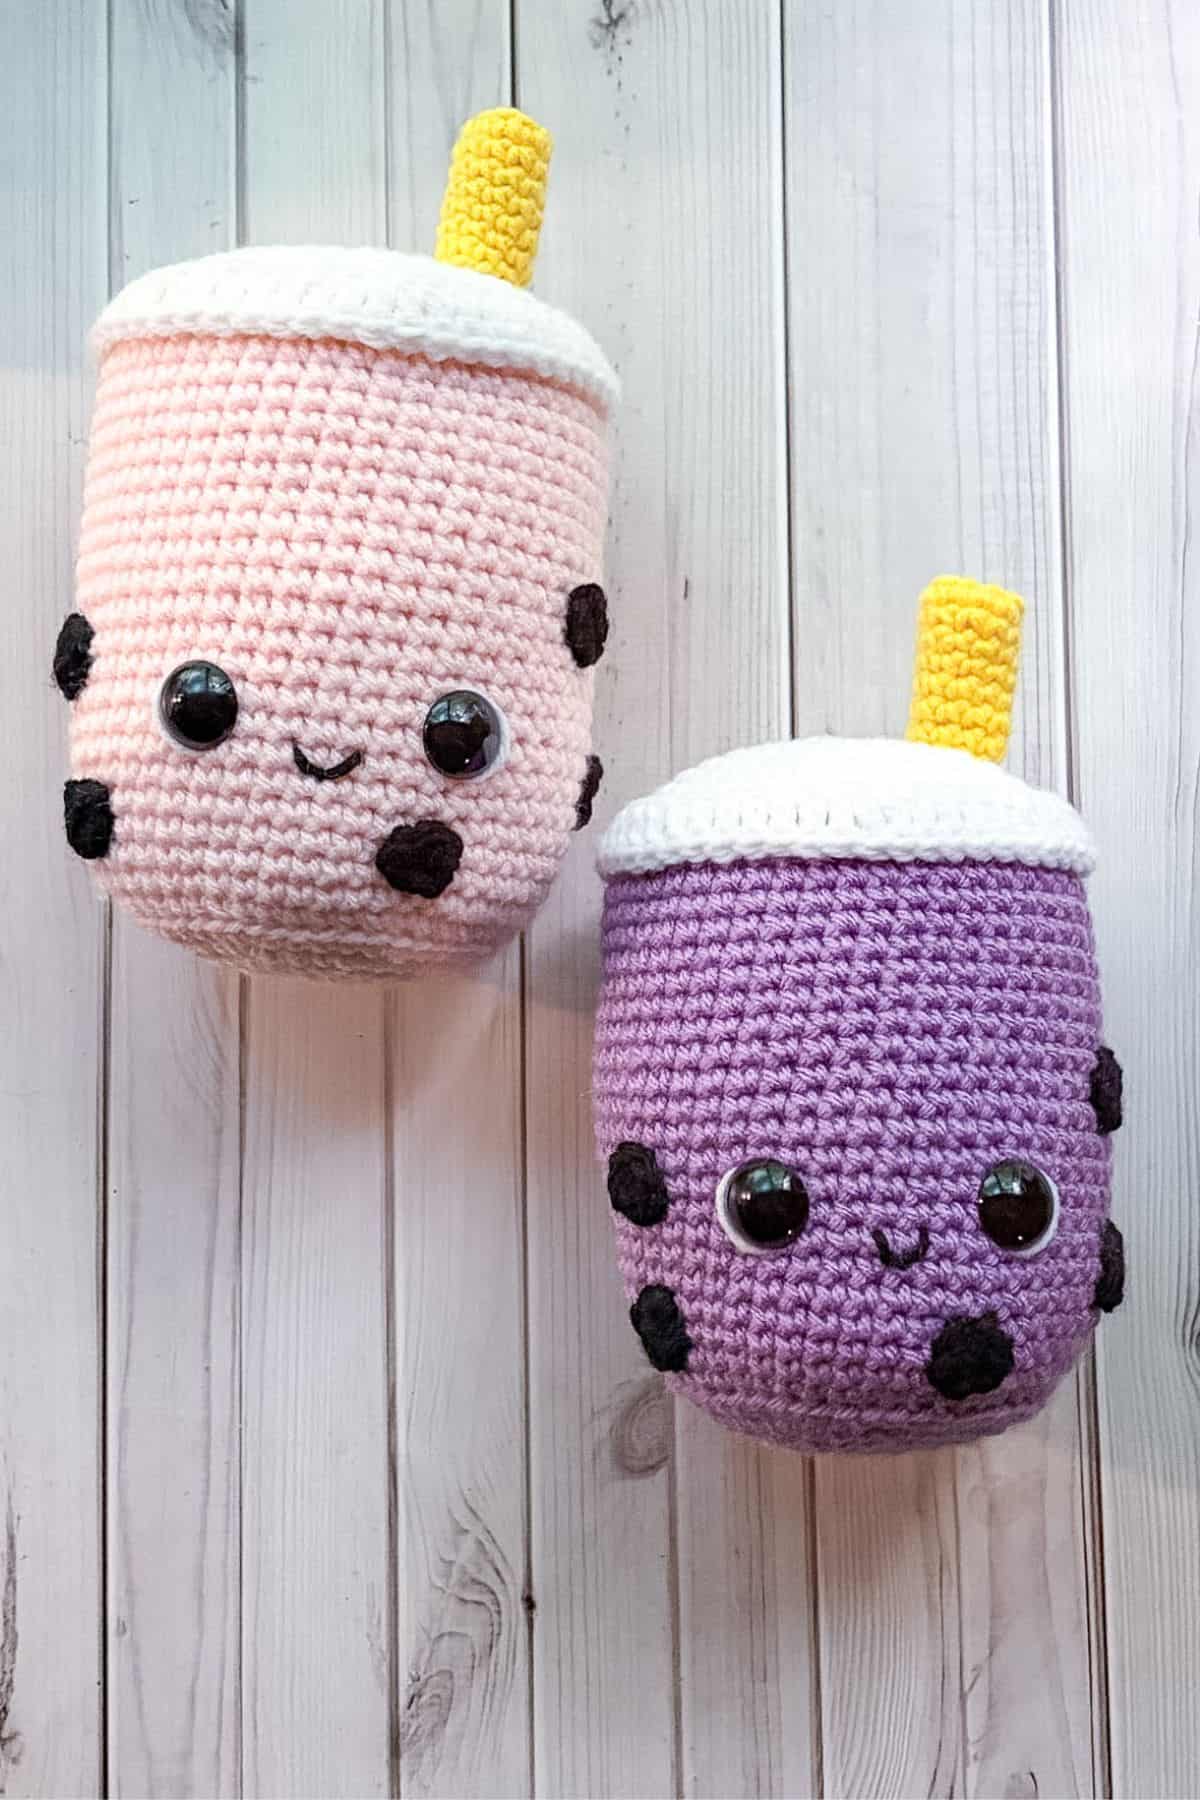
You could say we’ve become a little obsessed with boba. Okay, I’ve become obsessed! So much so that I’ve taken it upon myself to crochet an amigurumi bubble tea pal to snuggle with.
The pattern is super simple to make and can be replicated in any color and yarn. I think this pattern would look fantastic in chunky yarn, creating a HUGE boba tea friend to love and squish!
If you like my boba tea pal, you might also want to try my crochet lemonade pattern or crochet coffee cup pattern.
Jump to:
✏️ Things to Note:
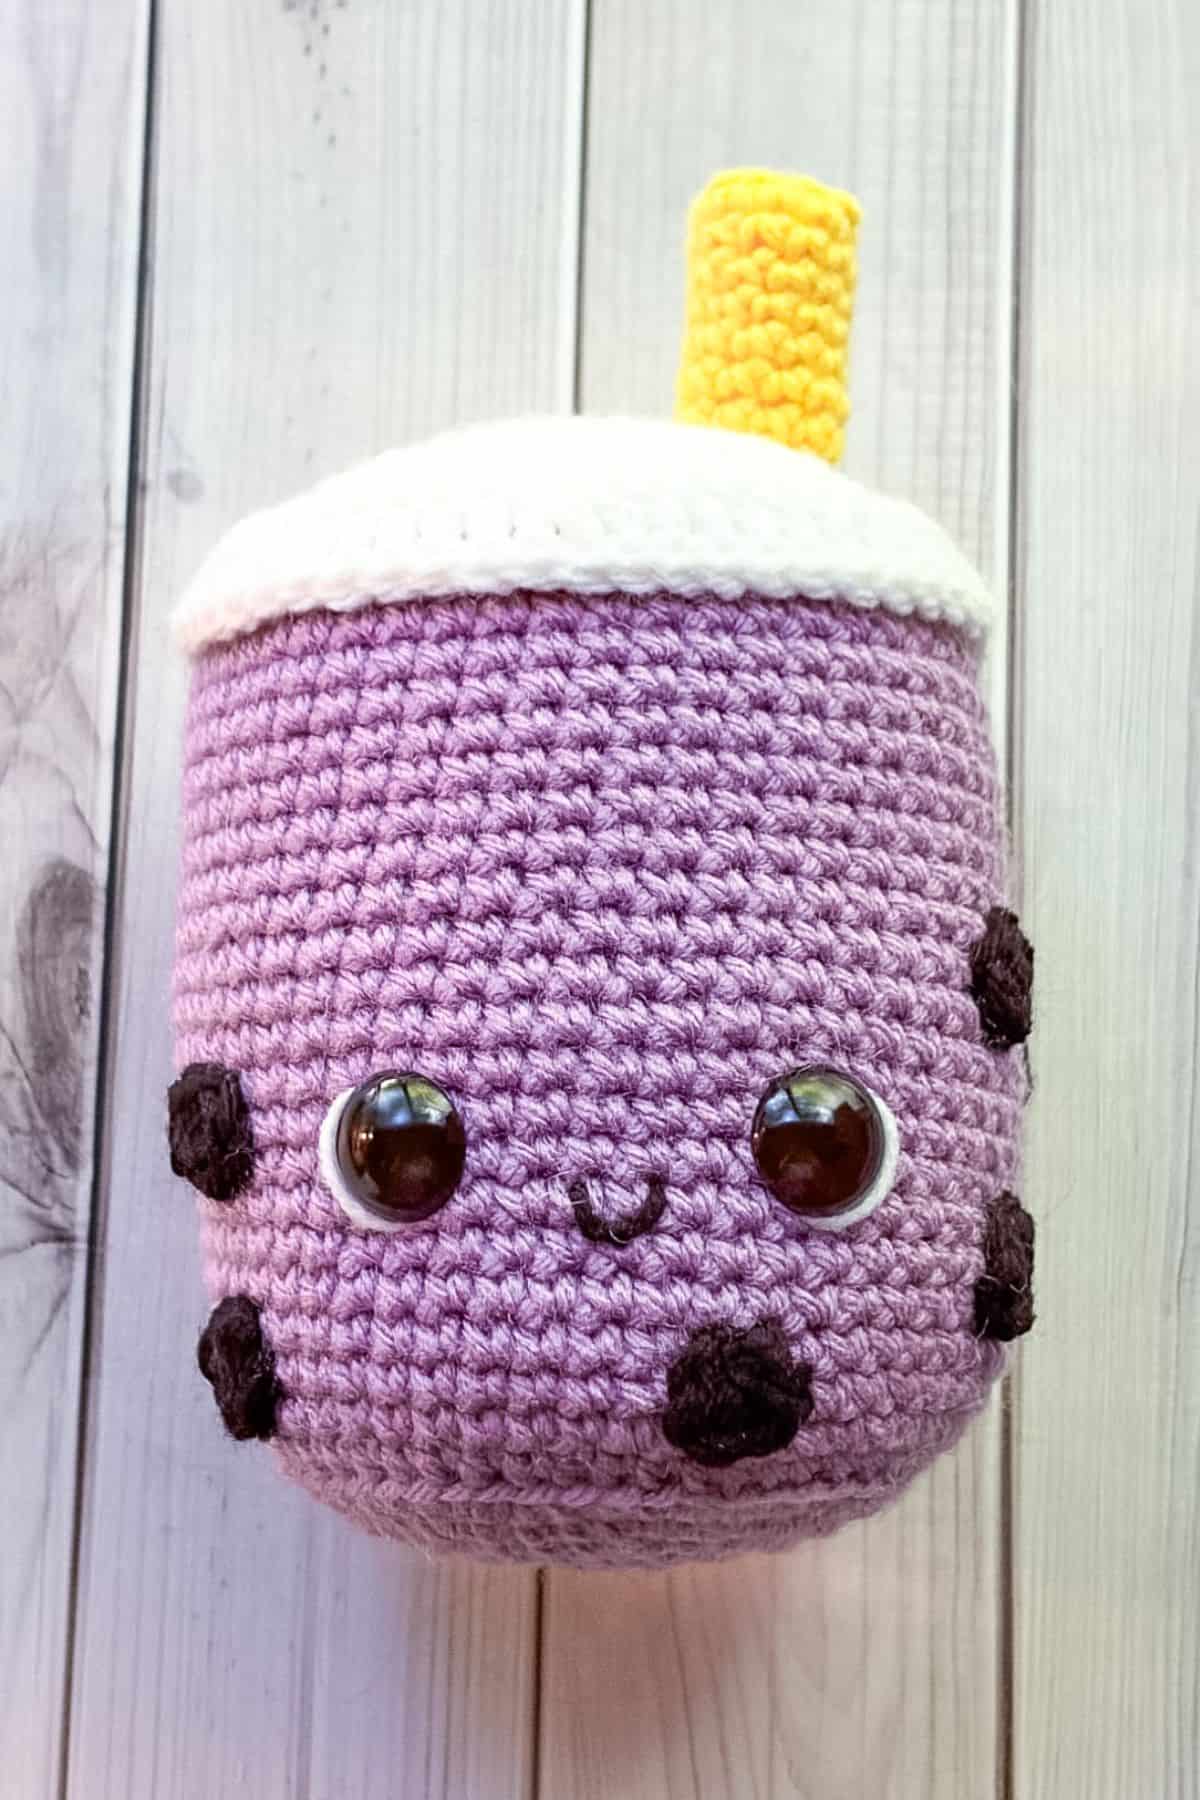
- Yarn Color: I made this using a partial skein of medium purple Red Heart yarn to emulate taro bubble tea, but feel free to choose any color that represents your favorite bubble tea flavor. I recommend using black or a very dark brown for the boba pearls and white for the lid. I also used a bit of light yellow for the straw, but you can change that color as well to complement the bubble tea.
- Yarn Type: I used acrylic yarn because it was what I had on hand, but you can complete this project with any type of yarn. Cotton, acrylic, and chunky yarn are highly recommended.
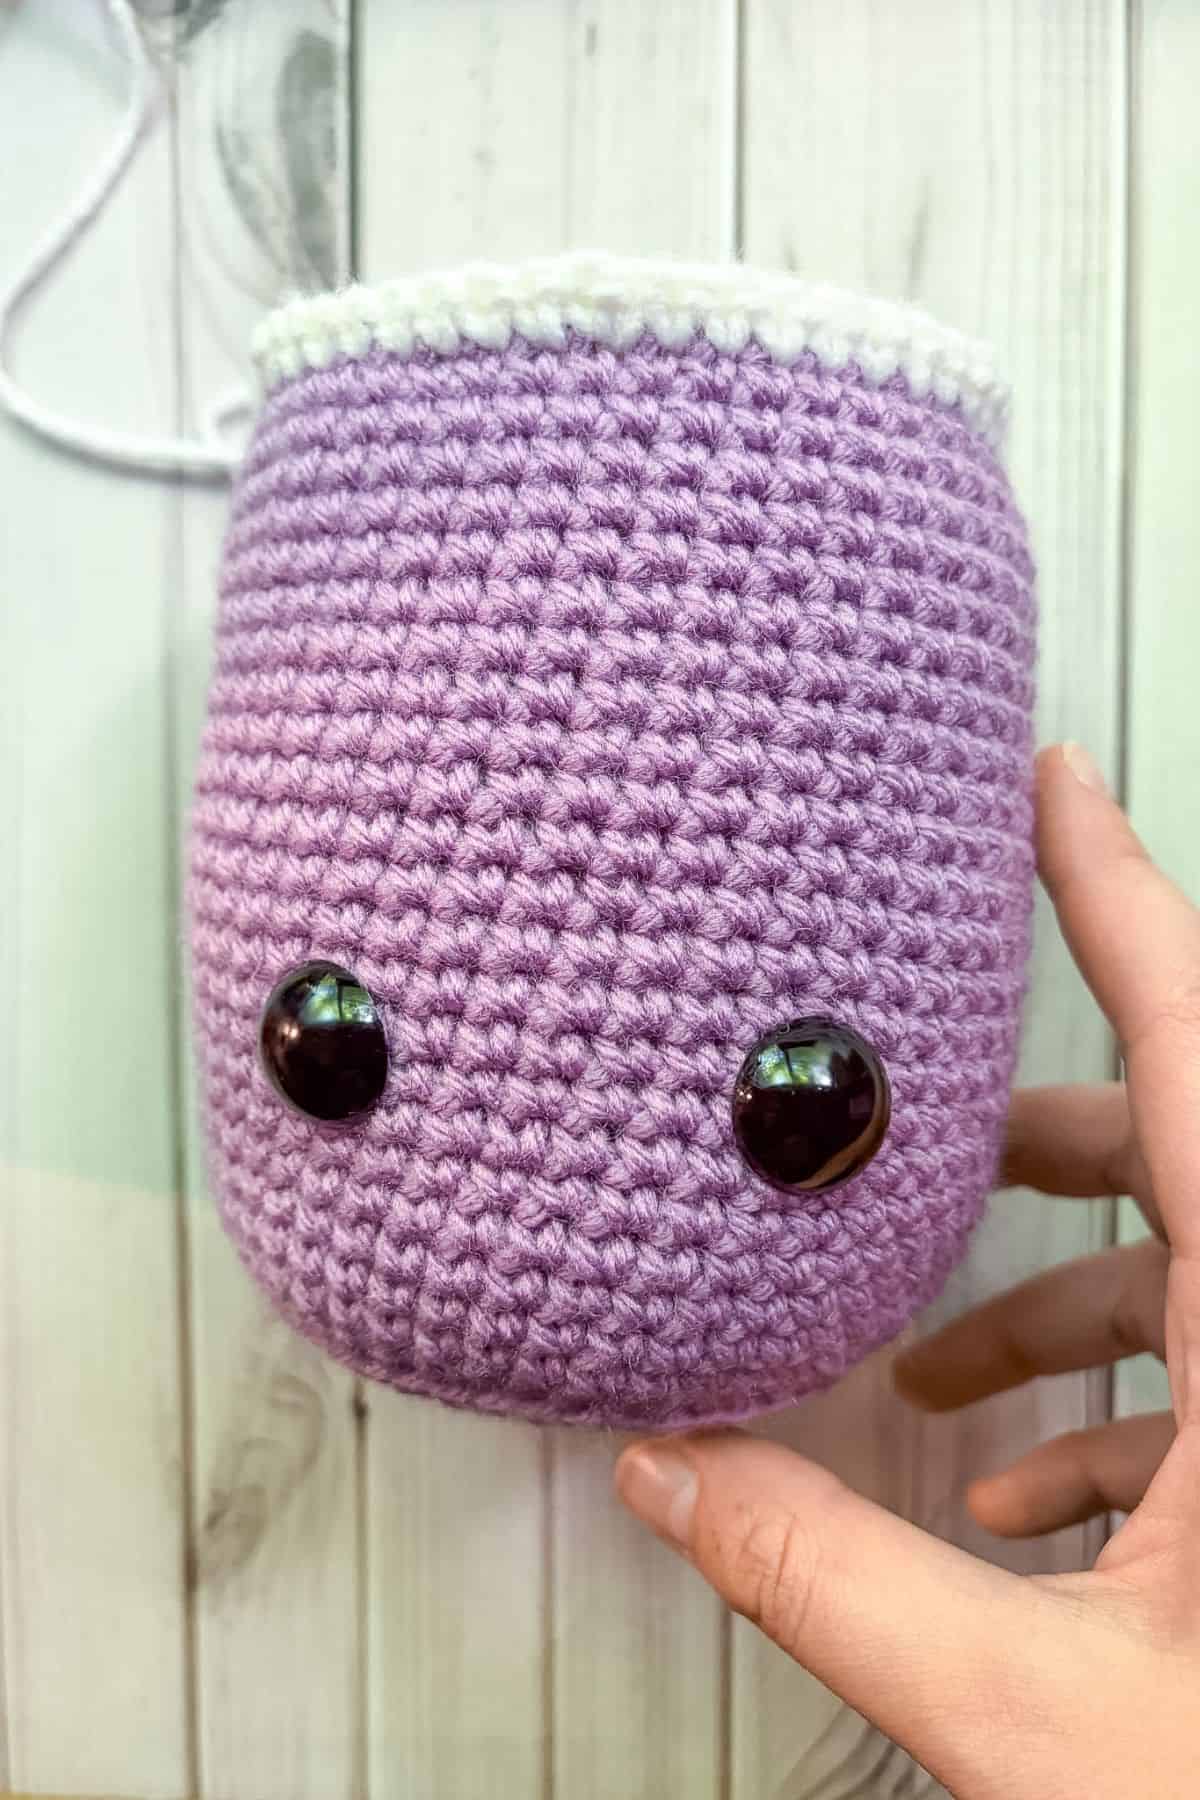
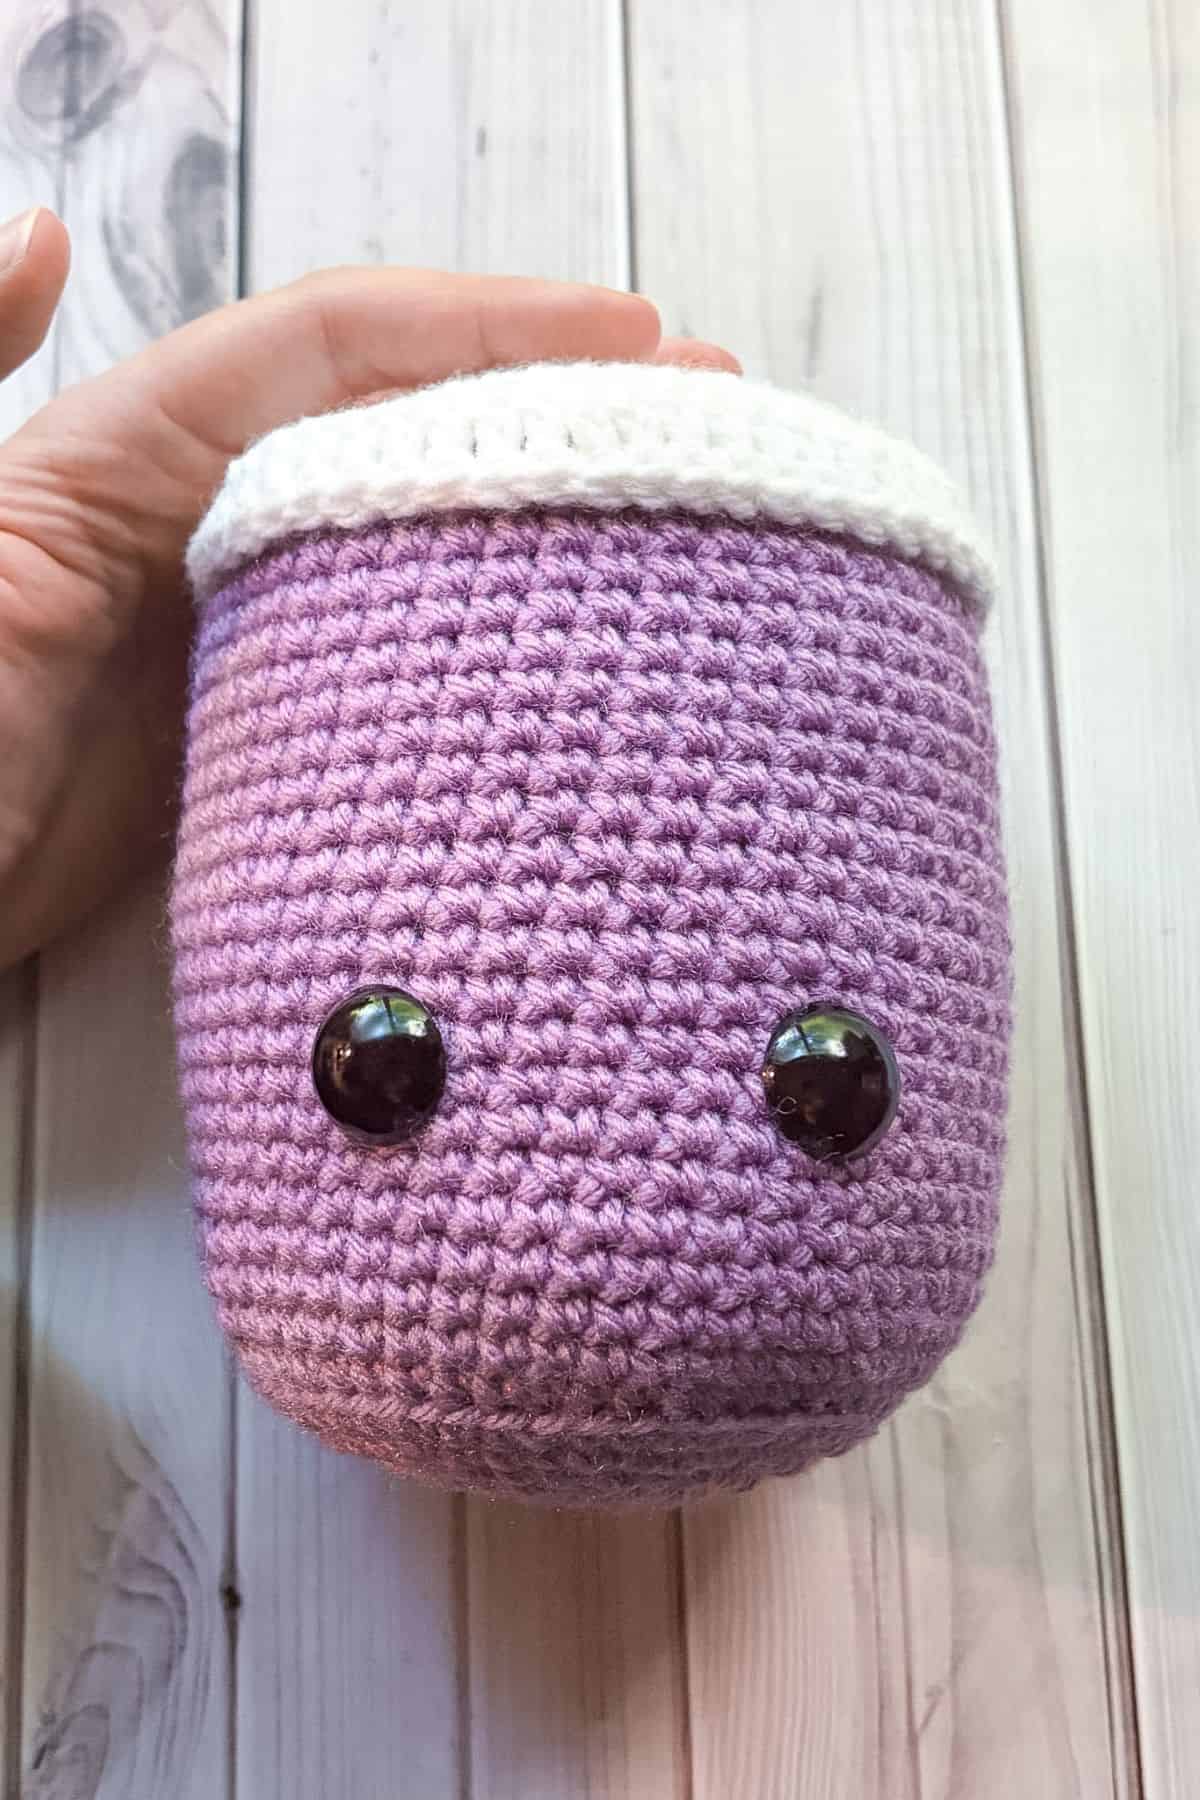
- Finished Size: The finished size of the crochet boba tea is about 8 inches high using a 4mm hook. If you use a different hook or yarn size, the finished size may vary.
🪡 Materials Needed
- Red Heart Yarn - medium purple
- Red Heart Yarn - black
- Red Heart Yarn - white
- Scrap yarn for the straw
- 4mm hook
- Tapestry needle
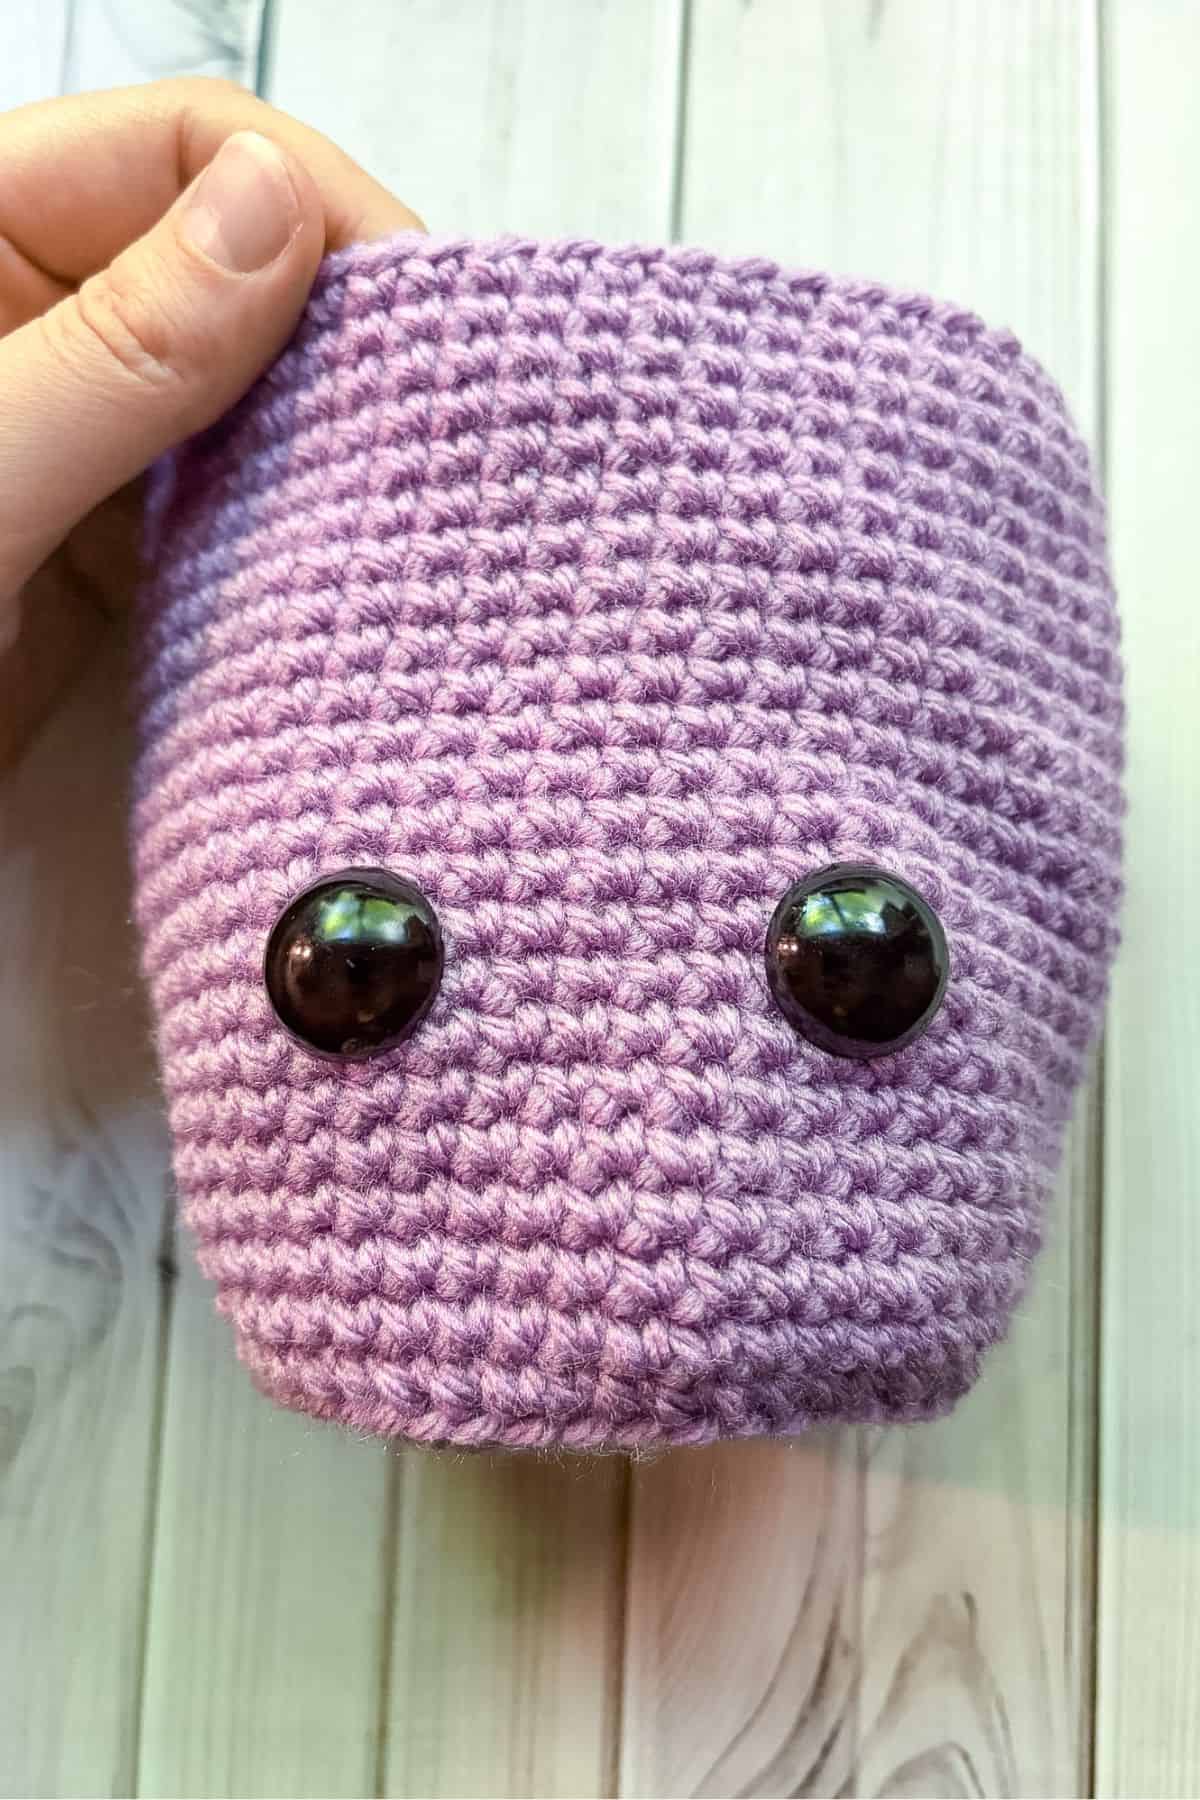
- 1 inch safety eyes
- Polyfill
💭 Abbreviations to Remember (US Terms)
- Magic ring (mr)
- Single crochet (sc)
- Increase (inc) - 2 stitches in the same stitch
- Double crochet - (dc)
- Chains (ch)
- Back loop only (blo)
🧋 Variations
Choose different color yarns to make other boba flavors! I personally have made a pink one, but you can use any color based on the type of crochet bubble tea you are trying to make.
🍵 Instructions for Crochet Bubble Tea Amigurumi Pattern
For this pattern, we will be working in rounds.
Round 1: Using purple (or another yarn color). Make a mr and work sc x8 in to the circle. If you find it difficult making a magic ring you can chain 2 and then crochet sc x8 in the second chain from the hook (8).
Round 2: Inc in every sc (16).
Round 3: Inc, sc. Then repeat until end of round (24).
Round 4: Inc, sc x2. Then repeat until end of round (32).
Round 5: Inc, sc x3. Then repeat until end of round (40).
Round 6: Inc, sc x4. Then repeat until end of round (48).
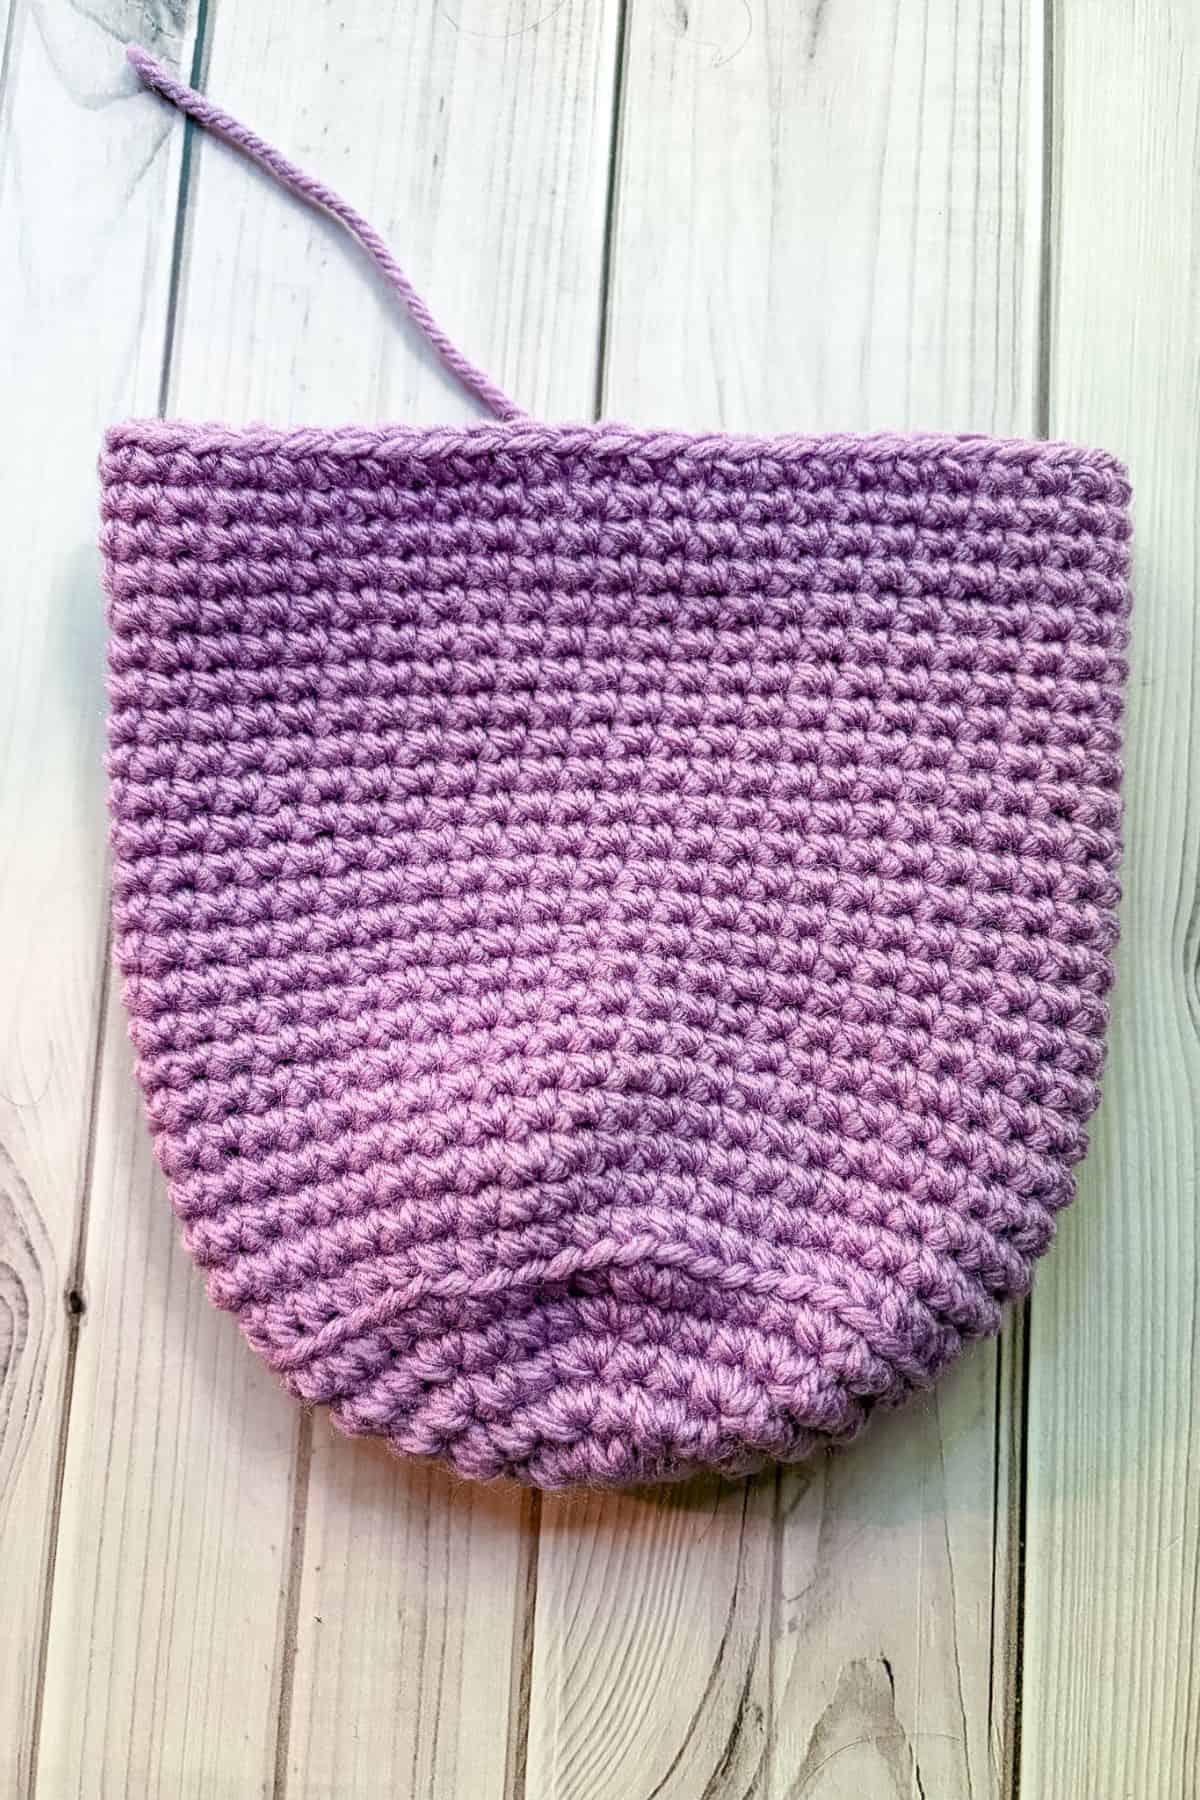
Round 7: Sc in blo for the entire round (48).
Round 8-30: Sc in every stitch (48).
Add the safety eyes between rounds 14-15 roughly 7 stitches apart.
Crochet Lid:
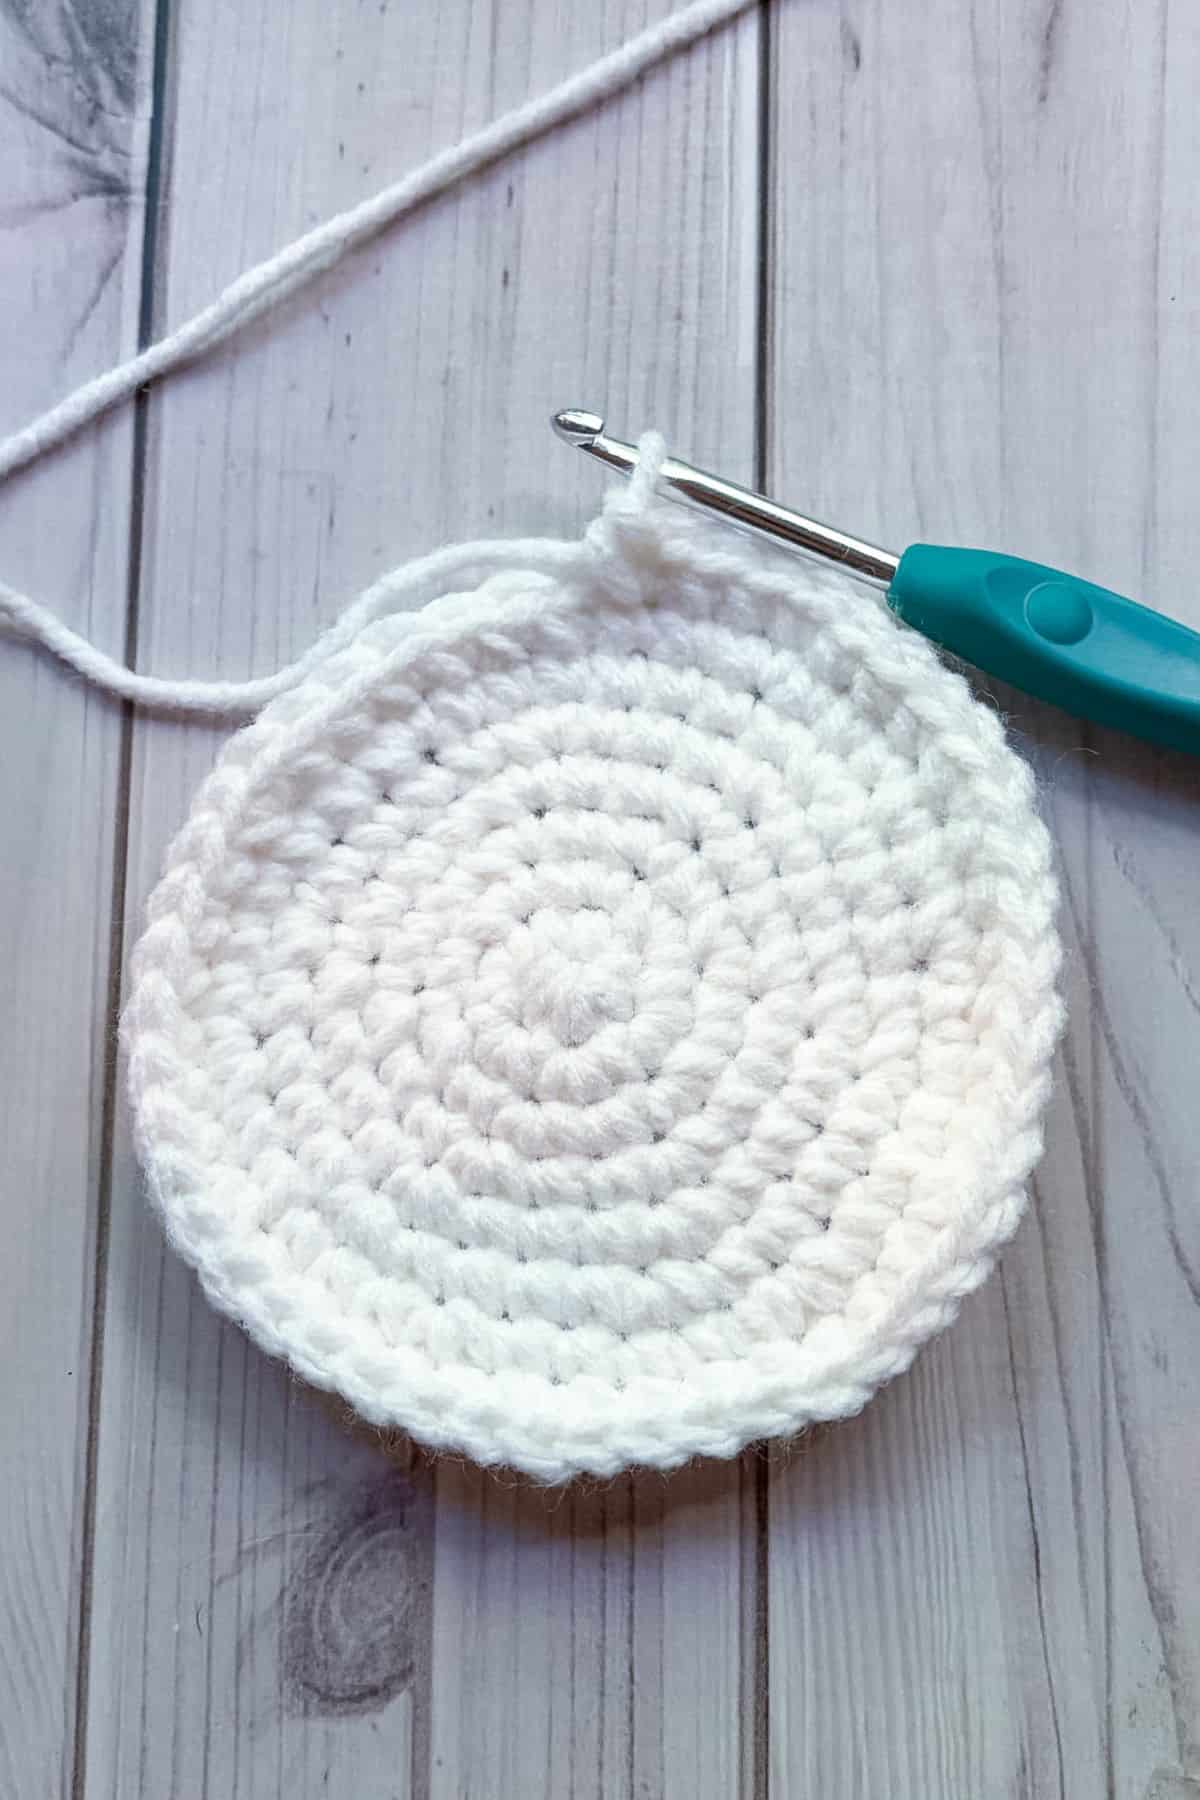
Round 1: Using white, make a mr and work sc x6 into the circle (6).
Round 2: Inc in every sc (12).
Round 3: Inc, sc. Then repeat until end of round (18).
Round 4: Inc, sc x2. Then repeat until end of round (24).
Round 5: Inc, sc x3. Then repeat until end of round (30).
Round 6: Inc, sc x4. Then repeat until end of round (36).
Round 7: Inc, sc x5. Then repeat until end of round (42).
Round 8: Inc, sc x6. Then repeat until end of round (48).
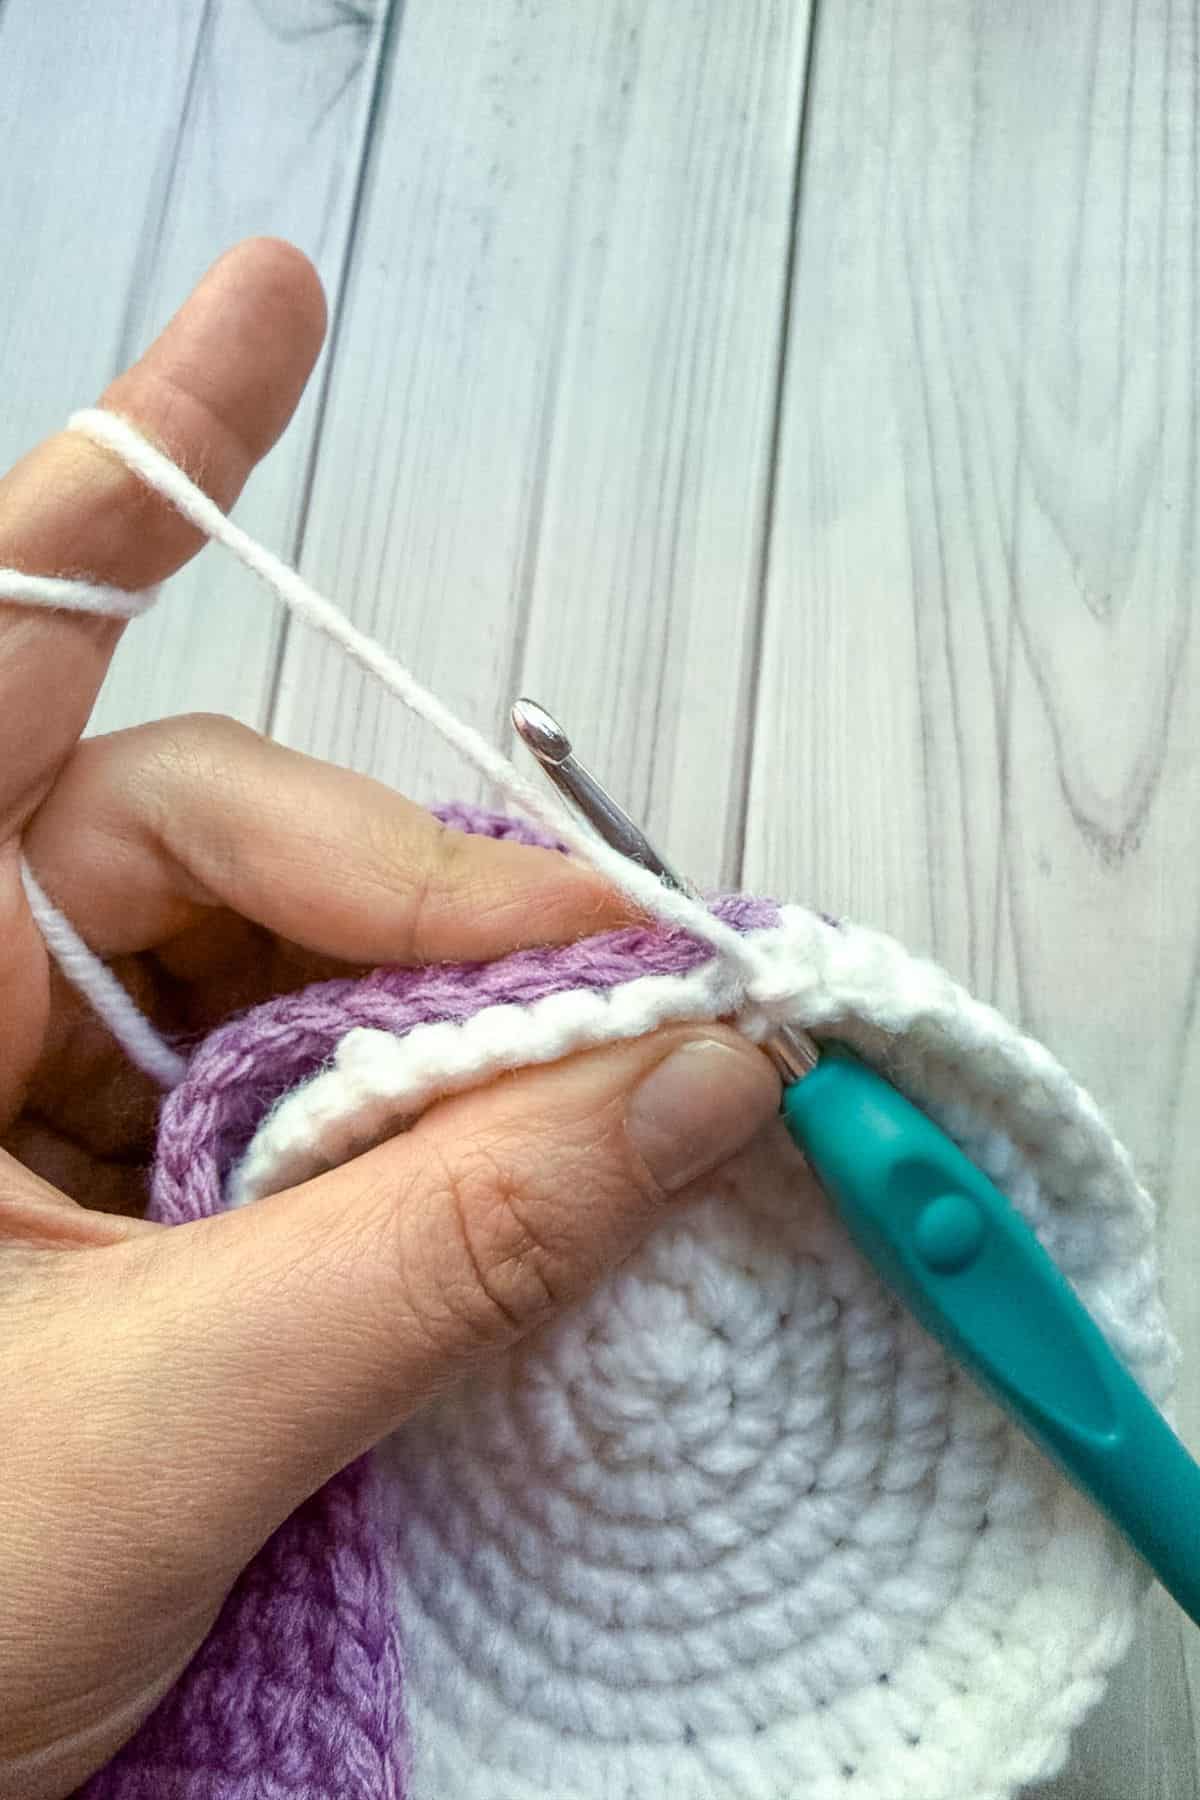
Round 9: This round we will be attaching the lid to the top of the bubble tea. To do this you will go through the 2 sc at once. One from the white lid and the other from the purple. Both have 48sc so there should be no extra sc.
Inc, sc x7. Then repeat for the rest of the round (54). Before closing the top, stuff the crochet bubble tea.
Round 10: We will be creating the rest of the lid.
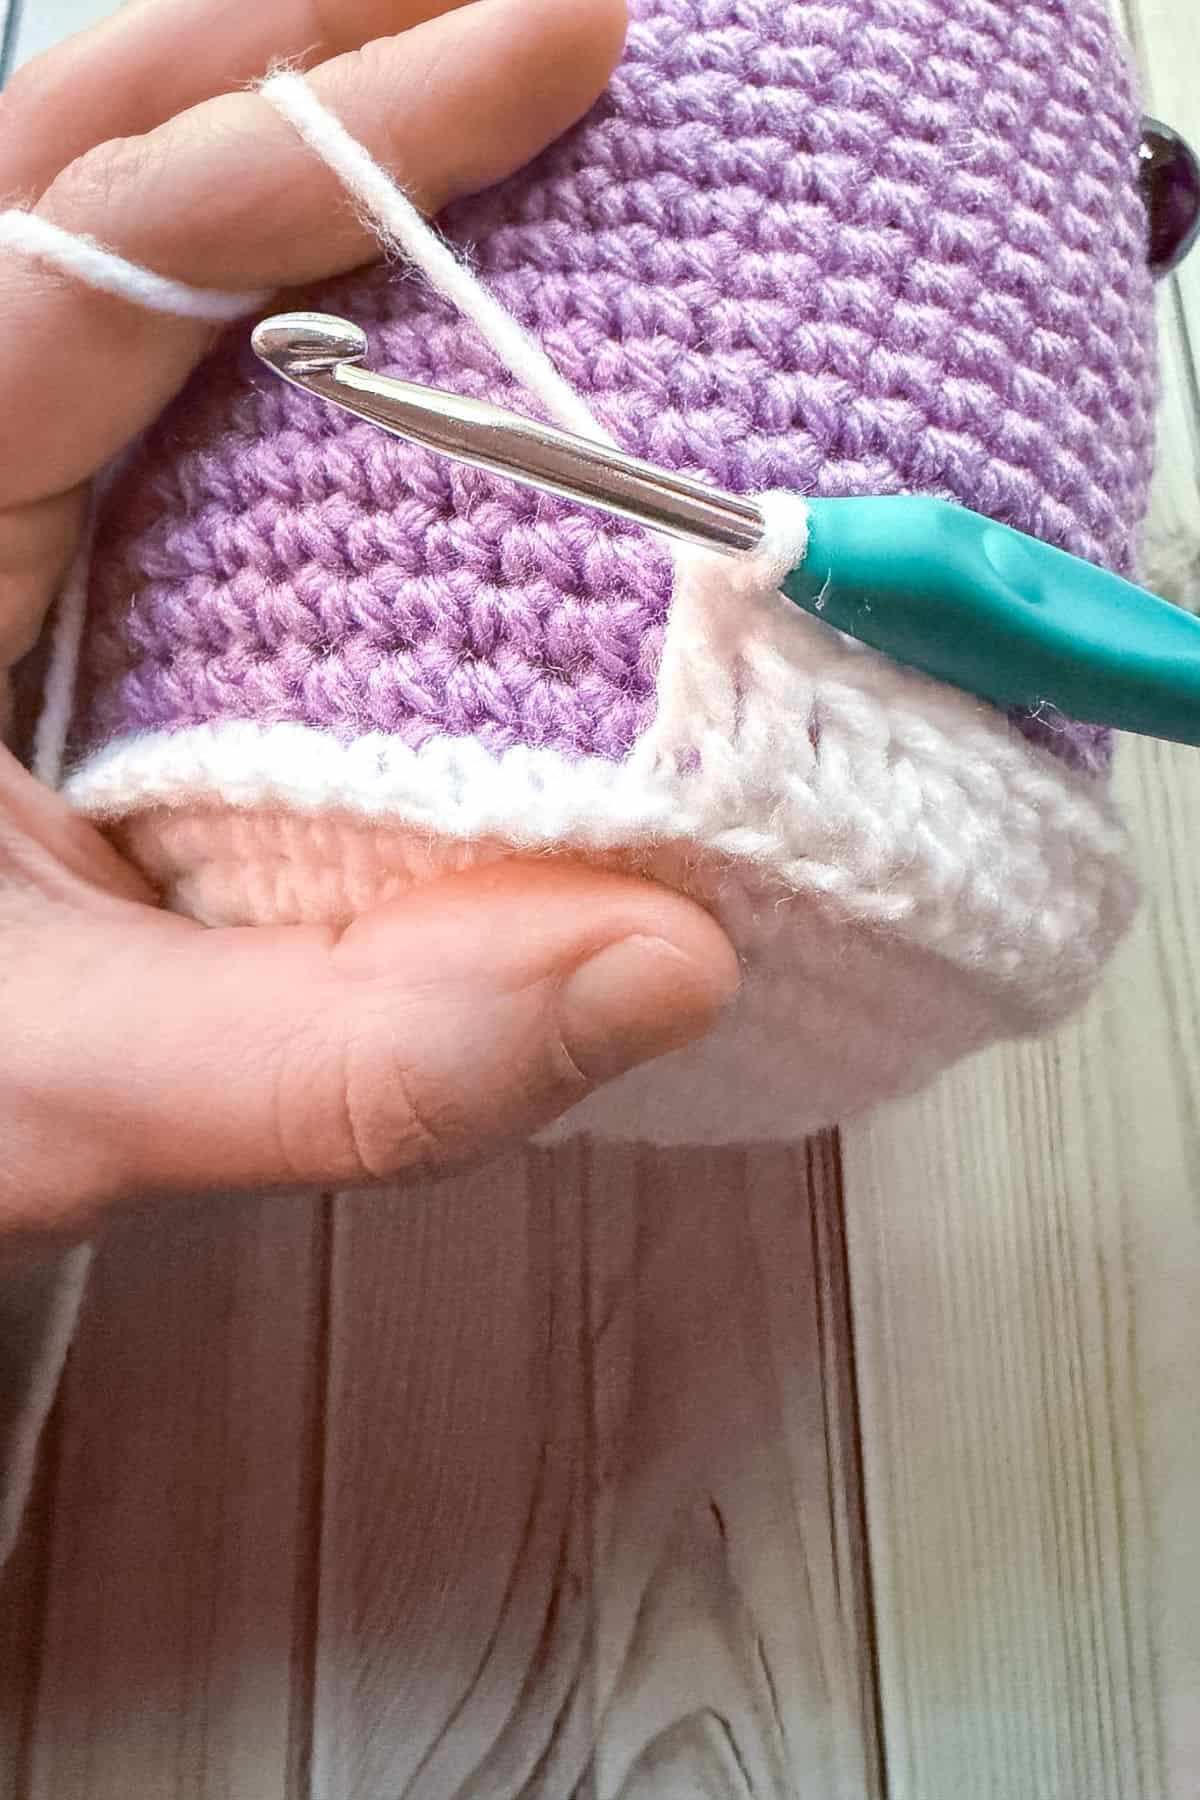
Ch x2, in blo, dc in every stitch (54). Slip stitch to the beginning chains and fasten off the yarn. Weave in any ends. Fold the dc round down so it covers a few rounds of the purple. Optionally, you can tact the lid to the tea base if it keeps flipping up on you.
Crochet Boba Pearls:
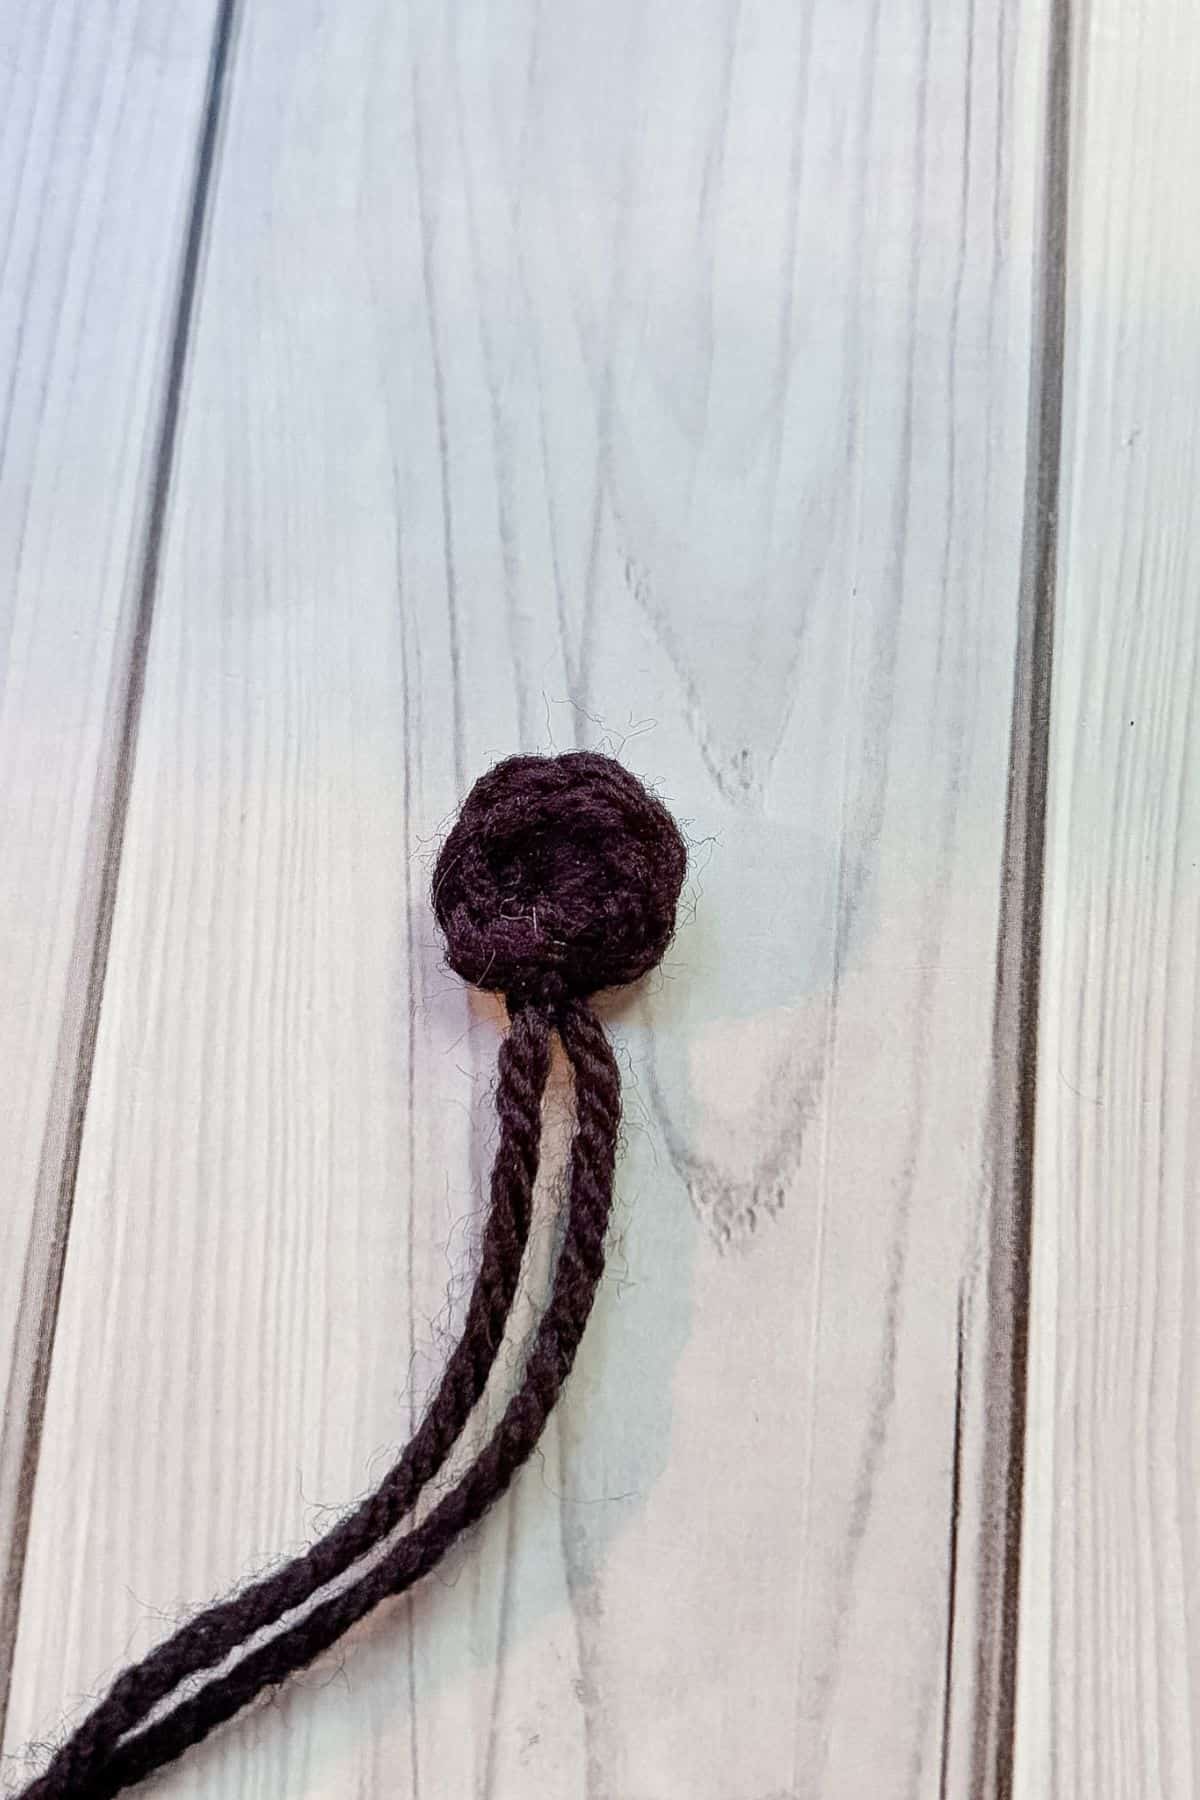
Boba x12:
Using black yarn make a mr and work sc x6 in to the circle (6). Fasten off and leave tails for sewing.
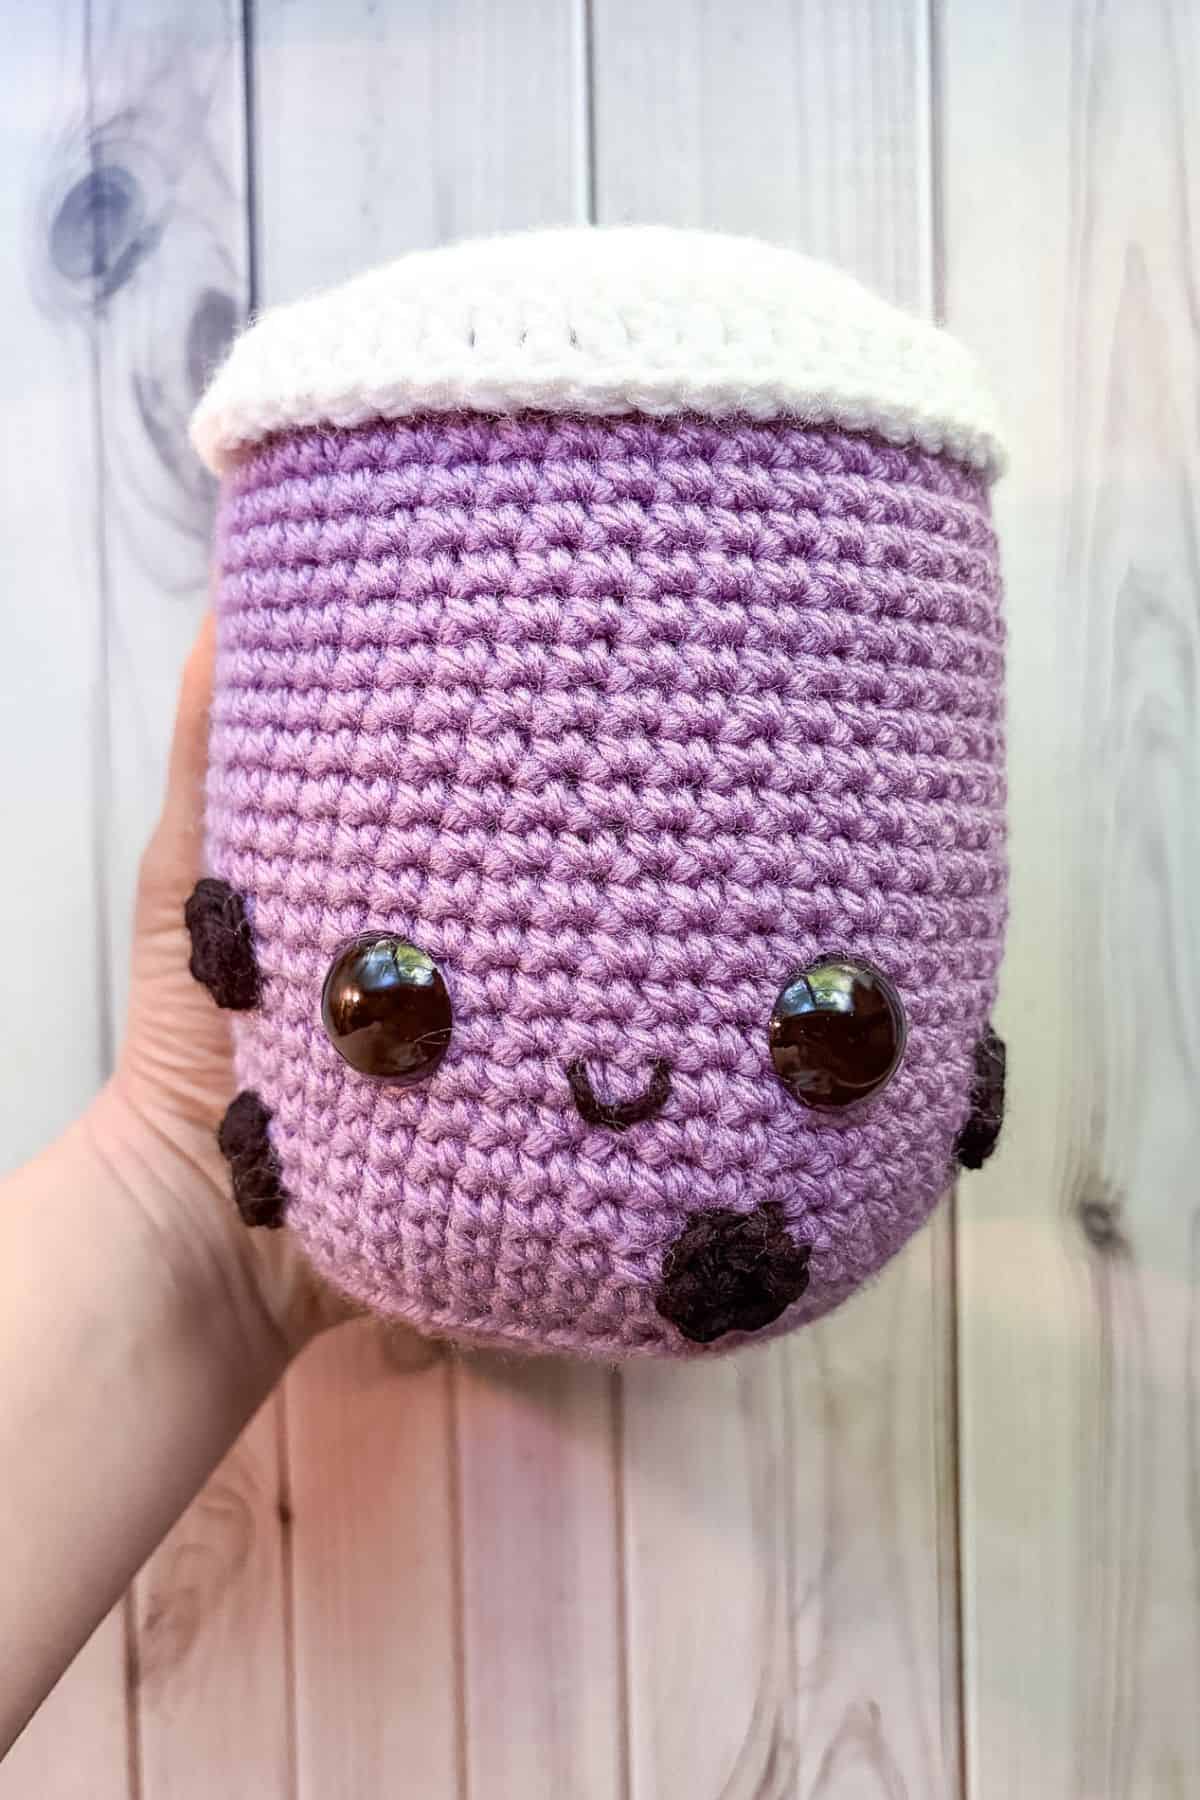
Sew on boba pearls.
Crochet Straw:
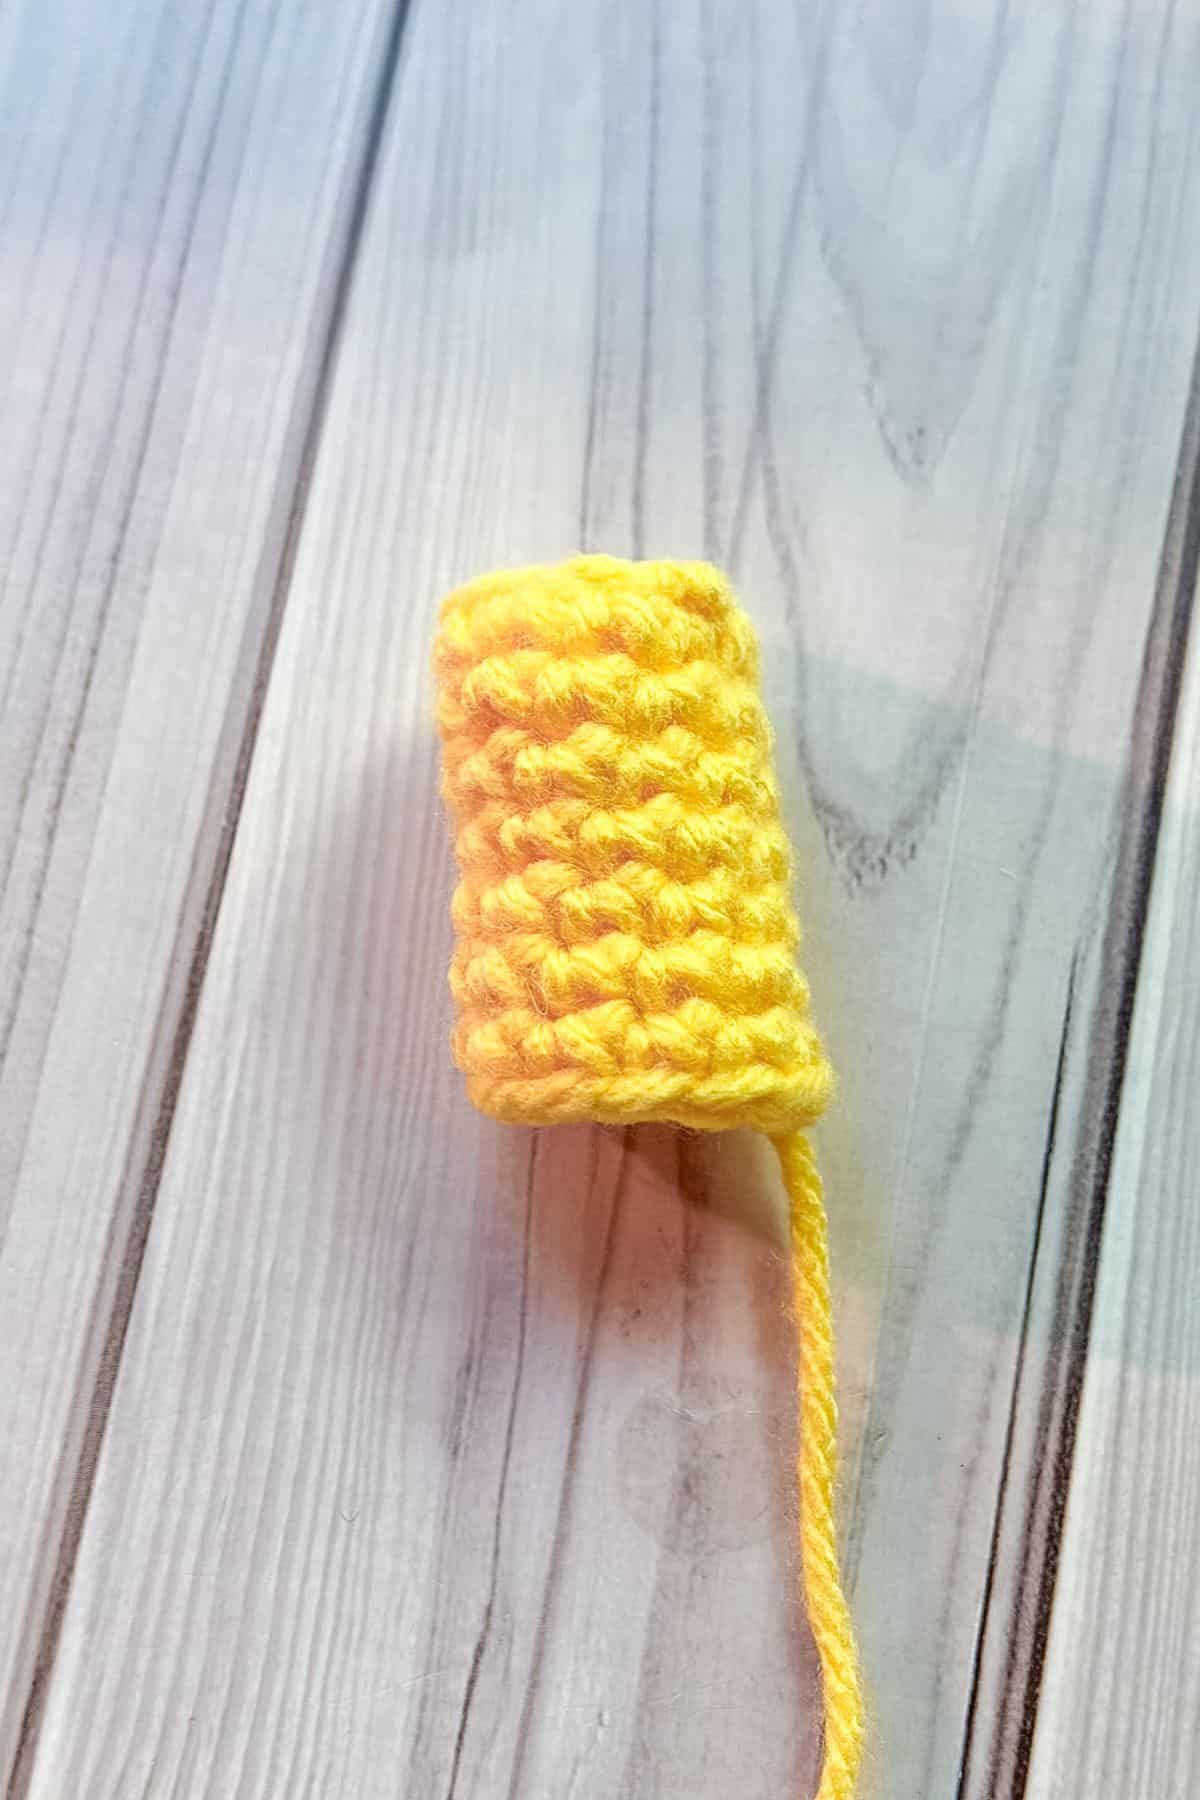
Round 1: Using light yellow (or another color yarn), ch x10, slip stitch together (10).
Round 2: Sc in the next ch. Then repeat for the entire round (10).
Round 3-8: Repeat round 2. Fasten off and leave tail for sewing.
Sew the straw anywhere you want at the top of the crochet bubble tea.
And now your crochet bubble tea is complete!
If you are looking for more summer fun, consider crocheting my crochet lemon bag pattern or crochet strawberry purse pattern!
if you are looking for large food patterns, check out my crochet strawberry pillow pattern and my crochet tempura shrimp pattern. Want to make something smaller? My crochet dumpling pattern is quick to make!
🐌Expert Tips
- Color Combinations: Don’t be afraid to experiment with color combinations! Try using pastel shades for a more whimsical look or bold colors for a striking design.
- Stuffing: For a more structured and firm amigurumi, use a high-quality polyfill. Consider using fabric scraps or other eco-friendly stuffing alternatives if you have them on hand.
- Safety Eyes: Make sure to securely attach safety eyes to ensure they don’t come loose, especially if the finished piece is intended for a child.
- Personalization: Add a little personalization to your bubble tea! Consider embroidering a smiley face or adding decorative elements like a crochet flower.
- Experiment with Sizes: You can create a whole set of bubble teas in different sizes. Simply adjust the number of rounds in the base or use varying yarn weights to create mini or giant versions.
🧵 Pattern FAQs
Boba refers to tapioca pearls that are typically brown or black. They are cooked and tossed in a sugar syrup, then added to a tea or milk drink. This is why the drink is called bubble tea, as the boba resembles bubbles that are nice and chewy.
Absolutely! Simply create fewer rounds in the base of the bubble tea.
Yes! This pattern is completely customizable; you can add more or fewer boba pearls and even change their colors if you like!
🧶More Crochet Food Patterns

If you tried this Crochet Bubble Tea Amigurumi Pattern (or any other pattern on my website), please let me know how it went in the 📝 comments below. I'd love to hear from you!
Crochet Bubble Tea Amigurumi Pattern
Materials
Abbreviations (US terms)
- Magic ring - mr
- Single crochet - sc
- Increase (inc) - 2 stitches in the same stitch
- Double crochet - dc
- Chains - ch
- Back loop only - blo
Notes
- Yarn Color: I made this using a partial skein of medium purple Red Heart yarn to emulate taro bubble tea, but feel free to choose any color that represents your favorite bubble tea flavor. I recommend using black or a very dark brown for the boba pearls and white for the lid. I also used a bit of light yellow for the straw, but you can change that color as well to complement the bubble tea.
- Yarn Type: I used acrylic yarn because it was what I had on hand, but you can complete this project with any type of yarn. Cotton, acrylic, and chunky yarn are highly recommended.
- Finished Size: The finished size of the crochet bubble tea is about 8 inches high using a 4mm hook. If you use a different hook or yarn size, the finished size may vary.
Instructions
- For this pattern, we will be working in rounds.
- Round 1: Using purple (or another yarn color). Make a mr and work sc x8 in to the circle. If you find it difficult making a magic ring you can chain 2 and then crochet sc x8 in the second chain from the hook (8).
- Round 2: Inc in every sc (16).
- Round 3: Inc, sc. Then repeat until end of round (24).
- Round 4: Inc, sc x2. Then repeat until end of round (32).
- Round 5: Inc, sc x3. Then repeat until end of round (40).
- Round 6: Inc, sc x4. Then repeat until end of round (48).
- Round 7: Sc in blo for the entire round (48).
- Round 8-30: Sc in every stitch (48).
- Add the safety eyes between rounds 14-15 roughly 7 stitches apart.
Crochet Lid:
- Round 1: Using white, make a mr and work sc x6 into the circle (6).
- Round 2: Inc in every sc (12).
- Round 3: Inc, sc. Then repeat until end of round (18).
- Round 4: Inc, sc x2. Then repeat until end of round (24).
- Round 5: Inc, sc x3. Then repeat until end of round (30).
- Round 6: Inc, sc x4. Then repeat until end of round (36).
- Round 7: Inc, sc x5. Then repeat until end of round (42).
- Round 8: Inc, sc x6. Then repeat until end of round (48).
- Round 9: This round we will be attaching the lid to the top of the bubble tea. To do this you will go through the 2 sc at once. One from the white lid and the other from the purple. Both have 48sc so there should be no extra sc.
- Inc, sc x7. Then repeat for the rest of the round (54). Before closing the top, stuff the crochet bubble tea.
- Round 10: We will be creating the rest of the lid.
- Ch x2, in blo, dc in every stitch (54). Slip stitch to the beginning chains and fasten off the yarn. Weave in any ends. Fold the dc round down so it covers a few rounds of the purple. Optionally, you can tact the lid to the tea base if it keeps flipping up on you.
Crochet Boba Pearls:
Boba x12:
- Using black yarn make a mr and work sc x6 in to the circle (6). Fasten off and leave tails for sewing.
- Sew on boba pearls.
Crochet Straw:
- Round 1: Using light yellow (or another color yarn), ch x10, slip stitch together (10).
- Round 2: Sc in the next ch. Then repeat for the entire round (10).
- Round 3-8: Repeat round 2. Fasten off and leave tail for sewing.
- Sew the straw anywhere you want at the top of the crochet bubble tea.
- And now your crochet bubble tea is complete!


Leave a Reply