
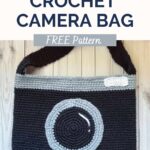
My Crochet Camera Bag Pattern is the perfect bag to make a statement! Made in the round, you'll have this bag completed in no time with minimal sewing.

I love making unusual and unique crochet bags. I draw inspiration from various sources, like fruit for my Crochet Strawberry Bag Pattern or Orange Crochet Bag Pattern. I use these fruity bags all the time when I go to the farmer's market in the summer.
I also take inspiration from nature itself, like with my Japanese Knot Bag Crochet Pattern, which resembles Mount Fuji. Living near many mountains in the PNW fuels my creativity, leading to designs like my reversible Crochet Volcano Pattern that showcases a snowcapped mountain on the other side.
Sometimes, my inspiration comes from family and friends, just like with this crochet camera bag pattern! I have many friends who are photographers, and I thought of them while creating this unique crochet bag pattern.
Although I love the art of photography, it was always hard for me to grasp. Now that I take photos for my blog posts, I've learned a lot (and am still learning), but my respect for photographers continues to grow as I navigate my photography journey.
Jump to:
✏️ Things To Note:
- Yarn Choice: This camera bag crochet pattern is made using acrylic yarn, but you can use any yarn and any weight. Chunky yarn will create a large tote, while DK will yield a small crochet camera pouch—perfect for a phone and other small items.
- Closure Options: Although I sew the camera lens all the way around to close it, you can sew the bottom half and leave the top open as a small pouch.
- Finished Size: The finished size of the camera bag is approximately 12 inches wide and 10 inches tall.
🪡 Materials Needed
- Caron one pound yarn black
- Caron one pound yarn gray
- Caron one pound yarn white
- 5mm hook
- Tapestry needle
- Closures of choice (zippers, buttons, etc)
💭Abbreviations to Remember (US terms)
- Chains - ch
- Single crochet - sc
- Increase - inc
🧋Variations
You can either make the crochet camera strap like I did or buy a strap and attach it to the edges. Feel free to change the color of the camera bag if you don't want to crochet in black!
🍵Instructions for Crochet Camera Bag Pattern
The crochet camera bag pattern is made in the round.

Round 1: Ch x45. In the second chain from the hook make an inc. Then sc x42 for the chain length. In the last ch in the row make an increase x2 (4 sc stitches) and turn to the other side of the chain that has not been worked in. Then sc x42 and make an inc in the last stitch. (88)
Round 2: Make a sc in every stitch (88)
Round 3-32: Repeat round 2. At the end of the last row switch the black yarn to gray. (88)

Round 33-38: Repeat round 2. (88) Fasten off the yarn and weave in any ends.
Crochet Camera Lens Cover:

Round 1: Using black yarn, make a MR and make sc x6 in the circle. If you find it difficult making a magic ring you can chain 2 and then crochet sc x6 in the second chain from the hook. (6)
Round 2: Inc in every sc. (12)
Round 3: Inc, sc, then repeat until end of round (18)
Round 4: Inc, sc x2, then repeat until end of round (24)
Round 5: Inc, sc x3, then repeat until end of round (30)
Round 6: Inc, sc x4, then repeat until end of round (36)
Round 7: Inc, sc x5, then and repeat until end of round (42)
Round 8: Inc, sc x6, inc, sc x6 and repeat until end of round (48). When you get done with this round switch the color to gray.
Round 9: With the gray yarn, Inc, sc x7 then repeat until end of round (54)
Round 10: Inc, sc x8, then repeat until end of round (60)
Round 11: Inc, sc x20, repeat the rest of the round (66). Fasten off the yarn and then leave a tail for sewing.
White Rectangle and Crochet Camera Strap
These are made in rows not rounds.

White Rectangle:
Row 1: Ch x10
Row 2: In the second ch from the hook make a sc. Then sc for the rest of the row. (9)
Ch x1 and turn.
Row 3-4: Repeat row 2.

Strap:
Row 1: Using black yarn, ch x6 and then turn.
Rows 2-115: In the second ch from the hook make a sc. Then sc for the rest of the row. Then ch x1 and turn. Then repeat for the following rows.
Adjust the length of the strap as needed by adding more or less rows.
Finishing
Sew the lens to the middle of the crochet camera bag, if you leave the top of the lens open it can act like a little crochet pouch. Then sew the white rectangle to the upper right part of the bag in the gray part. Finally attach the crochet camera strap to the bag's corners. Optionally you can add a highlight mark to the lens.
Now the crochet camera bag should be done! I hope you enjoy making the crochet camera bag pattern!
If you are looking for more cool crochet bag patterns, you can't go wrong with a crochet emoji bag pattern or Crochet Orca Bag.
If you have any extra black and white yarn, try making my crochet granny square bag pattern.
I probably won't stop creating fun and unique crochet bags! They are just so fun to design!

🐌Expert Tips
- Add a Lining: If you want the crochet camera bag to hold many items, consider widening the base and adding a lining. This will help maintain its shape when filled with heavier items.
- Personalize Your Design: Feel free to embellish the crochet camera bag with additional crochet motifs, beads, or buttons for a unique touch.
- Adjust the Size: To customize the bag’s size, simply adjust the number of chains in the starting round or the number of rounds completed.
🧵Pattern FAQs
Of course, chunky yarn would make the bag become a large tote versus a phone bag so keep that in mind.
Of course! I usually make my handles out of crochet, but you can always add on a different handle if you want it to be stronger.
When the bag is done, lay it down over fabric, then cut out 2 rectangles that are slightly bigger than the actual bag. Sew the 2 pieces of fabric together either by hand or machine then sew to the inner top of the bag.

🧶More Crochet Purse Patterns

If you tried this Crochet Camera Bag Pattern (or any other pattern on my website), please let me know how it went in the 📝 comments below. I'd love to hear from you!

Crochet Camera Bag Pattern
Materials
- ½ Caron one pound yarn black
- small ball Caron one pound yarn gray
- small ball Caron one pound yarn white
- 5mm hook
- Tapestry needle
- Closures of choice zippers, buttons, etc
Abbreviations (US terms)
- Chains - ch
- Single crochet - sc
- Increase - inc
Notes
- The camera bag crochet pattern is made using acrylic yarn, but you can use any yarn and any weight. Chunky will make it a large tote, while DK will make it a small crochet camera pouch - perfect for a phone and another small item.
- Although I sew the camera lens all the way around so it is shut, you can sew the bottom half and leave the top of it open as a small little pouch.
- The finished size of the camera bag is roughly 12 inches wide and 10 inches tall.
Instructions
- The crochet camera bag pattern is made in the round.
- Round 1: Ch x45. In the second chain from the hook make an inc. Then sc x42 for the chain length. In the last ch in the row make an increase x2 (4 sc stitches) and turn to the other side of the chain that has not been worked in. Then sc x42 and make an inc in the last stitch. (88)
- Round 2: Make a sc in every stitch (88)
- Round 3-32: Repeat round 2. At the end of the last row switch the black yarn to gray. (88)
- Round 33-38: Repeat round 2. (88) Fasten off the yarn and weave in any ends.
Circle Lens:
- This pattern is made in the round.
- Round 1: Using black yarn, make a MR and make sc x6 in the circle. If you find it difficult making a magic ring you can chain 2 and then crochet sc x6 in the second chain from the hook. (6)
- Round 2: Inc in every sc. (12)
- Round 3: Inc, sc, then repeat until end of round (18)
- Round 4: Inc, sc x2, then repeat until end of round (24)
- Round 5: Inc, sc x3, then repeat until end of round (30)
- Round 6: Inc, sc x4, then repeat until end of round (36)
- Round 7: Inc, sc x5, then and repeat until end of round (42)
- Round 8: Inc, sc x6, inc, sc x6 and repeat until end of round (48). When you get done with this round switch the color to gray.
- Round 9: With the gray yarn, Inc, sc x7 then repeat until end of round (54)
- Round 10: Inc, sc x8, then repeat until end of round (60)
- Round 11: Inc, sc x20, repeat the rest of the round (66). Fasten off the yarn and then leave a tail for sewing.
White rectangle:
- This part of the pattern is made in rows.
- Row 1: Ch x10
- Row 2: In the second ch from the hook make a sc. Then sc for the rest of the row. (9)
- Ch x1 and turn.
- Row 3-4: Repeat row 2.
Strap:
- Row 1: Using black yarn, ch x6 and then turn.
- Rows 2-115: In the second ch from the hook make a sc. Then sc for the rest of the row. Then ch x1 and turn. Then repeat for the following rows.
- Adjust the length of the strap as needed by adding more or less rows.
Finishing:
- Sew the lens to the middle of the bag. Then sew the white rectangle to the upper right part of the bag in the gray part. Finally attach the crochet camera strap to the bag's corners. Optionally you can add a highlight mark to the lens.
- I hope you enjoy your new crochet camera purse!

Leave a Reply