
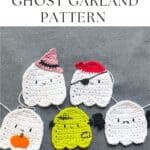
Decorate for Halloween with My Crochet Ghost Garland Pattern! Each ghost has its own personality, ready for trick-or-treating!

Do you love Halloween? I sure do! I love all the decorations and costumes everyone wears. This is also the time of year when more crochet projects start popping up, and I am here for it!
This year, I created a few more crochet Halloween patterns. My favorites so far have been my crochet potion bottle and my crochet ghost coaster pattern.
While making the ghost coaster pattern, I thought, "What if the ghosts had costumes too?" Initially, I considered them for the coasters, but then I imagined them as part of a display—like a garland, similar to my crochet fall garland pattern.
And thus, my Crochet Ghost Garland Pattern was born! Of course, you can also use these dressed-up ghosts as crochet coasters.
Jump to:
✏️ Things To Note:
- I made the crochet ghost garland pattern using cotton yarn. Cotton yarn is great for coasters because it is heat-resistant, won’t melt, and absorbs liquids easily. Acrylic yarn doesn’t offer these benefits.
- The crochet ghost garland pattern is made in rows, not rounds, making it easier to create the perfect shape for the top of the ghost.
- Each crochet ghost measures about 4 inches wide and 5 inches tall. If you want a different size, adjust the hook and yarn accordingly. The measurements don’t include additional details like bat wings or witch hats.
🪡 Materials Needed
💭Abbreviations to Remember (US terms)
- Chain - ch
- Single crochet - sc
- Double crochet - dc
- Half double crochet - hdc
- Triple crochet - tr
- Increase - inc
- Slip Stitch - sl st
* The ch x1 at the end of each row does not count as a stitch in the row, it is a turning chain.
* If you see a stitch abbreviation with "x" after it, it means how many times you do that stitch in the following amount of stitches. For example: sc x6 would mean you make a single crochet in the next 6 stitches. Inc x2 means you make an inc in the next 2 stitches.
🧋Variations
You can make two ghosts and crochet them together to create a little pouch or charm for bags and purses. The pattern can also be used for appliques on blankets, similar to my crochet sunflower blanket pattern.
Who says you have to use ghosts as the base for this pattern? Try using my crochet frog coaster pattern instead. Imagine little wizard frogs—how cute would that be?!
🍵Instructions for Crochet Ghost Garland Pattern
If you would like step by step visual guide, check out the crochet ghost coaster pattern. Otherwise, the written instructions are below.
Crochet Ghost Pattern:

Row 1: With white yarn, ch x7, then in the second ch from the hook make a sc. Then sc for the rest of the row (6). After, ch x1 and turn.
Row 2: Inc, sc x4, inc (8). Then ch x1 and turn.
Row 3: Inc, sc x6, inc (10). Then ch x1 and turn.
Row 4: Inc, sc x8, inc (12). Then ch x1 and turn.
Row 5-13: Sc in every stitch (12). Then ch x1 and turn, except for the last row. For the last row, do not ch x1 - just turn.
Row 14: Skip the first stitch and make dc x5 in the second stitch. Then skip the next stitch and make a sc in the following stitch. You just made your first shell for the bottom of the ghost. Repeat the above process 2 more times to finish off the row.
After the 3 shell stitches are made, sc around the sides and top of the ghost. You want to make a sc for every row you made, as well as 1 sc for every stitch you did at the top. This will help your ghost have a cleaner edge. Then sl st to where the shell stitch row begins and fasten off. Do not crochet around the shell stitches.
Embroidery:
Now with the black yarn or black embroidery floss, embroider the eyes and mouth on the 7 and 8th rows of the ghost pattern. Alternatively, you can also use fabric paint if you don’t feel like doing embroidery work.
And now you have a completed crochet ghost pattern! See below for more additional ghost costumes.
Make as many of the ghosts as you want for your crochet ghost garland pattern.
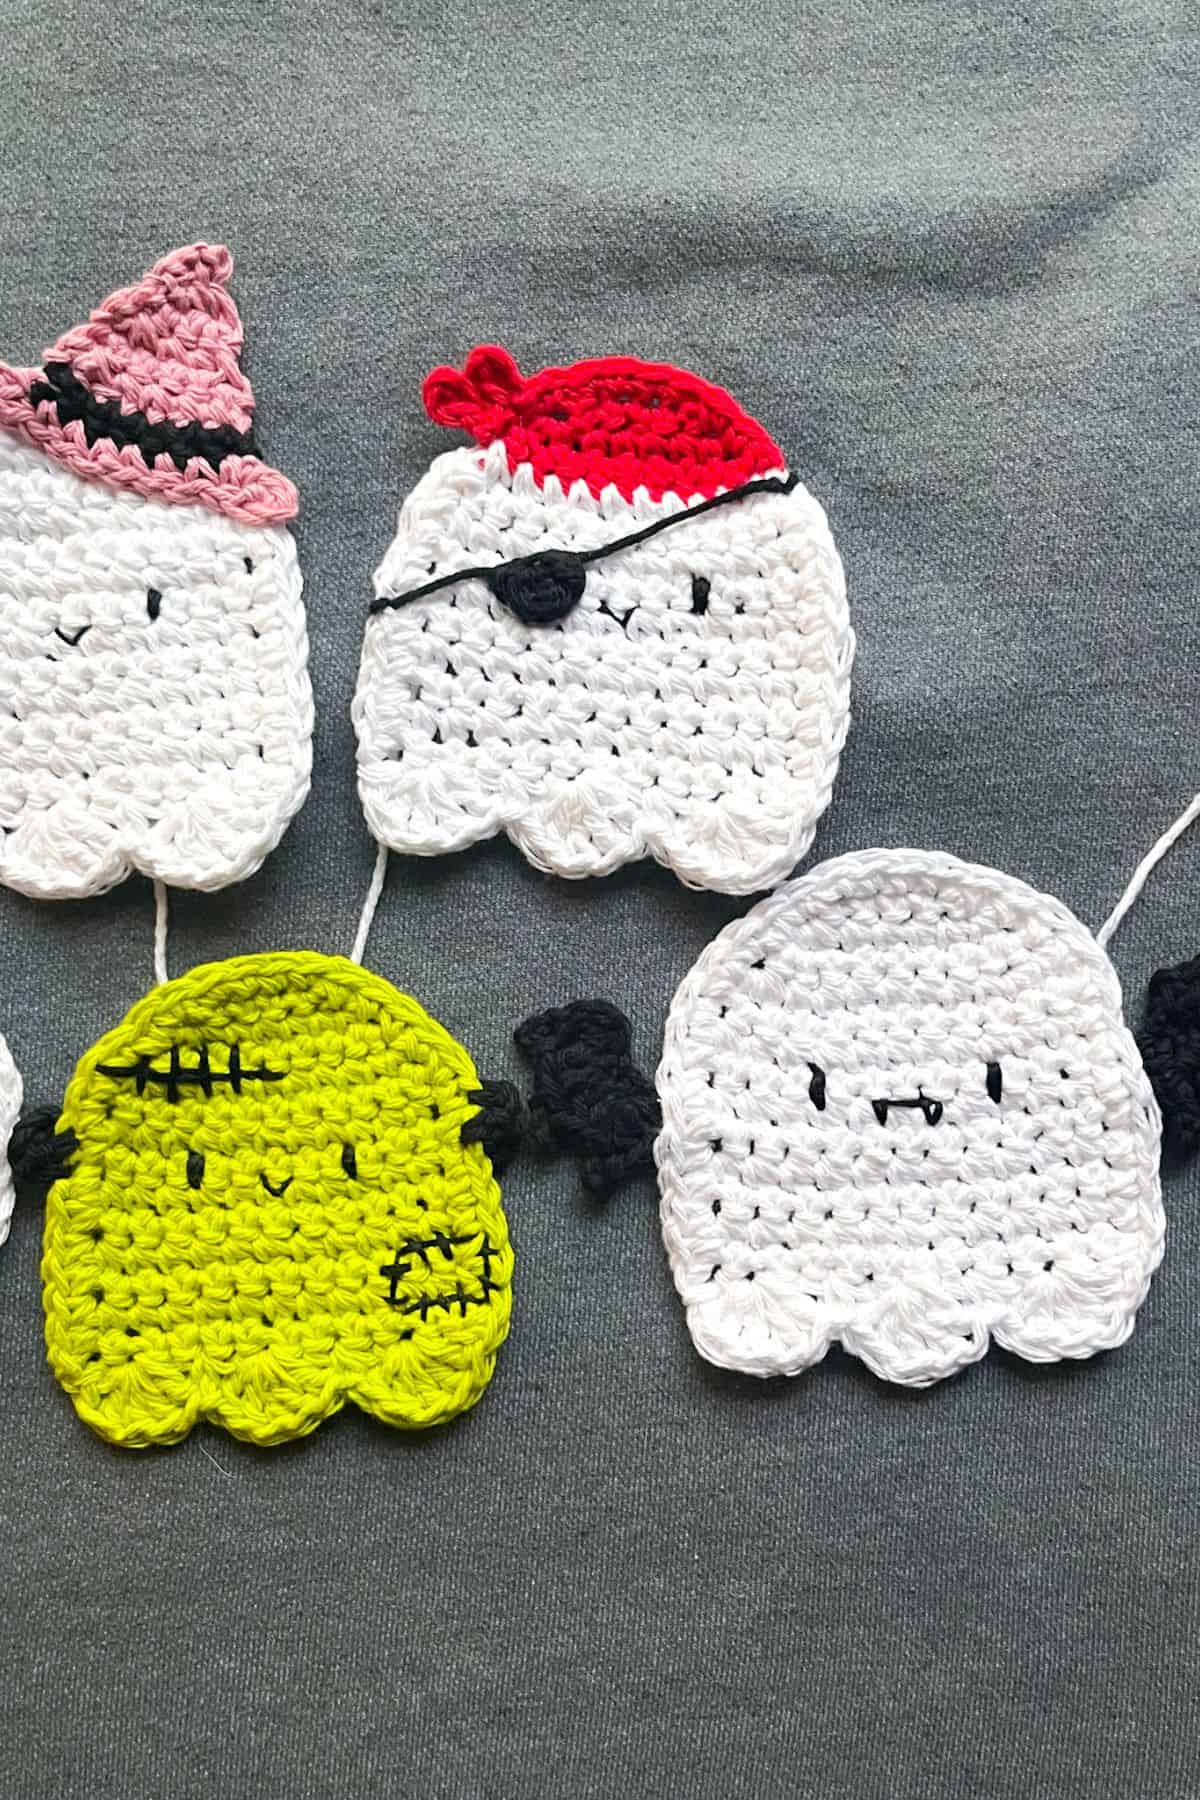
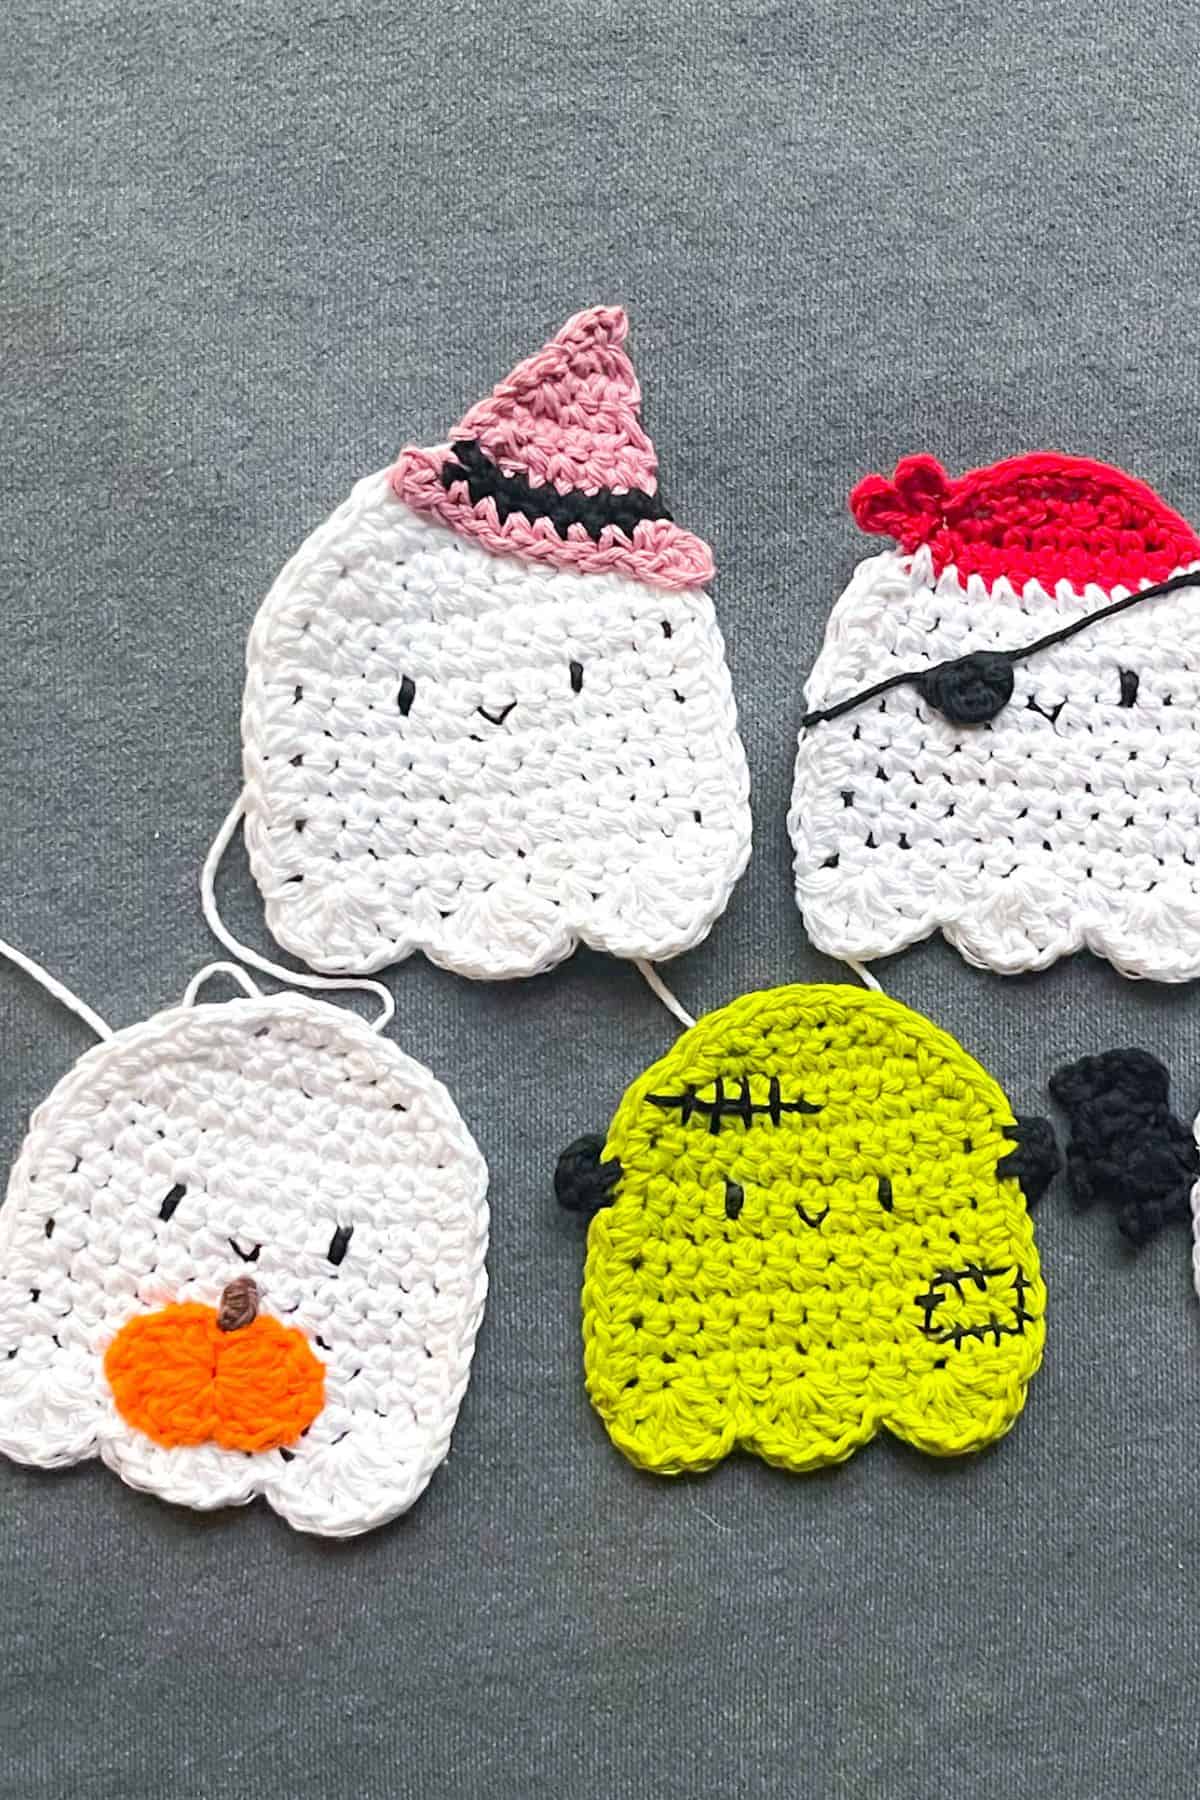
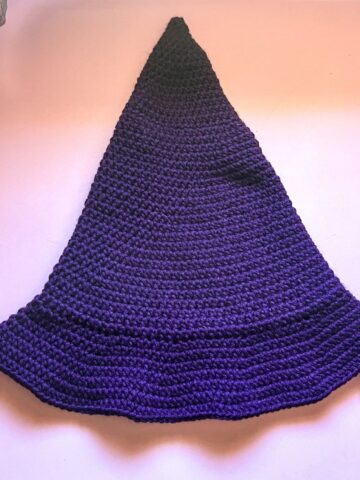
Crochet Ghost with Witches Hat:
Follow the ghost pattern above. Then make the witches hat.
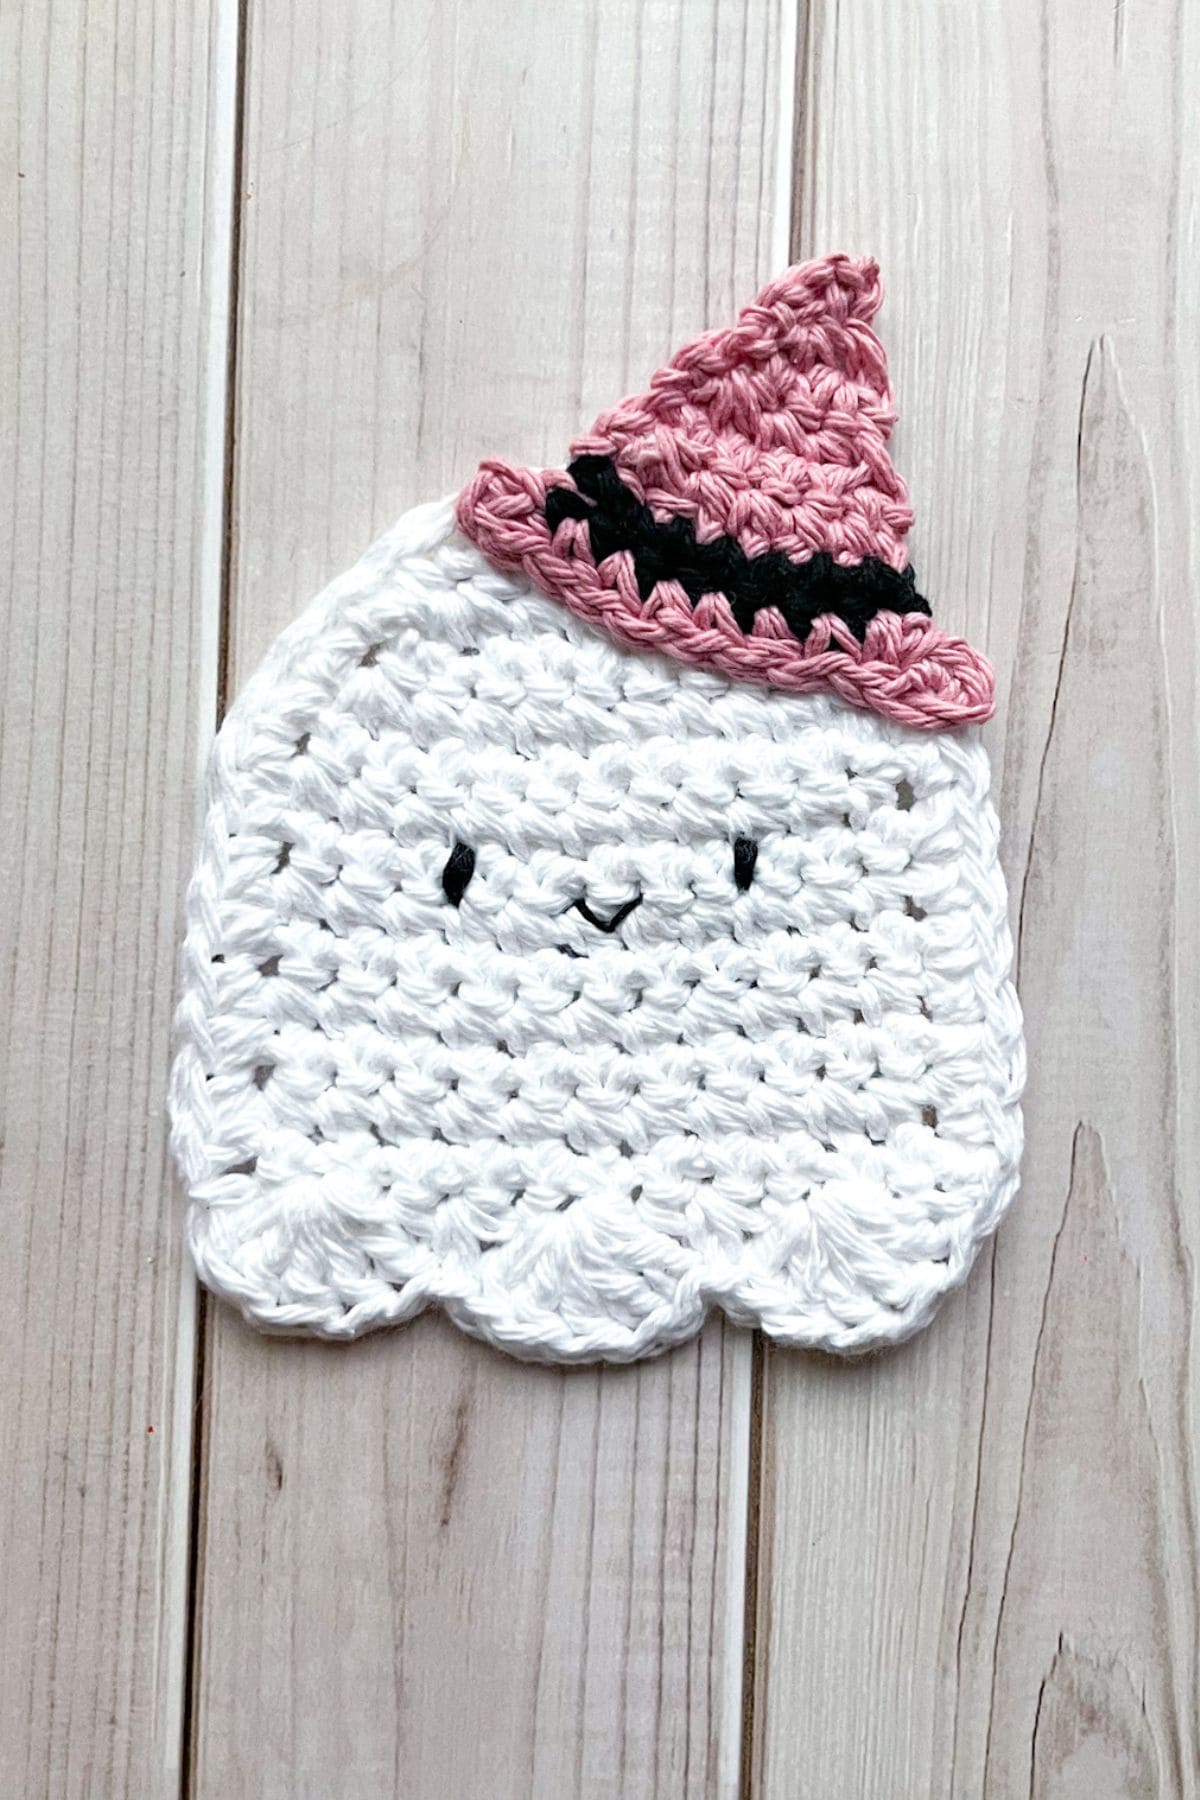
Witches Hat:
Row 1: With the purple yarn, ch x2 and then in the second ch from the hook make a sc inc. Then ch x1 and turn.
Row 2: Inc, sc. Then ch x1 and turn (3).
Row 3: Inc, sc x2. Then ch x1 and turn (4).
Row 4: Inc, sc x3. Then ch x1 and turn (5).
Row 5: Inc, sc x4. Then ch x1 and turn (6).
Row 6: Inc, sc x5. Switch the color to black yarn by pulling up black yarn for the last stitch. Then ch x1 and turn (7).
Row 7: With the black yarn sc x7, then switch the yarn color back to purple at the end of this row (7). In preparation for the next row, ch x2 in purple.
Row 8: Inc in the second chain from the hook. Then sc x7 and ch x2. Then instead of turning it and starting a new row, you are going to turn it the other way so you are working next to the black row (but still in the purple chains). Inc in the second ch and after that make a sl st in the corner where the black and purple yarn meet.
The reason we made the hat brim this way is so that the hat brim is even. Fasten off the purple yarn but leave a tail for sewing. Sew the witch hat to the top right or left side of the ghost.
Crochet Ghost with Pumpkin:
Follow the crochet ghost pattern above. Then make the mini crochet pumpkin.
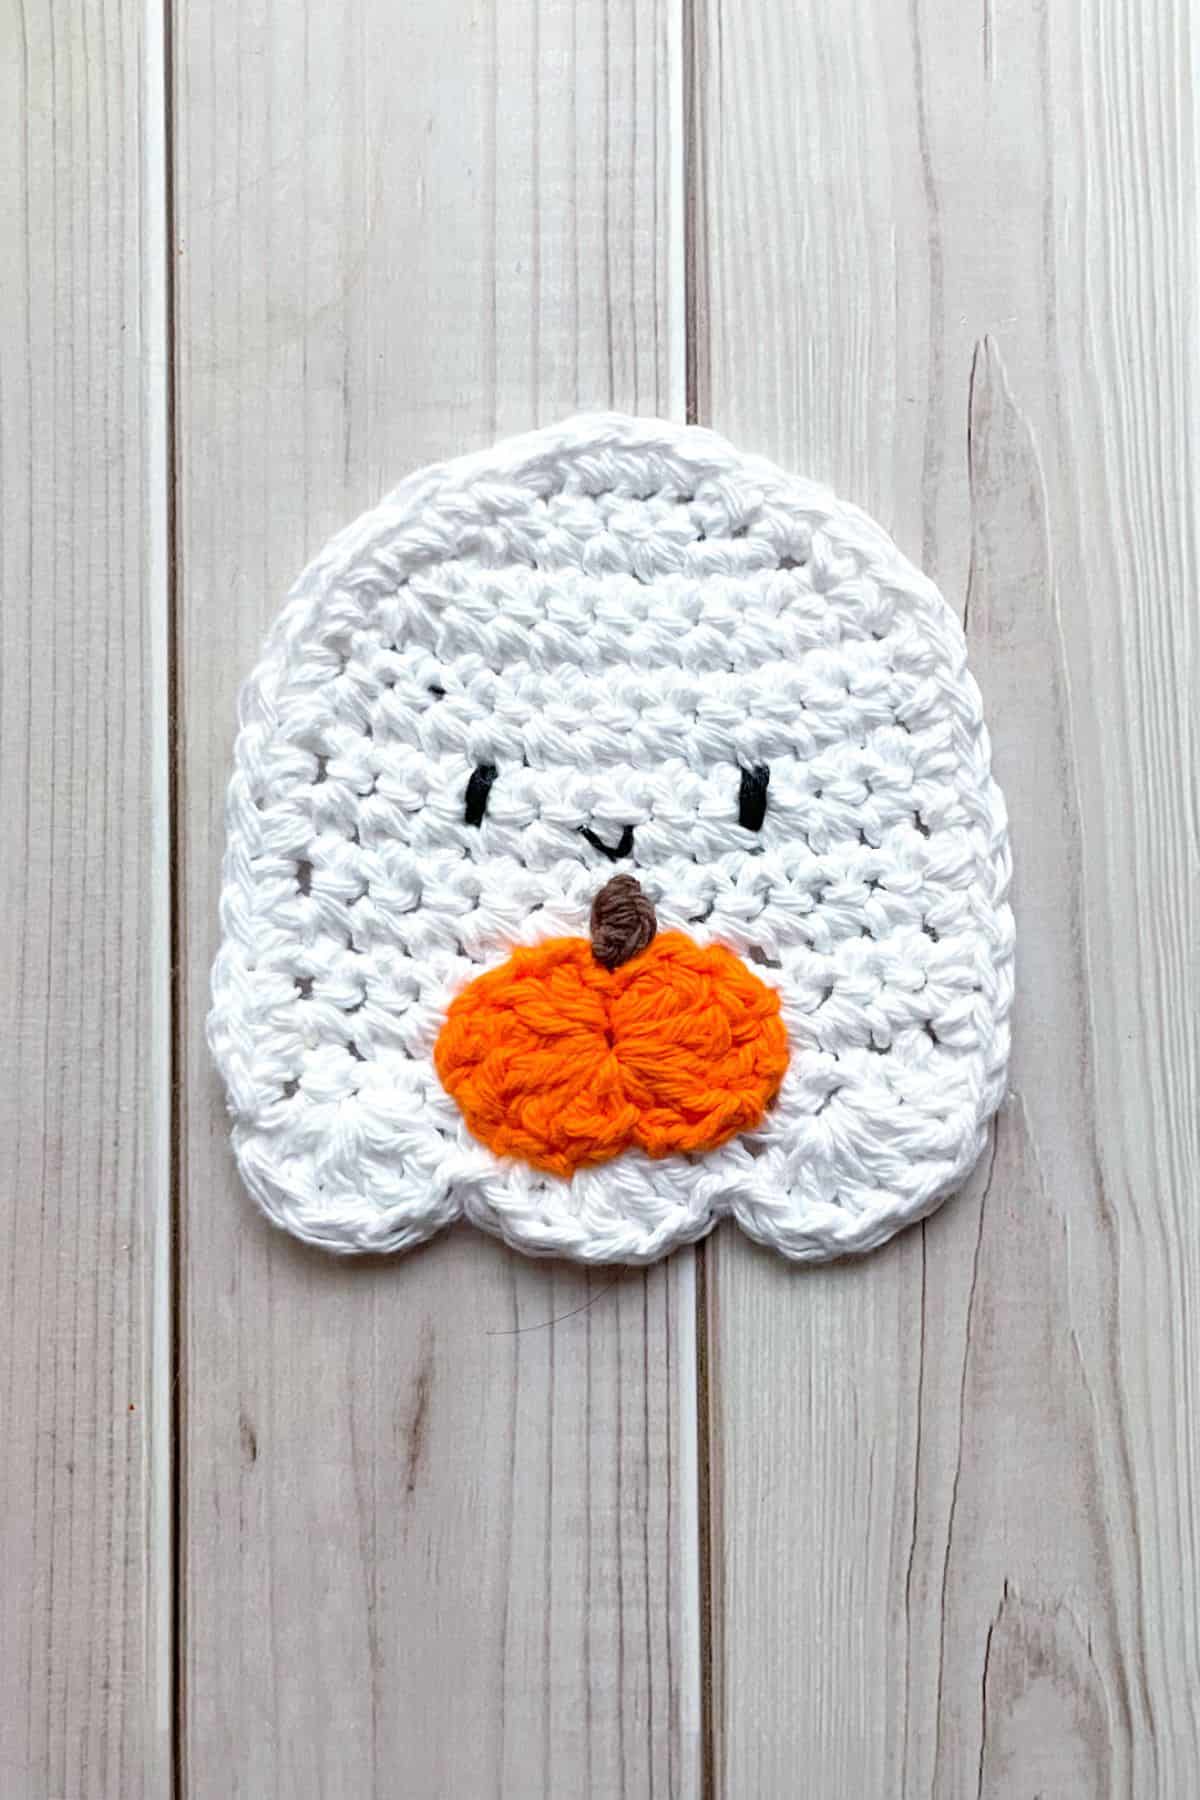
Crochet Pumpkin:
With the orange yarn make a mr, then sl st, dc x2, tr x2, dc x2, sl st, dc x2, tr x2, dc x2 and then sl st to the circle. Pull the mr tight and fasten off the yarn and leave a tail for sewing.
Crochet Pumpkin Stem:
Join the brown yarn to the sl st you last made. Then ch x2 and sl st in the second ch from the hook. Make a sl st back to the pumpkin and fasten off. Weave in any ends.
Sew the pumpkin to the lower half of the crochet ghost.
Crochet Frankenstein Ghost:
Follow the crochet ghost pattern above but in hot green.
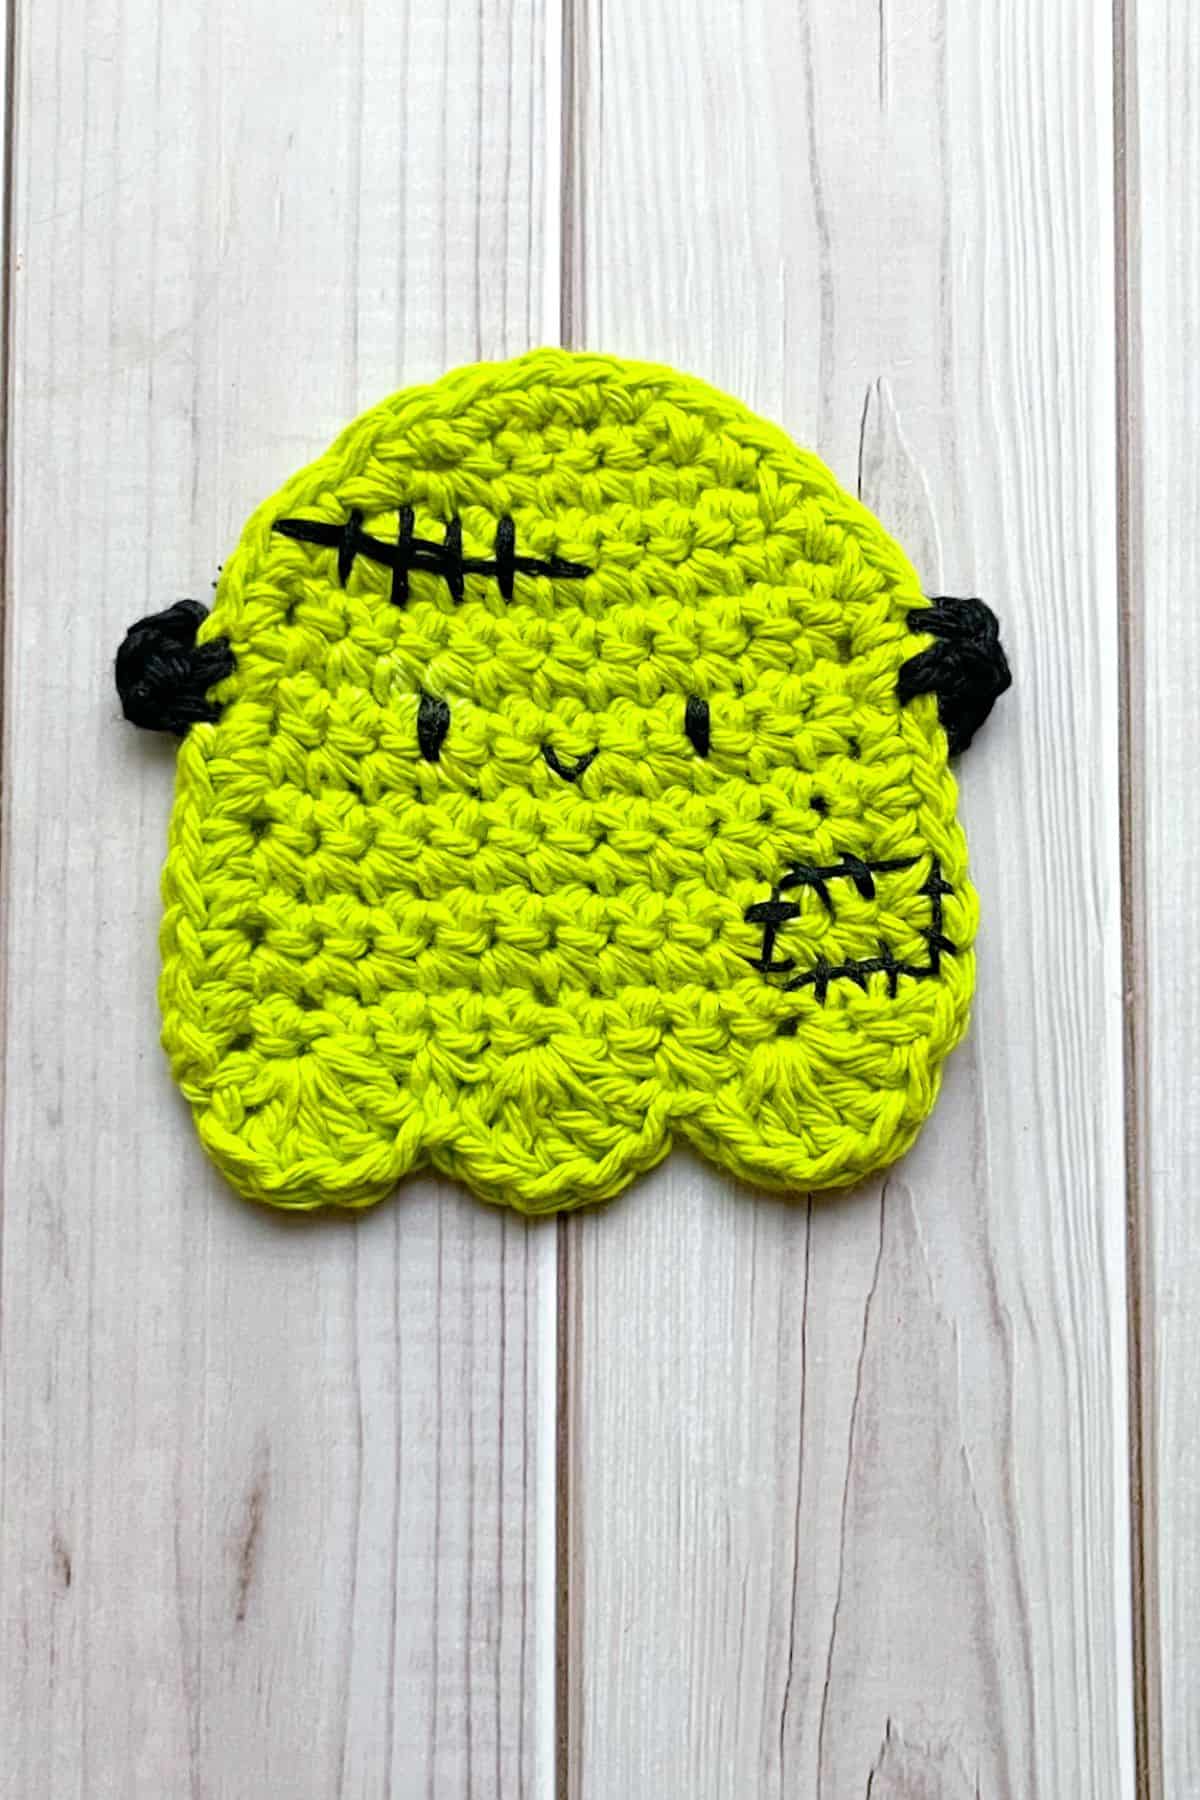
Join the black yarn to the sc on the outside of row 6. And sc x2 along the edge going down towards the bottom of the ghost. Then ch x1 and turn. Sc x2 and fasten off the yarn. Weave in any ends and do the same for the other side of the ghost.
Then using some more black yarn or black embroidery thread, embroider fake stitches and patches on the ghost. If you want you can also use fabric paint to do this if you have a steady hand and prefer not to embroider.
Crochet Pirate Ghost:
Follow the crochet ghost pattern above but do the first 3 rounds of the ghost pattern in red. Then switch the color to white and finish the ghost.
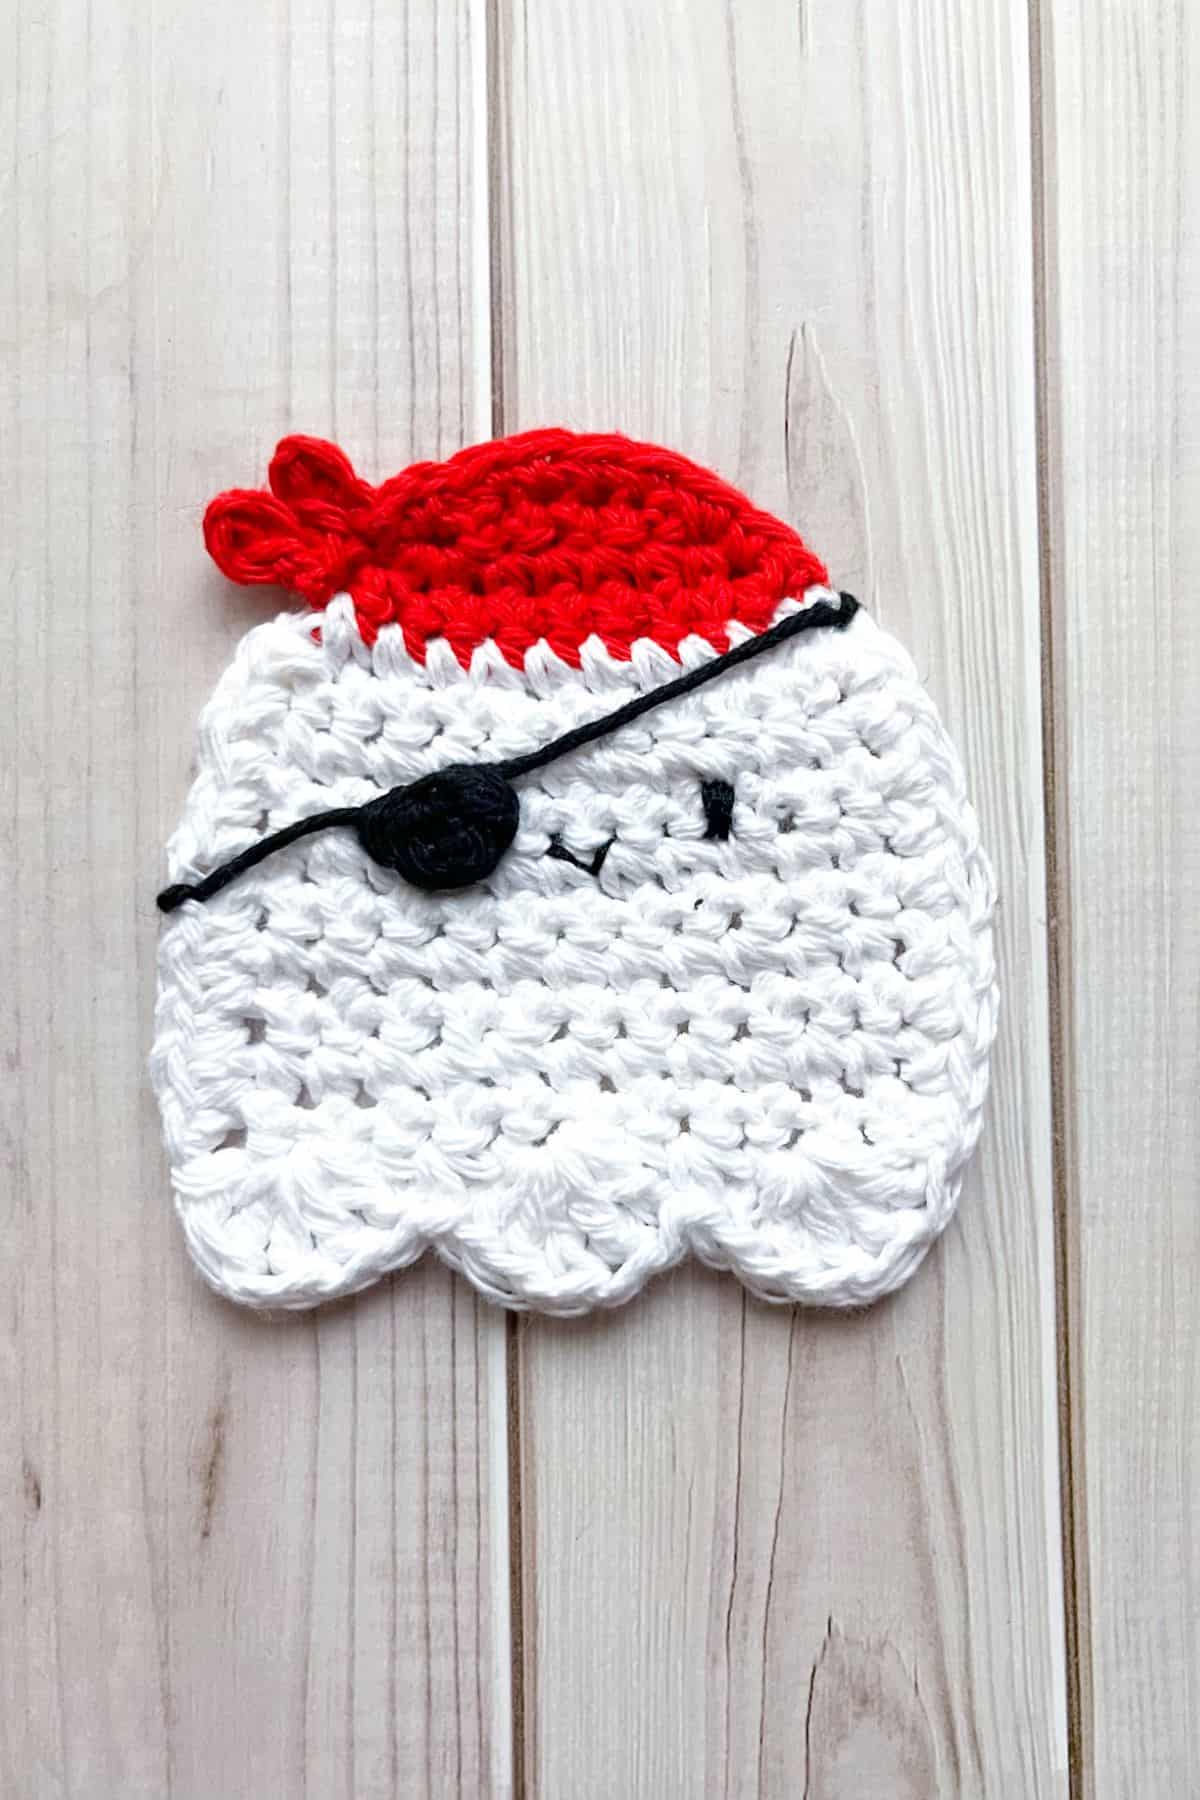
When you are crocheting around the edge of the ghost, switch the white to red to crochet the outside of the red bandana. Then when you get to the other side of the bandana follow these instructions:
In the last stitch available for the red yarn make a sl st, and then *ch x3. In the 2nd ch from the hook make a hdc, then sl st in the next ch and sl st back to the same stitch. Repeat from * for the second bandana end. Then fasten off the red yarn and switch it back to white to finish crocheting the ghosts' side.
Crochet Eyepatch:
Make a mr and hdc x4 in it. Then pull it tight and fasten off. Sew the eyepatch over the left eye and add embroidery from the sides of the ghosts face to the eyepatch to complete it.
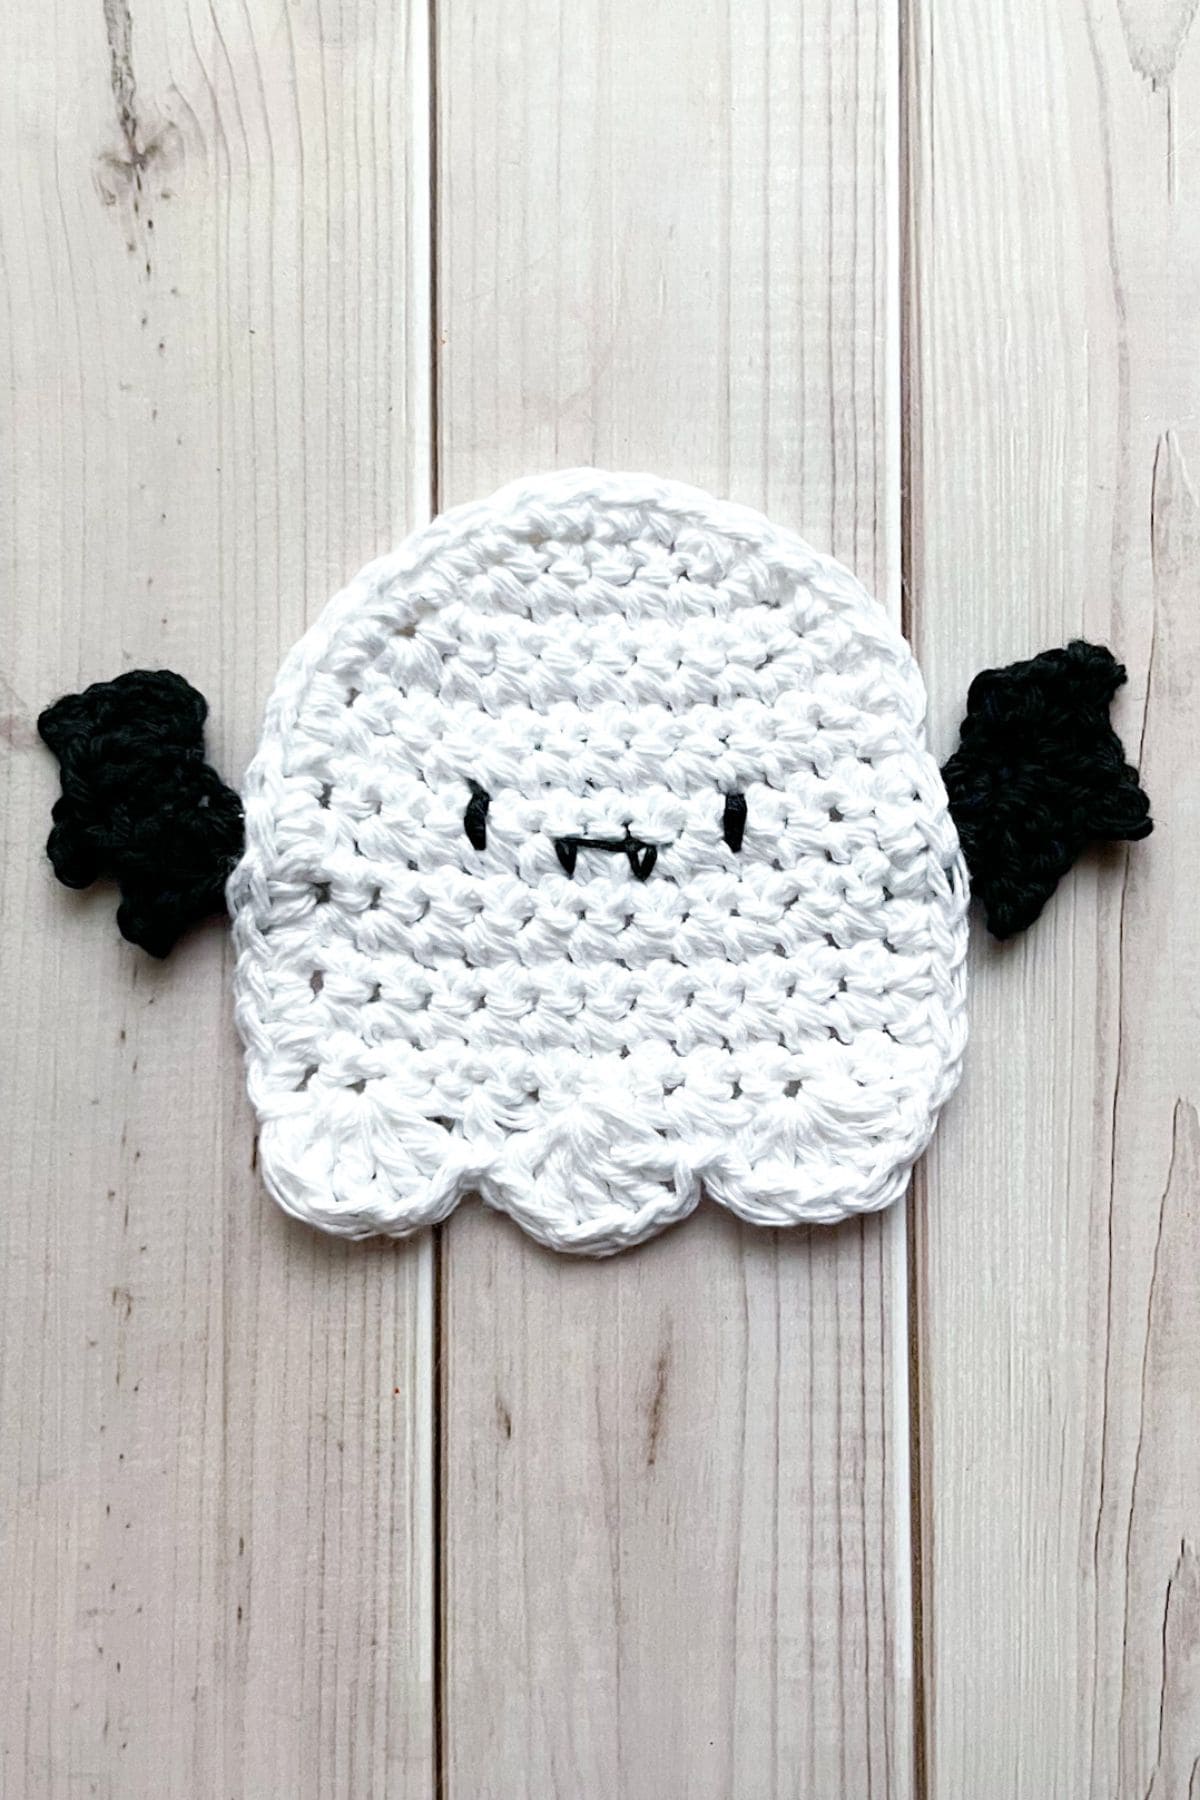
Crochet Vampire Ghost:
Follow the crochet ghost pattern above but embroider teeth with the mouth.
If you have difficulty with the wings having large gaps between stitches, crochet these with a tighter tension, or if it's available a smaller hook.
Crochet Bat Wings:
With the black yarn, ch x5 and then in the 3rd ch from the hook make a dc and then a picot stitch.
A picot stitch is where you ch x3 and then make a sl st in the 3rd ch.
Then make a dc in the same stitch where you made the first dc.
In the next stitch make a dc, picot, and dc.
In the last stitch make a dc, picot, and dc x3. Then fasten off the yarn with a tail for sewing.
Make another bat wing, then sew the bat wings on the ghost on rows 7 and 8.
And now your crochet ghosts are ready for Halloween! String them together to create a crochet ghost garland or sew them to a blanket for an epic crochet Halloween blanket. For added variety, you can mix in other ghoulish designs, like crochet pumpkin coasters.
I hope you enjoyed my crochet ghost garland pattern!
🐌Expert Tips
- Weaving in Ends: For a cleaner look, weave your yarn ends behind a few stitches at the back of the crochet ghost, ensuring they aren’t visible from the front.
- Face Embroidery: When embroidering the ghost’s face, using a smaller needle can help with precision.
- Prevent Curling: If your crochet ghosts tend to curl, it's likely due to uneven tension. Aim to maintain uniform stitch sizes for the best results.
🧵Pattern FAQs
Cotton yarn is ideal because it’s durable, absorbent, and heat-resistant, making it a practical choice for coasters. But if you are making this a garland and not a coaster, you can use acrylic as well.
The crochet ghosts may curl due to inconsistent tension. Keep your stitch sizes uniform for the best results.
Yes! You can either make a string of chains and then sc the ghosts to the chain, or you can sew them together with a string and needle!
🧶More Crochet Halloween Patterns
If you tried this Crochet Ghost Garland Pattern (or any other pattern on my website), please let me know how it went in the 📝 comments below. I'd love to hear from you!

Crochet Ghost Garland Pattern
Materials
Abbreviations (US terms)
- Chain - ch
- Single crochet - sc
- Double crochet - dc
- Half double crochet - hdc
- Triple crochet - tr
- Increase - inc
- Slip stitch - sl st
Notes
- I made the crochet ghost garland pattern using cotton yarn. Cotton yarn is great for crochet coasters because it is good at being heat resistant so it won't melt, and it soaks up liquid easily since it is cotton. Acrylic doesn't do this.
- The crochet ghost garland pattern is made in rows not rounds, that way it is easier to create the perfect roundness needed for the top of the ghost.
- The size of each crochet ghost is roughly 4 inches wide and 5 inches tall. If you want it smaller or bigger, you can adjust the hook and yarn size. The sizing does not include any additional details like bat wings and witches hats.
Instructions
Crochet Ghost Pattern:
- Row 1: With white yarn, ch x7, then in the second ch from the hook make a sc. Then sc for the rest of the row (6). After, ch x1 and turn.
- Row 2: Inc, sc x4, inc (8). Then ch x1 and turn.
- Row 3: Inc, sc x6, inc (10). Then ch x1 and turn.
- Row 4: Inc, sc x12, inc (12). Then ch x1 and turn.
- Row 5-13: Sc in every stitch (12). Then ch x1 and turn, except for the last row. For the last row, do not ch x1 - just turn.
- Row 14: Skip the first stitch and make dc x5 in the second stitch. Then skip the next stitch and make a sc in the following stitch. You just made your first shell for the bottom of the ghost. Repeat the above process 2 more times to finish off the row.
- After the 3 shell stitches are made, sc around the sides and top of the ghost. You want to make a sc for every row you made, as well as 1 sc for every stitch you did at the top. This will help your ghost have a cleaner edge. Then sl st to where the shell stitch row begins and fasten off. Do not crochet around the shell stitches.
- Embroidery:
- Now with the black yarn or black embroidery floss, embroider the eyes and mouth on the 7 and 8th rows of the ghost pattern. Alternatively you can also use fabric paint if you don’t feel like doing embroidery work.
- And now you have a completed crochet ghost pattern! See below for more additional ghost costumes.
Crochet Ghost with Witches Hat:
- Follow the ghost pattern above. Then make the witches hat.
- Witches Hat:
- Row 1: With the purple yarn, ch x2 and then in the second ch from the hook make a sc inc. Then ch x1 and turn.
- Row 2: Inc, sc. Then ch x1 and turn (3).
- Row 3: Inc, sc x2. Then ch x1 and turn (4).
- Row 4: Inc, sc x3. Then ch x1 and turn (5).
- Row 5: Inc, sc x4. Then ch x1 and turn (6).
- Row 6: Inc, sc x5. Switch the color to black yarn by pulling up black yarn for the last stitch. Then ch x1 and turn (7).
- Row 7: With the black yarn sc x7, then switch the yarn color back to purple at the end of this row (7). In preparation for the next row, ch x2 in purple.
- Row 8: Inc in the second chain from the hook. Then sc x7 and ch x2. Then instead of turning it and starting a new row, you are going to turn it the other way so you are working next to the black row (but still in the purple chains). Inc in the second ch and after that make a sl st in the corner where the black and purple yarn meet.
- The reason we made the hat brim this way is so that the hat brim is even. Fasten off the purple yarn but leave a tail for sewing. Sew the witch hat to the top right or left side of the ghost.
Crochet Ghost with Pumpkin:
- Follow the ghost pattern above. Then make the mini crochet pumpkin.
- Crochet Pumpkin:
- With the orange yarn make a mr, then sl st, dc x2, tr x2, dc x2, sl st, dc x2, tr x2, dc x2 and then sl st to the circle. Pull the mr tight and fasten off the yarn 0 leave a tail for sewing.
- Crochet Pumpkin Stem: Join the brown yarn to the sl st you last made. Then ch x2 and sl st in the second ch from the hook. Make a sl st back to the pumpkin and fasten off. Weave in any ends.
- Sew the pumpkin to the lower half of the crochet ghost.
Crochet Frankenstein Ghost:
- Follow the ghost pattern above but in hot green.
- Join the black yarn to the sc on the outside of row 6. And sc x2 along the edge going down towards the bottom of the ghost. Then ch x1 and turn. Sc x2 and fasten off the yarn. Weave in any ends and do the same for the other side of the ghost.
- Then using some more black yarn or black embroidery thread, embroider fake stitches and patches on the ghost. If you want you can also use fabric paint to do this if you have a steady hand and prefer not to embroider.
Crochet Pirate Ghost:
- Follow the ghost pattern above but do the first 3 rounds of the ghost pattern in red. Then switch the color to white and finish the ghost.
- When you are crocheting around the edge of the ghost, switch the white to red to crochet the outside of the red bandana. Then when you get to the otherside of the bandana follow these instructions:
- In the last stitch available for the red yarn make a sl st, and then *ch x3. In the 2nd ch from the hook make a hdc, then sl st in the next ch and sl st back to the same stitch. Repeat from * for the second bandana end. Then fasten off the red yarn and switch it back to white to finish crocheting the ghosts' side.
- Crochet Eyepatch:
- Make a mr and hdc x4 in it. Then pull it tight and fasten off. Sew the eyepatch over the left eye and add embroidery from the sides of the ghosts face to the eyepatch to complete it.
Crochet Vampire Ghost:
- Follow the ghost pattern above but embroider teeth with the mouth.
- Crochet Bat Wings:
- With the black yarn, ch x5 and then in the 3rd ch from the hook make a dc and then a picot stitch.
- A picot stitch is where you ch x3 and then make a sl st in the 3rd ch.
- Then make a dc in the same stitch where you made the first dc.
- In the next stitch make a dc, picot, and dc.
- In the last stitch make a dc, picot, and dc x3. Then fasten off the yarn with a tail for sewing.
- Make another bat wing, then sew the bat wings on the ghost on rows 7 and 8.
- And now all your crochet ghosts are ready for Halloween! Just string them up to make a garland! I hope you enjoyed my crochet ghost garland pattern!


Leave a Reply