
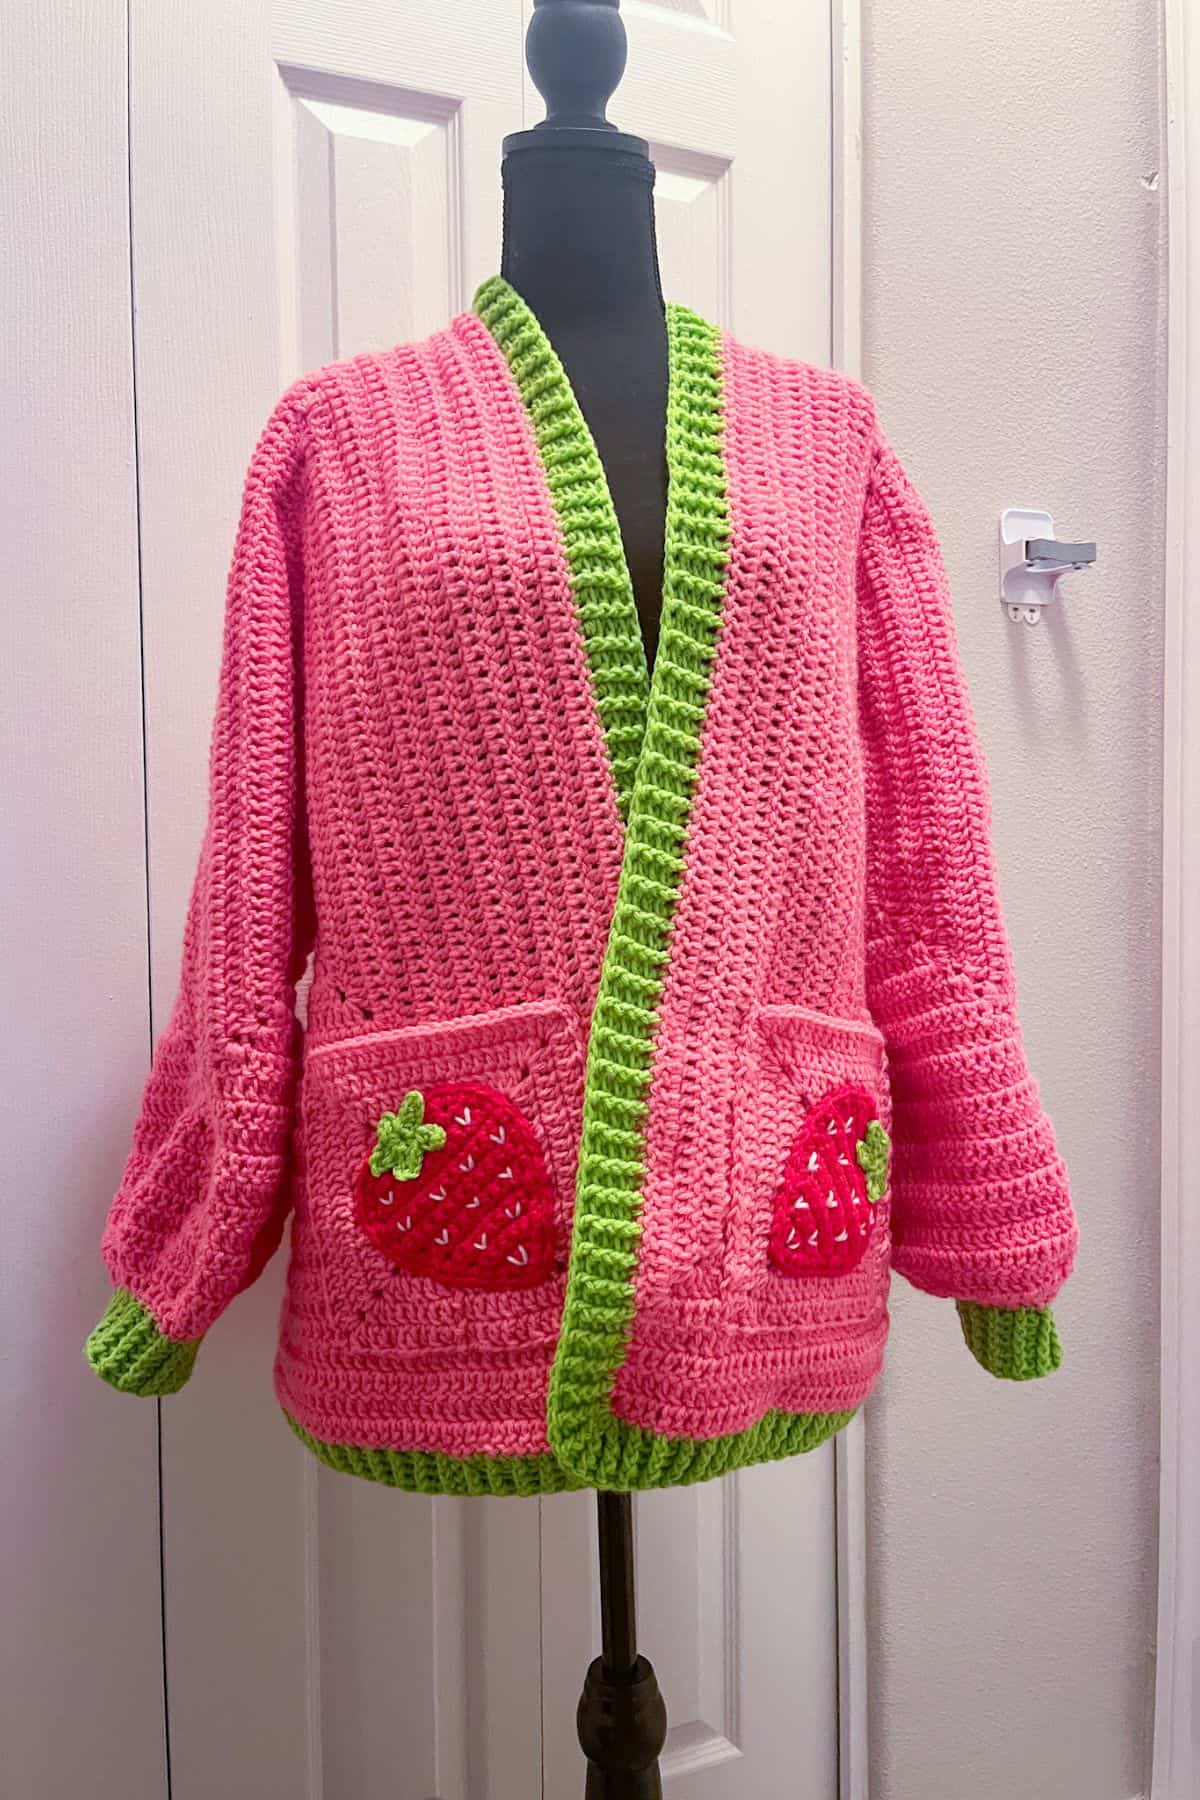
I’m so excited to share my Strawberry Cardigan Crochet Pattern with you! This strawberry crochet cardigan is one of the easiest cardigans to make, and I can’t wait for you to try it out.
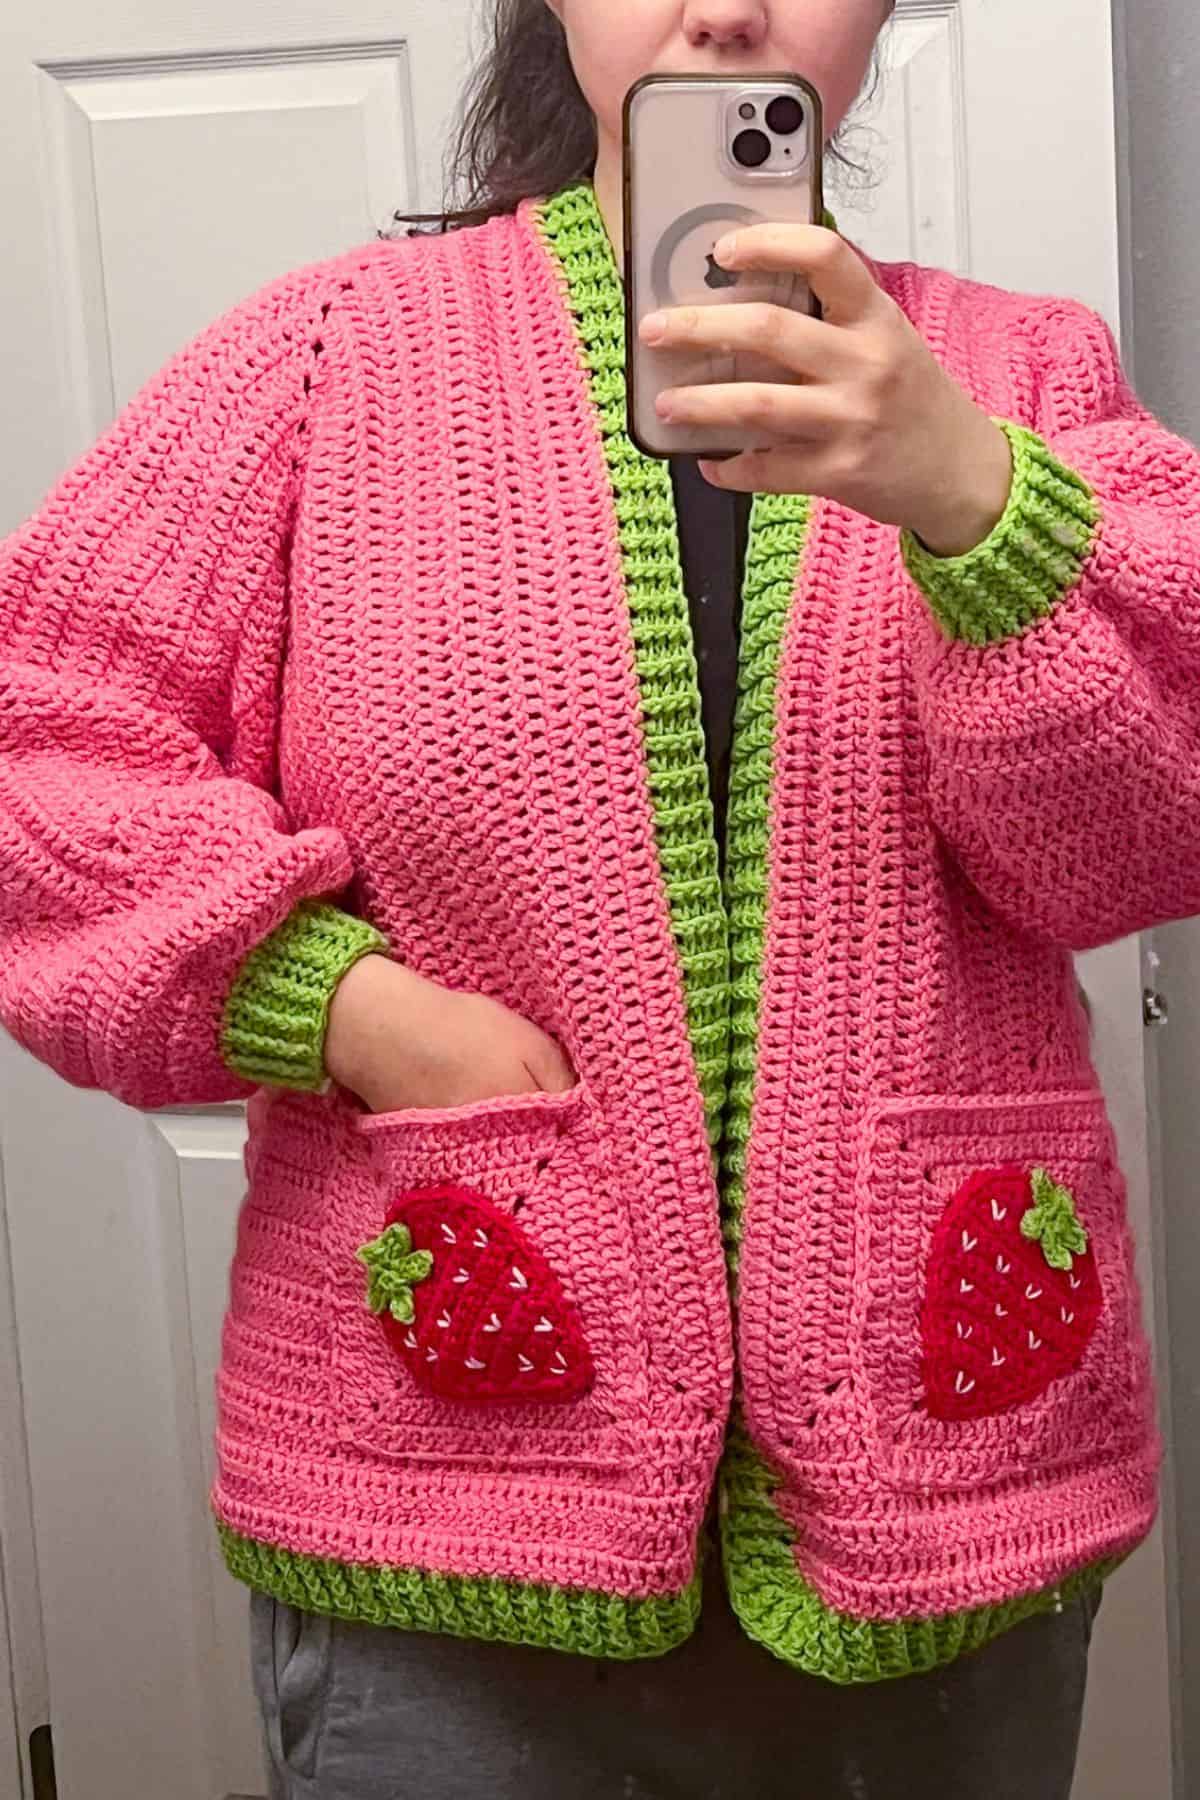
Why is it so easy? Well, it’s a crochet hexagon cardigan! The beauty of a crochet solid hexagon cardigan is that you only need to make two simple panels, making it beginner-friendly and adjustable to fit any body shape. Plus, you won’t spend hours on complex shaping – the crochet hexi cardi design makes it so simple to put together.
What’s even better is the minimal sewing involved. You only need to sew the arms and the middle to join the two panels—easy peasy! And for the stitch itself, I’ve kept it simple with just double crochet, so you don’t need to worry about advanced techniques. The whole strawberry cardigan crochet pattern comes together quickly and effortlessly!
For the strawberry cardigan crochet pattern, I’ve added adorable large strawberry appliques to the pockets to give it a fun, fruity touch, but you can easily swap them out for any applique you like – think crochet stars, crochet sakura cherry blossoms, or even crochet hearts! Whether you're a crochet pro or just starting out, this crochet strawberry sweater is a great project for all skill levels.
Ready to get started on your new favorite sweater? Let’s dive into how to crochet a strawberry hexagon cardigan!
Jump to:
✏️ Things To Note:
- Sizing Flexibility: This strawberry cardigan crochet pattern is super versatile and can be adjusted to fit a range of sizes. Since you’re only working with two panels, it’s easy to add or remove stitches to make the cardigan the perfect fit for you. I made mine an oversize large by doing 19 full rounds plus 4 rows on 3 sides- the front, bottom and back. Omit the extra 4 rounds if you don't want it to be oversized. Otherwise follow these for base measurements for other sizes (these have not been tested out so you may need to measure it to a sweater or coat for precise measurements)
- 15 rounds (small)
- 17 rounds (medium)
- 19 rounds (large)
- 21 rounds (XL) and so forth.
- Simple Stitches: I’ve kept the strawberry cardigan crochet pattern beginner-friendly by using double crochet as the base stitch. This makes the process go by smoothly and quickly, especially if you’re familiar with basic crochet techniques.
- Minimal Sewing: One of the best parts of strawberry cardigan crochet pattern is the very little sewing required! You only need to sew the arms together and join the middle of the panels. It’s perfect for those who want to avoid too much finishing work!
🪡 Materials Needed
- Red Heart Yarn - white
- Red Heart Yarn - perfect pink (2-3 jumbo skeins)
- Red Heart Yarn - red
- Big Twist - Lime or Red Heart Yarn - spring green if you can't find Big Twist.
- 4mm hook
- 5mm hook
- 5.5mm hook
- Tapestry needle
💭Abbreviations to Remember (US terms)
- Chains (ch)
- Magic ring (mr)
- Single crochet (sc)
- Double crochet (dc)
- Slip stitch (sl st)
- Increase (inc)
- Decrease (dec)
- Front Post Double Crochet (fpdc)
- Back Post Double Crochet (bpdc)
* If you see a stitch abbreviation with "x" after it, it means how many times you do that stitch in the following amount of stitches. For example: sc x6 would mean you make a single crochet in the next 6 stitches. Inc x2 means you make an inc in the next 2 stitches.
🧋Variations
- Different Appliques: While I’ve added cute strawberry appliques to the pockets, you can easily customize them to match your style. Try stars, sakura cherry blossoms, hearts, or even rainbows for a totally unique twist! The possibilities are endless, and it’s a fun way to express your personality.
- Color Combinations: Change up the vibe of your strawberry cardigan crochet pattern by experimenting with different yarn colors. You could go for a classic strawberry red and green combo, or opt for pastel shades like soft pinks, blues, and yellows for a lighter, springtime look. A crochet ribbed cardigan in a solid color would also be stunning.
- Longer Sleeves or a Cropped Version: If you prefer long sleeves, just add a few extra rows to the armholes. Alternatively, you can go for a trendy crochet cropped cardigan by adjusting the length of the body.
🍵Instructions for Strawberry Cardigan Crochet Pattern
Crochet Hexagon Cardigan Pattern:
With the 5MM HOOK: Ch x6 then sl st to the first chain.
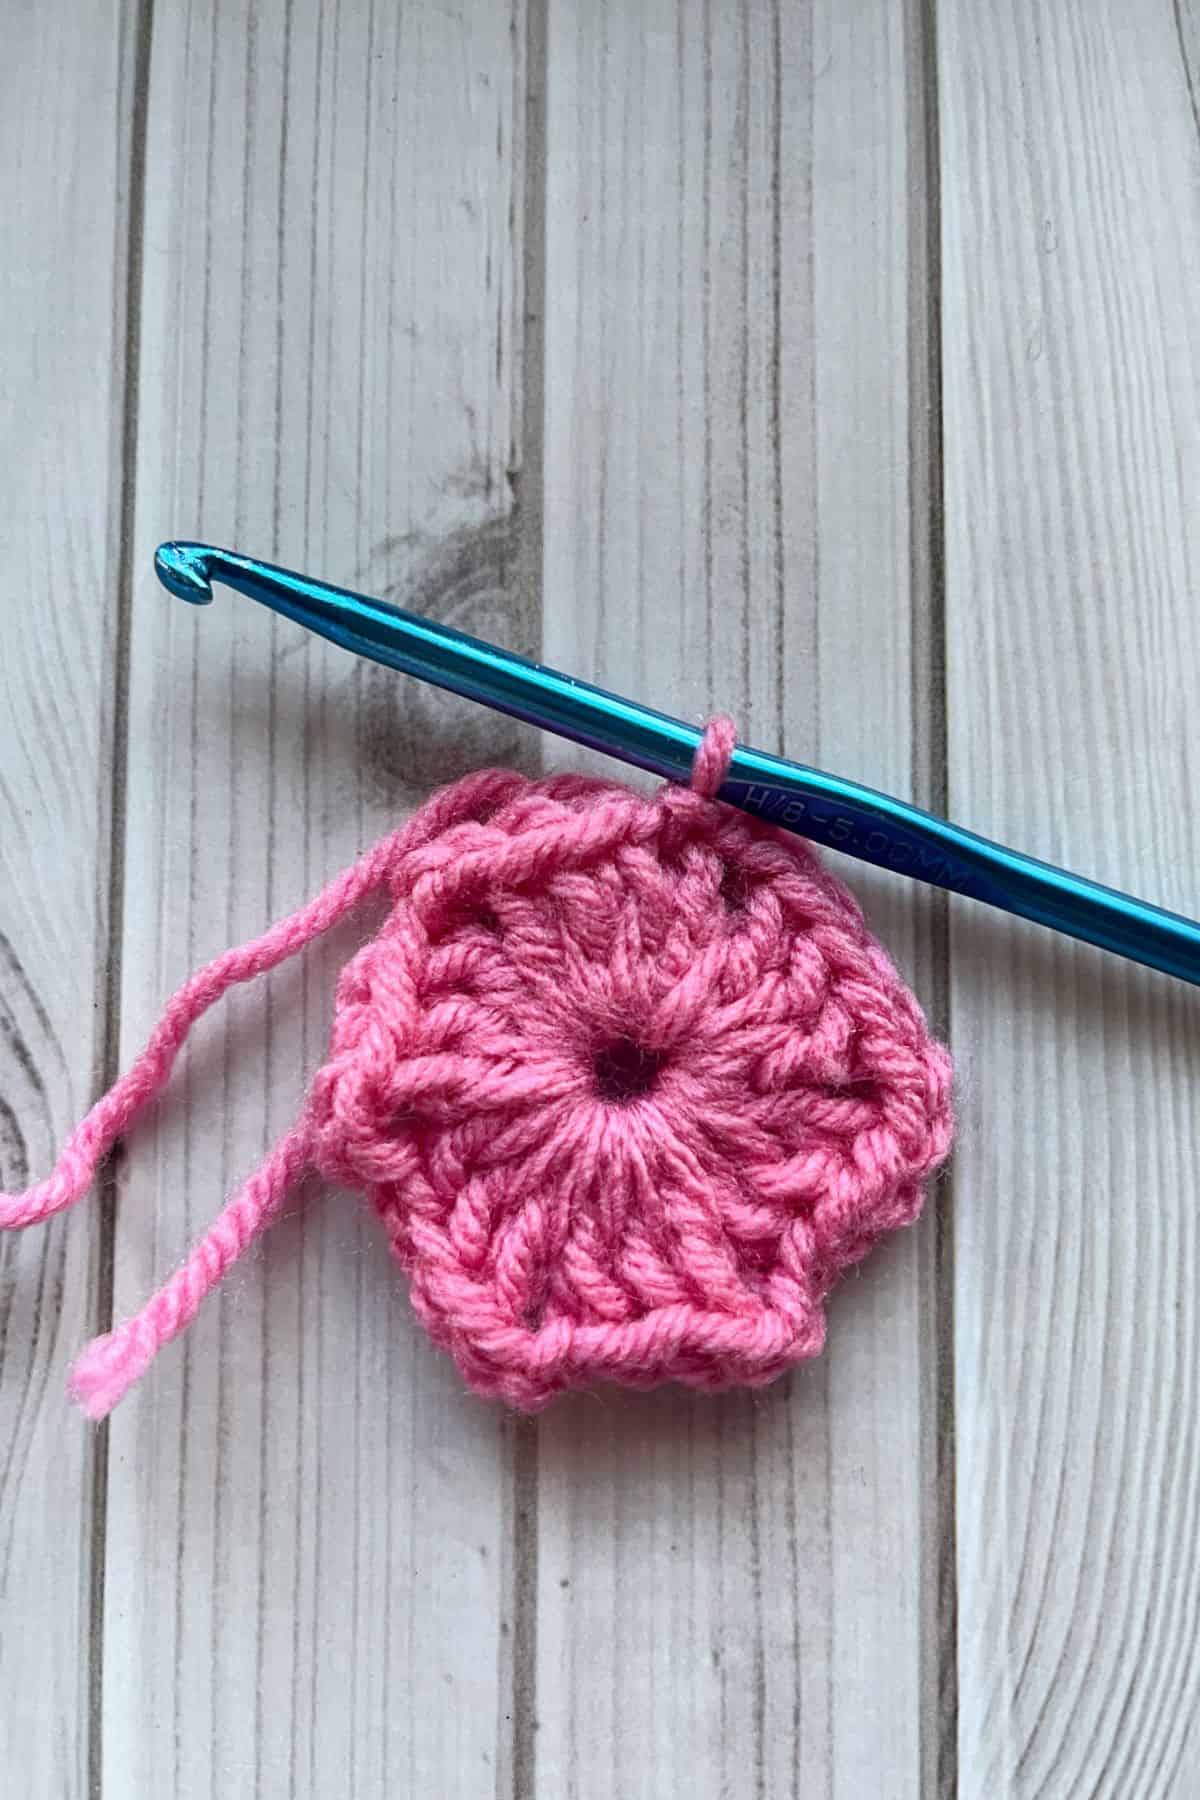
Round 1: Ch x2 then dc x2 into the circle. * Ch x2 and dc x3 into the circle* repeat * 4 more times, for 6 total clusters. Then ch x2 and sl st to the ch x2.
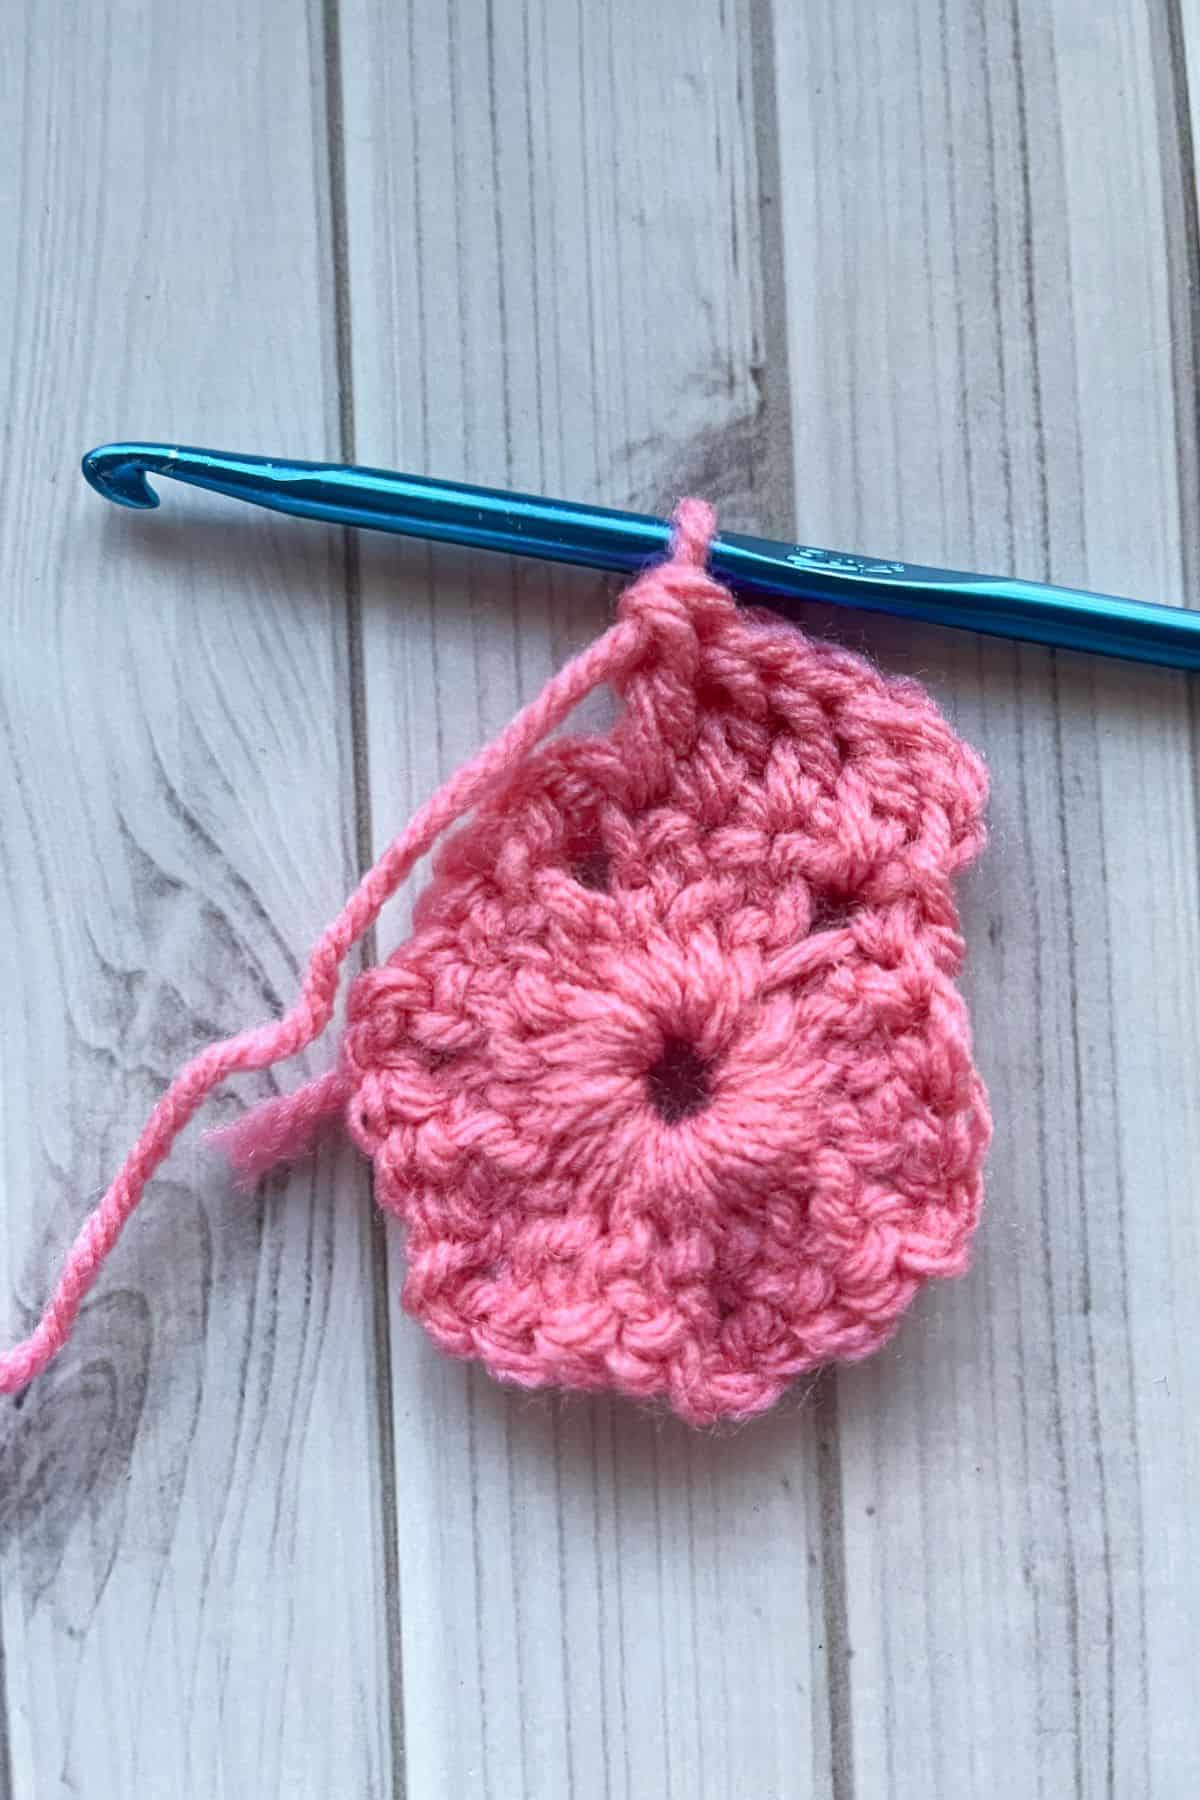
Round 2: Turn your work over and sl st back into the ch x2 space below. Then ch x2, dc x1 and dc in every dc top from the round below.
When you get to the corners dc x2, ch x2, and dc x2. Repeat for all 6 sides of the hexagon, then in the last corner, dc x2, ch x2, and sl st to the starting ch x2 in the round.

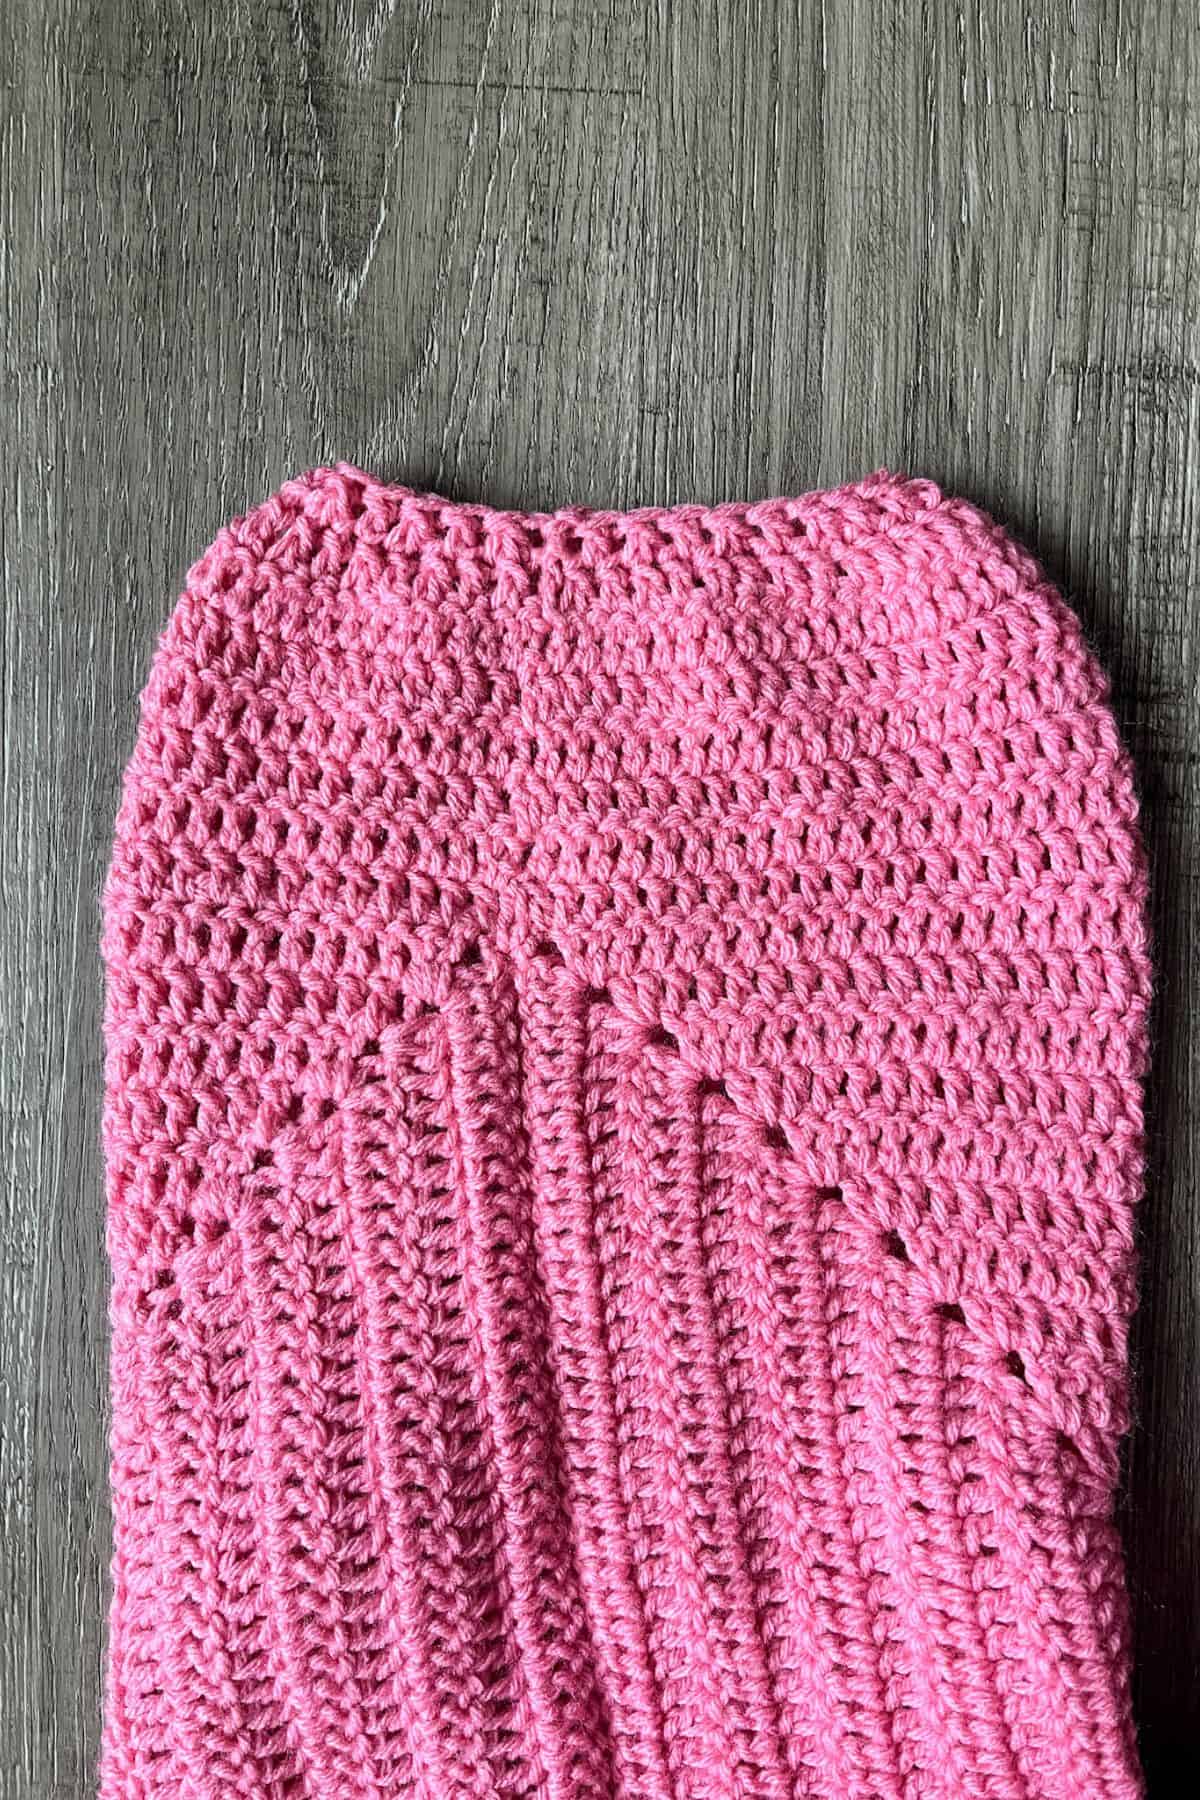
The hexagon should not lay flat and should be a bit wavy - this is a good sign that you made your hexagon cardigan correctly.
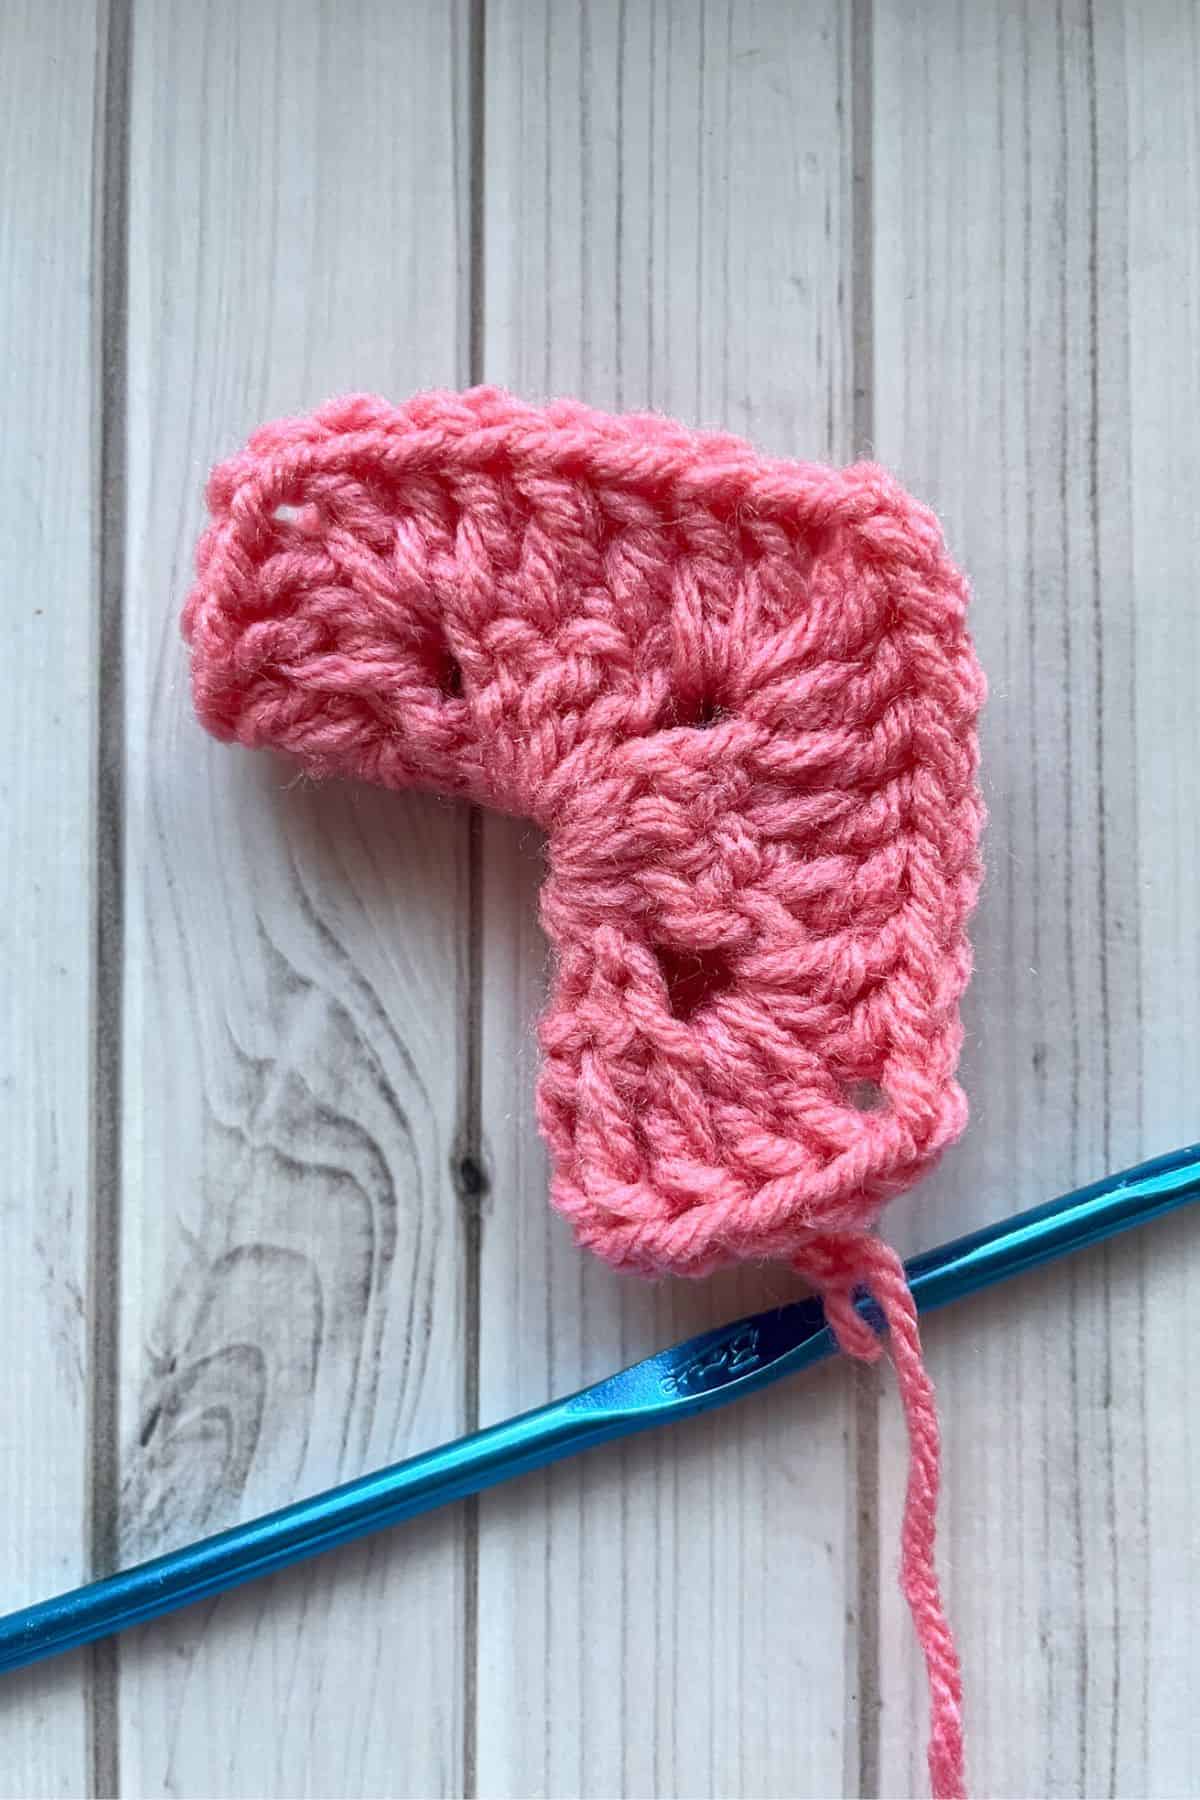
Also, make sure that if you fold the hexagon in half that you make an L shape - this is also another way to double check that you made the hexagon cardigan correctly.
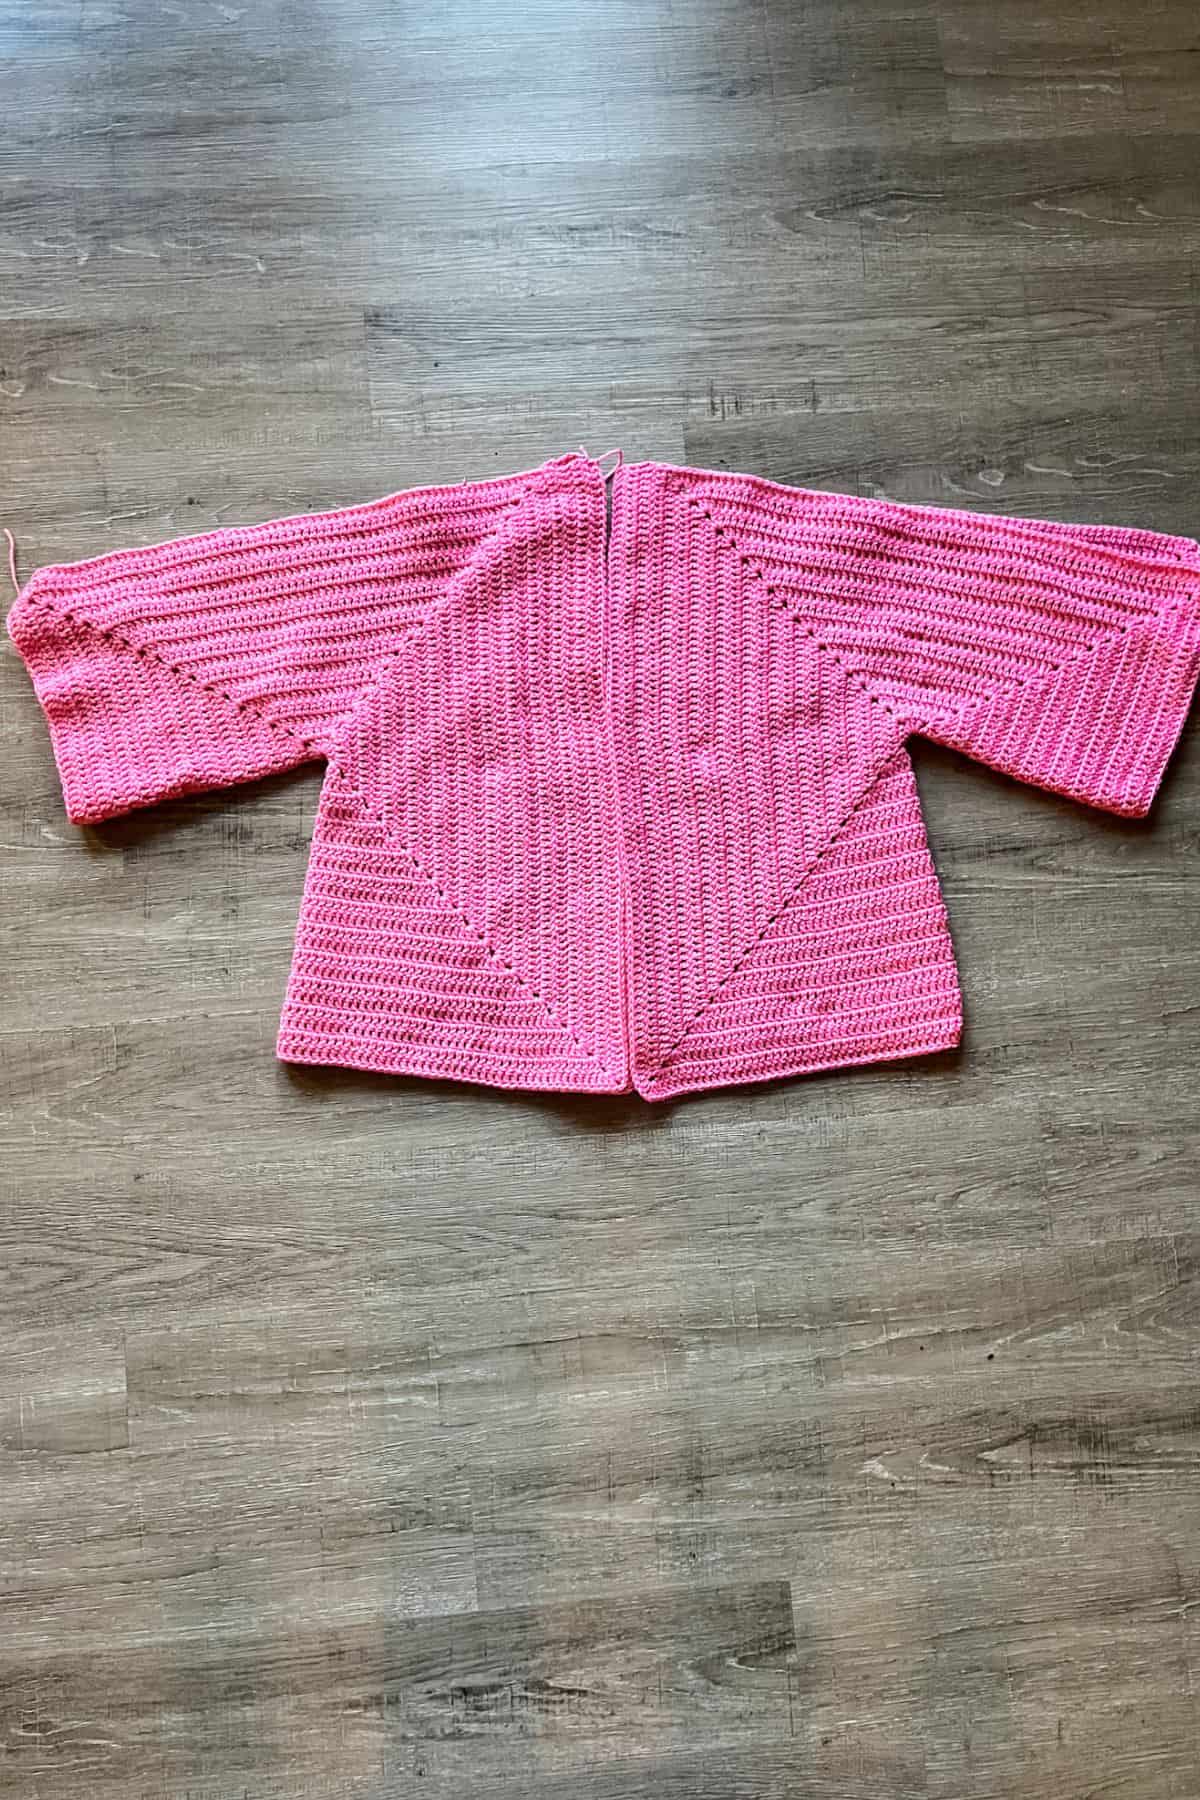
Round 3-19: Repeat round 2. Note: make sure that the last side always has the same amount of stitches in it as the other 5 sides - because we are joining the round and then flipping it, it is easy to lose a stitch or two. Make x2.
For an oversize look:
Either add additional full rounds or half rounds by making additional rows on the back, bottom and middle - I did 4 extra rows for these sides because I did not want to make my arms wider.
You want to follow the overall gist of what you did for the crochet rounds but after you reach 3 sides, ch x2 and turn - do this for all 4 rows.
For additional length:
Add extra rows to the bottom - I did an extra 4 rows at the bottom for a longer look.
You want to follow the overall gist of what you did for the crochet rounds but after you reach the other side, ch x2 and turn - do this for all 4 rows.
At this point sew the 2 halves of the crochet cardigan together by sewing the back together. Then sew the seam for each arm so each arm is a tube.
Fasten off and weave in any ends at this point. Now we can add extra arm length.
For arm length:
Round 1: Add extra rounds to each arm by rejoining the yarn to where the seam is, ch x2 and dc in every stitch. Then sl st to the beginning chain.
Round 2: Next, ch x2 and TURN your work (this is optional but it helps create the same texture throughout the whole piece) Dc in every stitch and then sl st to the chain.
Round 3-6: Repeat round 2.
Round 7: This part does not have to be exact. Ch x2 and turn, make a dc dec (dc2tog) and then a normal dc in the next stitch. Repeat for the rest of the round.
Round 8: Repeat round 7.
Do round 1-8 for the other arm. Fasten off any yarn and weave in the ends.
Crochet Ribbing:
Crochet Cuff Ribbing:

Round 1: With the green yarn and a 4MM HOOK, join the yarn into any of the dc stitches in the last round on the sleeve. Then ch x2 and dc in every stitch in the round. Next sl st to the beginning chains. For this part you do not need to turn every round.
Round 2: Ch x2, then make a fpdc in the next stitch and a bpdc in the following. Then repeat for the rest of the round. Sl st to the beginning chains.
Round 3-7: Repeat round 2. Make sure you make a fpdc over other fpdc and vice versa - this creates the ribbing effect.
Repeat for the other arm. You could use a larger size hook for this part, but I like a tight cuff because I know this part of the cardigan will loosen up over time.
Crochet Ribbed Cardigan:

Round 1: Using a 5MM HOOK and green yarn, join the yarn anywhere to the edge of the body of the cardigan. Then ch x2 and dc in every stitch along the edge. When you get to places that are raw edges, make 2 dc for every row of dc stitches. When you get to the end, sl st to the beginning chains.
For corners dc x3.
Round 2: Ch x2, then make a fpdc in the next stitch and a bpdc in the following. Then repeat for the rest of the round. Sl st to the beginning chains.
For corners make a normal dc + a fpdc in each of the 3 stitches in the corner for the second round. It could also be done fpdc, then a dc.
Round 3-5: Repeat round 2. But do not increase the amount of stitches in the corner, if it curls up on you - just make the stitches a little looser.
Crochet Strawberry Granny Square:
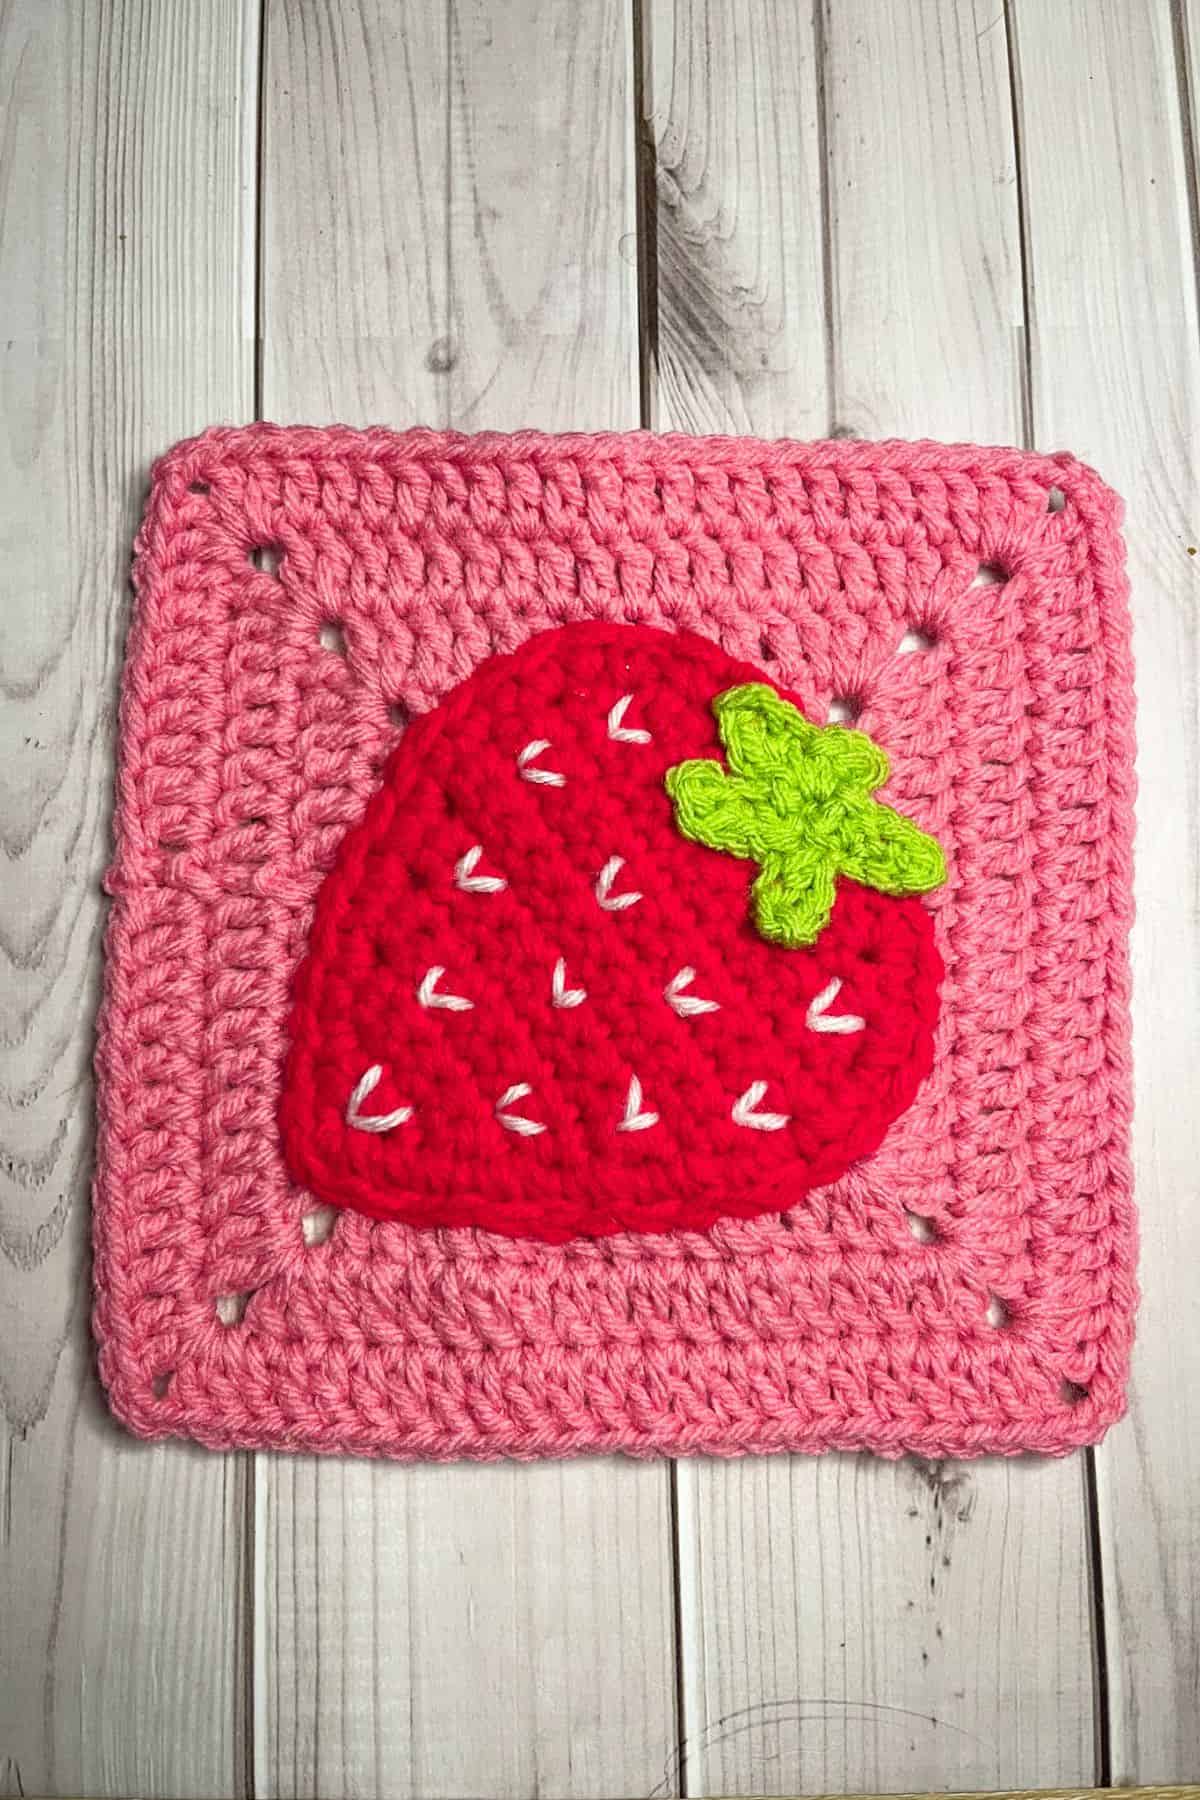
Crochet Solid Granny Square:
Make 2 squares for pockets.
Round 1: Using a 5MM HOOK and pink yarn, Make a mr, ch x3 and then dc x2 in the circle. Ch x2, dc x3, ch x2 and dc x3, ch x2 and dc x3, ch x2 and sl st to the 3rd chain. You should have 4 sides. Pull the magic circle closed and you can see you have a small square.
Round 2-6: Ch x3. Dc in each dc stitch from the previous round, dc x2, ch x2, dc x2 in each chx2 corner stitch. Then sl st to the 3rd chain you made at the beginning when you get to the end of each round.
After the 6th round, fasten off and weave in any tails.
Large Crochet Strawberry Appliques:
This pattern is made in rows.
Row 1: Using a 5.5MM HOOK, and red yarn - Ch x2 and turn.
Row 2: In the second chain from the hook, make an inc. (2) Then ch x1 and turn (for this next row and every row afterwards you will make a turning chain, but do not work in it. It’s to help turn your work).
Row 3: Inc x2 (4). Then ch x1 and turn.
Row 4: Inc, sc x2, inc (6). Then ch x1 and turn.
Row 5: Sc in every stitch (6). Then ch x1 and turn.
Row 6: Inc, sc x4, inc (8). Then ch x1 and turn.
Row 7: Sc in every stitch (8). Then ch x1 and turn.
Row 8: Inc, sc x6, inc (10). Then ch x1 and turn.
Row 9: Sc in every stitch (10). Then ch x1 and turn.
Row 10: Inc, sc x8, inc (12). Then ch x1 and turn.
Row 11-14: Sc in every stitch (12). Then ch x1 and turn.
Row 15: Dec, sc x8, dec (10). Then ch x1 and turn.
Row 16: Dec, sc x6, dec (8). Then ch x1 and turn.
Row 17: Dec, sc x4, dec (6). Then ch x1 and turn.
After your last row, fasten off your yarn and leave a long tail for sewing. Crochet around the edges of your strawberry if you want a neater finish and a slightly bigger strawberry. Then fasten off and weave in the ends.
Crochet Strawberry Stem and Leaves:
This pattern is made one stem/leaf at a time.
Step 1: Using a 5.5MM HOOK and green yarn, Ch x3, then in the second ch from the hook make a sc, then make a sc in the following stitch. This is the stem.
Step 2: Ch x4 and in the second ch from the hook make a sc. Then sc in the following 2 chains. Then sl st back to the stitch where you broke off and made chains for the first leaf.
Step 3: Repeat step 2 x3.
Fasten off and leave a long tail for sewing.
Finishing:
Sew the strawberry stem and leaves to the top part of the strawberry.
With white yarn and tapestry needle, crochet little v’s onto the strawberry. They look like little hearts which add additional cuteness to the applique!
Weave in any loose ends.
Sew the strawberries onto the granny squares and then sew those to the cardigan where you would like the pockets to be placed.
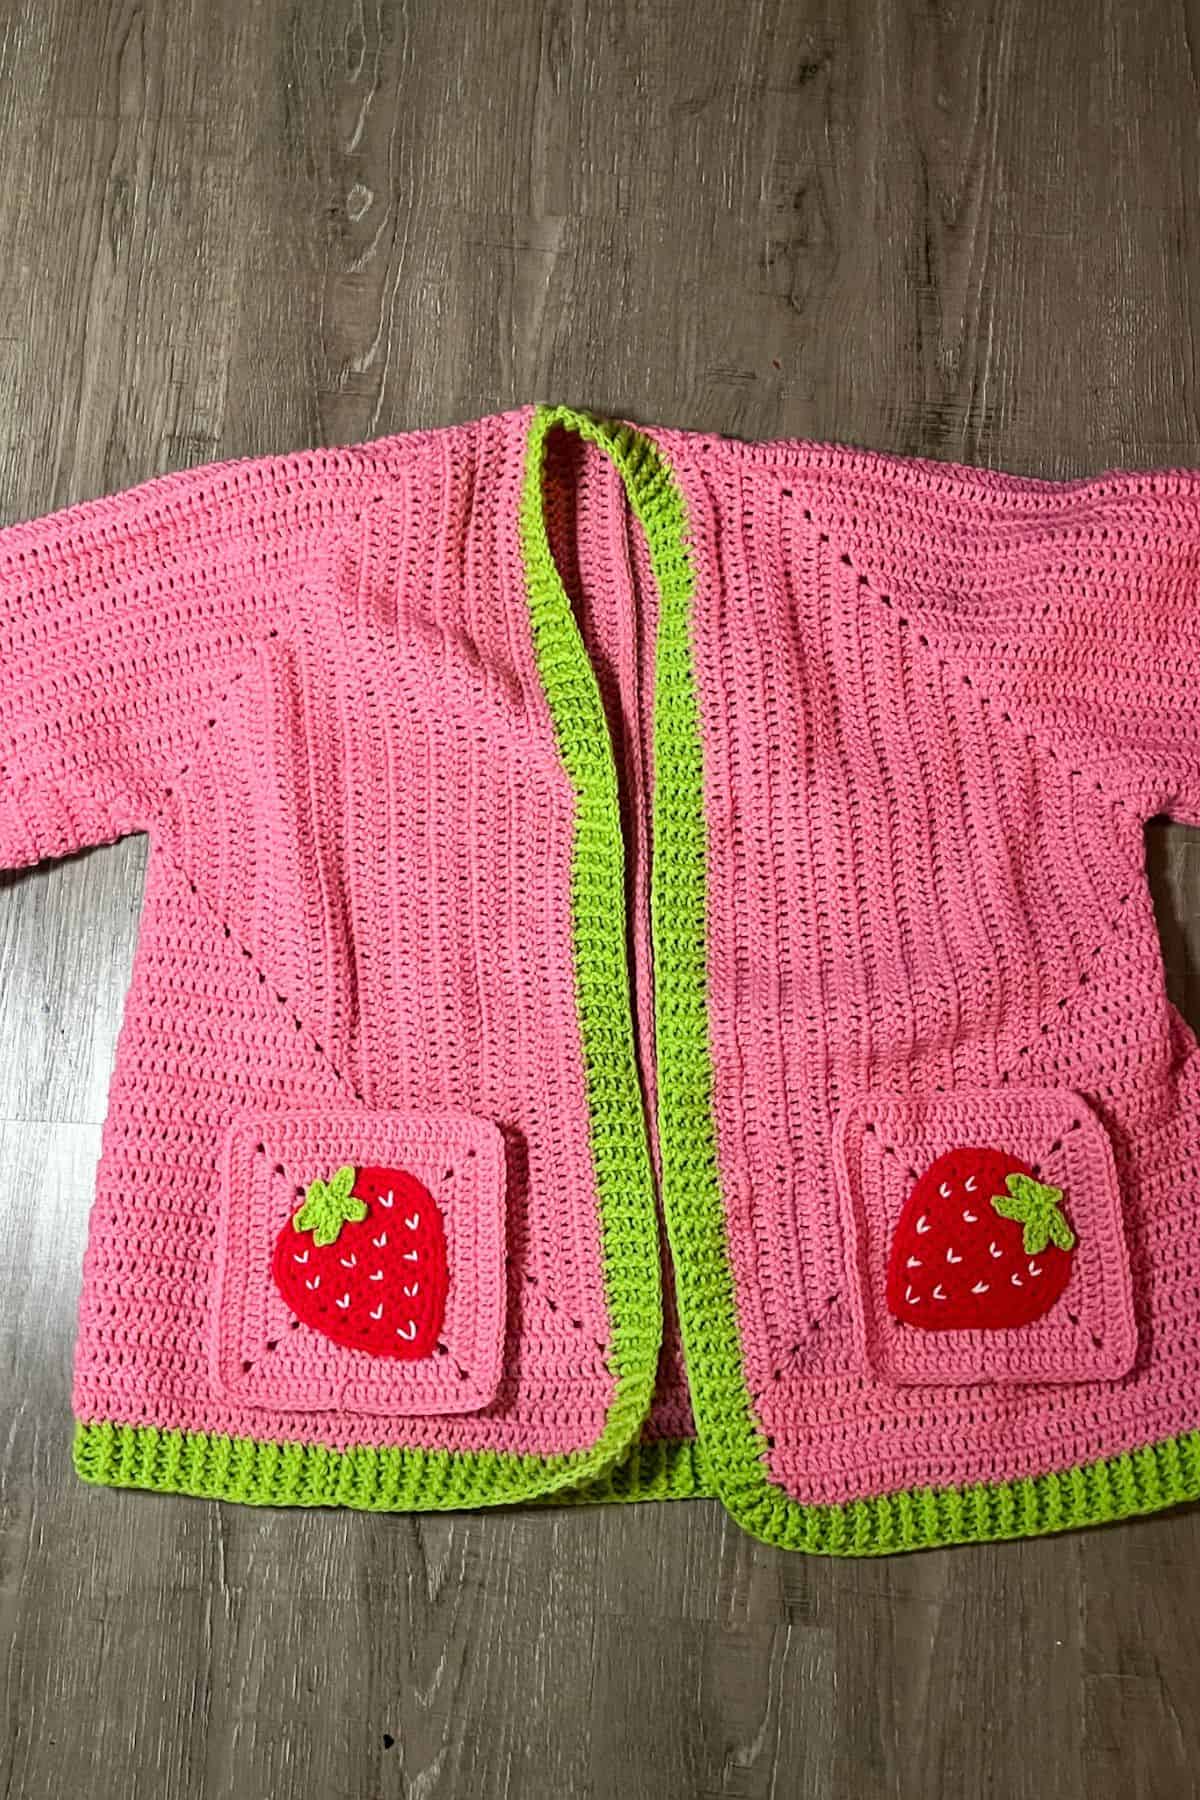
And now you are finished making my strawberry cardigan crochet pattern!
The best part about the strawberry cardigan crochet pattern is its versatility – it’s the perfect base to customize for any theme you love. Whether you stick with the fruity strawberry look or swap in something fun like frogs (how cute would that be with my crochet frog coaster as an applique?), the possibilities are endless.
This strawberry cardigan crochet pattern can easily be transformed to suit any season, style, or personality with just a few simple changes in color and appliques. The beauty of this design is that you have the freedom to make it truly yours!
If you are looking for other strawberry themed crochet patterns, check out my crochet strawberry pillow pattern and my crochet strawberry blanket pattern where its size can be adjusted to any size blanket!
Thank you so much for following along with this strawberry crochet cardigan pattern journey. I can’t wait to see your creations! Don't forget to share your finished pieces and any creative variations you come up with – I love seeing how you all make this pattern your own.
Happy crocheting, and enjoy wearing your cozy new cardigan!
🐌Expert Tips
- Keep Tension Consistent: When working with double crochet, try to keep your tension consistent to ensure your hexagons are the same size. This will make the assembly process much easier and give your cardigan a polished, professional look.
- Use Stitch Markers: If you're adjusting the size of the strawberry cardigan crochet pattern or working with multiple colors, stitch markers are your best friend! Use them to keep track of your stitch count and ensure your hexagons stay on track.
- Make Sure to Measure as You Go: While the strawberry cardigan crochet pattern is adjustable, it’s always good to double-check your measurements as you work. This way, you can ensure that the fit is perfect and make any necessary changes before sewing everything together.
🧵Pattern FAQs
This pattern is great for beginners to intermediate crocheters! The base of the cardigan is made using double crochet, which is a simple stitch, and the assembly involves minimal sewing. If you’re familiar with basic crochet stitches, you’ll be able to follow along with ease.
Yes! One of the best parts of the strawberry cardigan crochet pattern is its versatility. You can adjust the size by adding or removing stitches on the panels. This allows you to make the cardigan fit a wide range of body types. I recommend measuring as you go to make sure it’s the right fit for you.
I recommend using a medium-weight yarn (worsted weight) for the best results, as it gives the cardigan a cozy, wearable feel. Choose a yarn that feels soft and comfortable against your skin, especially if you plan on wearing it often!
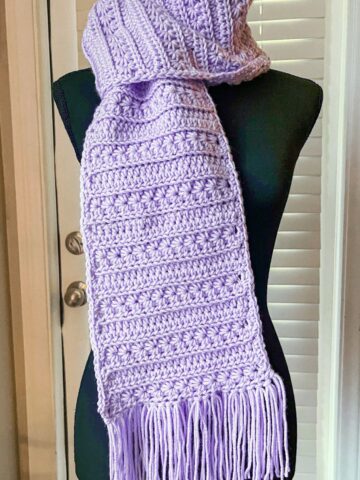
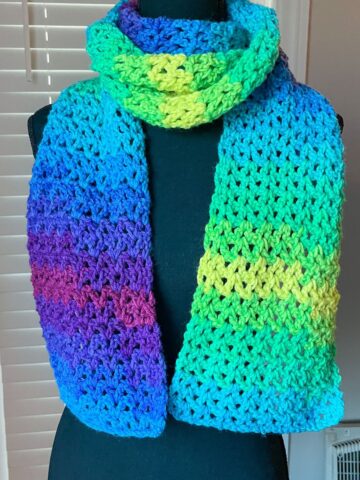
🧶More Wearable Crochet Patterns
If you tried this Strawberry Cardigan Crochet Pattern (or any other pattern on my website), please let me know how it went in the 📝 comments below. I'd love to hear from you!

Strawberry Cardigan Crochet Pattern
Materials
Abbreviations (US terms)
- Chains - ch
- Magic ring - mr
- Single crochet - sc
- Double crochet - dc
- Slip stitch - sl st
- Increase - inc
- Decrease - dec
- Front post double crochet (fpdc)
- Back post double crochet (bpdc)
Notes
- Sizing Flexibility: This crochet hexi cardi is super versatile and can be adjusted to fit a range of sizes. Since you’re only working with two panels, it’s easy to add or remove stitches to make the cardigan the perfect fit for you. I made mine an oversize large by doing 19 full rounds plus 4 rows on 3 sides- the front, bottom and back. Omit the extra 4 rounds if you don't want it to be oversized. Otherwise follow these for base measurements for other sizes (these have not been tested out so you may need to measure it to a sweater or coat for precise measurements).
- 15 rounds (small)
- 17 rounds (medium)
- 19 rounds (large)
- 21 rounds (XL) and so forth.
- Simple Stitches: I’ve kept the pattern beginner-friendly by using double crochet as the base stitch. This makes the process go by smoothly and quickly, especially if you’re familiar with basic crochet techniques.
- Minimal Sewing: One of the best parts of this pattern is the very little sewing required! You only need to sew the arms together and join the middle of the panels. It’s perfect for those who want to avoid too much finishing work!
Instructions
Crochet Hexagon Cardigan Pattern:
- With the 5MM HOOK: Ch x6 then sl st to the first chain.
- Round 1: Ch x2 then dc x2 into the circle. * Ch x2 and dc x3 into the circle* repeat * 4 more times, for 6 total clusters. Then ch x2 and sl st to the ch x2.
- Round 2: Turn your work over and sl st back into the ch x2 space below. Then ch x2, dc x1 and dc in every dc top from the round below. When you get to the corners dc x2, ch x2, and dc x2. Repeat for all 6 sides of the hexagon, then in the last corner, dc x2, ch x2, and sl st to the starting ch x2 in the round.
- The hexagon should not lay flat and should be a bit wavy - this is a good sign that you made your hexagon cardigan correctly. Also, make sure that if you fold the hexagon in half that you make an L shape - this is also another way to double check that you made the hexagon cardigan correctly.
- Round 3-19: Repeat round 2. Note: make sure that the last side always has the same amount of stitches in it as the other 5 sides - because we are joining the round and then flipping it, it is easy to lose a stitch or two. Make x2
For an oversize look:
- Either add additional full rounds or half rounds by making additional rows on the back, bottom and middle - I did 4 extra rows for these sides because I did not want to make my arms wider.
- You want to follow the overall gist of what you did for the crochet rounds but after you reach 3 sides, ch x2 and turn - do this for all 4 rows.
For additional length:
- Add extra rows to the bottom - I did an extra 4 rows at the bottom for a longer look.
- You want to follow the overall gist of what you did for the crochet rounds but after you reach the other side, ch x2 and turn - do this for all 4 rows.
- At this point sew the 2 halves of the crochet cardigan together by sewing the back together. Then sew the seam for each arm so each arm is a tube.
- Fasten off and weave in any ends at this point. Now we can add extra arm length.
For arm length:
- Round 1: Add extra rounds to each arm by rejoining the yarn to where the seam is, ch x2 and dc in every stitch. Then sl st to the beginning chain.
- Round 2: Next, ch x2 and TURN your work (this is optional but it helps create the same texture throughout the whole piece) Dc in every stitch and then sl st to the chain.
- Round 3-6: Repeat round 2.
- Round 7: This part does not have to be exact. Ch x2 and turn, make a dc dec (dc2tog) and then a normal dc in the next stitch. Repeat for the rest of the round.
- Round 8: Repeat round 7.
- Do round 1-8 for the other arm. Fasten off any yarn and weave in the ends.
Crochet Ribbing:
Crochet Cuff Ribbing:
- Round 1: With the green yarn and a 4MM HOOK, join the yarn into any of the dc stitches in the last round on the sleeve. Then ch x2 and dc in every stitch in the round. Next sl st to the beginning chains. For this part you do not need to turn every round.
- Round 2: Ch x2, then make a fpdc in the next stitch and a bpdc in the following. Then repeat for the rest of the round. Sl st to the beginning chains.
- Round 3-7: Repeat round 2. Make sure you make a fpdc over other fpdc and vice versa - this creates the ribbing effect. Fasten off and weave in the ends.
- Repeat for the other arm.
- You could use a larger size hook for this part, but I like a tight cuff because I know this part of the cardigan will loosen up over time.
Crochet Ribbed Cardigan:
- Round 1: Using a 5MM HOOK and green yarn, join the yarn anywhere to the edge of the body of the cardigan. Then ch x2 and dc in every stitch along the edge. When you get to places that are raw edges, make 2 dc for every row of dc stitches. When you get to the end, sl st to the beginning chains.
- For corners dc x3.
- Round 2: Ch x2, then make a fpdc in the next stitch and a bpdc in the following. Then repeat for the rest of the round. Sl st to the beginning chains.
- For corners make a normal dc + a fpdc in each of the 3 stitches in the corner for the second round. It could also be done fpdc, then a dc.
- Round 3-5: Repeat round 2. But do not increase the amount of stitches in the corner, if it curls up on you - just make the stitches a little looser.
Crochet Solid Granny Square:
- Make 2 squares for pockets.
- Round 1: Using a 5MM HOOK and pink yarn, Make a mr, ch x3 and then dc x2 in the circle. Ch x2, dc x3, ch x2 and dc x3, ch x2 and dc x3, ch x2 and sl st to the 3rd chain. You should have 4 sides. Pull the magic circle closed and you can see you have a small square.
- Round 2-6: Ch x3. Dc in each dc stitch from the previous round, dc x2, ch x2, dc x2 in each chx2 corner stitch. Then sl st to the 3rd chain you made at the beginning when you get to the end of each round.
- After the 6th round, fasten off and weave in any tails.
Large Crochet Strawberry Appliques:
- This pattern is made in rows.
- Row 1: Using a 5.5MM HOOK, and red yarn - Ch x2 and turn.
- Row 2: In the second chain from the hook, make an inc. (2) Then ch x1 and turn (for this next row and every row afterwards you will make a turning chain, but do not work in it. It’s to help turn your work).
- Row 3: Inc x2 (4). Then ch x1 and turn.
- Row 4: Inc, sc x2, inc (6). Then ch x1 and turn.
- Row 5: Sc in every stitch (6). Then ch x1 and turn.
- Row 6: Inc, sc x4, inc (8). Then ch x1 and turn.
- Row 7: Sc in every stitch (8). Then ch x1 and turn.
- Row 8: Inc, sc x6, inc (10). Then ch x1 and turn.
- Row 9: Sc in every stitch (10). Then ch x1 and turn.
- Row 10: Inc, sc x8, inc (12). Then ch x1 and turn.
- Row 11-14: Sc in every stitch (12). Then ch x1 and turn.
- Row 15: Dec, sc x8, dec (10). Then ch x1 and turn.
- Row 16: Dec, sc x6, dec (8). Then ch x1 and turn.
- Row 17: Dec, sc x4, dec (6). Then ch x1 and turn.
- After your last row, fasten off your yarn and leave a long tail for sewing. Crochet around the edges of your strawberry if you want a neater finish and a slightly bigger strawberry. Then fasten off and weave in the ends.
Crochet Strawberry Stem and Leaves:
- This pattern is made one stem/leaf at a time.
- Step 1: Using a 5.5MM HOOK and green yarn, Ch x3, then in the second ch from the hook make a sc, then make a sc in the following stitch. This is the stem.
- Step 2: Ch x4 and in the second ch from the hook make a sc. Then sc in the following 2 chains. Then sl st back to the stitch where you broke off and made chains for the first leaf.
- Step 3: Repeat step 2 x3.
- Fasten off and leave a long tail for sewing.
Finishing:
- Sew the strawberry stem and leaves to the top part of the strawberry.
- With white yarn and tapestry needle, crochet little v’s onto the strawberry. They look like little hearts which add additional cuteness to the applique!
- Weave in any loose ends.
- Sew the strawberries onto the granny squares and then sew those to the cardigan where you would like the pockets to be placed.
- And now you are finished making your Strawberry Crochet Cardigan!


Leave a Reply