
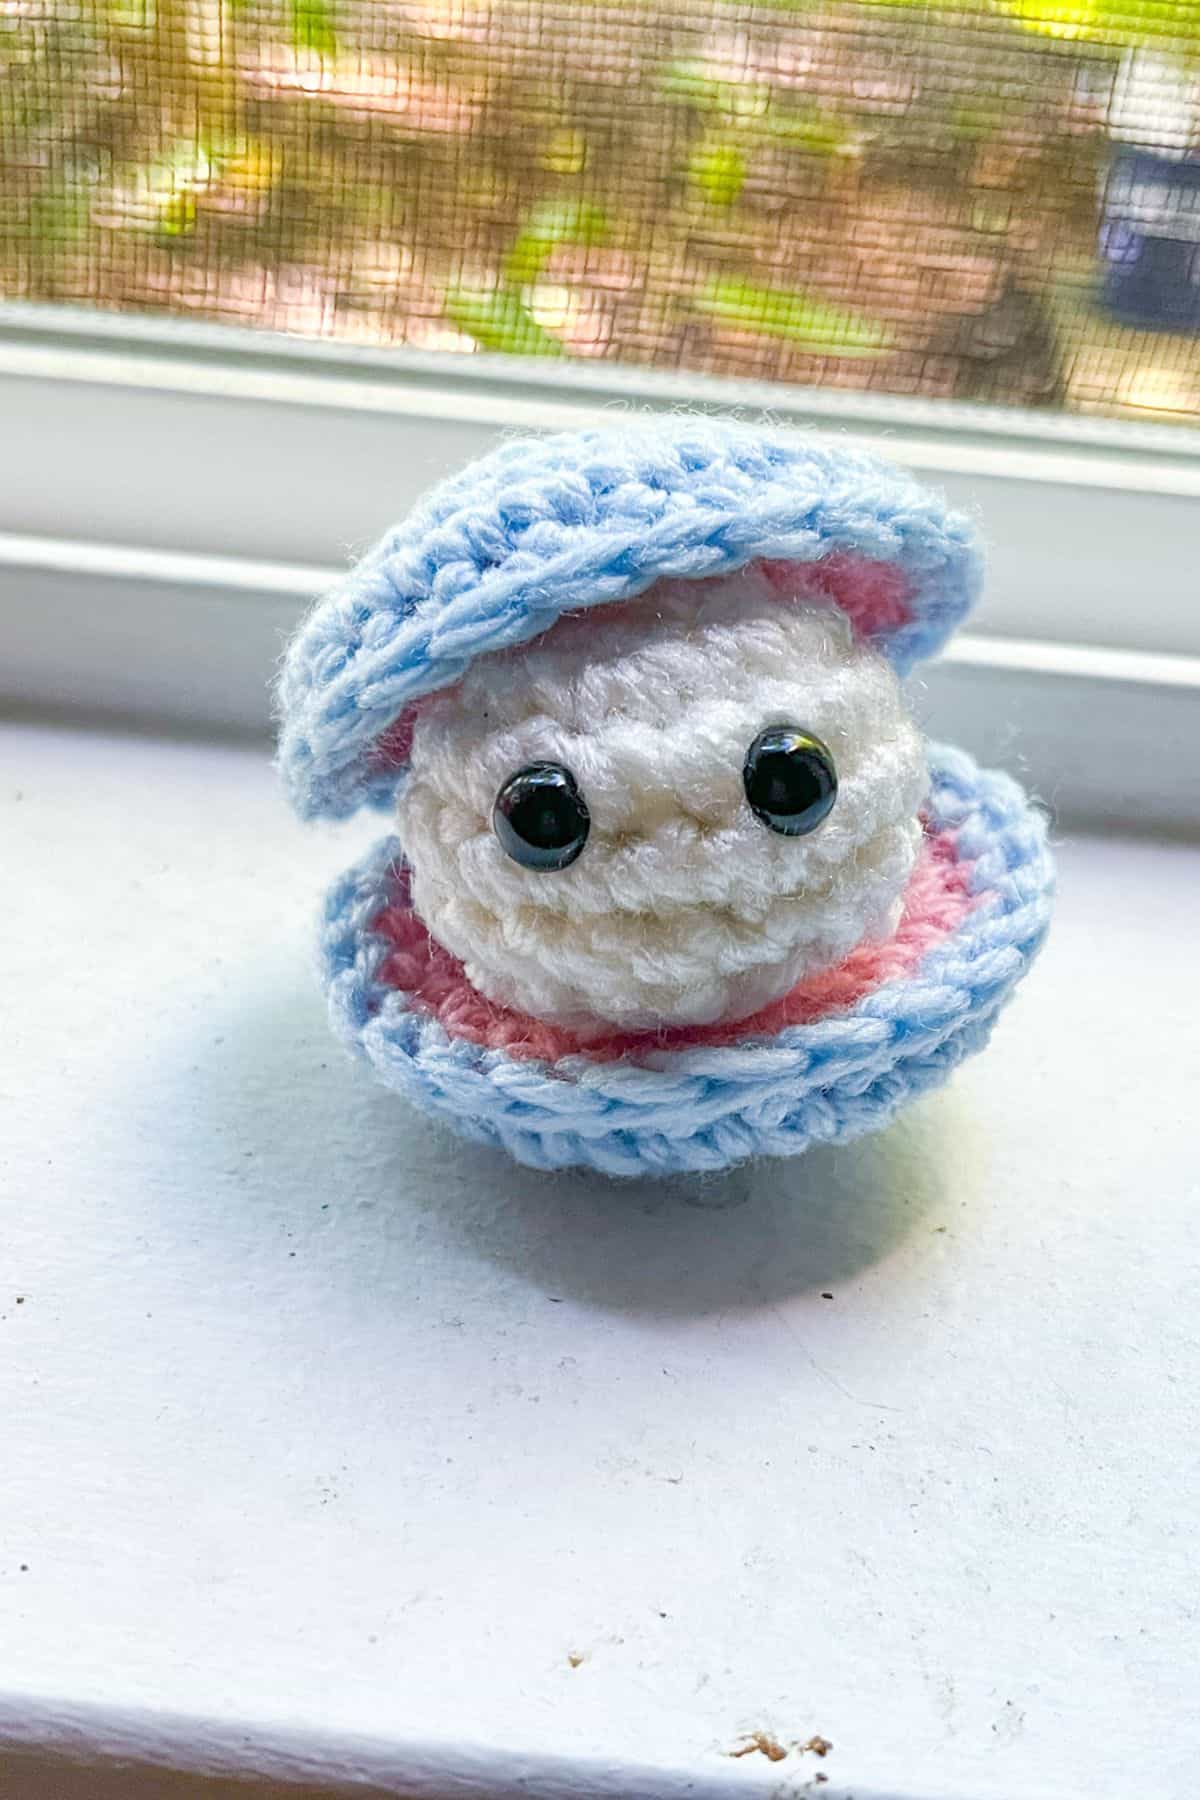
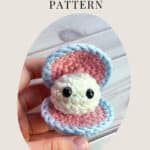
Summer is the perfect time to dive into ocean-inspired crochet, and I’m so excited to share my newest design with you — a crochet clam pattern that’s as easy as it is adorable! Whether you're heading to the beach, setting up for a summer craft market, or just love all things under the sea, this quick and beginner-friendly project is perfect for you.
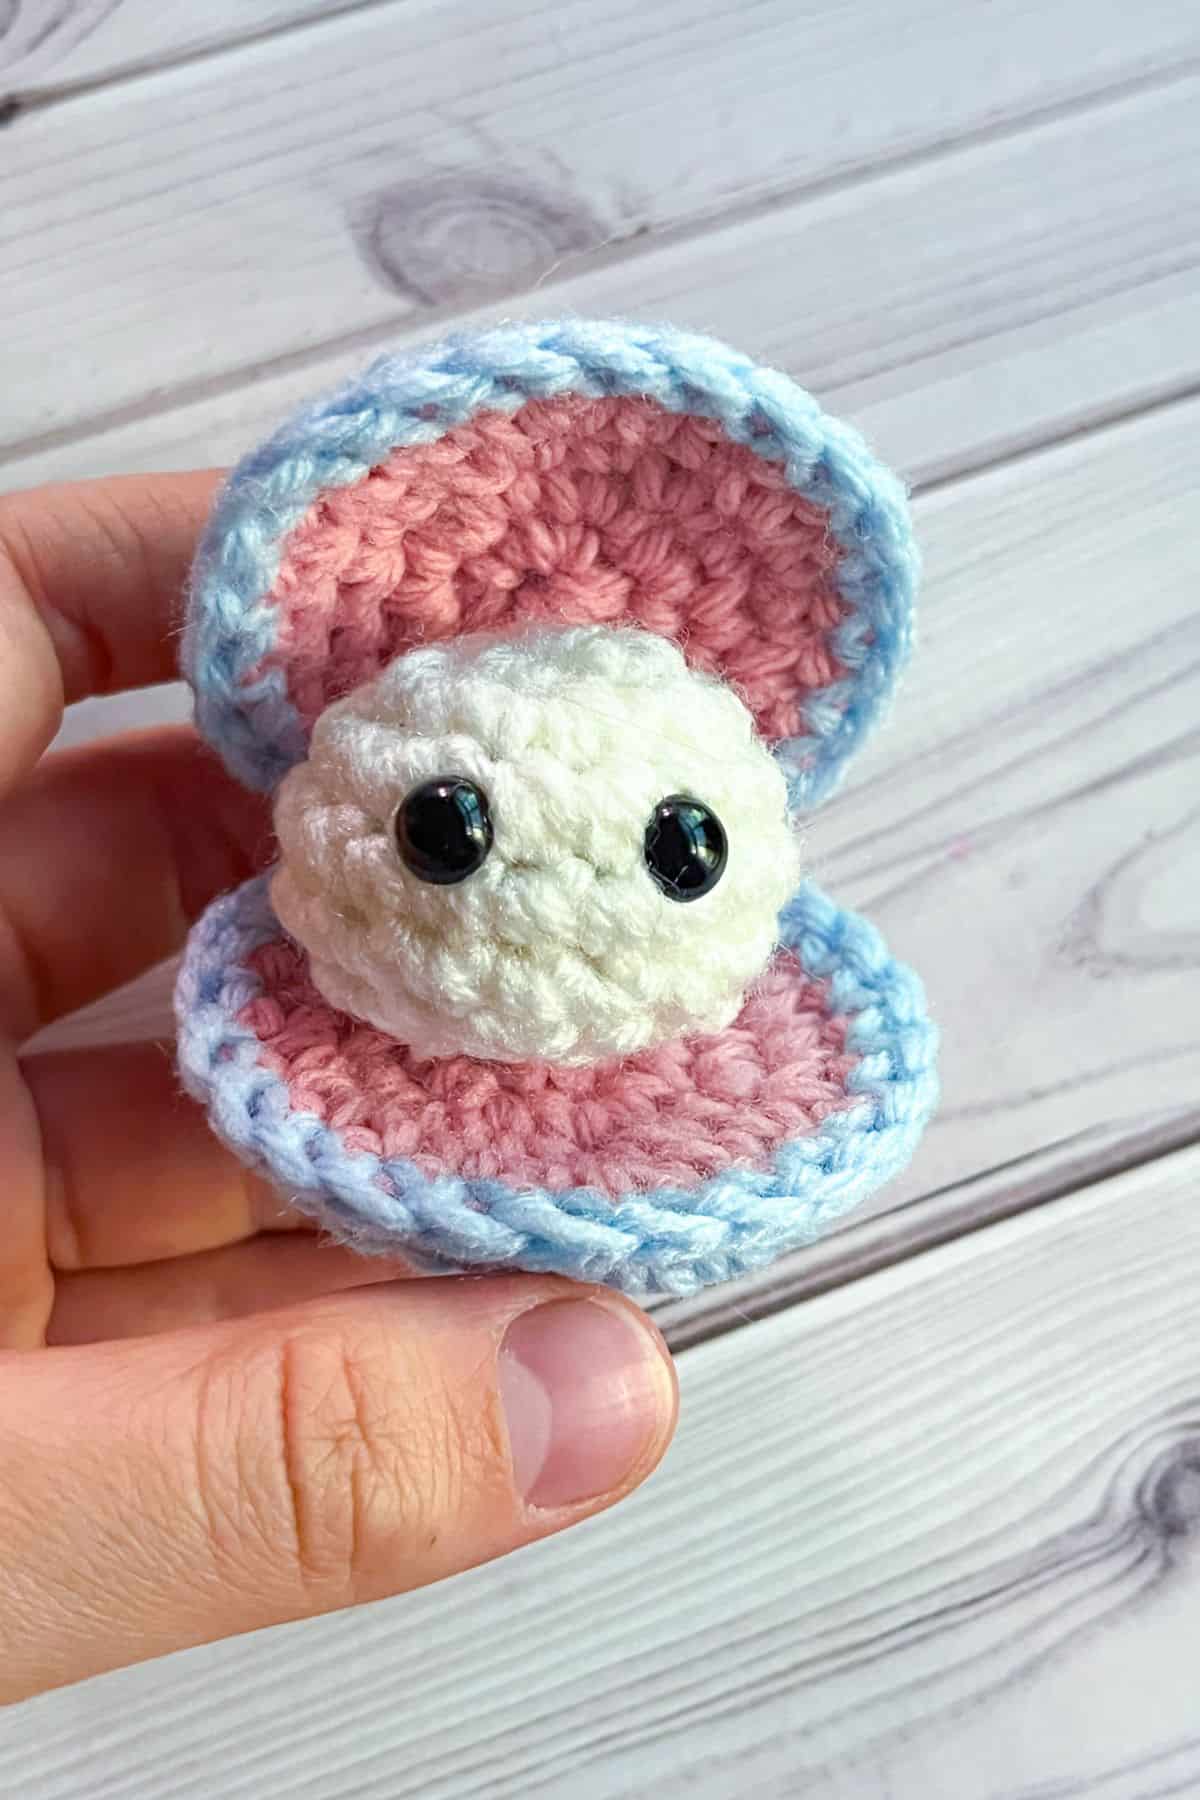
This amigurumi clam works up in just 20 minutes, making it a great option for last-minute gifts, market stock, or simply a relaxing evening project. Its compact size also makes it perfect for turning into a keychain or bag charm — especially cute when paired with one of my other ocean-themed designs like the crochet orca bag, crochet whale shark bag, or crochet stingray bag. You can clip the clam onto your bag for a playful, ocean-lover accessory that’s bound to turn heads!
The crochet clam pattern includes both the crochet clamshell pattern and a sweet little crochet pearl that nestles inside, giving it that classic seashell look with a soft and squishy twist. It’s simple enough for beginners but still satisfying for seasoned crocheters who want a quick and joyful project.
I designed this with summer in mind, but let’s be honest — ocean vibes are welcome all year round! Whether you're making one for yourself, gifting to a friend, or prepping for a craft fair, this little clam is guaranteed to make a splash.
So grab your favorite yarn, a 4.5mm hook, and let’s get started on this charming crochet clam pattern that’s bound to be your new go-to for beachy fun!
Jump to:
✏️ Things To Note:
- Size: When using a 4.5mm hook and worsted weight yarn, your finished amigurumi clam will measure approximately 2 to 2.5 inches wide when closed — the perfect palm-sized project for keychains, bag charms, or even play food.
- Yarn Flexibility: The crochet clam pattern is super versatile when it comes to yarn! While I used worsted weight acrylic for a sturdy finish, you can easily swap in cotton, velvet, or even blanket yarn for different textures, looks, and sizes. Just adjust your hook size accordingly to keep those stitches nice and tight.
- Beginner-Friendly: If you're new to crochet or amigurumi, don't worry — the crochet clam pattern is very approachable! It uses basic stitches like single crochet, increases, and decreases, with no complicated shaping. It’s a great confidence booster for newer crocheters.
🪡 Materials Needed
- Red Heart Yarn - Light blue
- Red Heart Yarn - Light Raspberry
- Red Heart Yarn- white
- 6mm safety eyes
- 4.5 mm Hook
- Polyfill
- Tapestry needle
💭Abbreviations to Remember (US terms)
- Magic ring (mr)
- Single crochet (sc)
- Increase (inc)
- Decrease (dec)
* If you see a stitch abbreviation with "x" after it, it means how many times you do that stitch in the following amount of stitches. For example: sc x6 would mean you make a single crochet in the next 6 stitches. Inc x2 means you make an inc in the next 2 stitches.
🧋Variations
- Giant Velvet Clam: Upsize your clam using chunky velvet or blanket yarn and a larger hook. This version turns into a plushie or pillow-sized softie — super cozy and squishy!
- Colors: You can experiment with different pearl colors, add tiny facial expressions to the clam, or use glitter yarn for a magical, mermaid-inspired twist. Try mixing and matching with pastel or ocean tones to match your aesthetic.
🍵Instructions for Crochet Clam Pattern
For this crochet clam pattern, we will be working in rounds.
Crochet Clamshell:
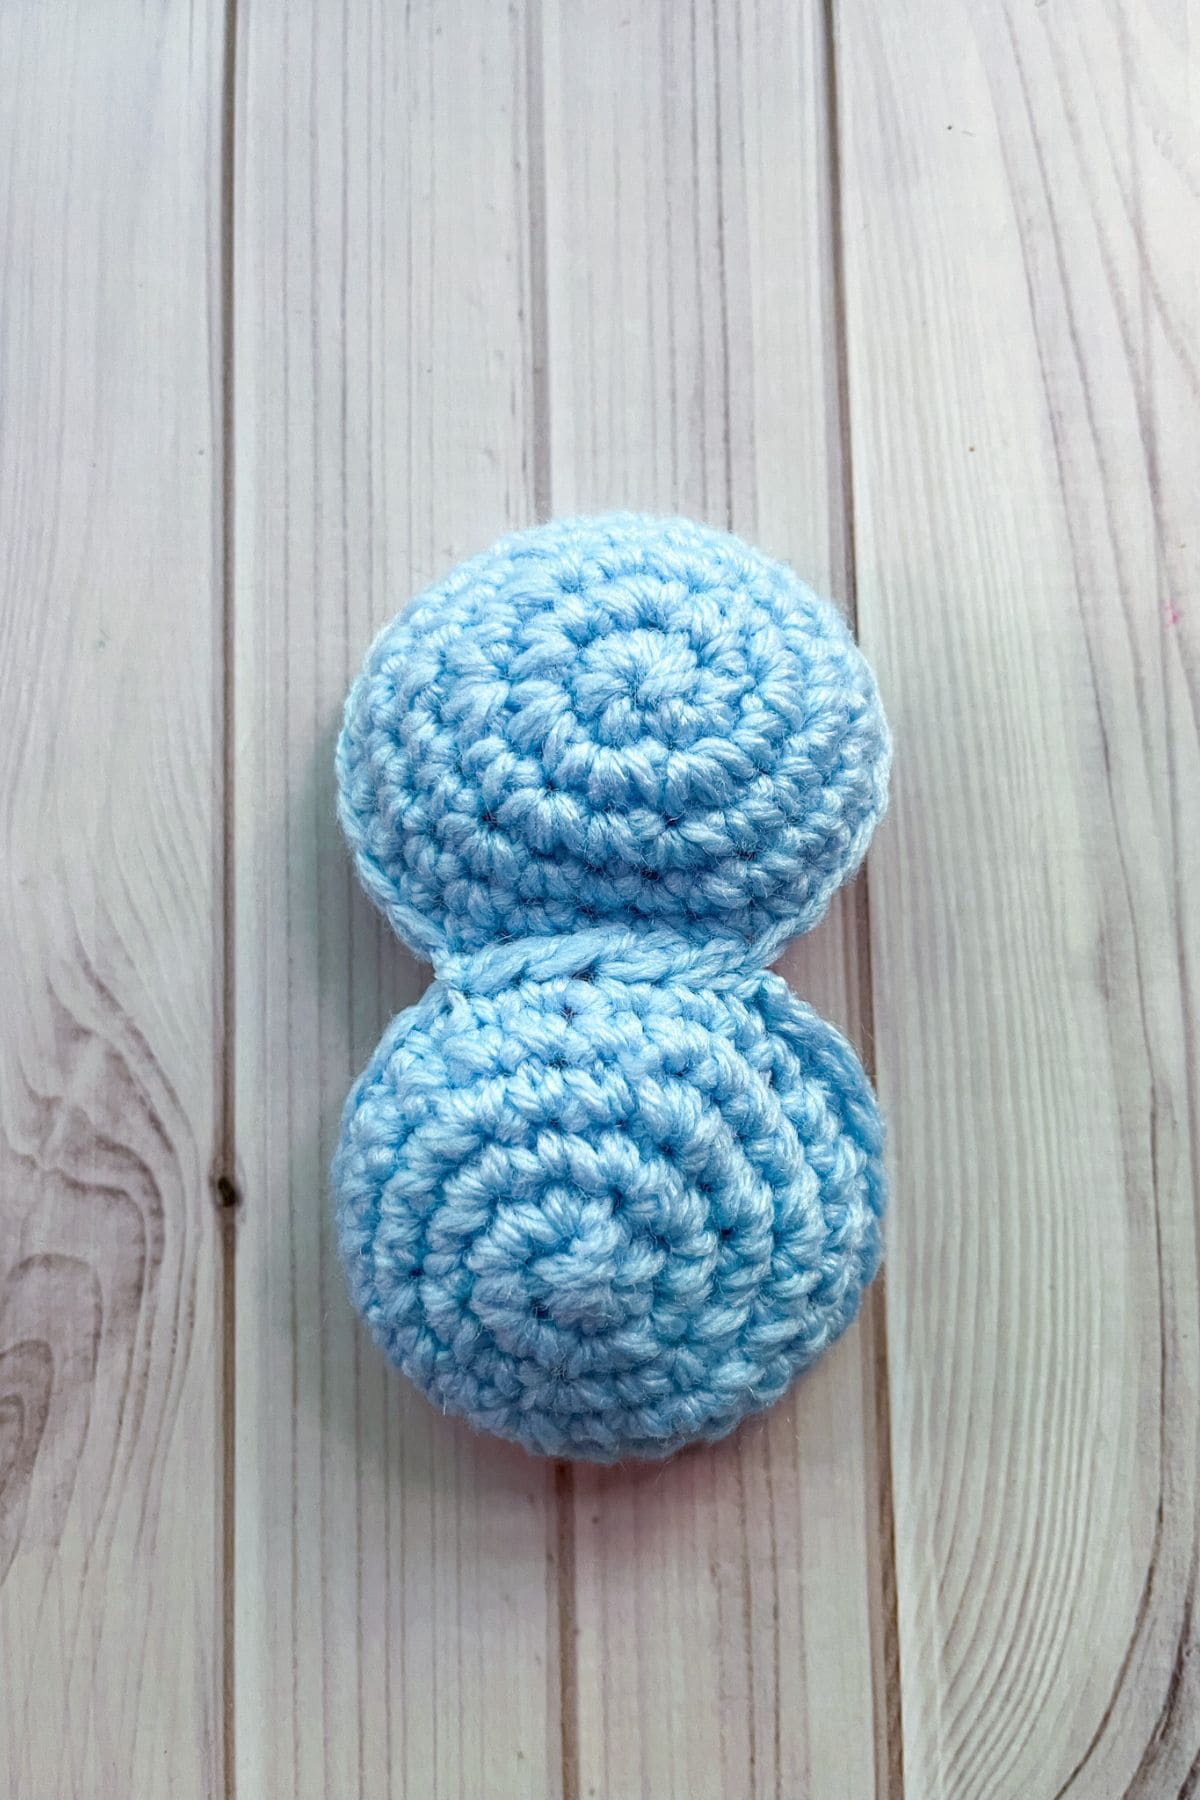
Inner Shell: Make x2 before starting the outer shells.
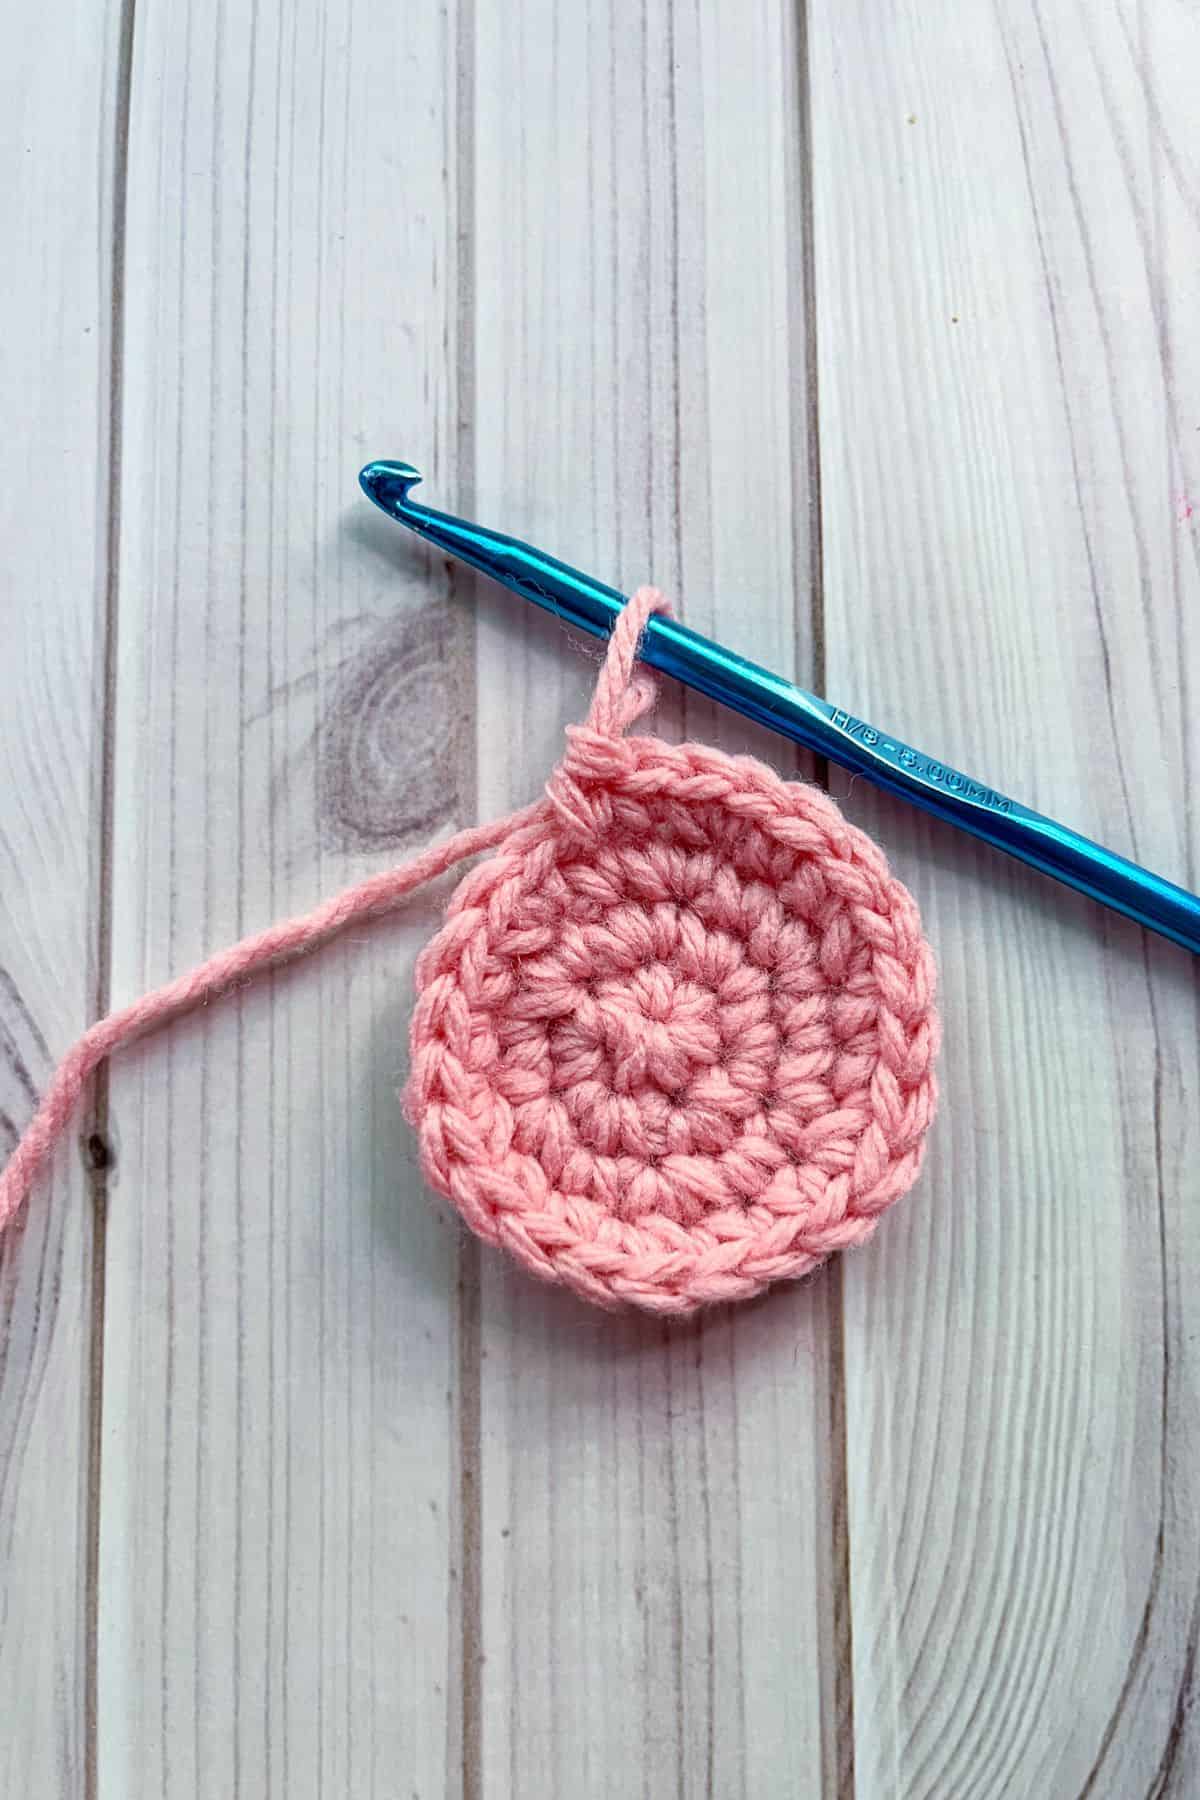
Round 1: Using the light raspberry yarn, make a mr and make sc x6 in the circle. If you find it difficult making a magic ring you can chain 2 and then crochet sc x6 in the second chain from the hook. (6)
Round 2: Inc in every sc. (12)
Round 3: Inc, sc. Then repeat until the end of round (18).
Round 4: Inc, sc x2. Then repeat until the end of round (24). Fasten off and then weave in the tails.
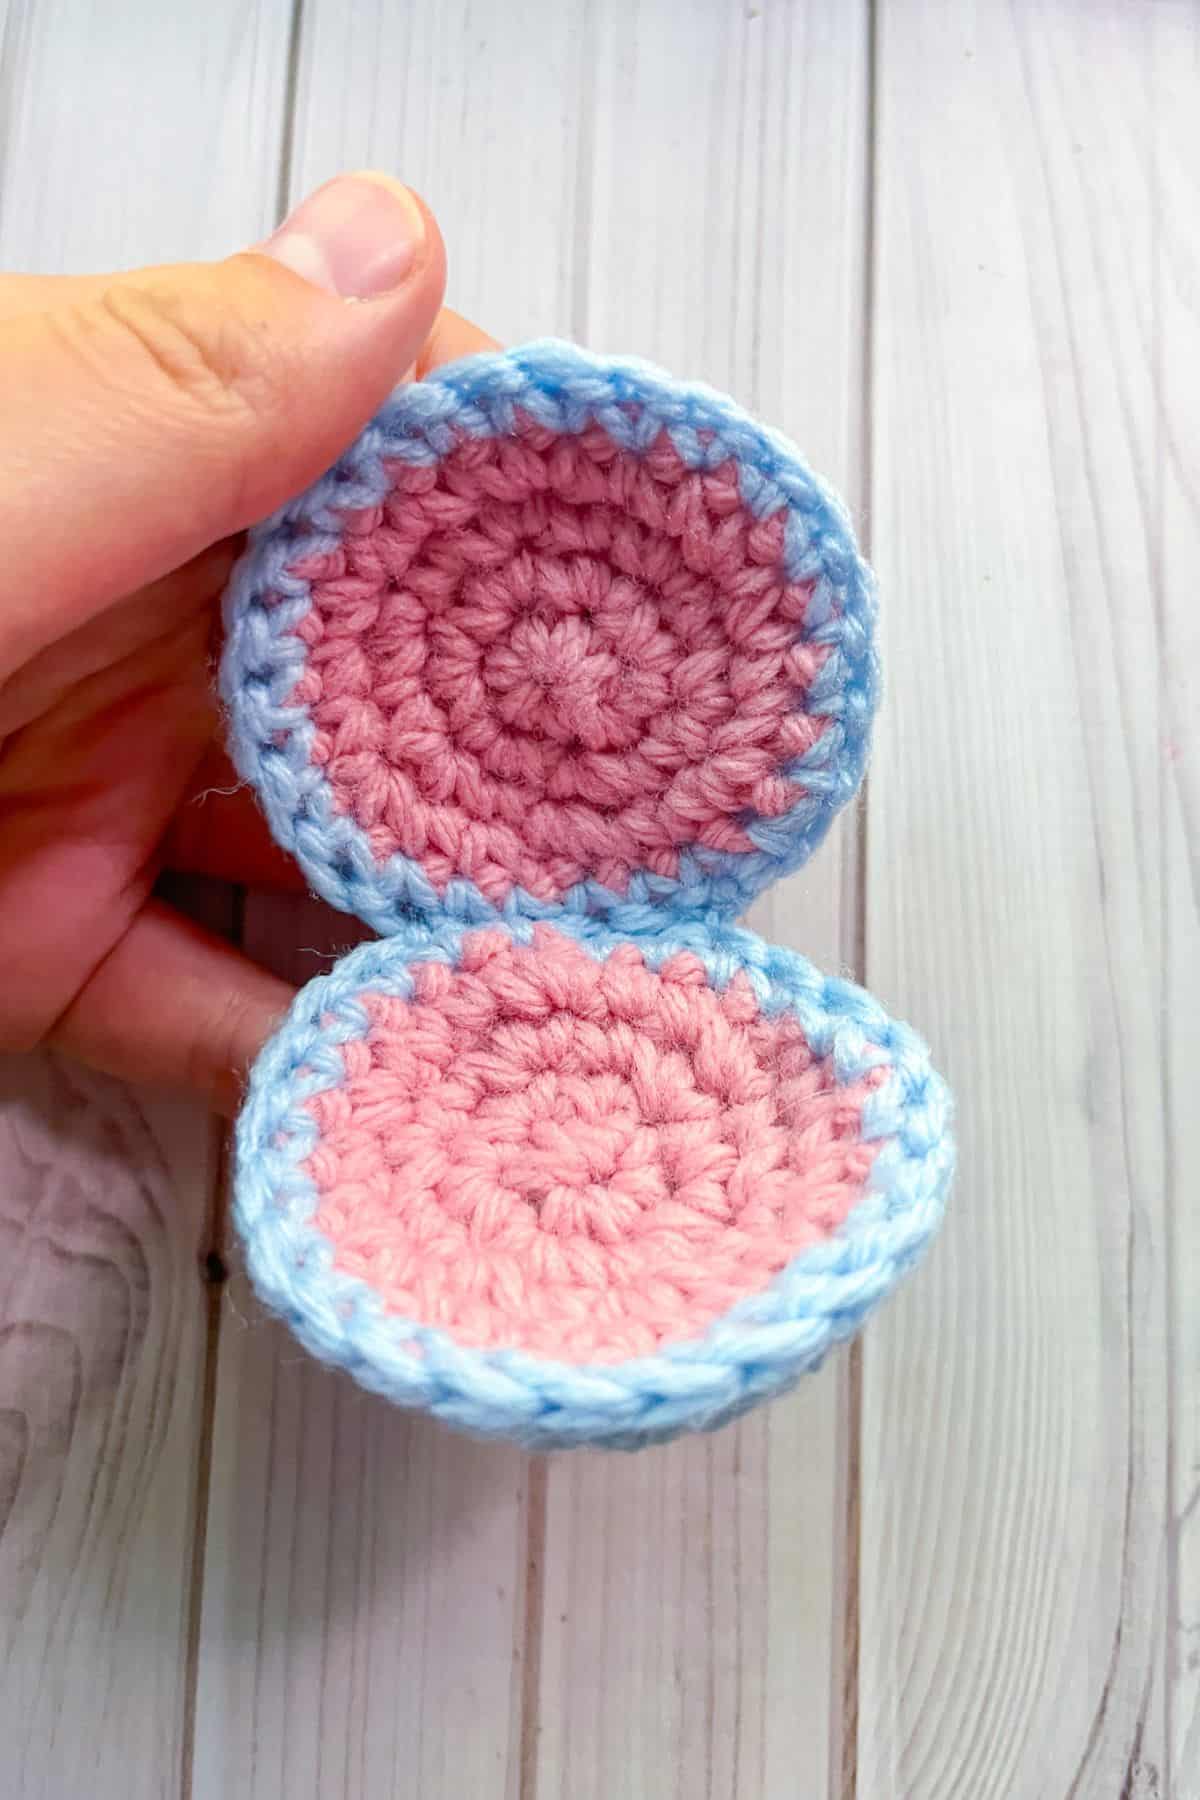
Outer Shell: Make x2 but one at a time since you will be crocheting the inner and outer shells together.
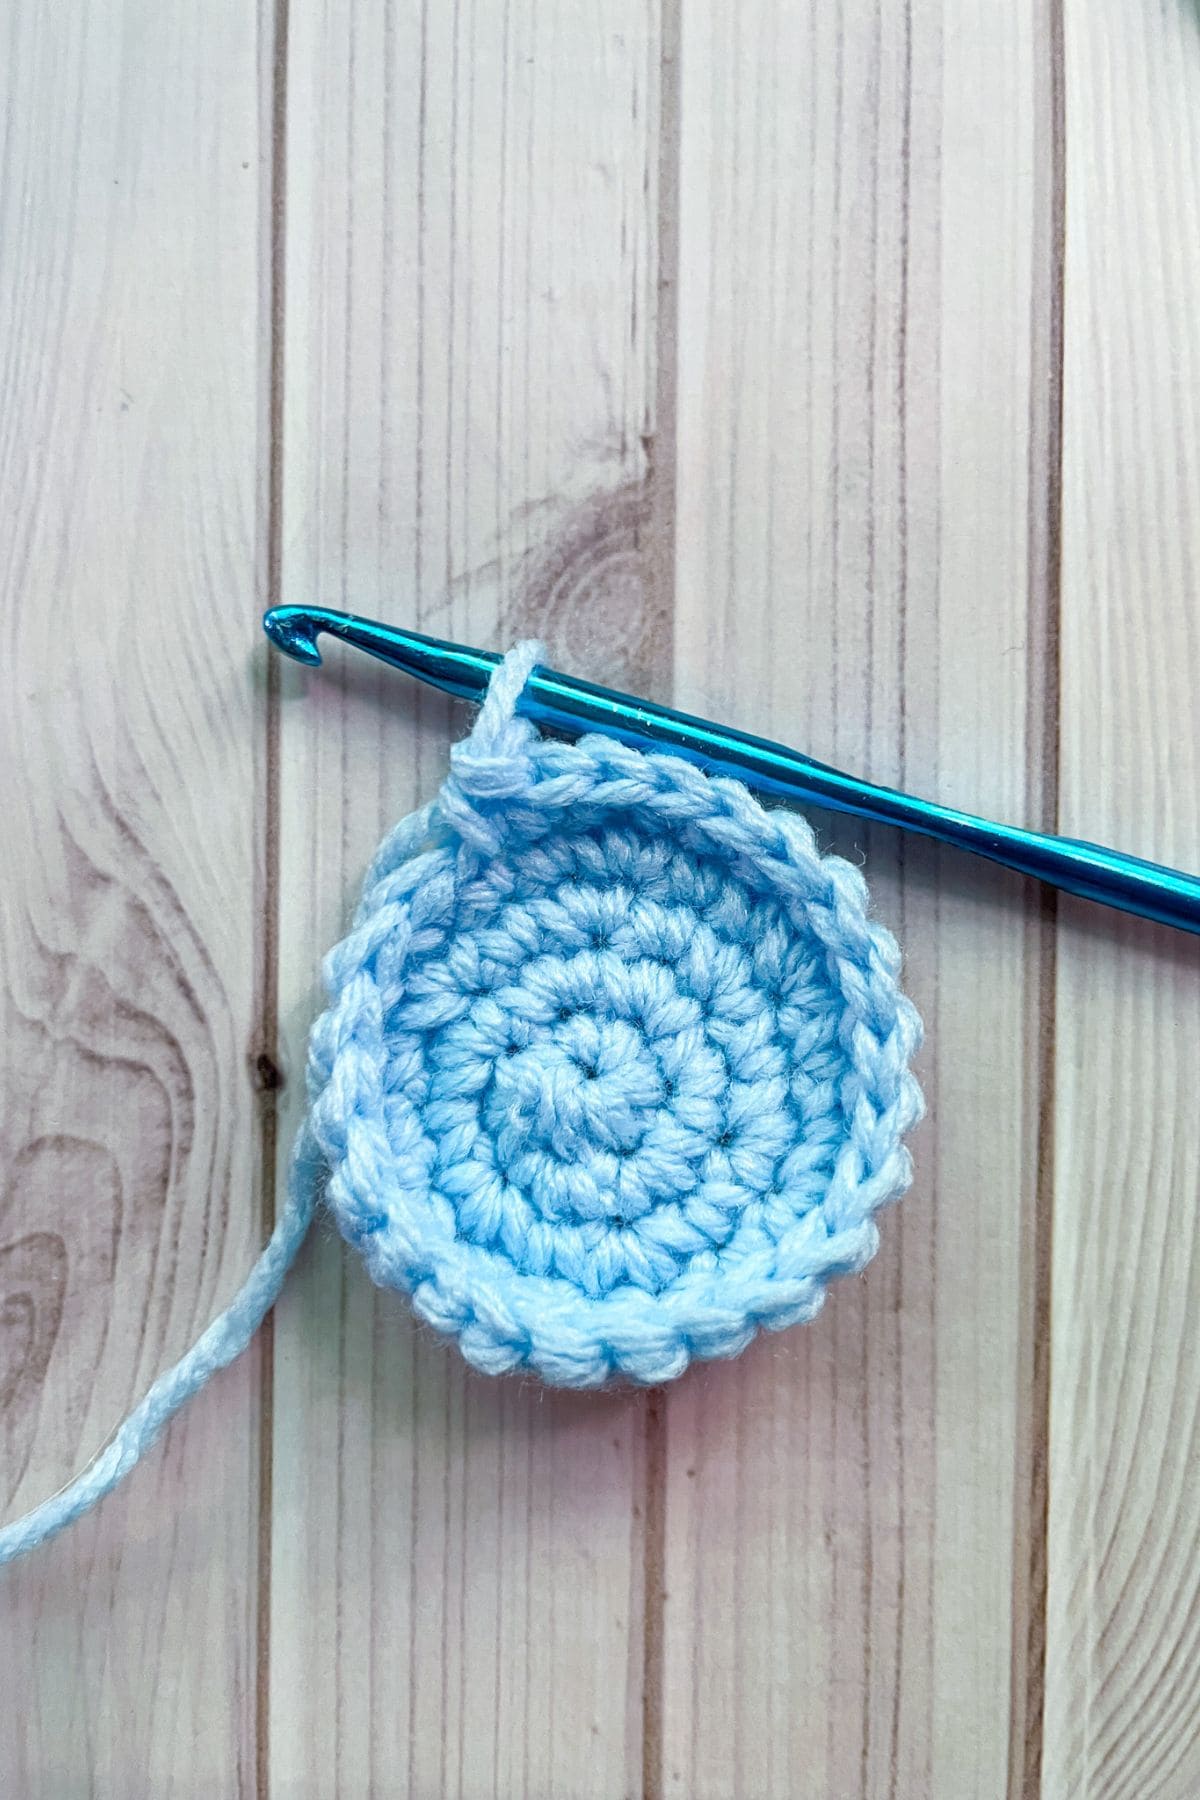
Round 1: Using the light blue yarn, make a mr and make sc x6 in the circle (6).
Round 2: Inc in every sc. (12)
Round 3: Inc, sc. Then repeat until the end of round (18).
Round 4: Inc, sc x2. Then repeat until the end of round (24).
Round 5: Sc in every stitch (24).
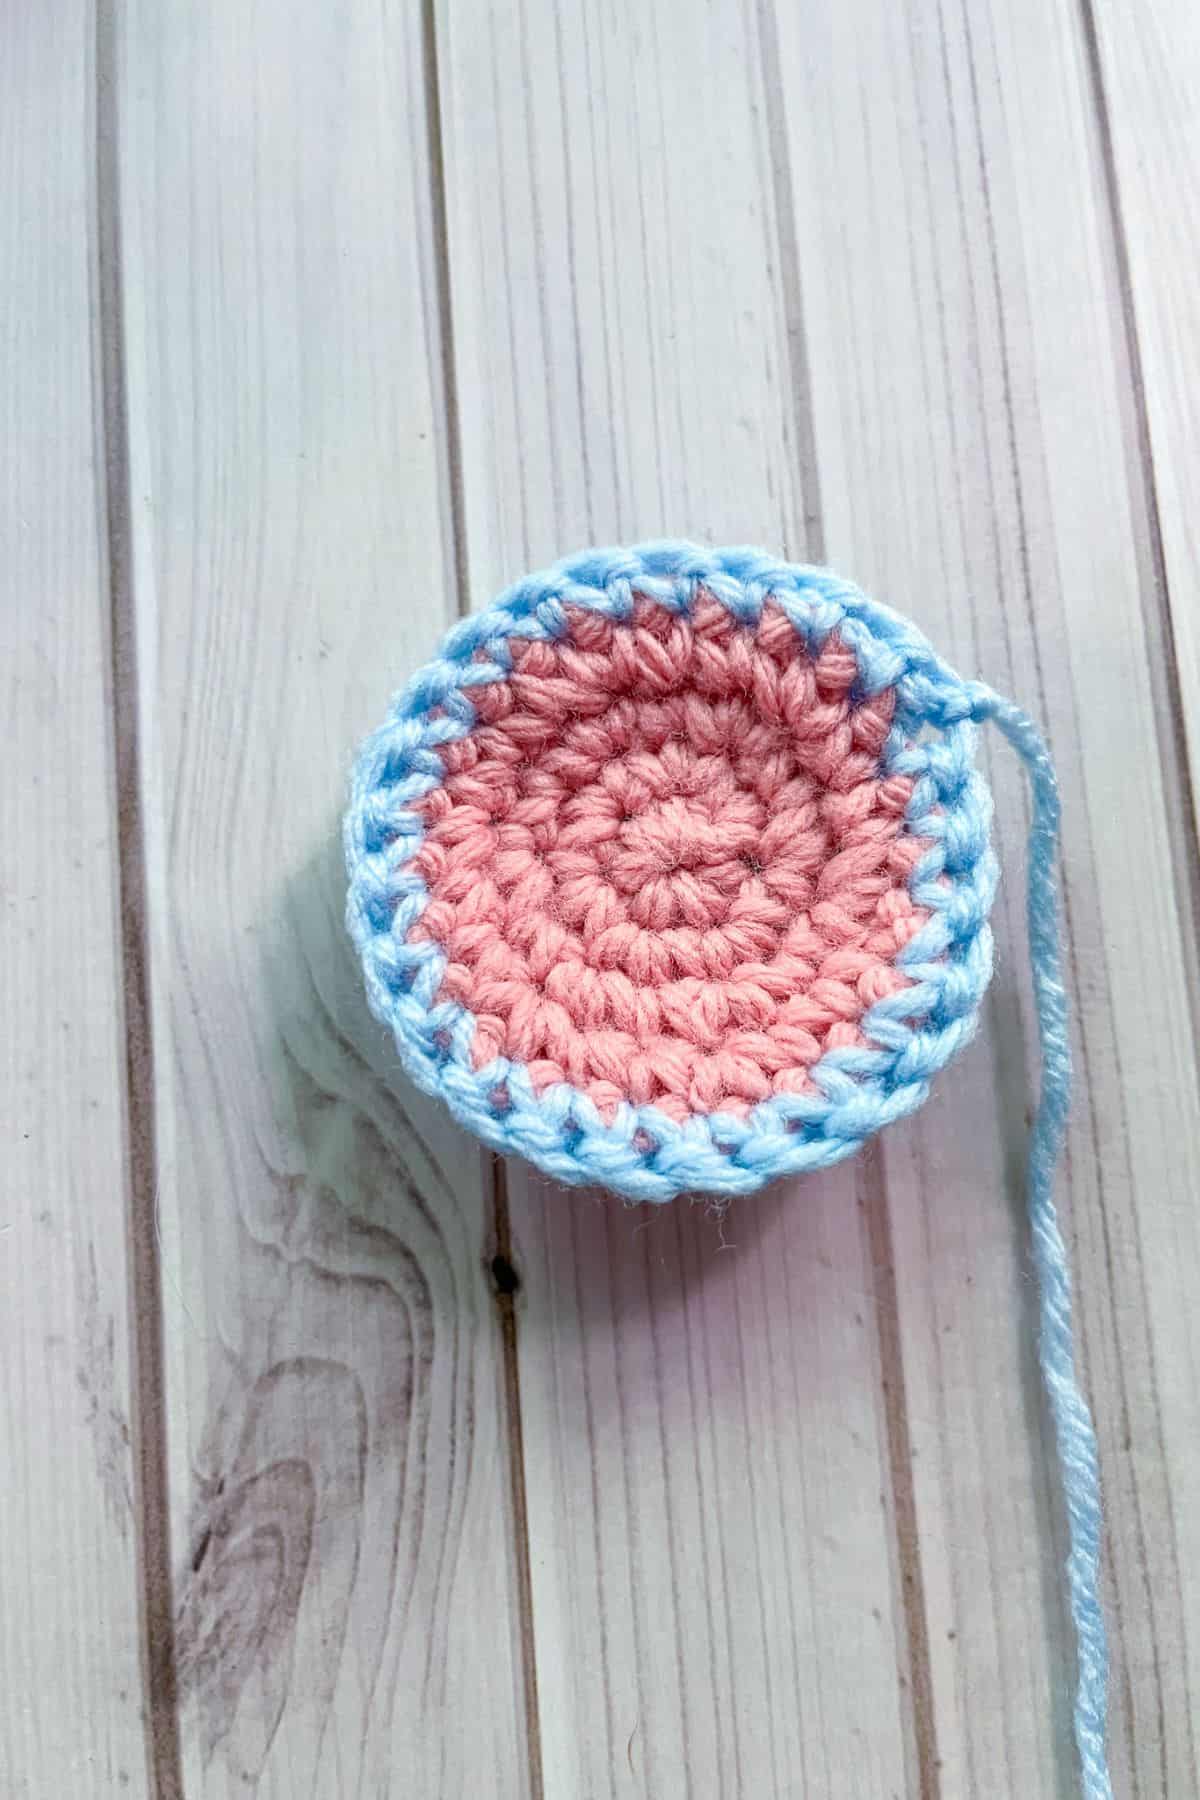
Round 6: Crochet the inner shell and outer shell together - make sure the right side of the stitches are facing outward for both pieces. For this round you will be using the light blue yarn and making a sc in each stitch - go through both loops of the inner and outer shell.
Then fasten off and weave in the tail.
Finish off the second shell and leave a tail.
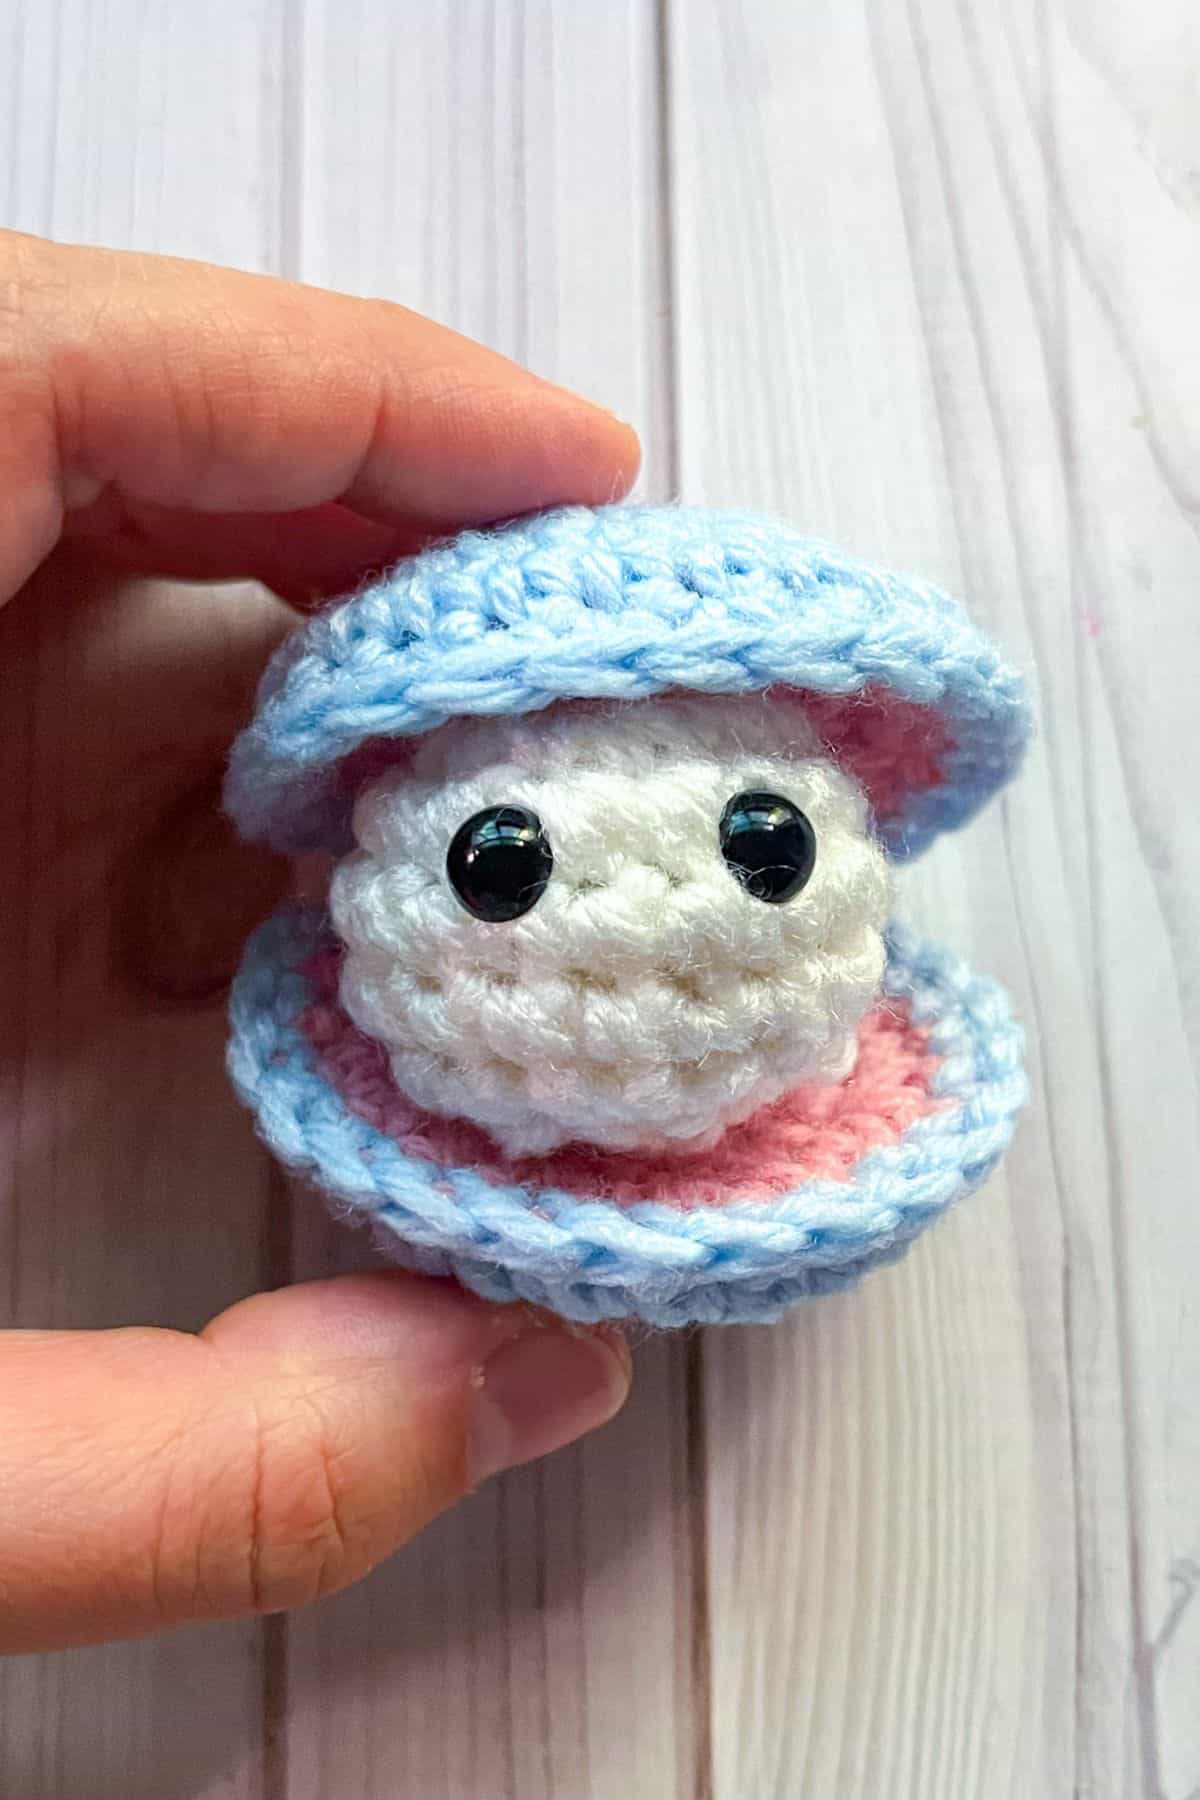
Sewing:
Sew the clam shells together - blue side facing outward, then sew 5-6 stitches together from both the top and bottom shell to connect them. Weave in the tail.
Now the shell crochet pattern part is done! Set aside 🙂
Pearl:
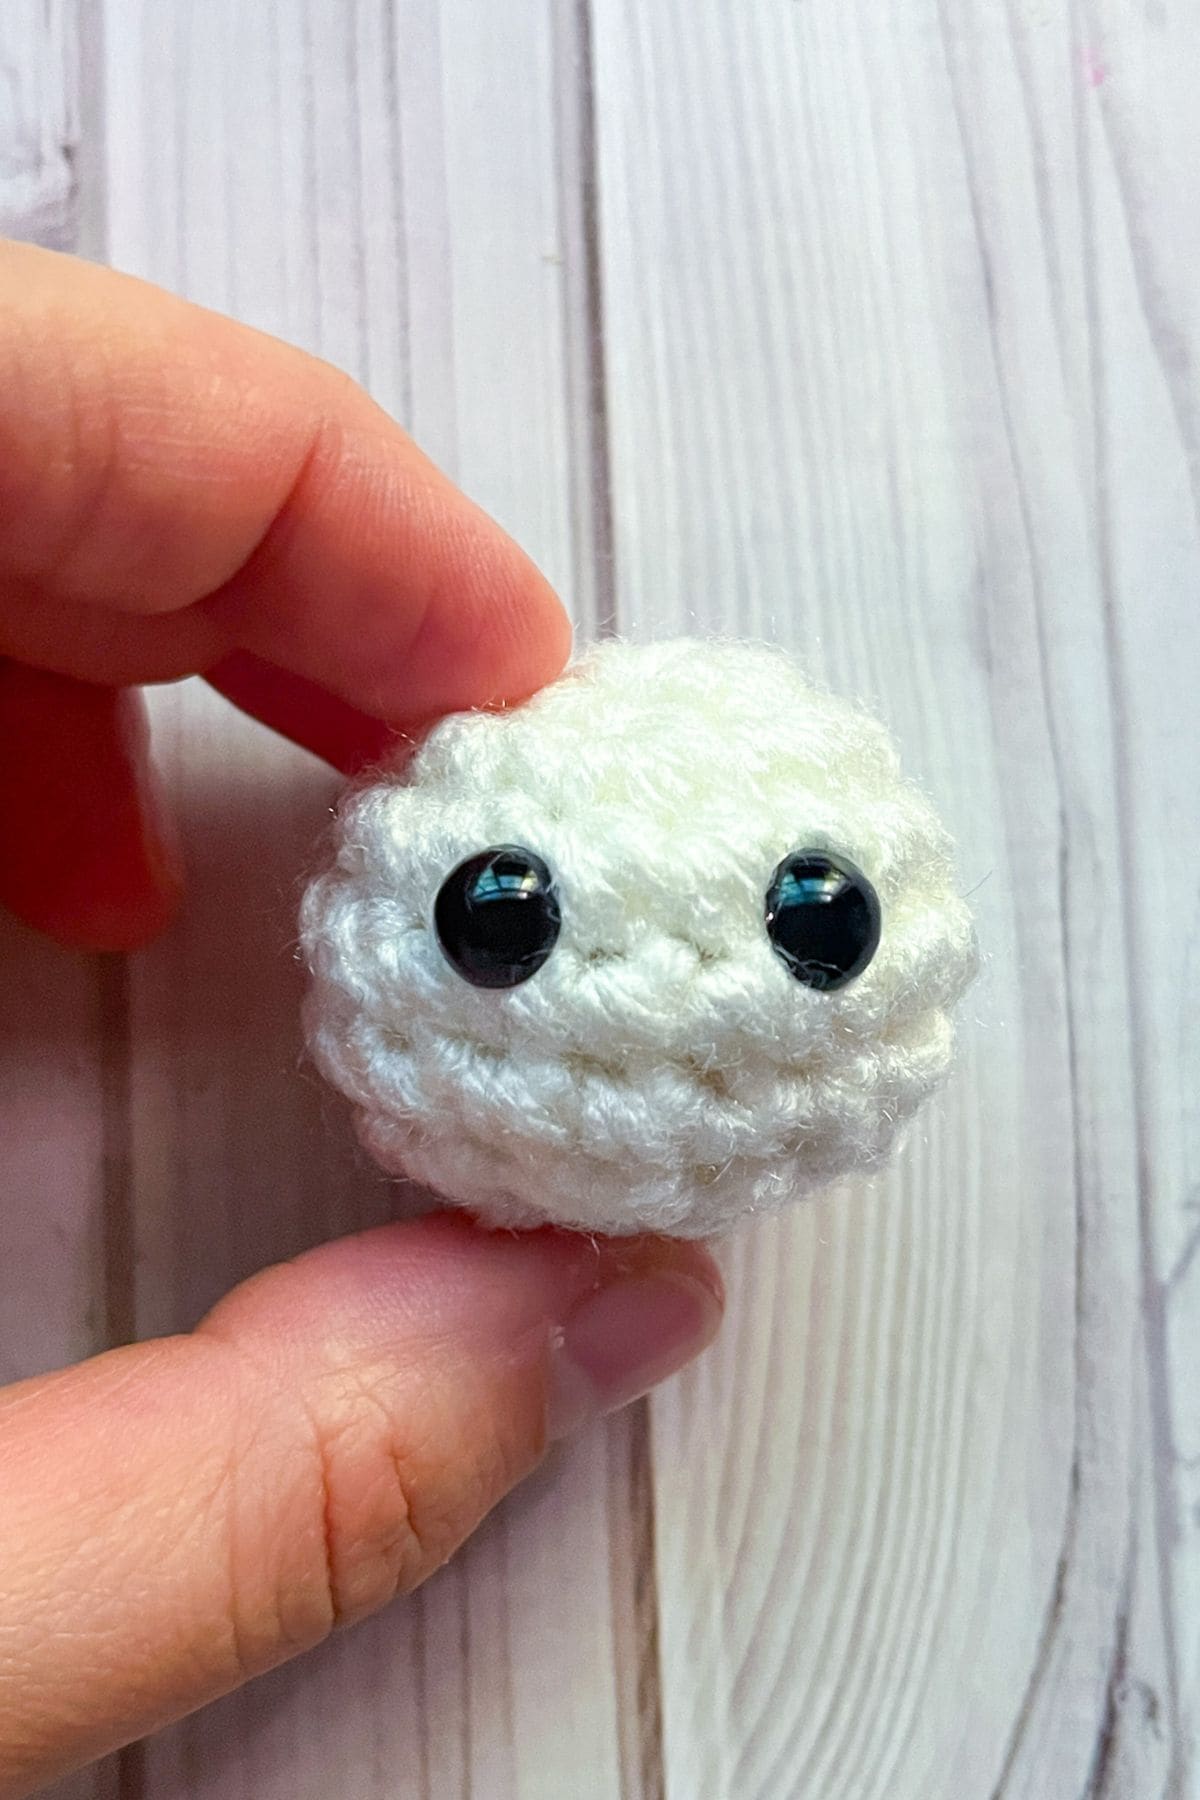
Round 1: Using the white yarn, make a mr and make sc x6 in the circle. (6)
Round 2: Inc in every sc. (12)
Round 3: Inc, sc. Then repeat until the end of round (18).
Round 4-5: Sc in every stitch (18). Place safety eyes between rounds 4 and 5 here.
Round 6: Dec, sc. Then repeat until the end of the round (12). Stuff with polyfill.
Round 7: Dc in every stitch (6). Then fasten off and weave in the tail.
Thanks so much for joining me in making this adorable crochet clam pattern! Whether you turned it into a sweet keychain and added it to your favorite summer bag, or whipped up a few for your next market booth, I hope this little amigurumi clam brought some ocean magic to your day.
If you're looking for more ocean or water-themed crochet fun, be sure to check out some of my other patterns. My crochet frog pattern is a cute little amphibian perfect for spring and pond vibes. The crochet crab no-sew pattern is a favorite for those who want something quick and low-effort but still super charming. If you're in the mood for a functional quirky piece, my crochet axolotl coaster pattern makes an adorable addition to your table setup. And don’t miss the crochet fish bag pattern — it's playful, eye-catching, and a great statement piece for any ocean lover.
I love seeing how you bring these patterns to life, so if you share your finished clam or any of my other designs on social media, be sure to tag me! I’m always inspired by your creativity and personal touches.
Until next time, happy crocheting — and may your summer be filled with yarn, sunshine, and lots of ocean vibes!
🐌Expert Tips
- Keep Your Stitches Tight: Since this is an amigurumi clam, tighter stitches will help the shape stay structured and prevent stuffing from peeking through. If you notice gaps, go down a hook size or try using a yarn with less stretch.
- Add a Bit of Weight: If you're turning your crochet clam into a keychain or bag charm, adding a tiny amount of poly-pellets or a small flat bead inside the base can give it a satisfying weight and help it hang nicely.
- Stiffen the Shell (Optional): To keep the crochet clamshell pattern open (especially for display or decor), lightly spray the inside with fabric stiffener and shape it as it dries. This gives the shell a more structured, open look.
🧵Pattern FAQs
This crochet clam pattern is beginner-friendly! If you're comfortable with single crochet, increasing, and decreasing in the round, you'll be able to make this with ease. It’s also a great starter project for learning amigurumi techniques.
On average, it takes about 20 minutes to complete one clam, making it a perfect quick project for markets, gifts, or stash-busting.
Yes! The pattern is super flexible. While I recommend worsted weight acrylic for durability, you can use cotton, velvet, or even chunky yarn. Just be sure to adjust your hook size to keep your stitches tight and prevent holes.
🧶More Crochet Summer Patterns


If you tried this Crochet Clam Pattern (or any other pattern on my website), please let me know how it went in the 📝 comments below. I'd love to hear from you!

Crochet Clam Pattern
Materials
Abbreviations (US terms)
- Magic ring - mr
- Single crochet - sc
- Increase - inc
- Decrease - dec
Notes
- Size: When using a 4.5mm hook and worsted weight yarn, your finished amigurumi clam will measure approximately 2 to 2.5 inches wide when closed — the perfect palm-sized project for keychains, bag charms, or even play food.
- Yarn Flexibility: This pattern is super versatile when it comes to yarn! While I used worsted weight acrylic for a sturdy finish, you can easily swap in cotton, velvet, or even blanket yarn for different textures, looks, and sizes. Just adjust your hook size accordingly to keep those stitches nice and tight.
- Beginner-Friendly: If you're new to crochet or amigurumi, don't worry — this project is very approachable! It uses basic stitches like single crochet, increases, and decreases, with no complicated shaping. It’s a great confidence booster for newer crocheters.
Instructions
Crochet Clamshell:
- Inner Shell:
- Make x2 before starting the outer shells.
- Round 1: Using the light raspberry yarn, make a mr and make sc x6 in the circle. If you find it difficult making a magic ring you can chain 2 and then crochet sc x6 in the second chain from the hook. (6)
- Round 2: Inc in every sc. (12)
- Round 3: Inc, sc. Then repeat until the end of round (18).
- Round 4: Inc, sc x2. Then repeat until the end of round (24). Fasten off and then weave in the tails.
- Outer Shell:
- Make x2 but one at a time since you will be crocheting the inner and outer shells together.
- Round 1: Using the light blue yarn, make a mr and make sc x6 in the circle (6).
- Round 2: Inc in every sc. (12)
- Round 3: Inc, sc. Then repeat until the end of round (18).
- Round 4: Inc, sc x2. Then repeat until the end of round (24).
- Round 5: Sc in every stitch (24).
- Round 6: Crochet the inner shell and outer shell together - make sure the right side of the stitches are facing outward for both pieces. For this round you will be using the light blue yarn and making a sc in each stitch - go through both loops of the inner and outer shell.
- Then fasten off and weave in the tail.
- Finish off the second shell and leave a tail.
Sewing:
- Sew the clam shells together - blue side facing outward, then sew 5-6 stitches together from both the top and bottom shell to connect them. Weave in the tail.Now the shell crochet pattern part is done! Set aside 🙂
Pearl:
- Round 1: Using the white yarn, make a mr and make sc x6 in the circle. (6)
- Round 2: Inc in every sc. (12)
- Round 3: Inc, sc. Then repeat until the end of round (18).
- Round 4-5: Sc in every stitch (18). Place safety eyes between rounds 4 and 5 here.
- Round 6: Dec, sc. Then repeat until the end of the round (12). Stuff with polyfill.
- Round 7: Dc in every stitch (6). Then fasten off and weave in the tail.
- Thanks so much for joining me in making this adorable crochet clam pattern! Whether you turned it into a sweet keychain and added it to your favorite summer bag, or whipped up a few for your next market booth, I hope this little amigurumi clam brought some ocean magic to your day.


Leave a Reply