
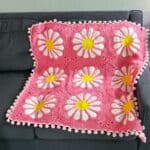
If you’re anything like me, you love the look of a Daisy Crochet Blanket Pattern but absolutely dread sewing all those tiny squares together. That’s why I decided to design my very own version — a bold, vintage-inspired daisy crochet square that’s big, beautiful, and only requires a few pieces to complete an entire crochet flower blanket!
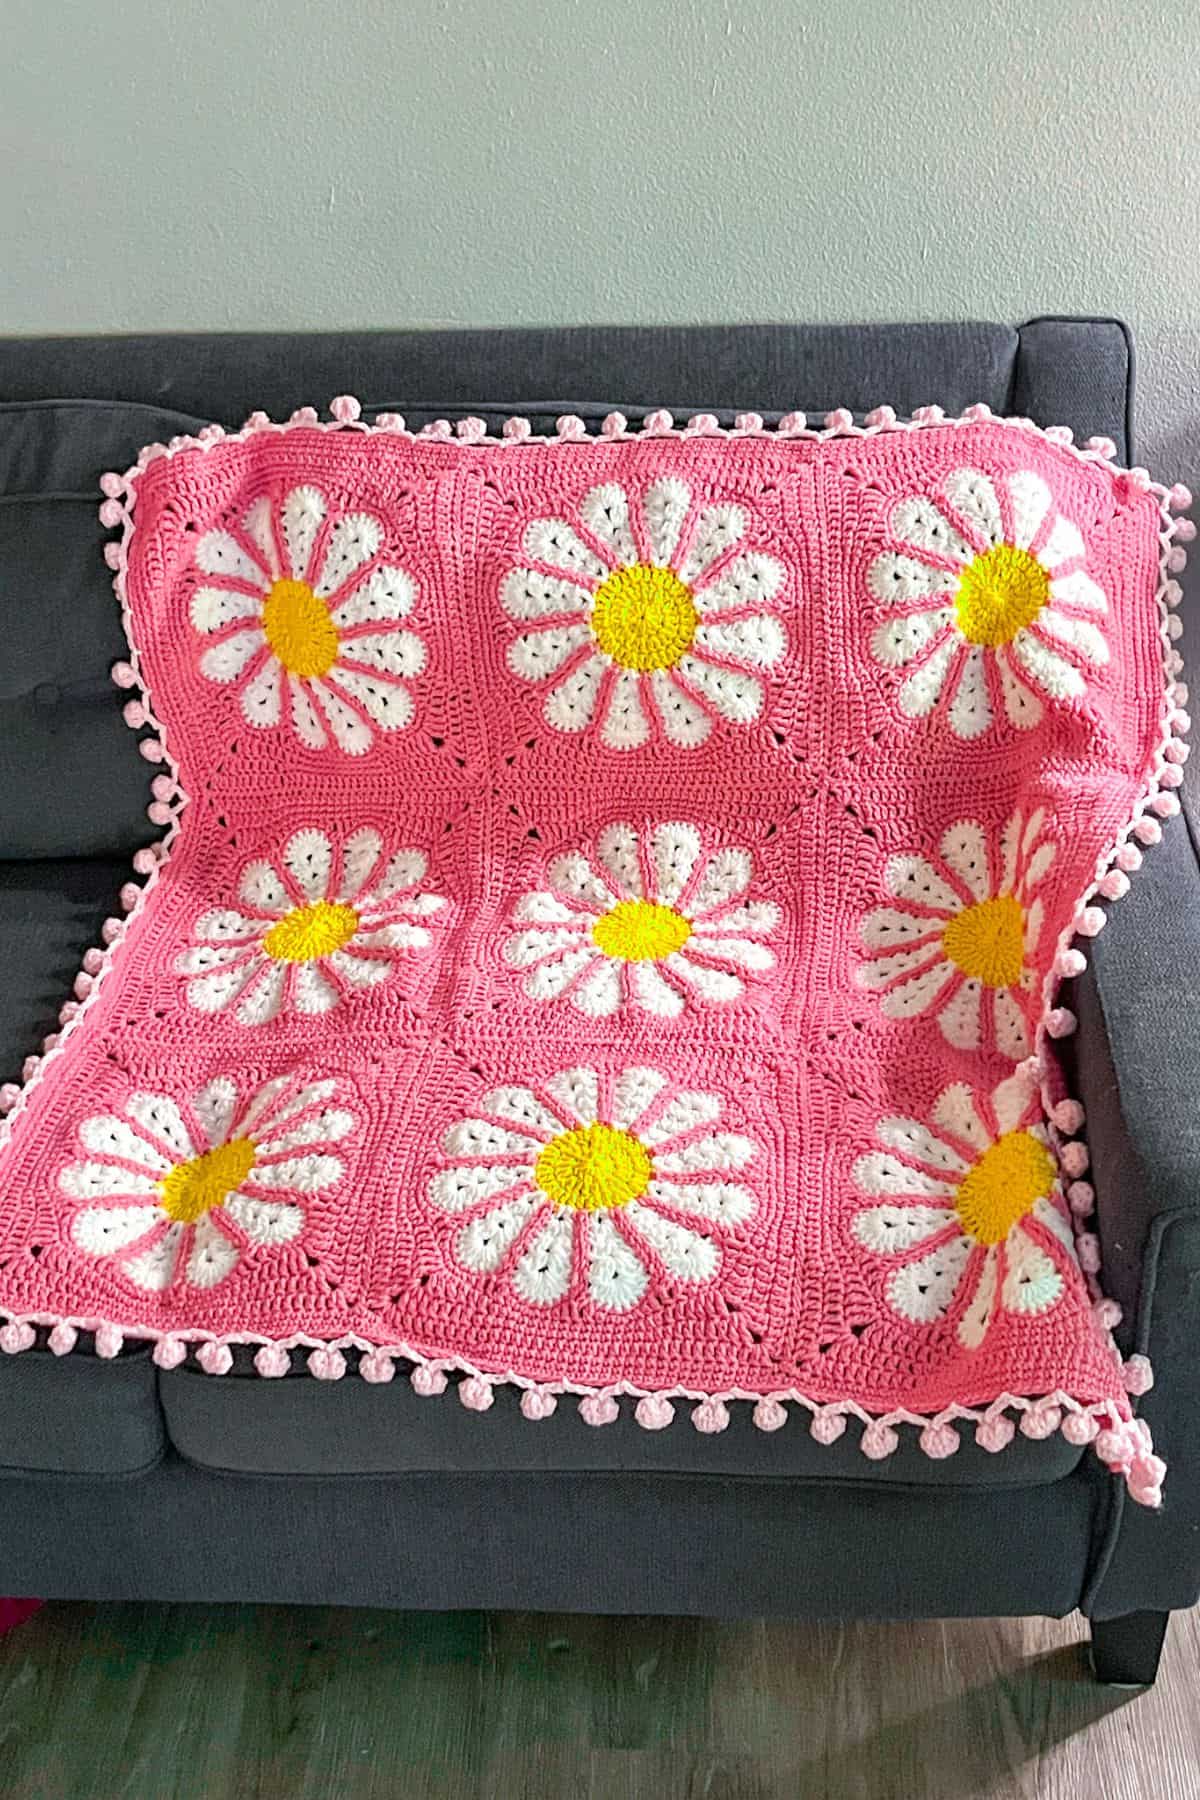
The daisy crochet blanket pattern uses squares that are roughly 12–13 inches wide, so you only need a handful to make a blanket. Less sewing, more relaxing crochet time — and the result is a soft, floral, retro dream. I based the design of the daisy crochet blanket on a vintage crochet flower potholder I found and loved.
Wanna know what's the best of all? The daisy crochet blanket pattern is way easier than it looks. You only work with one color at a time, so there’s no juggling multiple strands or weaving in a million ends. The most important thing is just making sure you count your stitches correctly — that’s truly the trickiest part!
I’ve used similar daisy or sunburst motifs in other projects like my crochet coin purse, granny square bag, and even my crochet backpack pattern. And to finish this blanket, I added my crochet pom pom border, which you might recognize from my crochet snowflake scarf pattern.
Jump to:
✏️ Things To Note:
- Time: Each square takes about an hour to complete. That might seem like a long time, but it does equal less sewing time so overall this daisy crochet blanket pattern might be quicker for you to complete.
- Size: The finished daisy crochet square is approximately 12–13 inches across, making it perfect for quick blankets with fewer pieces to stitch together. I only needed 9 squares to complete my daisy crochet blanket pattern which is roughly 40” x 40”.
- Beginner friendly: The crochet daisy square design may look intricate, but it’s super easy as long as you know foundational crochet stitches — the most challenging part is just counting your stitches.
🪡 Materials Needed
- Red Heart Yarn Super Saver- baby pink
- Red Heart Yarn Jumbo Super Saver- perfect pink x2
- Red Heart Yarn Super Saver- yellow
- Red Heart Yarn Jumbo Super Saver- white
- 5mm hook
- Tapestry needle
💭Abbreviations to Remember (US terms)
- Magic ring (mr)
- Chains (ch)
- Slip stitch (sl st)
- Decrease 2 together (dc2tog)
- Single crochet (sc)
- Half double crochet (hdc)
- Double crochet (dc)
- Triple crochet (tr)
- Increase (inc)
🧋Variations
The versatility of this daisy crochet square is one of its best features! Here are a few creative ways you can use it beyond blankets:
- Turn a square into a throw pillow cover by crocheting a back panel and stuffing it.
- Make just one square and turn it into a wall hanging with a wooden dowel.
- Use a single square as a table centerpiece or placemat.
- Combine a few squares to make a crochet daisy tote bag.
🍵Instructions for Daisy Crochet Blanket Pattern
The square for the daisy crochet blanket is made in the round.

Round 1: Using the yellow yarn, make a mr and immediately ch x3 (counts as a dc). Then dc x11 into the mr. Pull tight and to secure the round, sl st to the beginning chains in the round (12).
Round 2: Ch x3, then dc into the sl st. Next, dc inc in every stitch from the previous round. Then sl st to the beginning chains (24).
Round 3: Ch x3, then dc into the sl st. *Dc into the next stitch then a dc inc in the following stitch. Repeat from * for the rest of the round. Then sl st to the beginning chains in the round (36). Fasten off the yellow yarn and join the white.
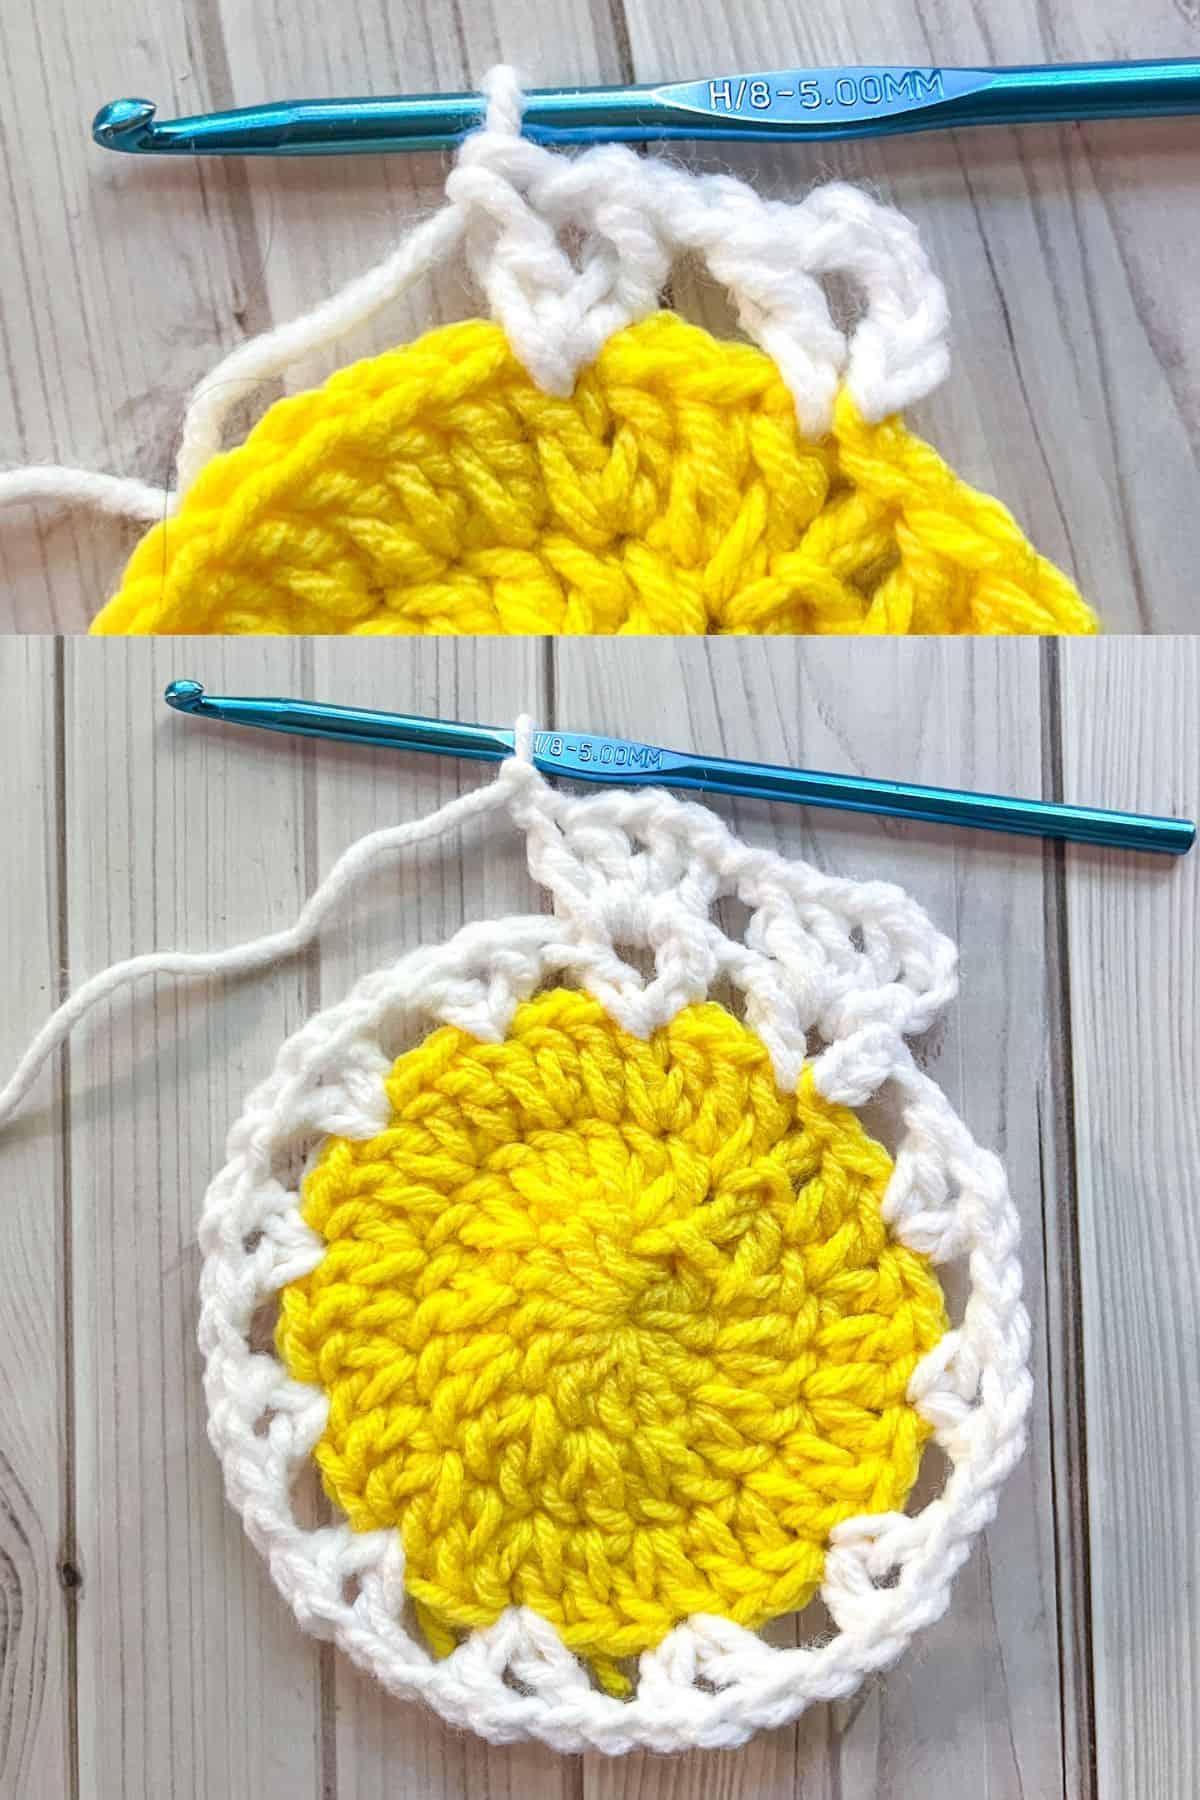
Round 4: Ch x4 (counts as a dc + ch), dc into the sl st you made to join the round. Then ch x1 and *skip 2 dc, (dc x1, ch x1, dc x1) into the next stitch. Next ch x1. Repeat from * for the rest of the round. Once you are done with the round, sl st to the 3rd ch you made at the beginning (12 groups of (1dc, ch 1, 1 dc)).
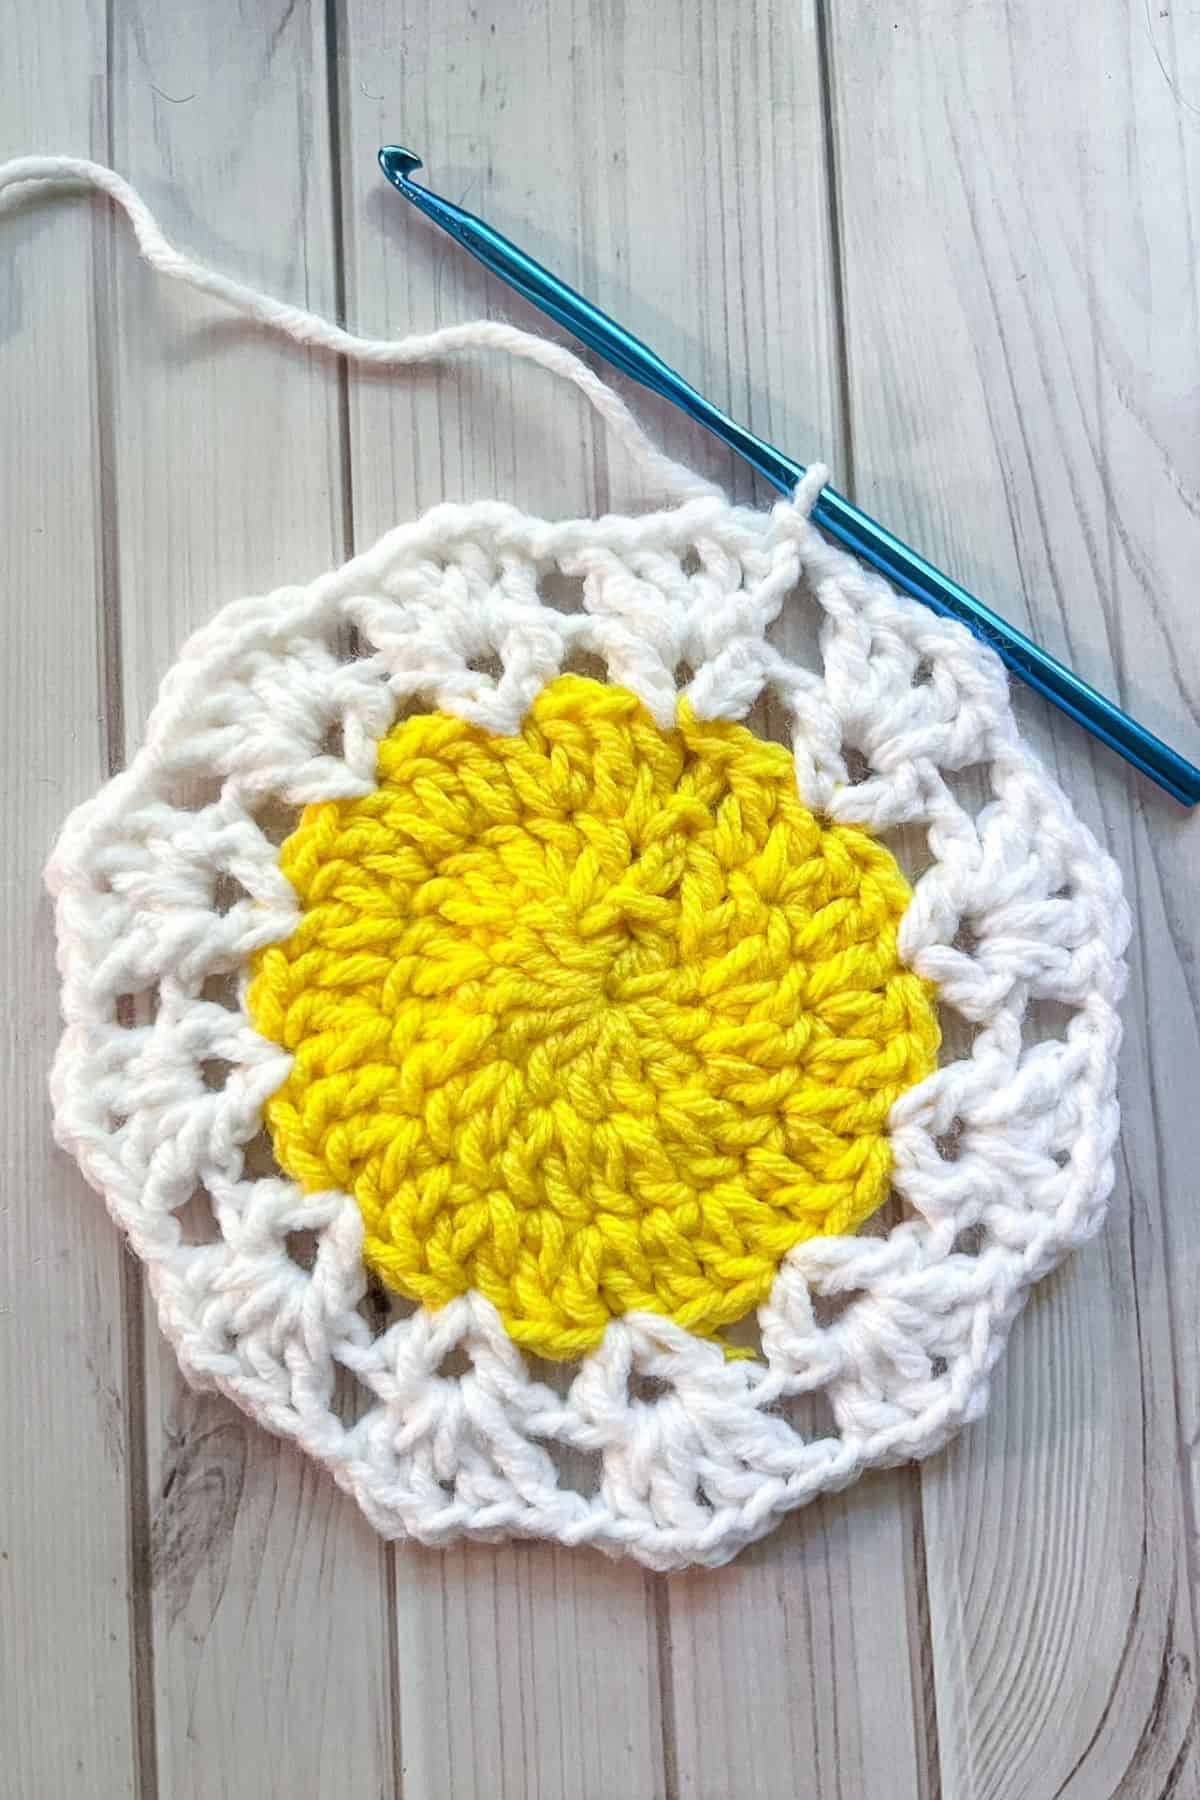
Round 5: Make a sl st into the ch x1 space (that 4th ch from the round before) as this will be your beginning point for this round. Ch x3 (counts as a dc), dc x1, ch x1, dc x2 into that ch space. Then ch x1, skip the next ch space and *(dc x2, ch x1, dc x2) into the next ch space (inside the v shape).
Next ch x1 and skip the next ch space. Repeat from * for the rest of the round. Sl st to the 3rd ch at the beginning to close the round (12 groups of ( 2 dc, ch 1, 2 dc)).
Round 6: Sl st into the dc and then the ch space in order to start this round. Then repeat round 5 (12 groups of ( 2 dc, ch 1, 2 dc)).
There might be some slight curling here- it should be completely flat after round 10.
Round 7: Sl st into the dc and then the ch space in order to start this round. Then ch x3, dc x2, ch x1, dc x3 into the ch space. Next ch x1, *skip the following ch space, and then in the ch space in the v shape - dc x3, ch x1, dc x3. Then ch x1. Repeat from * for the rest of the round. Sl st to the 3rd ch in the beginning (12 groups of ( 3 dc, ch 1, 3 dc)).
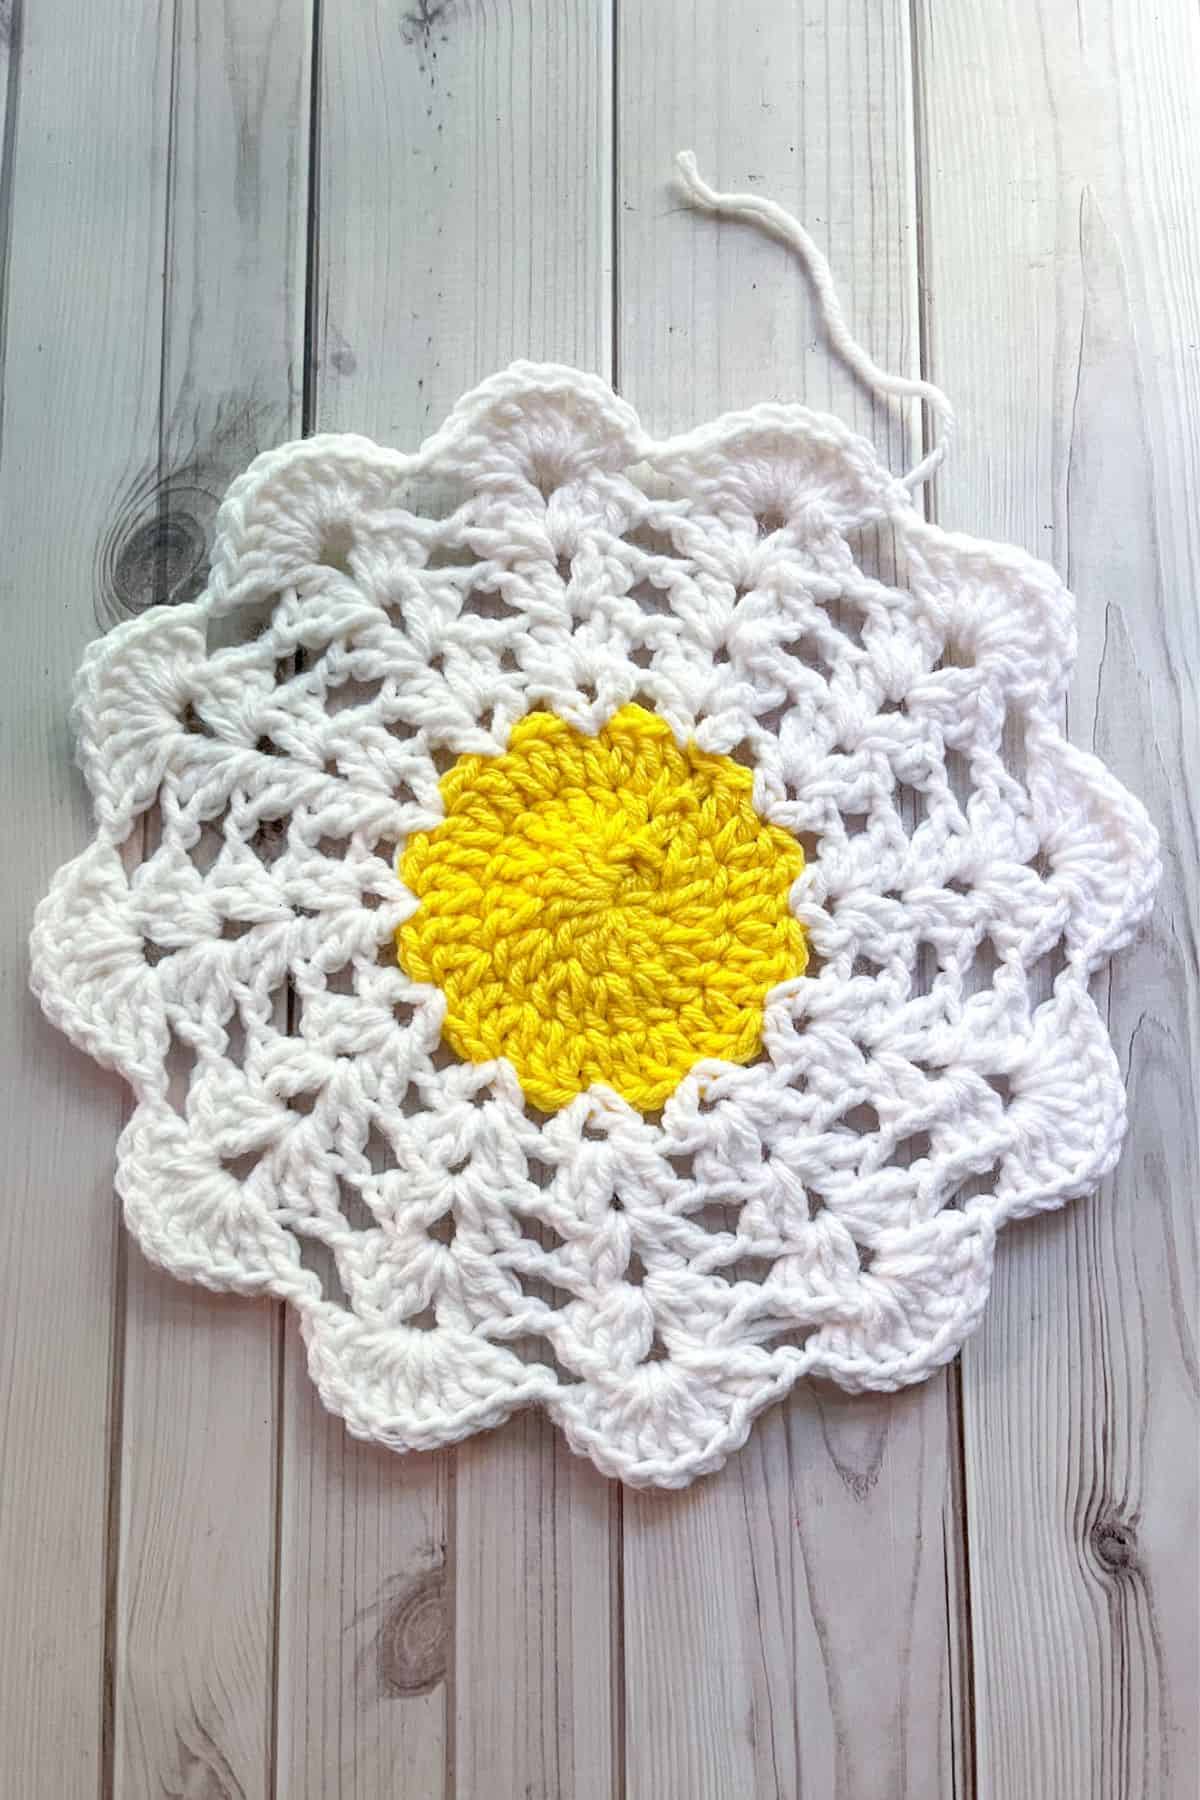
Round 8: Sl st into the dc stitches and then the ch space in order to start this round. Then ch x3 and dc x8. Ch x1 and then *skip the next ch space and dc x9 into the following ch space and then ch x1. Repeat from * for the rest of the round. Then sl st to the 3rd ch in the beginning (12 groups of (9 dc)).
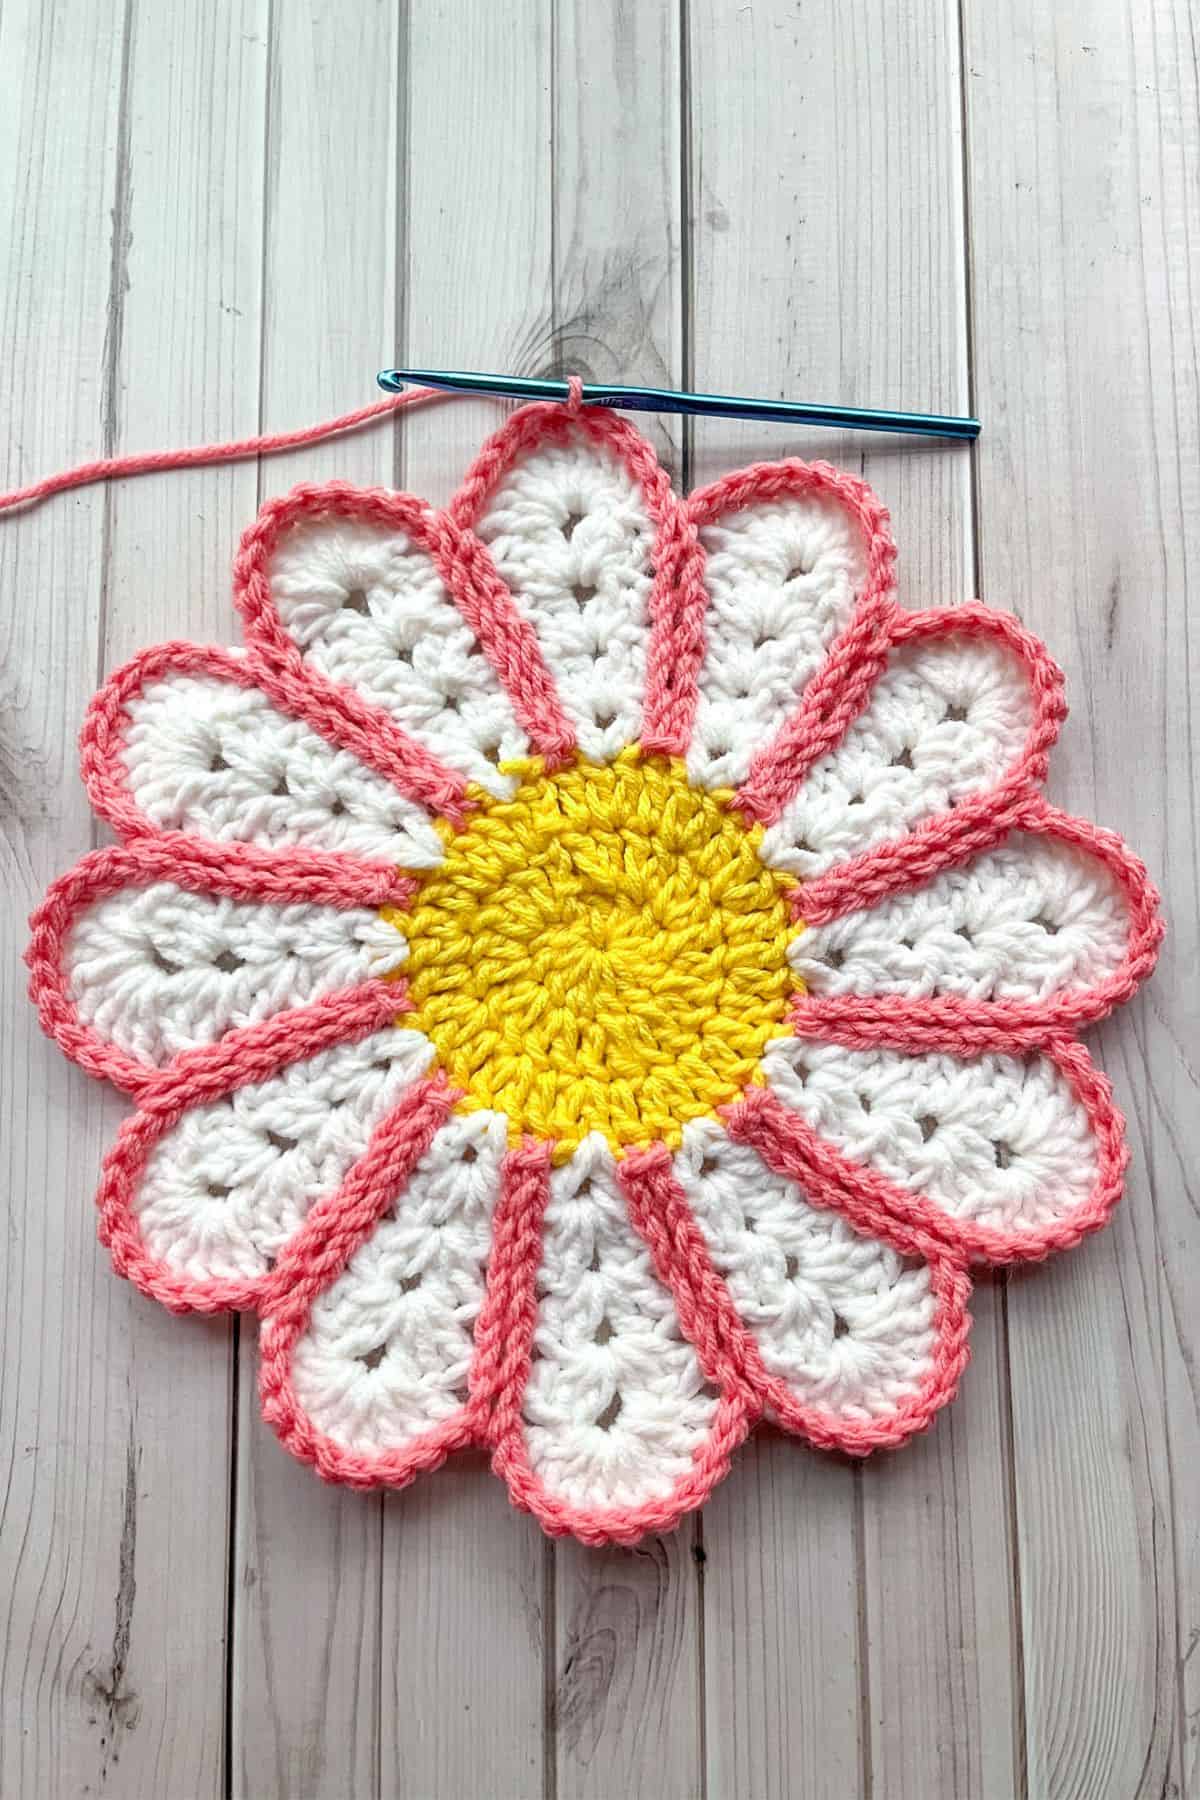
Fasten off the white and weave in the tail. The 9 dc shells are the top of our flower petals - there should be 12 of them.
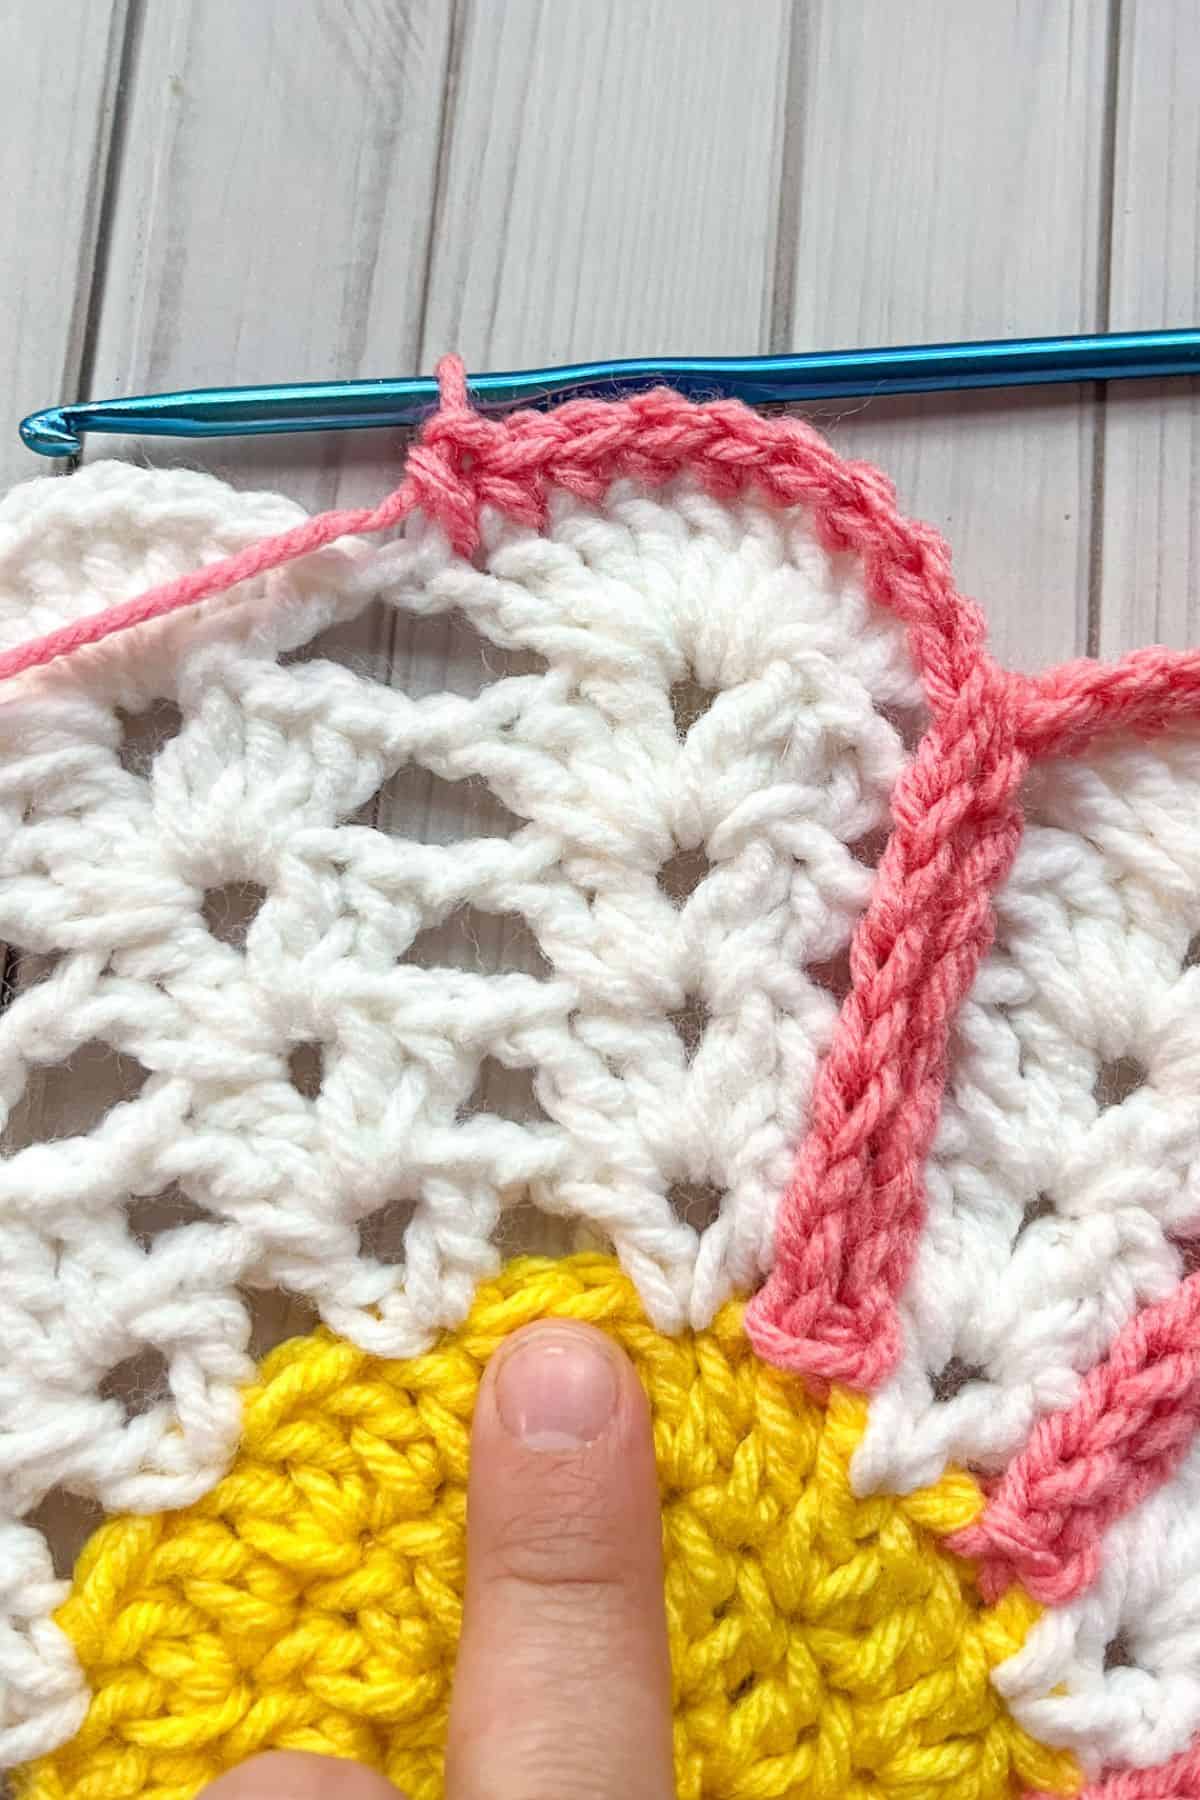
Round 9: Join your pink yarn to any 5th stitch of a 9 dc shell. Once the yarn is joined, ch x1(counts as a sc). Sc x4, THEN *sl st to the ch space, rotate your piece to a comfortable angle and ch x1.
Begin working downward toward the center of the flower: Sl st to the ch space in the round below, ch x1 and repeat until you reach the yellow stitches. Sl st to the unworked yellow stitch on the left, then make a sl st in the other unworked stitch next to it. Now work back up the petal: Keep alternating ch x1 and sl st until you reach round 8. (Make sure you are making these stitches alongside the stitches you made on the way down.) Once you reach round 8, make your final sl st into the ch x1 space.
Continue with 9 single crochets across the next 9-dc shell. Repeat from * around the entire round. Make the last 4 sc stitches needed in the last shell and then sl st to the ch x1 at the beginning - make sure you do not accidentally work in the previous rounds sl st.
(I do not have final counts for this round as it is tricky to determine what stitches to count. Just make sure you have 9 sc in each top of the flower petals.)
Round 10: This round we make our flower into a circle. Ch x1 then sc x1 into the same stitch you made the sl st in the previous round. Sc x1, hdc x1, dc x1 in the following stitches. *Dc2tog (dc dec) using the 9th sc of one petal and the 1st sc of the next petal. Dc x1, hdc x1, sc x1, inc x1, sc x1, hdc x1, dc x1 and repeat from * for the rest of the round. The last few stitches of the round should be a dc x1, hdc x1, sc x1, and then a sl st to the ch x1 from the beginning (108).
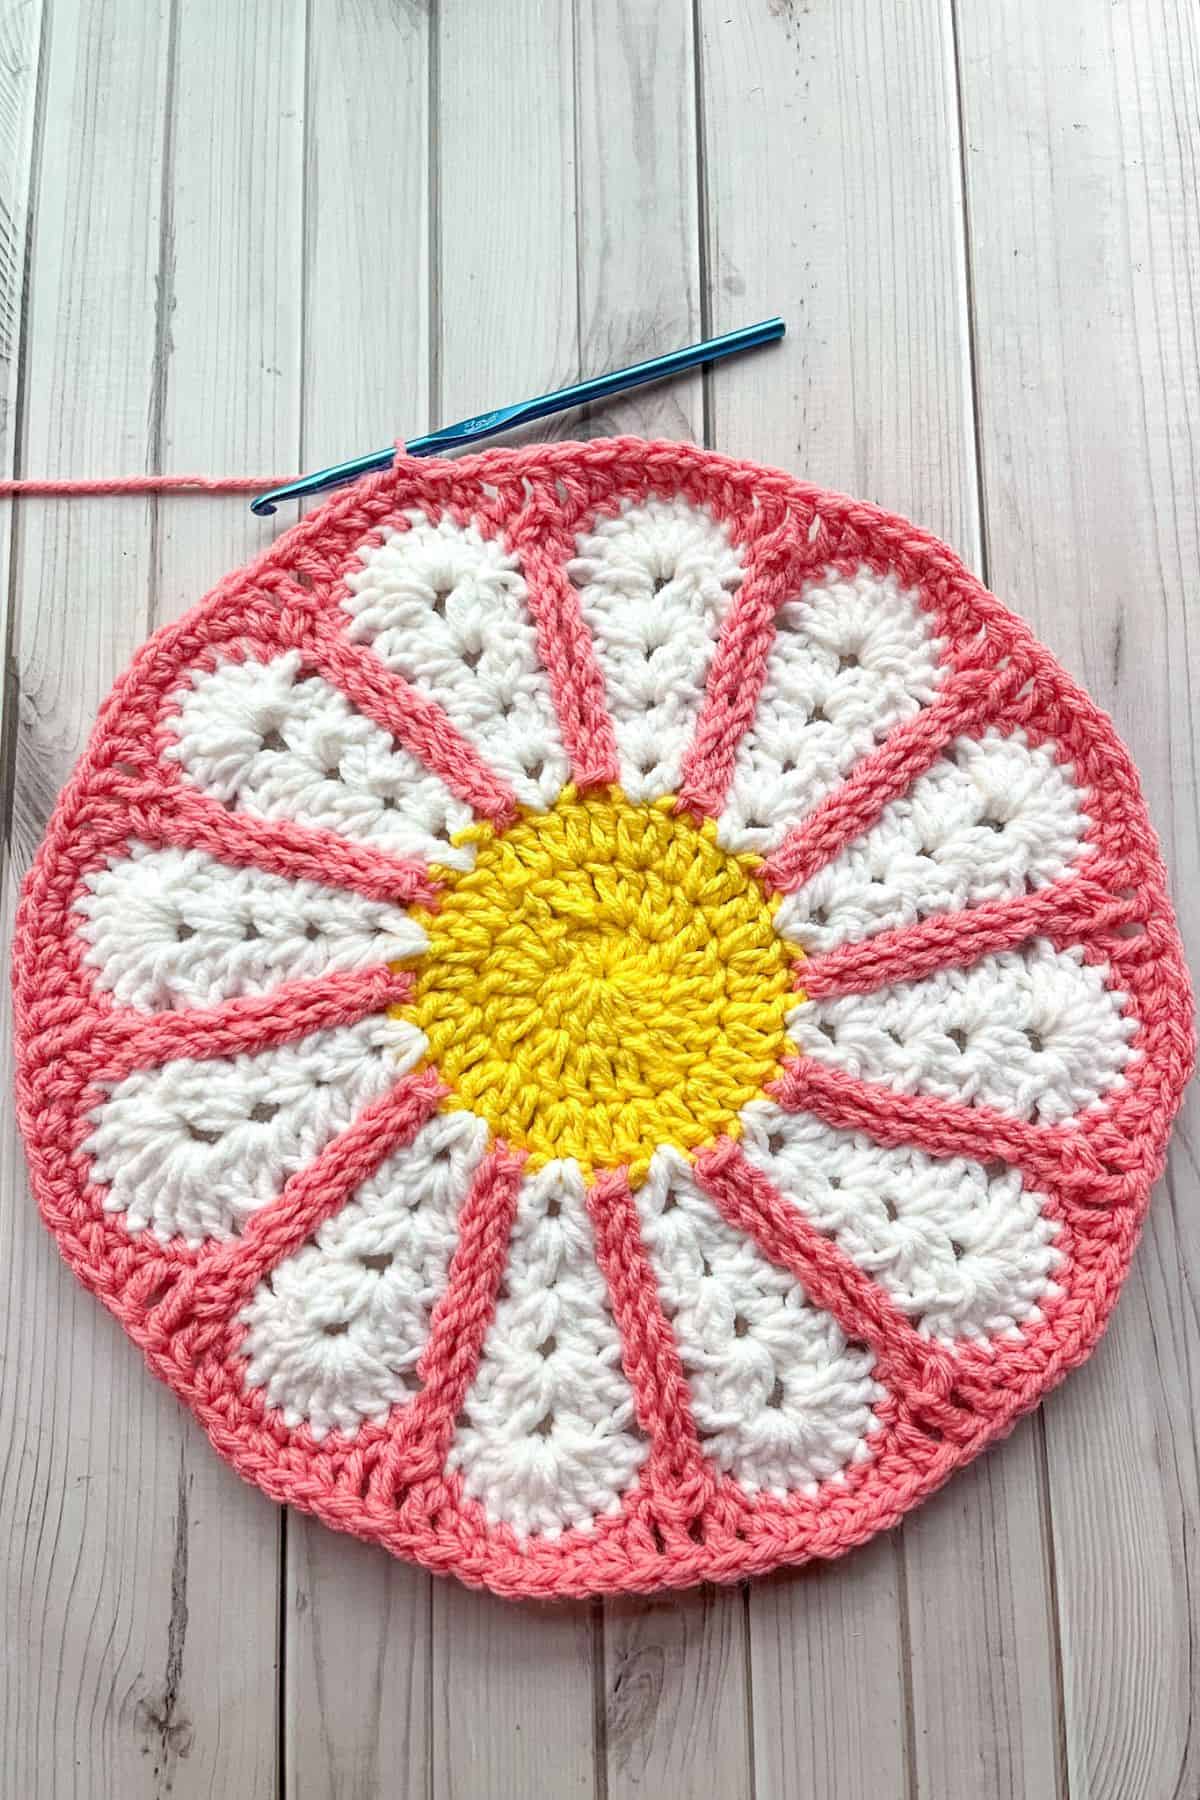
Round 11: Ch x4 + tr x1 into the same stitch you made the sl st, then ch x2 and in the next stitch tr x2. *Tr x1, dc x3, hdc x2, sc x13, hdc x2, dc x3, tr x1. Then make the corner in 2 stitches by doing tr x2, ch x2, and in the next stitch tr x2. The corner should be made in the sc increase from the round below. Repeat from * for the rest of the round. Sl st to the ch x4 at the beginning (116 + 4 ch x2 spaces).
Round 12: Make sl st into the top of the tr stitch and then the ch x2 space, this will be our starting point. Ch x4, tr x1, ch x2 and tr x2 into the ch space from the round below. * dc x5, hdc x2, sc x15, hdc x2, dc x5. Make a corner by making a tr x2, ch x2, and tr x2 into the ch x2 space from the round below. Repeat from * for the rest of the round. Sl st to the ch x4 at the beginning (132 + 4 ch x2 spaces).
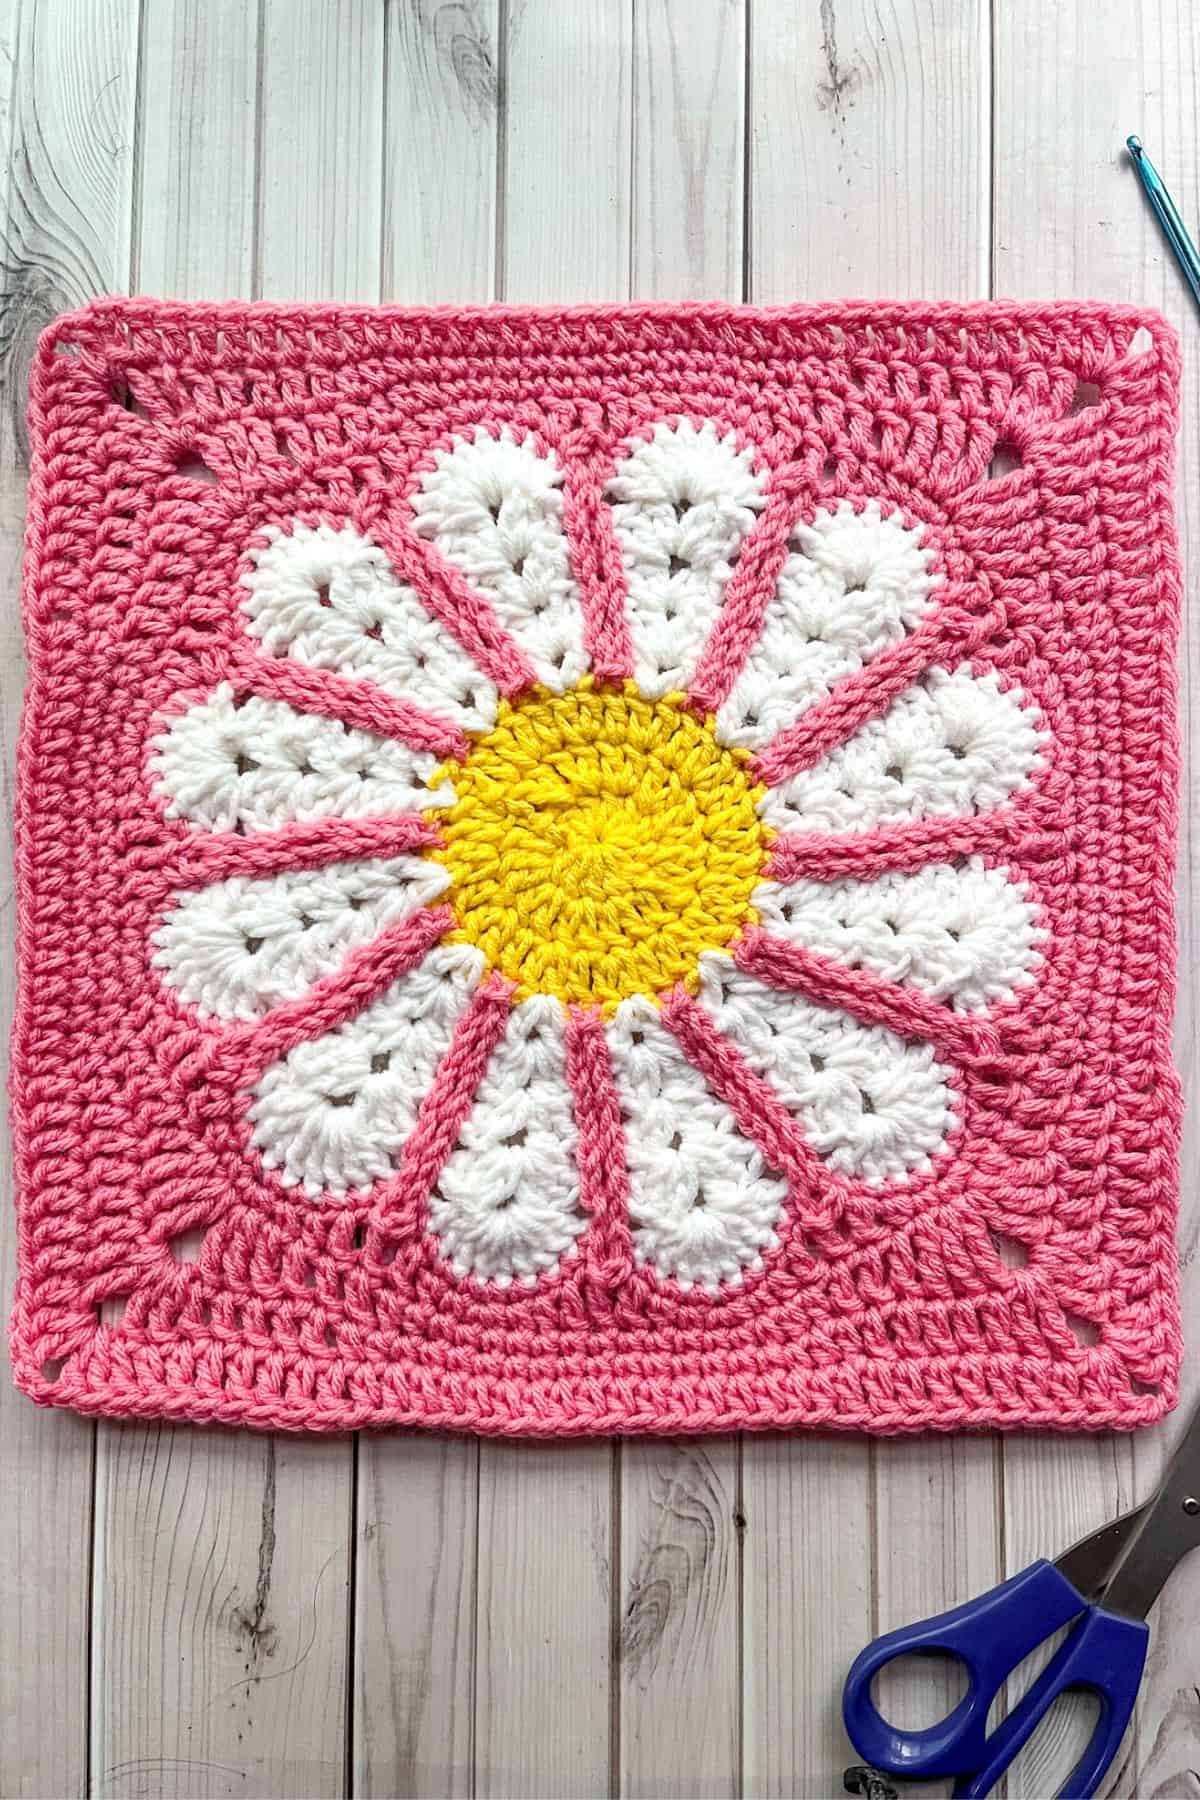
Round 13: Make sl st into the top of the tr stitch and then the ch x2 space, this will be our starting point. Ch x3, dc x1, ch x2, and dc x2 into the corner space. *Then dc x9, hdc x15, dc x9 and make a corner of dc x2, ch x2, dc x2 in the ch space. Repeat from * for the rest of the round. Sl st to the ch x3 at the beginning of the round. (148 + 4 ch x2 spaces). Fasten off and weave in any tails.
And that's the base of the daisy crochet blanket pattern!
Make x9 or more squares for your daisy crochet blanket.
Sewing:
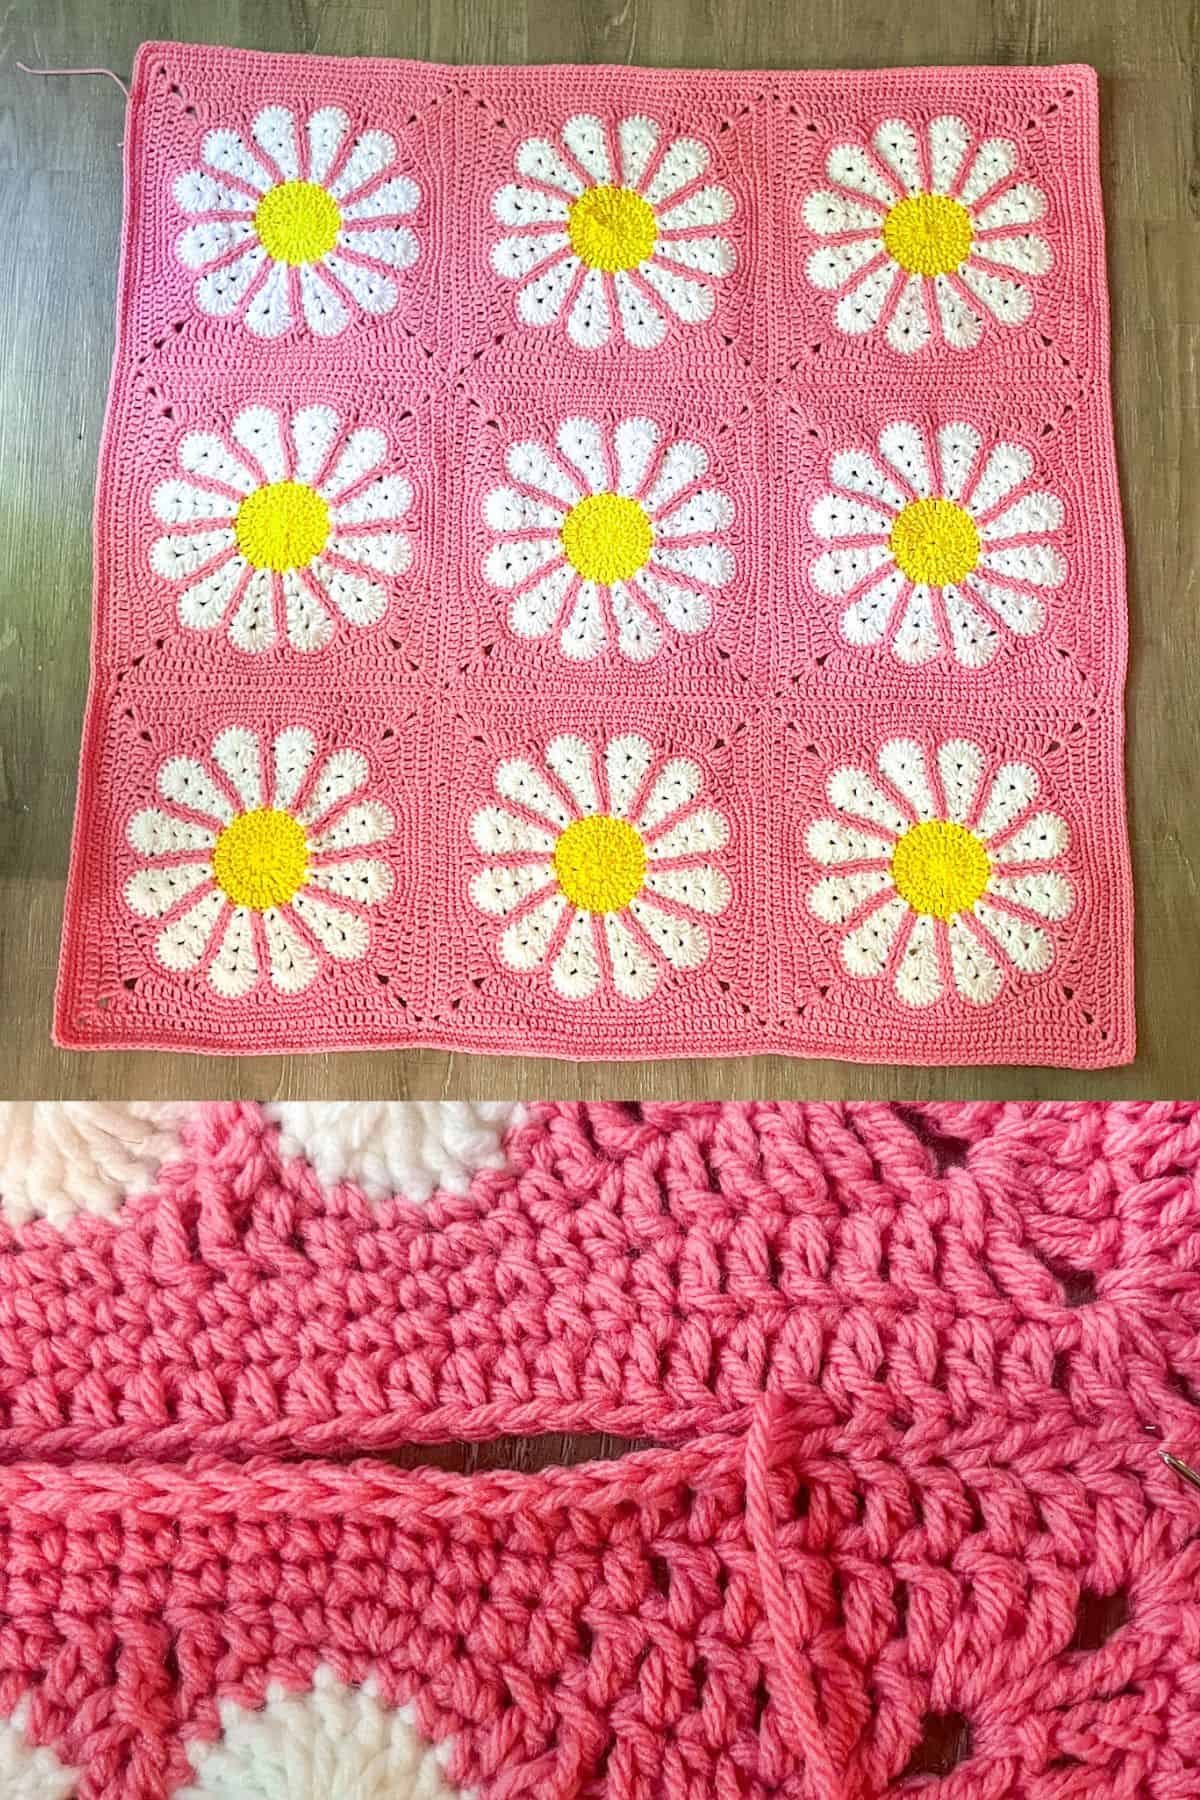
Once you have all the squares you need for your blanket, lay them out on a flat surface and then sew the squares together. As seen in the pictures I am just whip stitching the squares together. You can try this method or another method to sew the squares together. You can even crochet them together using slip stitches or single crochet.
Border:
Single crochets: Once the squares are all attached, you want to rejoin the pink yarn (anywhere is fine) and do 3 ROUNDS of sc around the blanket. This helps even out the blanket and create a nice sturdy base for the crochet pom pom border. For the corners sc x3. After 3 rounds fasten off the yarn and weave in the ends.
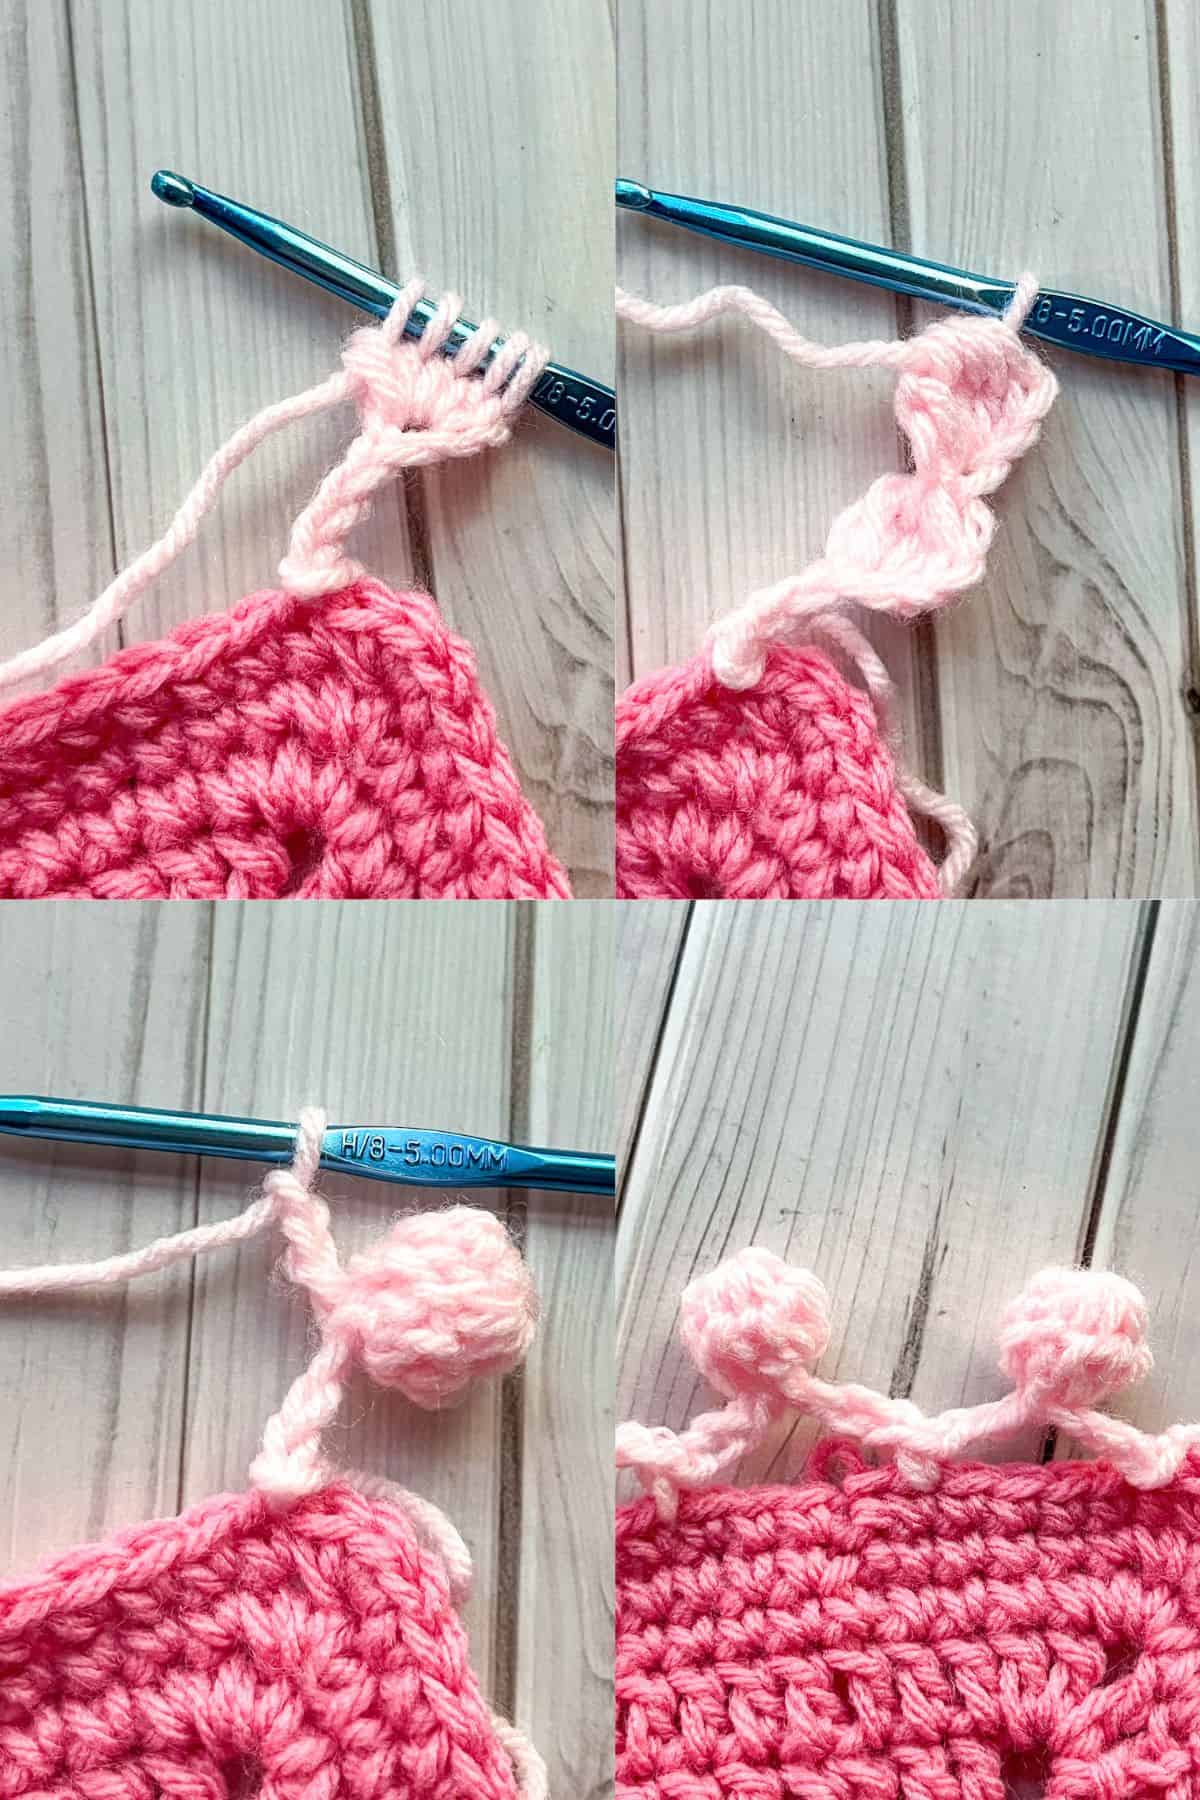
Pom Pom Border: Join the lighter pink yarn to any stitch from the last round and follow these instructions:
Ch x6 and in the 3rd chain from the hook, dc4tog (crochet a normal dc but instead of going through the last 2 loops on your hook you instantly make another dc and pull through 2 loops, so each time you make a dc you are gaining an extra loop on your hook). Keep making the half finished dc stitches until you have 5 loops on your hook. Then yarn over and go through all 5 loops.
Then ch x3.
In the 3rd chain from your hook, dc4tog again.
Fold the cluster of stitches over and sl st into the ch that you made your first group of dc’s in.
Then ch x3 again.
Now you want to skip 4 stitches and anchor the chain to the crochet edge with a sl st.
You have now successfully made your first pom pom. Repeat for the rest of the edge. Sl st to the beginning.
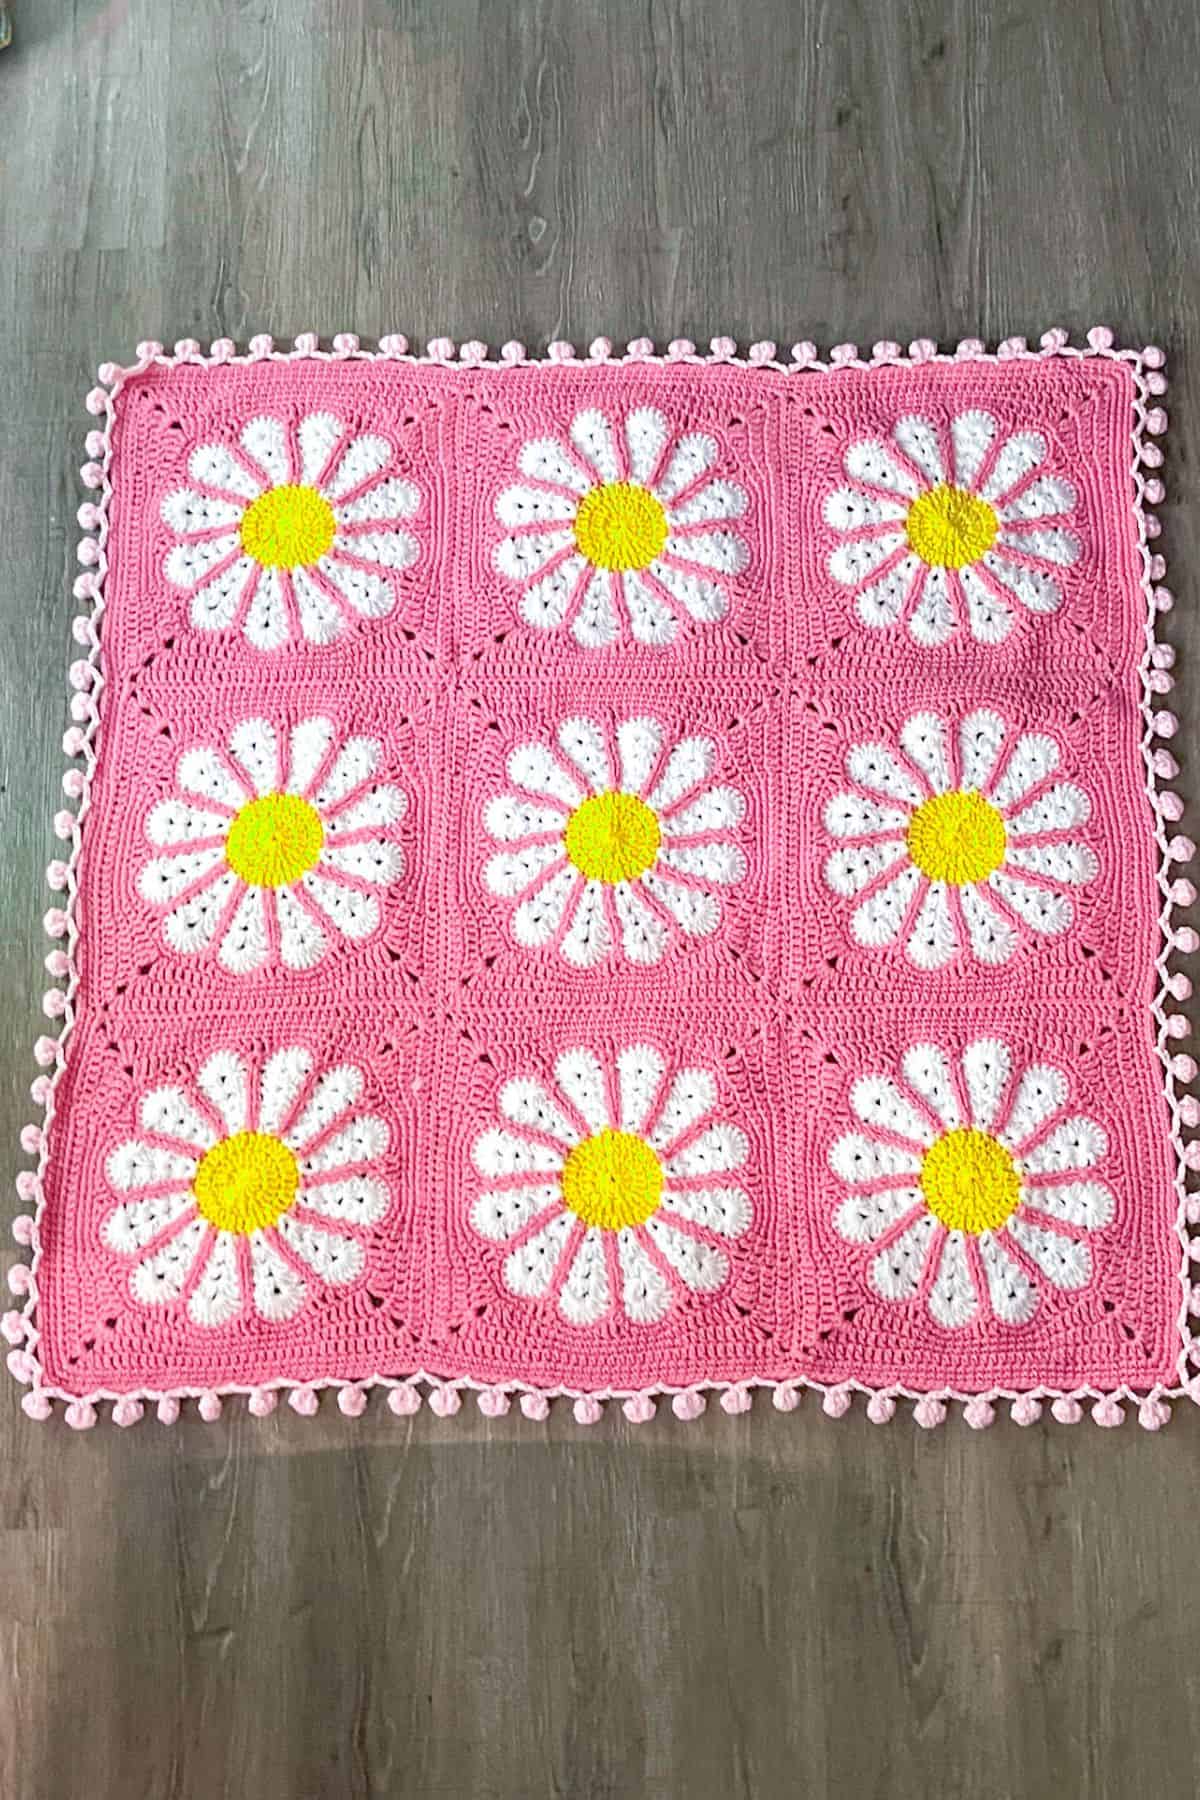
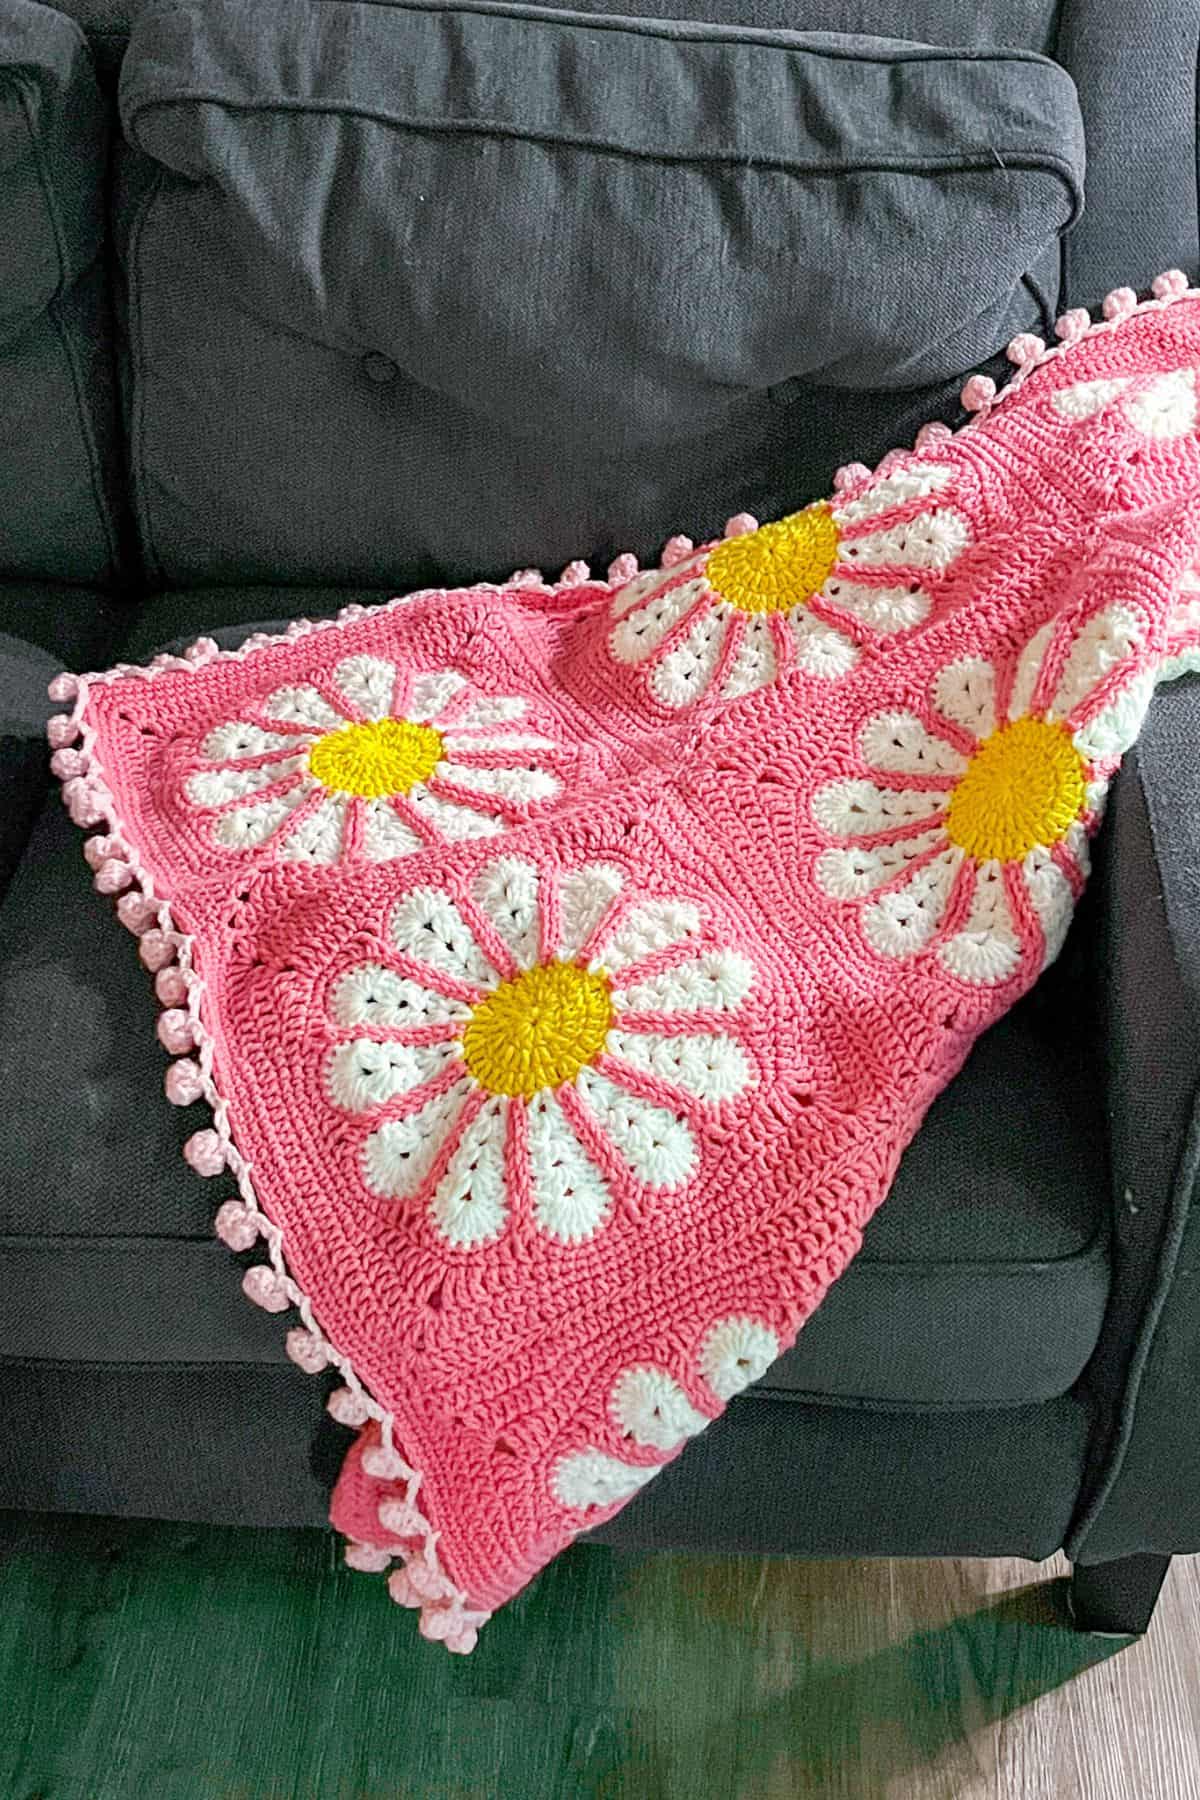
I hope you love making the daisy crochet blanket pattern as much as I loved designing it. It's the perfect blend of retro charm and modern ease — and best of all, minimal sewing!
Looking for more floral fun outside of my daisy crochet blanket pattern? Don’t miss my Crochet Daisy Coaster Pattern or my Crochet Flower Coaster with 6 Petals — perfect for quick, pretty projects.
Happy crocheting!
🐌Expert Tips
- It might curl at first — don’t panic!: The daisy crochet square may not lay flat during the early rounds, but by the time you finish Round 10, everything should settle beautifully.
- Count your stitches carefully: With so many petals and loops, it’s easy to miscount. Stitch markers can be your best friend here.
- Block your squares: Blocking helps your squares lay flat for the daisy crochet blanket pattern and makes seaming them much easier. Steam blocking works well for acrylic yarn.
🧵Pattern FAQs
Yes! If you know basic crochet stitches you’ll be fine. It looks more complicated than it is.
That depends on your desired size. For a baby blanket or lap blanket, 9 squares will be enough. A full-size throw might use 20 squares.
Absolutely! Just note that it may affect the final size and drape. I prefer acrylic for its durability and affordability.
🧶More Crochet Blanket Patterns

If you tried this Daisy Crochet Blanket Pattern (or any other pattern on my website), please let me know how it went in the 📝 comments below. I'd love to hear from you!
Daisy Crochet Blanket Pattern
Materials
Abbreviations (US terms)
- Magic ring - mr
- Chains - ch
- Slip stitch - sl st
- Decrease 2 together (dc2tog)
- Single crochet - sc
- Half double crochet - hdc
- Double crochet - dc
- Triple crochet - tr
- Increase - inc
Notes
- Time: Each square takes about an hour to complete. That might seem like a long time, but it does equal less sewing time so overall this pattern might be quicker for you to complete.
- Size: The finished square is approximately 12–13 inches across, making it perfect for quick blankets with fewer pieces to stitch together. I only needed 9 squares to complete my daisy crochet blanket pattern which is roughly 40” x 40”.
- Beginner friendly: The crochet daisy square design may look intricate, but it’s super easy as long as you know foundational crochet stitches — the most challenging part is just counting your stitches.
Instructions
- The square for the daisy crochet blanket pattern is made in the round.
- Round 1: Using the yellow yarn, make a mr and immediately ch x3 (counts as a dc). Then dc x11 into the mr. Pull tight and to secure the round, sl st to the beginning chains in the round (12).
- Round 2: Ch x3, then dc into the sl st. Next, inc in every stitch from the previous round. Then sl st to the beginning chains (24).
- Round 3: Ch x3, then dc into the sl st. *Dc into the next stitch then an inc in the following stitch. Repeat from * for the rest of the round. Then sl st to the beginning chains in the round (36). Fasten off the yellow yarn and join the white.
- Round 4: Ch x4 (counts as a dc + ch), dc into the sl st you made to join the round. Then ch x1 and *skip 2 dc, (dc x1, ch x1, dc x1) into the next stitch. Next ch x1. Repeat from * for the rest of the round. Once you are done with the round, sl st to the 3rd ch you made at the beginning (12 groups of (1dc, ch 1, 1 dc)).
- Round 5: Make a sl st into the ch x1 space (that 4th ch from the round before) as this will be your beginning point for this round. Ch x3 (counts as a dc), dc x1, ch x1, dc x2 into that ch space. Then ch x1, skip the next ch space and *(dc x2, ch x1, dc x2) into the next ch space (inside the v shape). Next ch x1 and skip the next ch space. Repeat from * for the rest of the round. Sl st to the 3rd ch at the beginning to close the round (12 groups of ( 2 dc, ch 1, 2 dc)).
- Round 6: Sl st into the dc and then the ch space in order to start this round. Then repeat round 5 (12 groups of ( 2 dc, ch 1, 2 dc)).
- There might be some slight curling here- it should be completely flat after round 10.
- Round 7: Sl st into the dc and then the ch space in order to start this round. Then ch x3, dc x2, ch x1, dc x3 into the ch space. Next ch x1, *skip the following ch space, and then in the ch space in the v shape - dc x3, ch x1, dc x3. Then ch x1. Repeat from * for the rest of the round. Sl st to the 3rd ch in the beginning (12 groups of ( 3 dc, ch 1, 3 dc)).
- Round 8: Sl st into the dc stitches and then the ch space in order to start this round. Then ch x3 and dc x8. Ch x1 and then *skip the next ch space and dc x9 into the following ch space and then ch x1. Repeat from * for the rest of the round. Then sl st to the 3rd ch in the beginning (12 groups of ( 9 dc). Fasten off the white and weave in the tail. The 9 dc shells are the top of our flower petals - there should be 12 of them.
- Round 9: Join your pink yarn to any 5th stitch of a 9 dc shell. Once the yarn is joined, ch x1(counts as a sc). Sc x4, THEN *sl st to the ch space, rotate your piece to a comfortable angle and ch x1. Begin working downward toward the center of the flower: Sl st to the ch space in the round below, ch x1 and repeat until you reach the yellow stitches. Sl st to the unworked yellow stitch on the left, then make a sl st in the other unworked stitch next to it. Now work back up the petal: Keep alternating ch x1 and sl st until you reach round 8. (Make sure you are making these stitches alongside the stitches you made on the way down.) Once you reach round 8, make your final sl st into the ch x1 space.
- Continue with 9 single crochets across the next 9-dc shell. Repeat from * around the entire round. Make the last 4 sc stitches needed in the last shell and then sl st to the ch x1 at the beginning - make sure you do not accidentally work in the previous rounds sl st.
- (I do not have final counts for this round as it is tricky to determine what stitches to count. Just make sure you have 9 sc in each top of the flower petals.)
- Round 10: This round we make our flower into a circle. Ch x1 then sc x1 into the same stitch you made the sl st in the previous round. Sc x1, hdc x1, dc x1 in the following stitches. *Dc2tog (dc dec) using the 9th sc of one petal and the 1st sc of the next petal. Dc x1, hdc x1, sc x1, inc x1, sc x1, hdc x1, dc x1 and repeat from * for the rest of the round. The last few stitches of the round should be a dc x1, hdc x1, sc x1, and then a sl st to the ch x1 from the beginning (108).
- Round 11: Ch x4 + tr x1 into the same stitch you made the sl st, then ch x2 and in the next stitch tr x2. *Tr x1, dc x3, hdc x2, sc x13, hdc x2, dc x3, tr x1. Then make the corner in 2 stitches by doing tr x2, ch x2, and in the next stitch tr x2. The corner should be made in the sc increase from the round below. Repeat from * for the rest of the round. Sl st to the ch x4 at the beginning (116 + 4 ch x2 spaces).
- Round 12: Make sl st into the top of the tr stitch and then the ch x2 space, this will be our starting point. Ch x4, tr x1, ch x2 and tr x2 into the ch space from the round below. * dc x5, hdc x2, sc x15, hdc x2, dc x5. Make a corner by making a tr x2, ch x2, and tr x2 into the ch x2 space from the round below. Repeat from * for the rest of the round. Sl st to the ch x4 at the beginning (132 + 4 ch x2 spaces).
- Round 13: Make sl st into the top of the tr stitch and then the ch x2 space, this will be our starting point. Ch x3, dc x1, ch x2, and dc x2 into the corner space. *Then dc x9, hdc x15, dc x9 and make a corner of dc x2, ch x2, dc x2 in the ch space. Repeat from * for the rest of the round. Sl st to the ch x3 at the beginning of the round. (148 + 4 ch x2 spaces). Fasten off and weave in any tails.And that's the basis of the daisy crochet blanket pattern!
- Make x9 or more squares for your blanket.
- Sewing: Once you have all the squares you need for your blanket, lay them out on a flat surface and then sew the squares together. As seen in the pictures I am just whip stitching the squares together. You can try this method or another method to sew the squares together. You can even crochet them together using slip stitches or single crochet.
Border:
- Single crochets: Once the squares are all attached, you want to rejoin the pink yarn (anywhere is fine) and do 3 ROUNDS of sc around the blanket. This helps even out the blanket and create a nice sturdy base for the crochet pom pom border. For the corners sc x3. After 3 round fasten off the yarn and weave in the ends.
- Pom Pom Border: Join the lighter pink yarn to any stitch from the last round and follow these instructions:
- Ch x6 and in the 3rd chain from the hook, dc4tog (crochet a normal dc but instead of going through the last 2 loops on your hook you instantly make another dc and pull through 2 loops, so each time you make a dc you are gaining an extra loop on your hook). Keep making the half finished dc stitches until you have 5 loops on your hook. Then yarn over and go through all 5 loops.
- Then ch x3.
- In the 3rd chain from your hook, dc4tog again.
- Fold the cluster of stitches over and sl st into the ch that you made your first group of dc’s in.
- Then ch x3 again.
- Now you want to skip 4 stitches and anchor the chain to the crochet edge with a sl st.
- You have now successfully made your first pom pom. Repeat for the rest of the edge. Sl st to the beginning.
- I hope you love making the daisy crochet blanket pattern as much as I loved designing it. It's the perfect blend of retro charm and modern ease — and best of all, minimal sewing!


Leave a Reply