
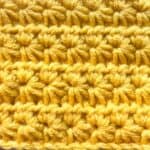
Welcome to my Daisy Stitch Crochet Tutorial! If you’re looking for a stitch that looks intricate and beautiful but is surprisingly simple to master, the Daisy Stitch Crochet is perfect for you.

This gorgeous stitch is often referred to as the Marguerite Crochet Stitch or even the Crochet Star Stitch—but don’t let the fancy names fool you! The Crochet Daisy Stitch is actually a 2-row repeat, making it super easy to track where you are in the pattern. Whether you're a beginner or an experienced crocheter, this stitch will quickly become a favorite in your collection.
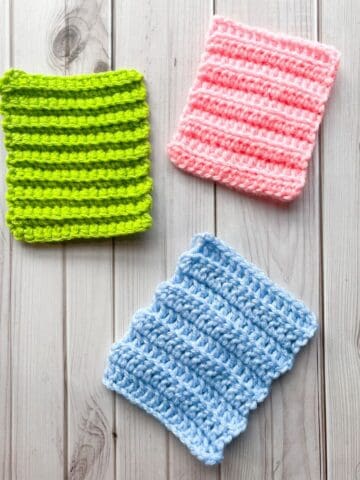
The Crochet Daisy Stitch Pattern is incredibly versatile, making it ideal for blankets, scarves, and all sorts of cozy projects. Want to add a little extra flair? You can easily alternate with other stitches, like half double crochet or even the whimsical bobble stitch, to give the design even more texture and visual complexity.
I personally used this stitch in my Crochet Star Stitch Scarf Pattern, and I’m sure you’ll fall in love with it too! And if you’re ready for more fun, check out my tutorials for the Crochet Suzette Stitch, Crochet Rice Stitch, and the delicate Crochet Iris Stitch.
Ready to get started? Let’s dive into how to crochet the daisy stitch and make your next project absolutely stunning!
Jump to:
✏️ Things To Note:
- Starting Chain: Make sure your starting chain is an odd number. This ensures that the daisy stitch crochet pattern will align correctly and you’ll have a beautiful, symmetrical design as you crochet.
- Watch for the Slant: The Daisy Stitch (or Crochet Star Stitch) can sometimes create a slight slant in your project. To avoid this, double-check that you’re placing the star stitch in the correct spots as you work. Keeping track of where each stitch goes will help maintain the stitch’s neat, consistent look and prevent any unintended slanting.
- Skill Level: The crochet daisy stitch is considered intermediate. It’s perfect for crocheters who are comfortable with basic stitches and are ready to try something a little more intricate. Don’t worry—once you get the hang of the 2-row repeat, it’ll be smooth sailing!
🪡 Materials Needed
- Any yarn
- 6.5mm hook
- Tapestry needle
💭Abbreviations to Remember (US terms)
- Chains (ch)
- Half double crochet (hdc)
🧋Variations
- Change the Yarn: Experiment with different yarn weights and types to change the look and feel of the stitch. For example:
- Use lightweight yarn for a more delicate, airy feel.
- Use bulky yarn for a cozier, thicker texture that's perfect for blankets or winter scarves.
- Color Variations: Create a beautiful ombré effect or use contrasting colors to highlight each "star" in the Crochet Star Stitch. You can even try color blocking or striping for a more modern twist.
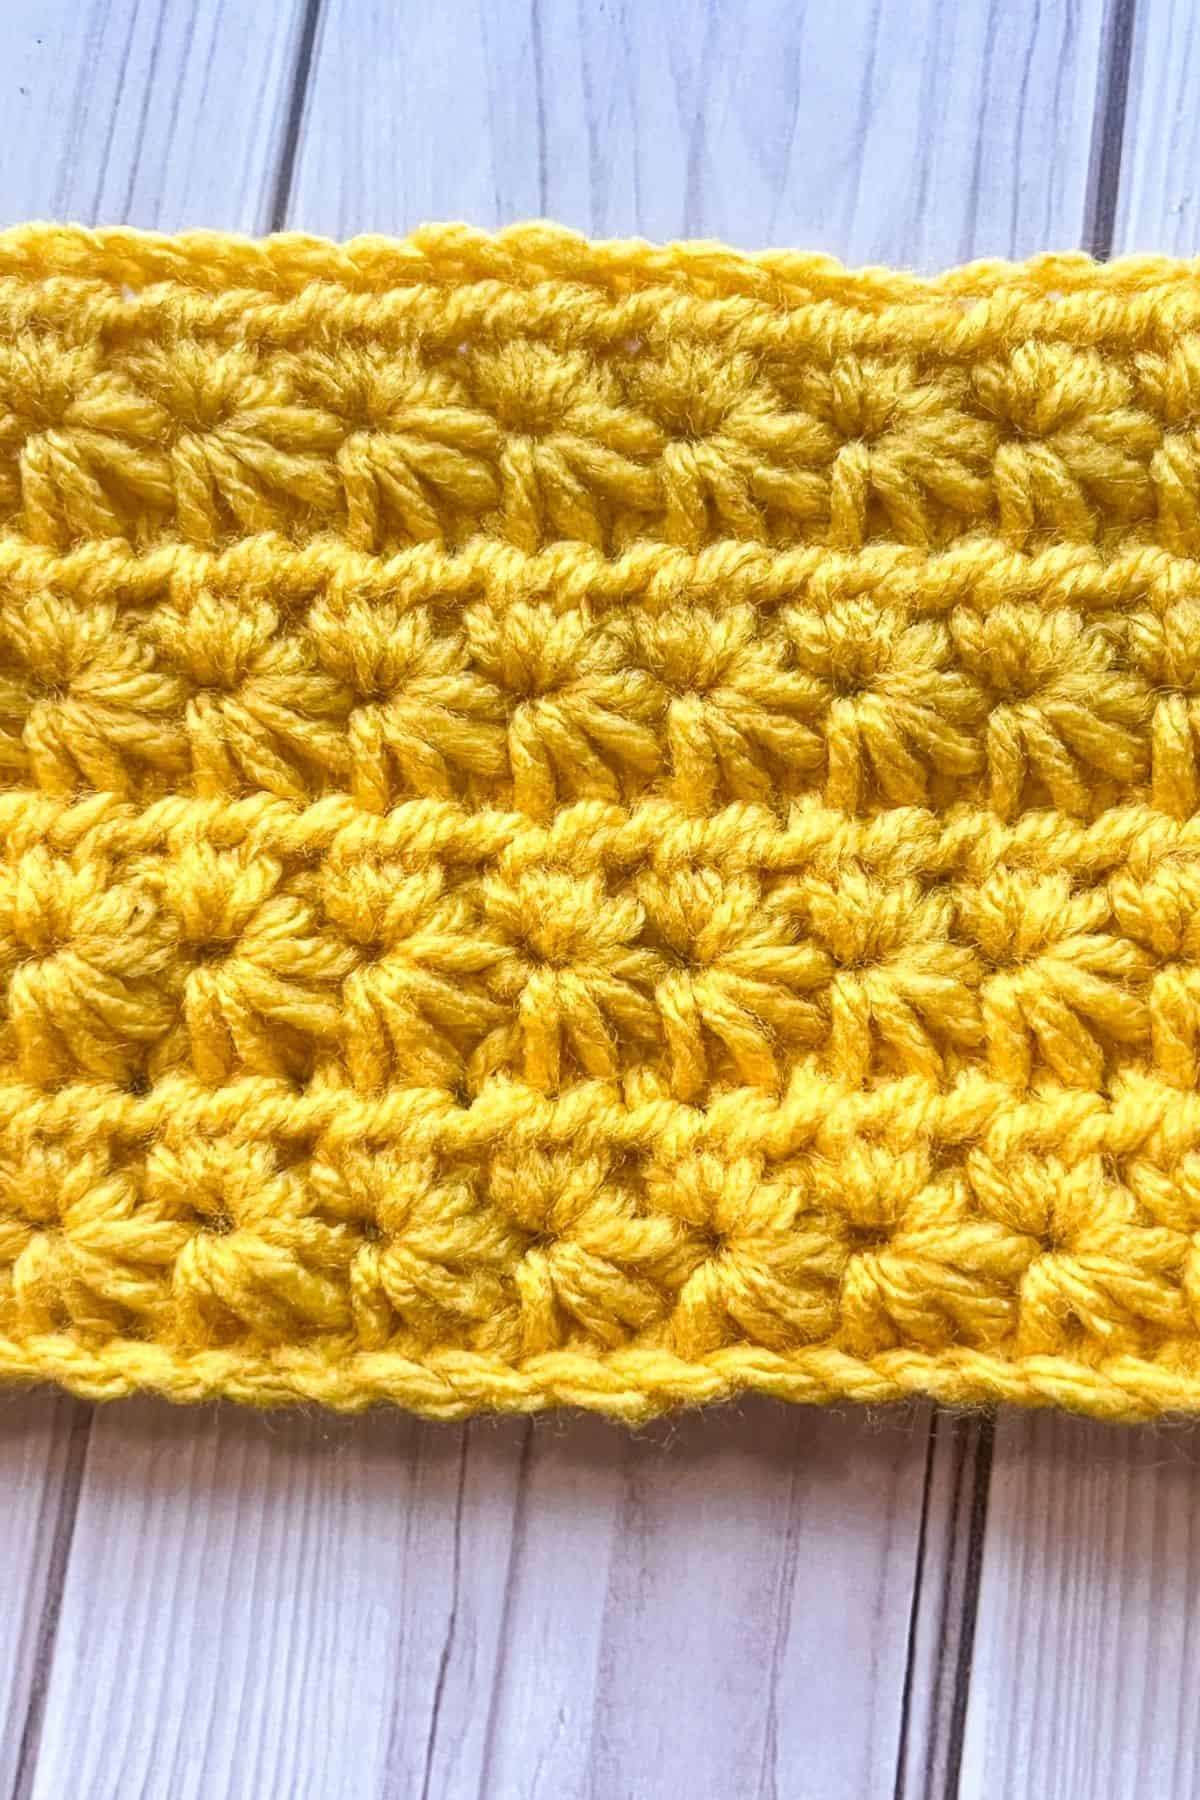
🍵Instructions for Daisy Stitch Crochet Tutorial
For the daisy stitch crochet tutorial, we will be working in the rows.

Row 1: Ch x29 (or more chains if making a larger project as this is just a stitch swatch, just make sure it's an ODD amount of chains).
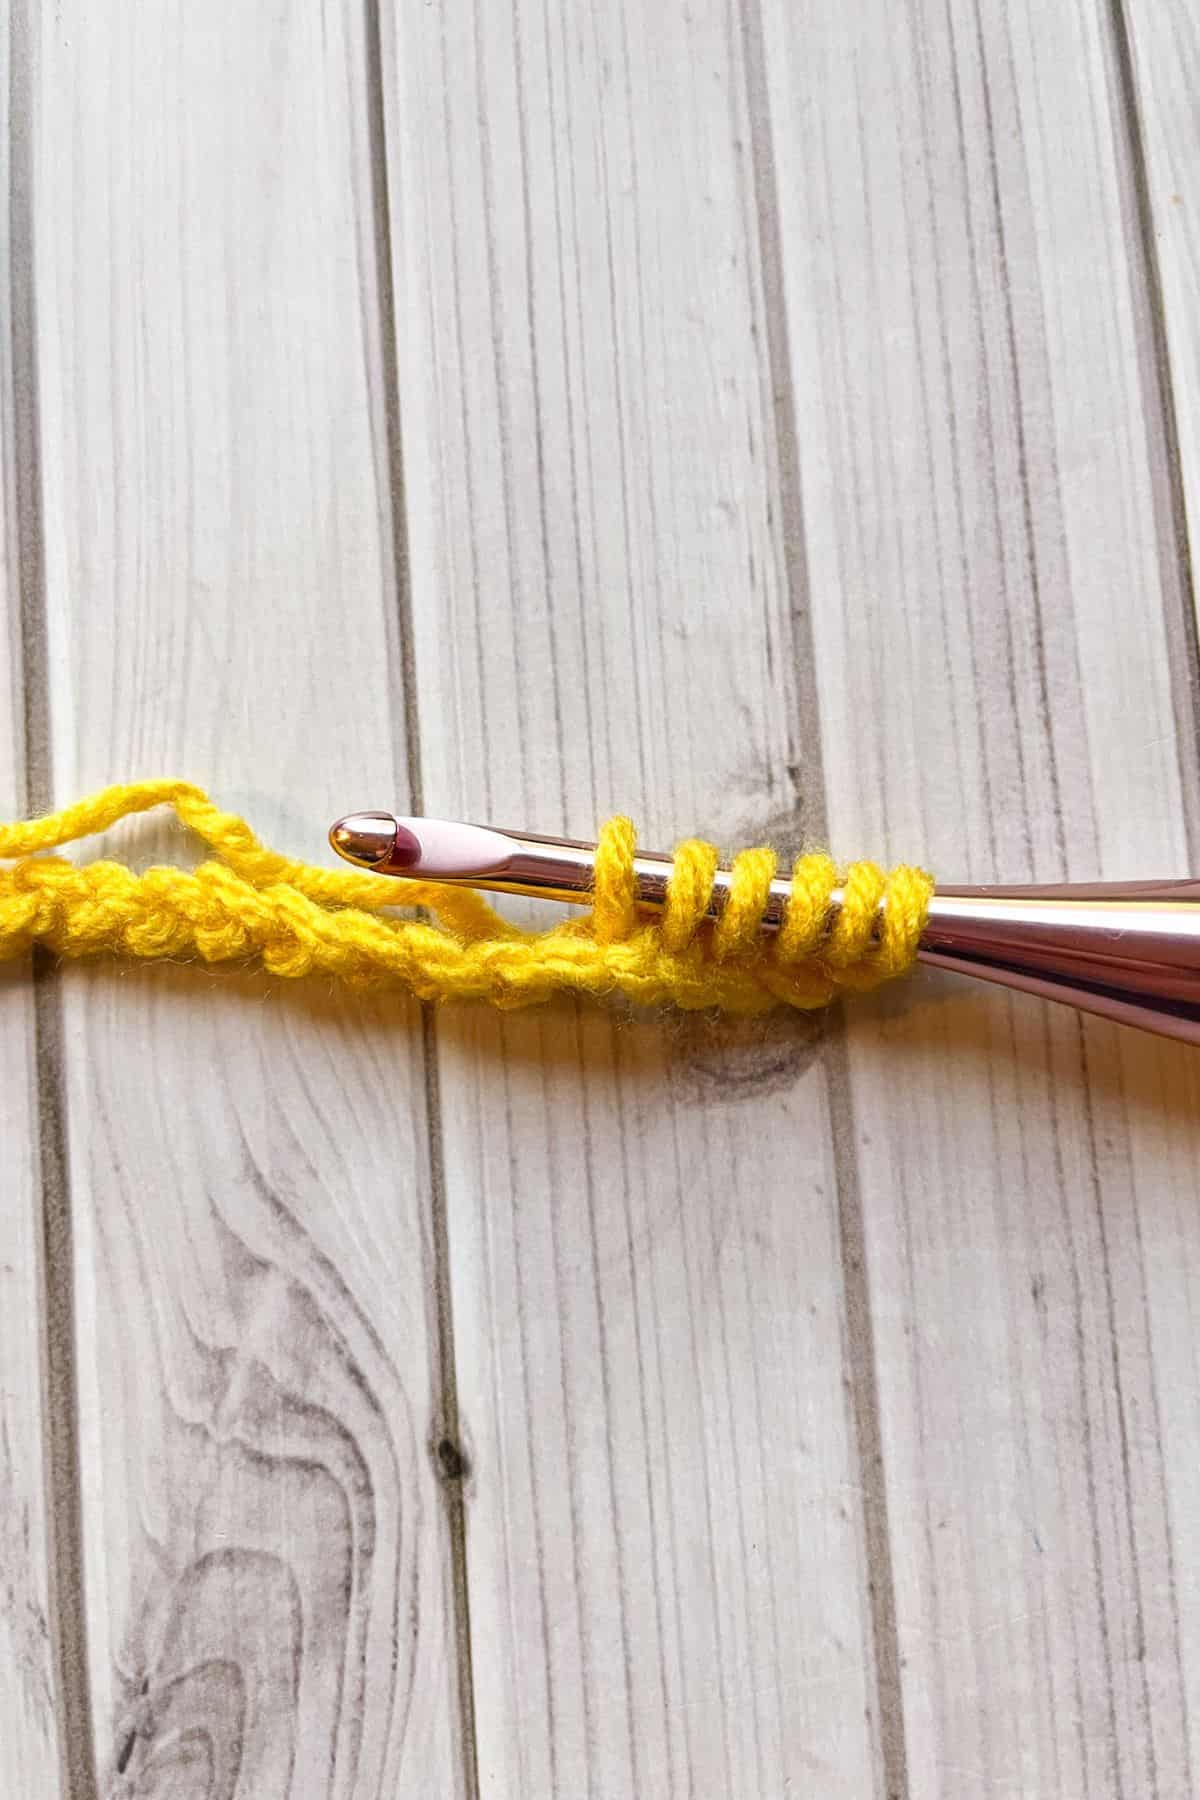
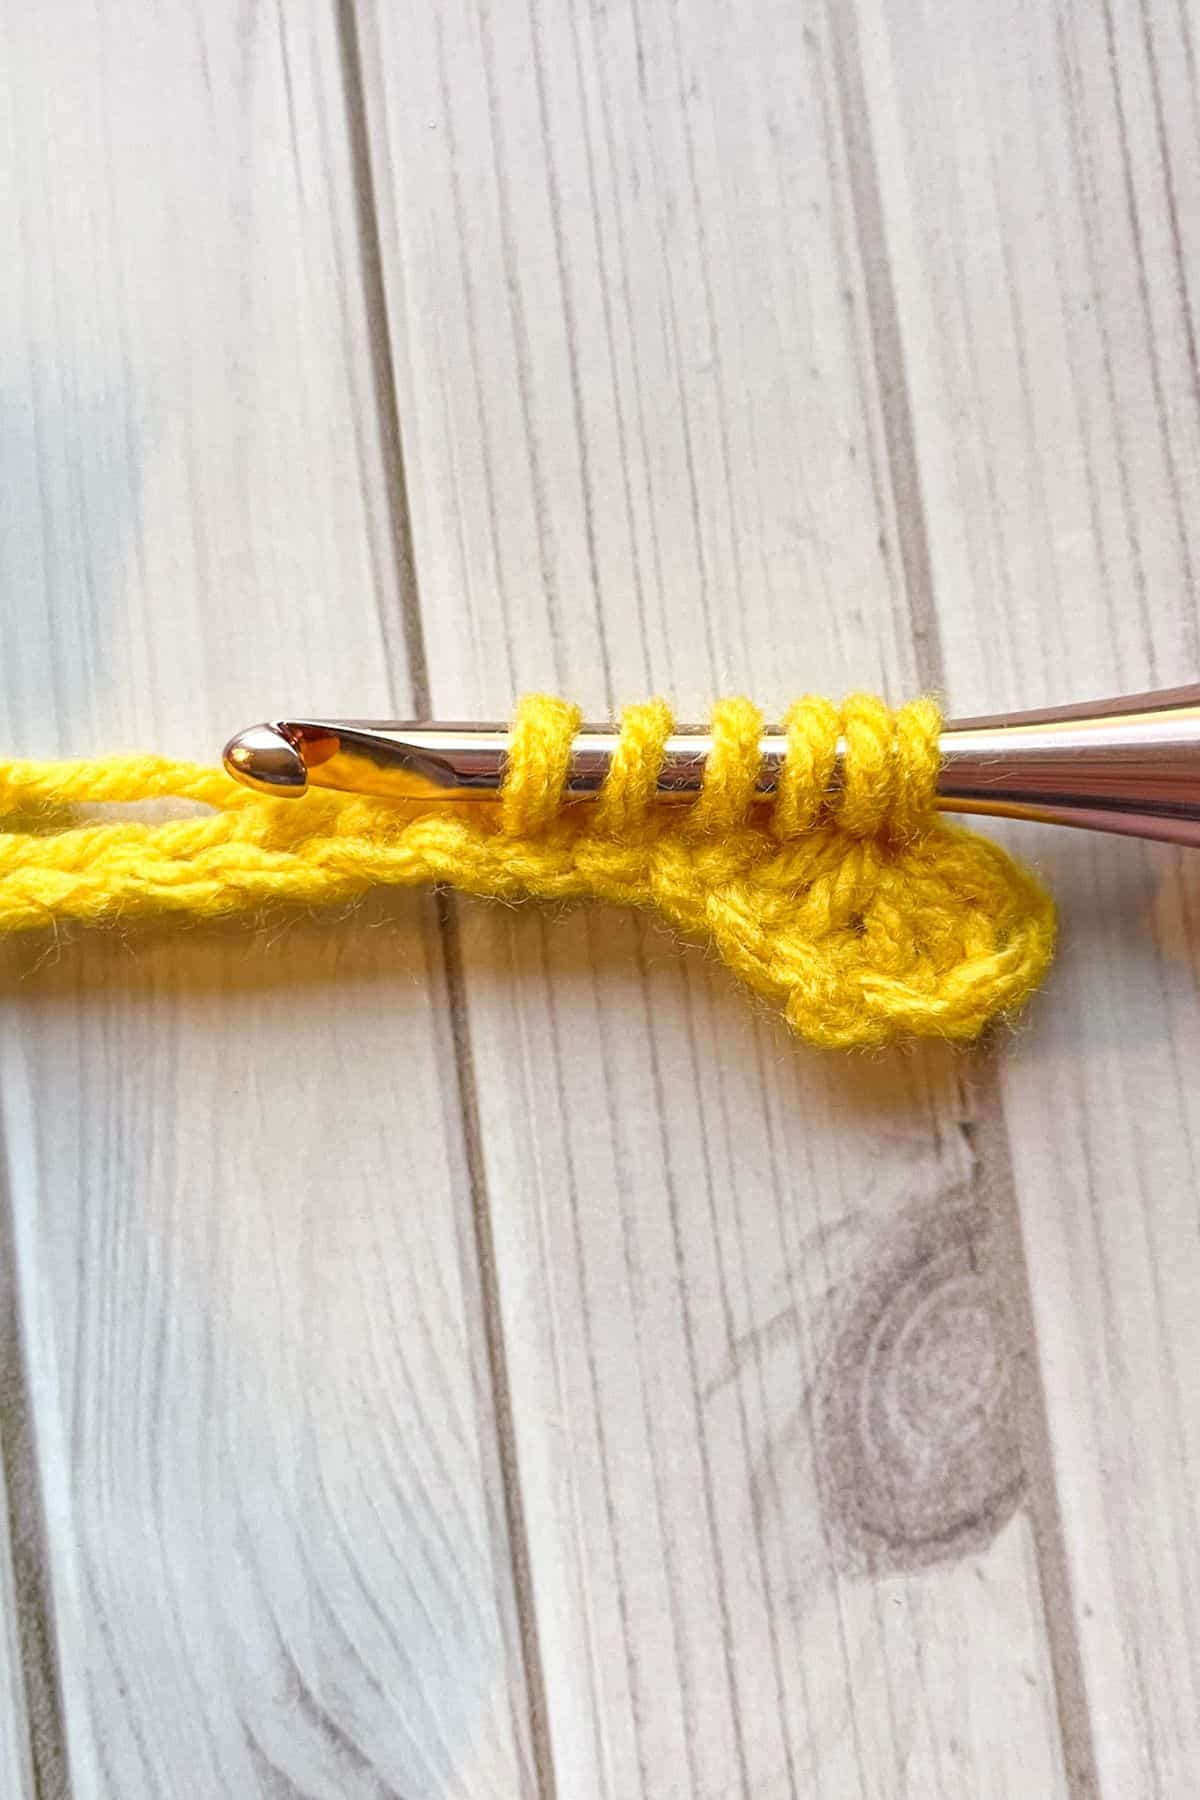
Row 2: Start by inserting your hook into the second chain from the hook. Yarn over and pull up a loop. Then, insert your hook into the next chain, yarn over, and pull through. You should now have three loops on your hook. Repeat this for the next three chains until you have six loops on the hook.
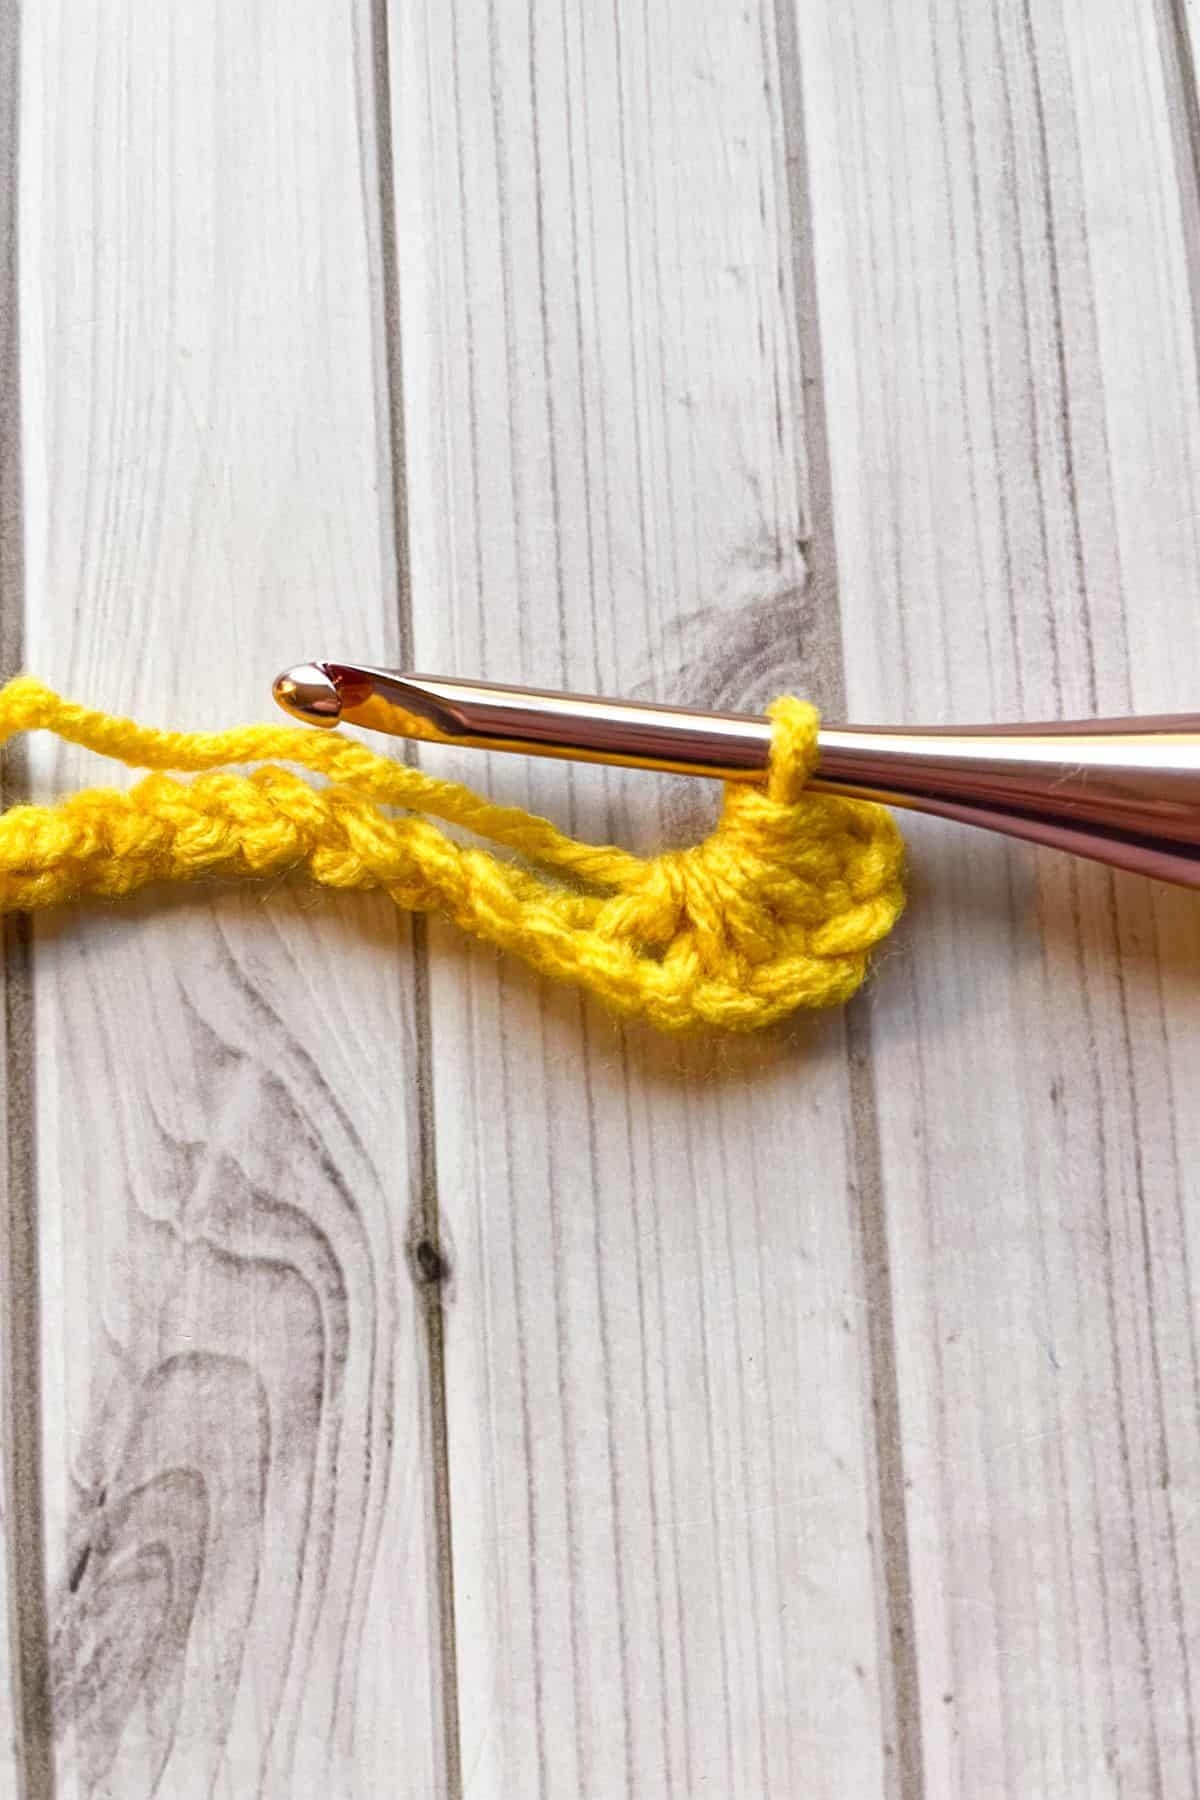
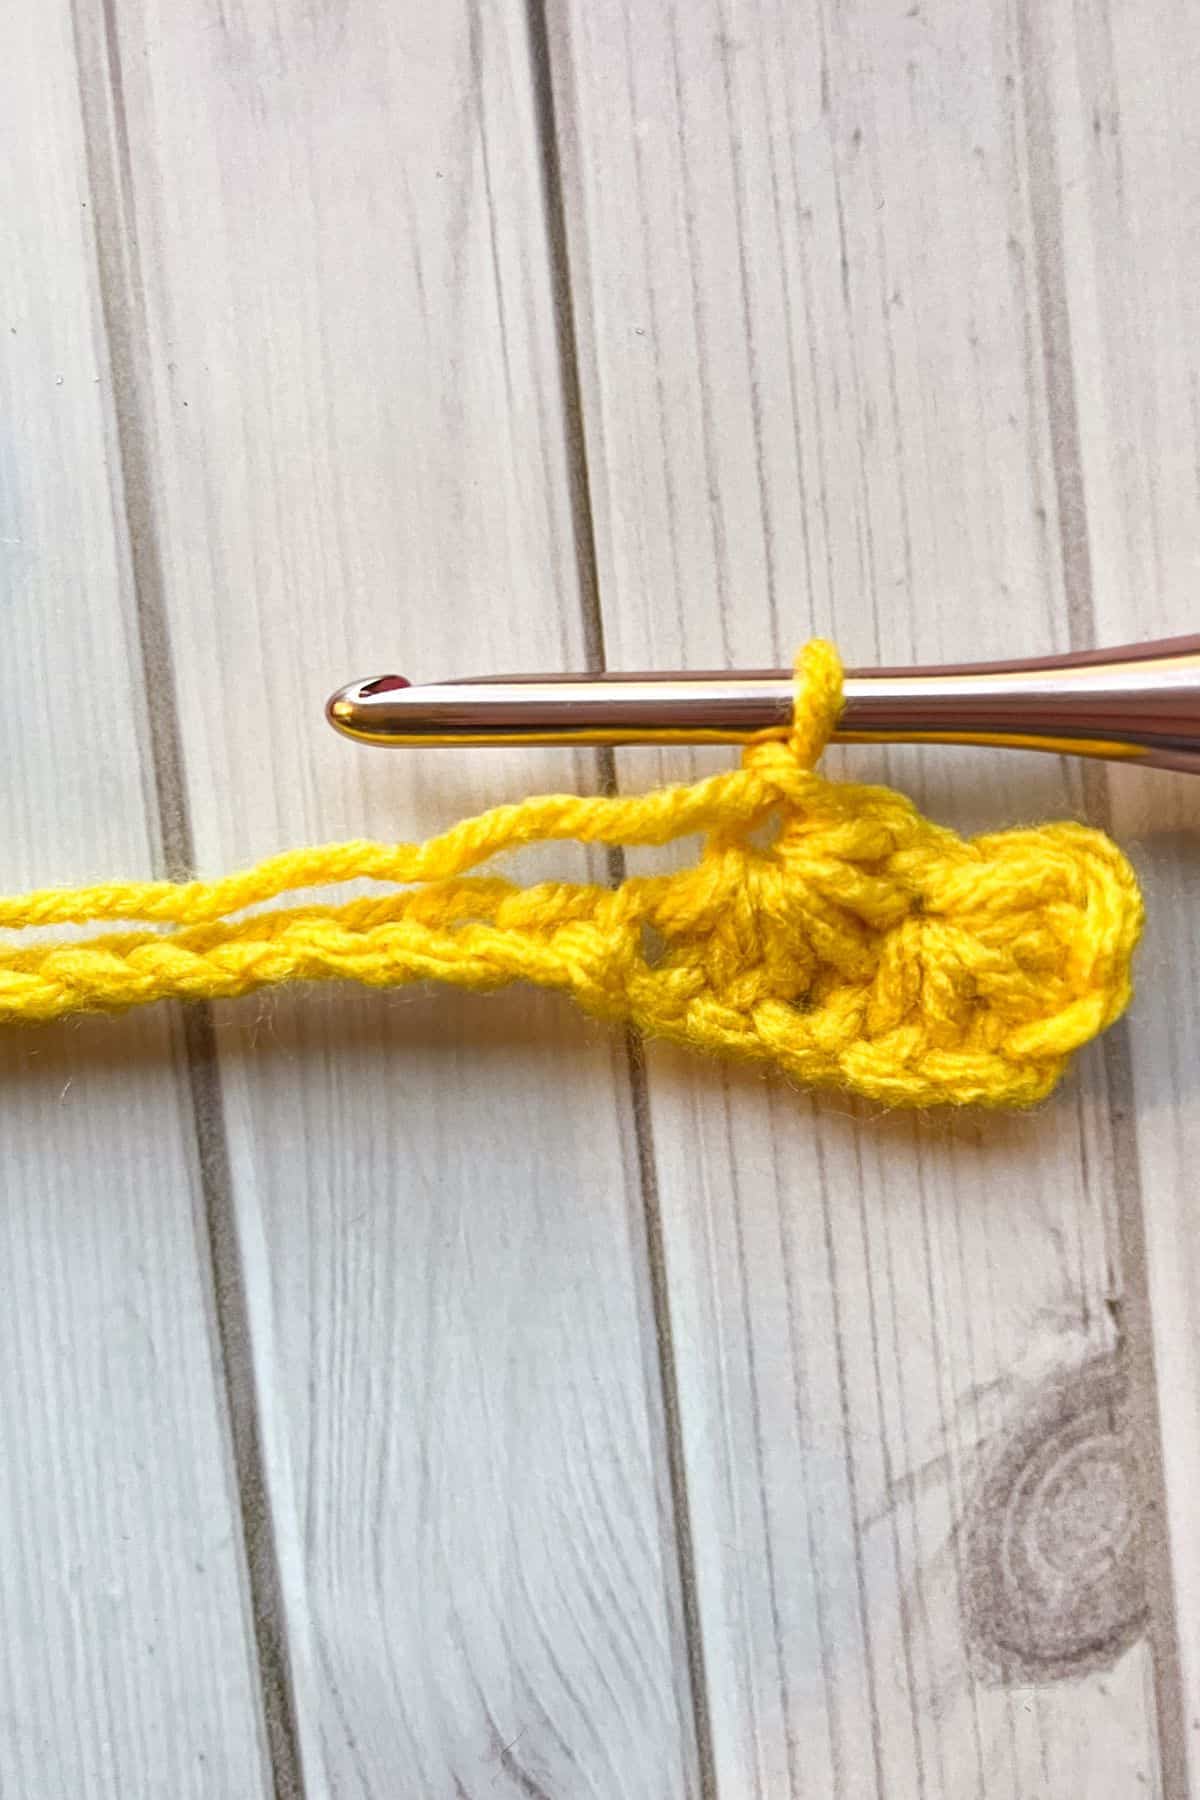
Once you have six loops on your hook, yarn over and pull through all six loops.

Then, chain 1 to complete the star and create the "eye" in the center.
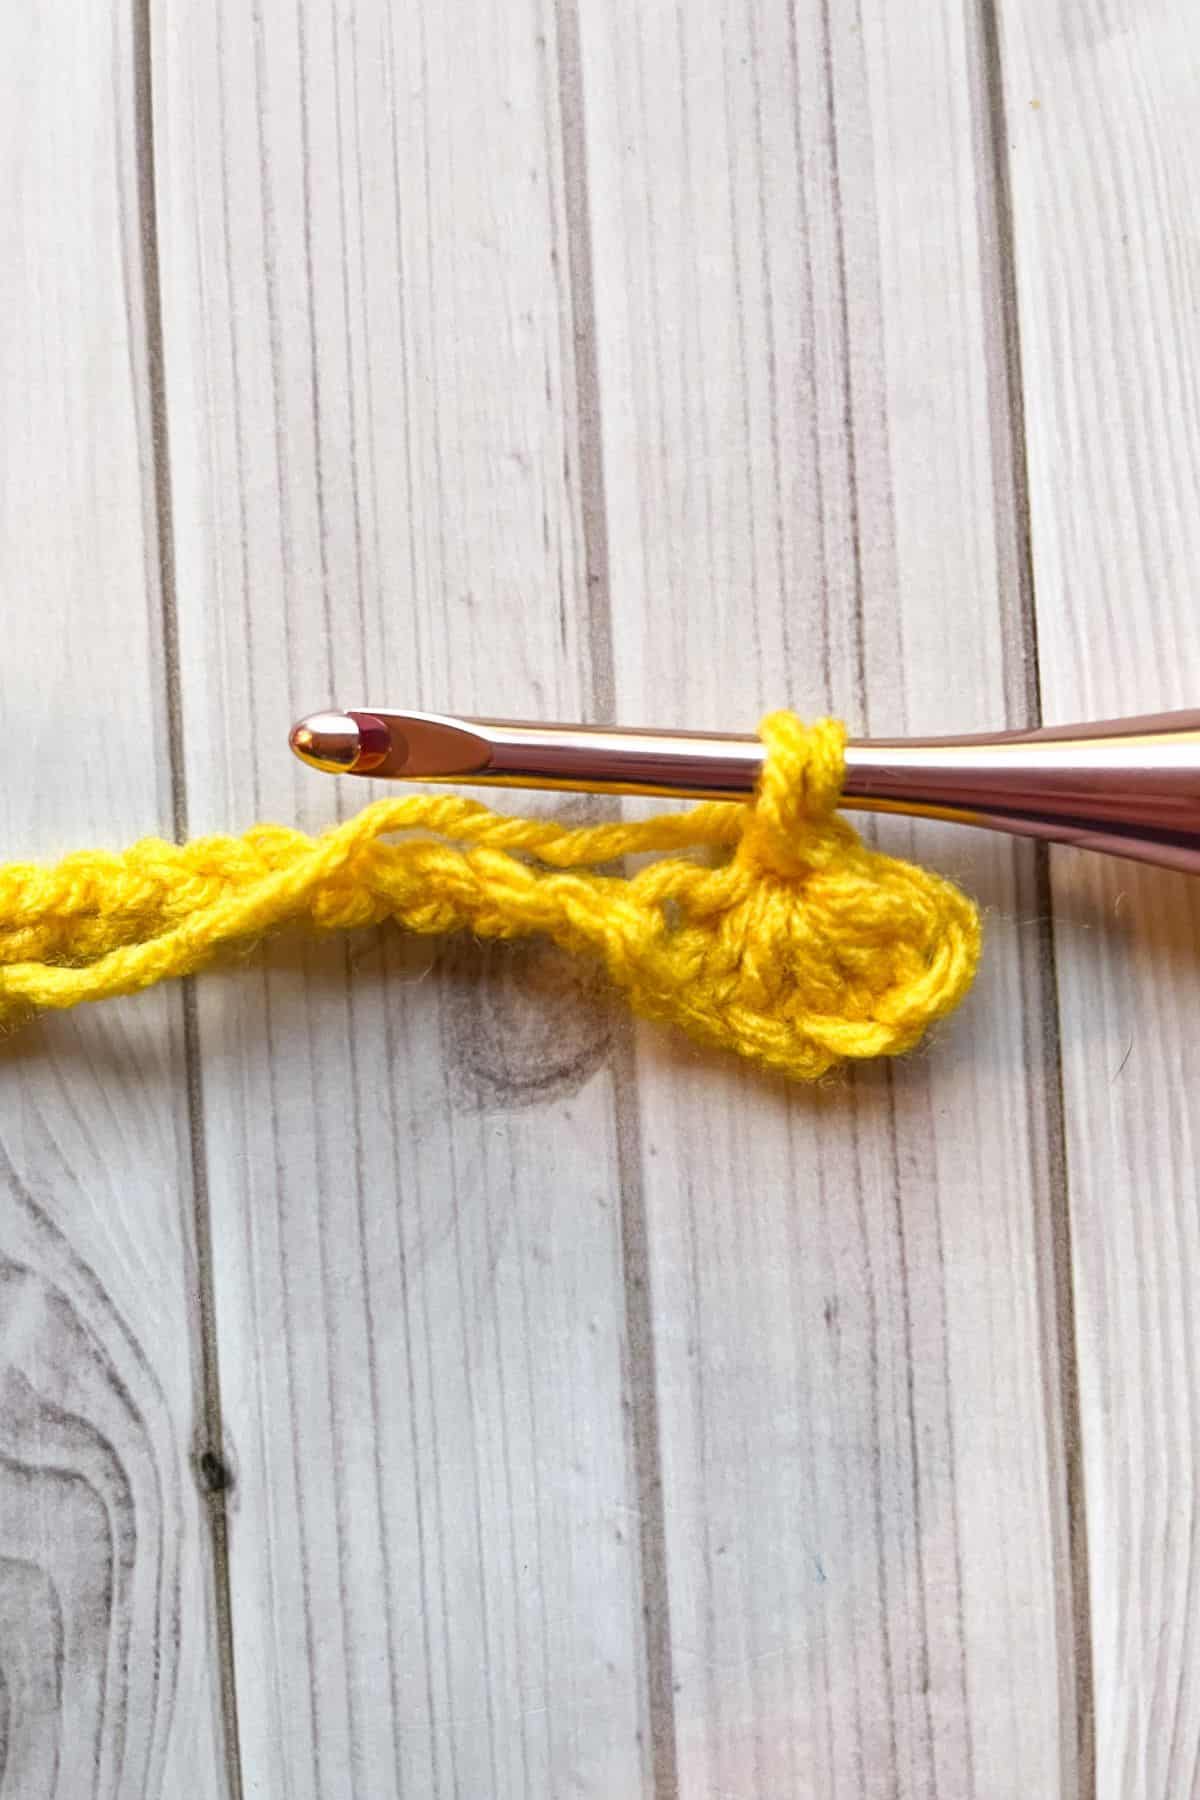
*Next, insert your hook into the "eye" you just made, yarn over, and pull through, leaving two loops on your hook.
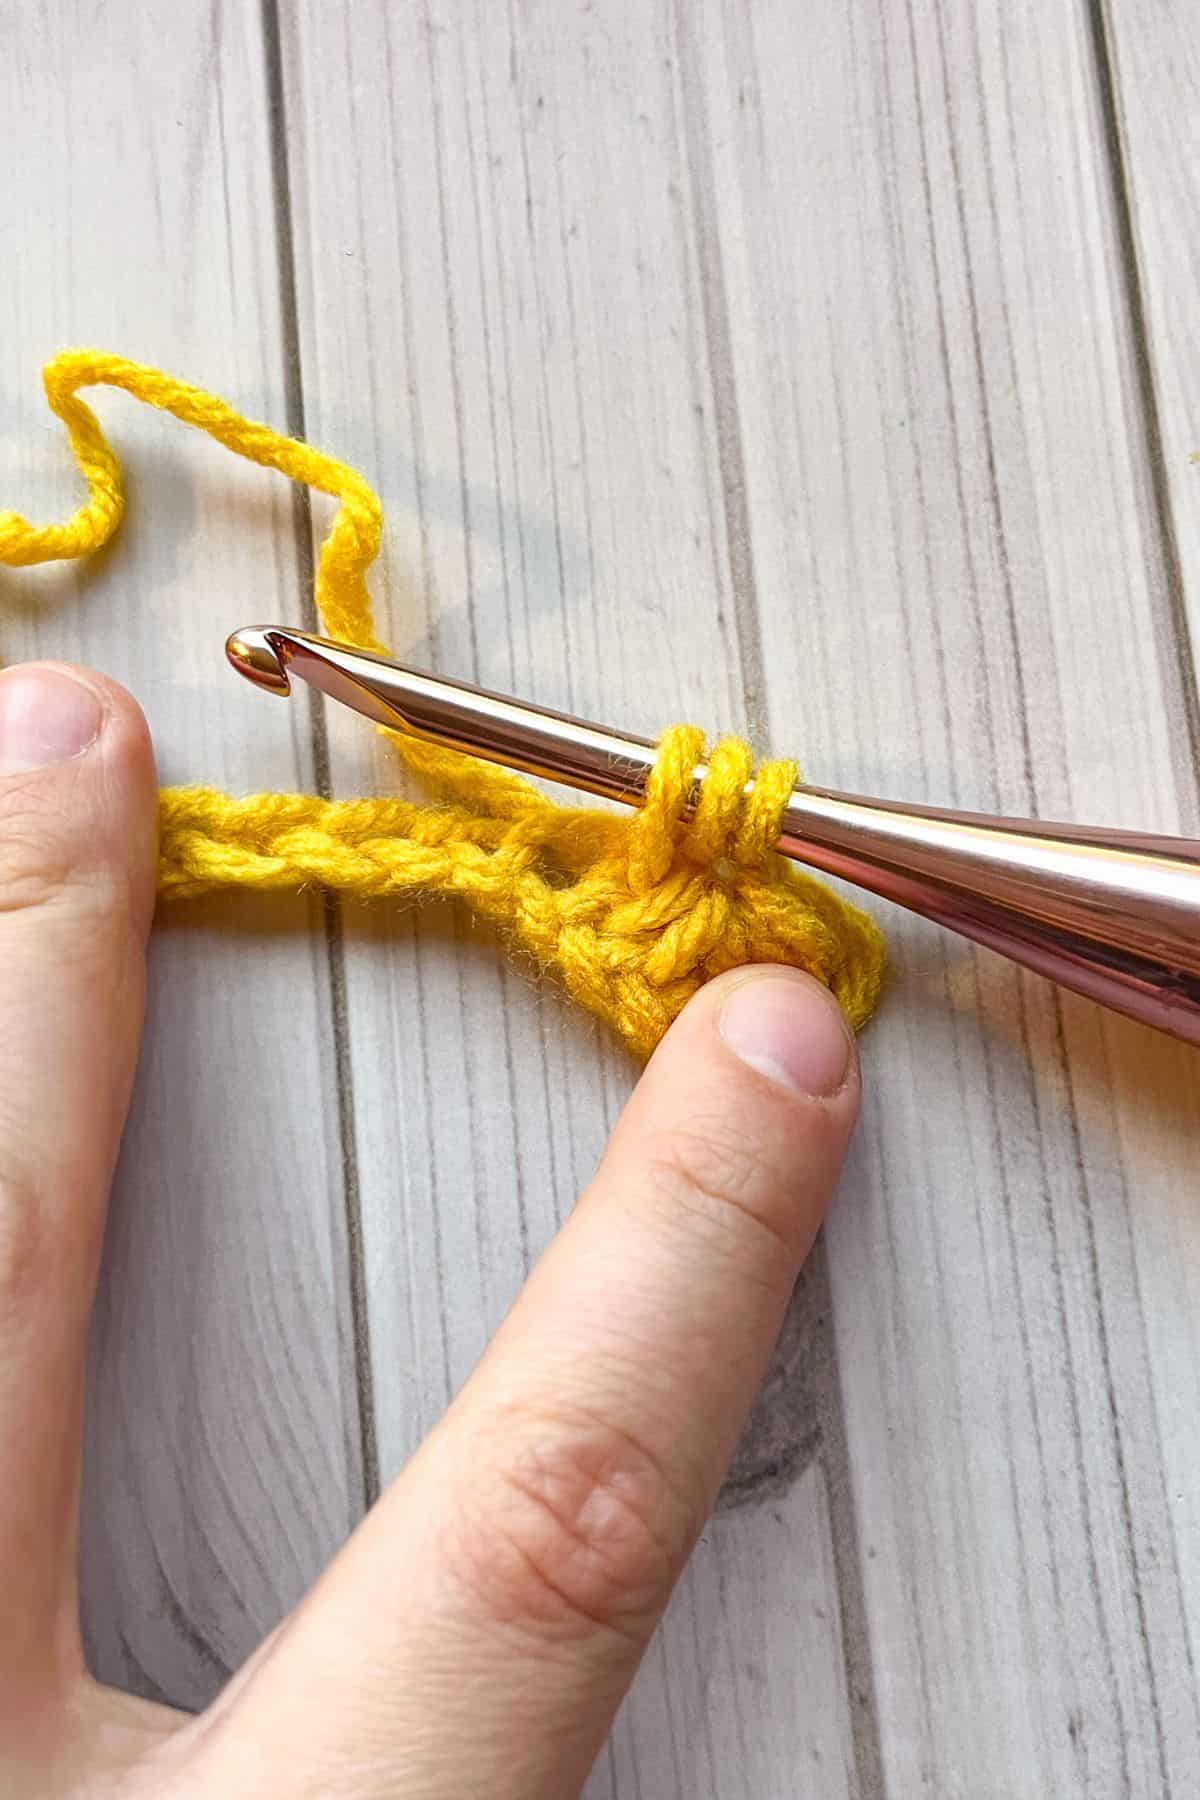
Then, insert your hook into the space between the two last "spikes" of the first star, yarn over, and pull through. This will give you three loops on your hook.
Now, insert your hook into the same chain where you worked the last stitch of the previous star, yarn over, and pull through, so you have four loops on your hook. Insert your hook into the next chain, yarn over, and pull through. Repeat this in the following chain until you have six loops on your hook.
Yarn over and pull through all six loops on the hook. Chain 1 to close the second star.
*Repeat these steps for the rest of the row.
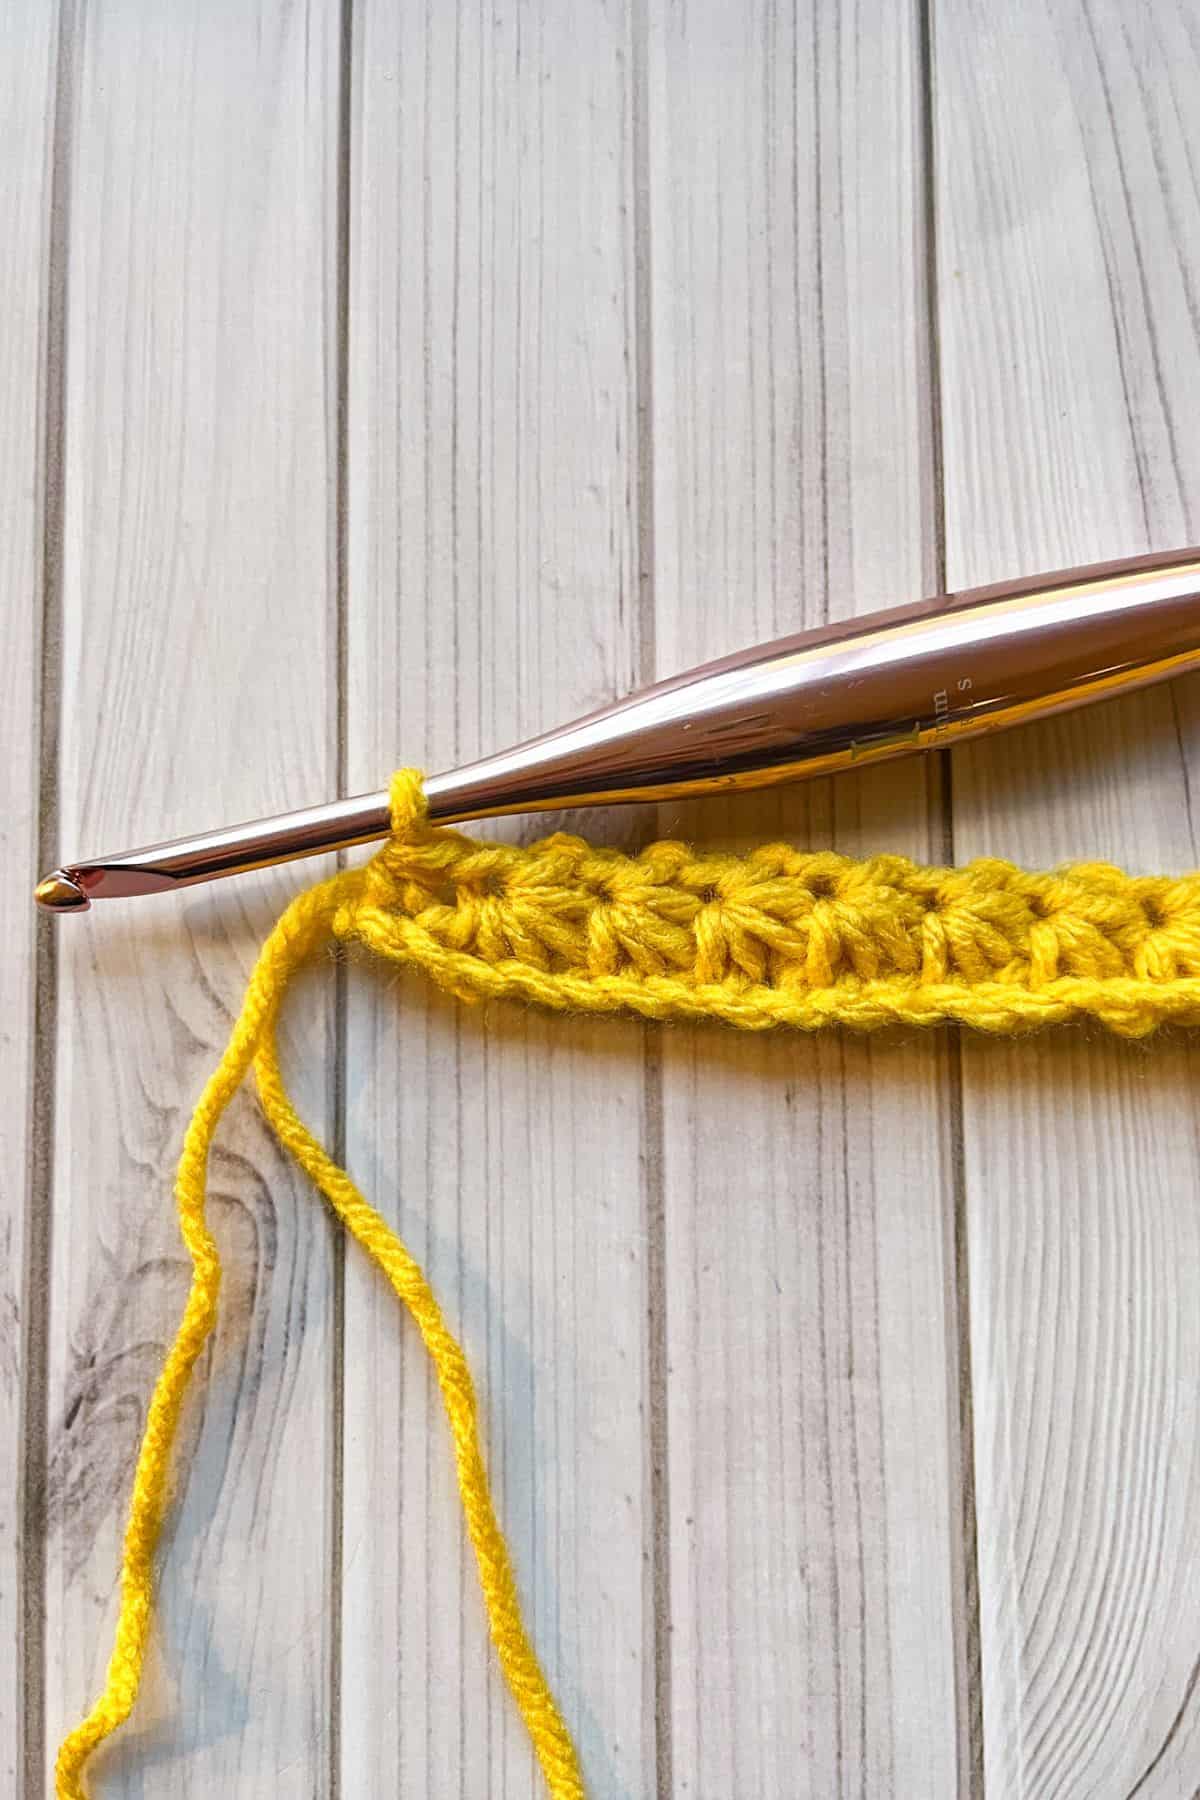
When you reach the end, finish by making 1 hdc in the last stitch. Then ch x2 and turn.
Row 3: Crochet 2 hdc in the "eye" of each star across.
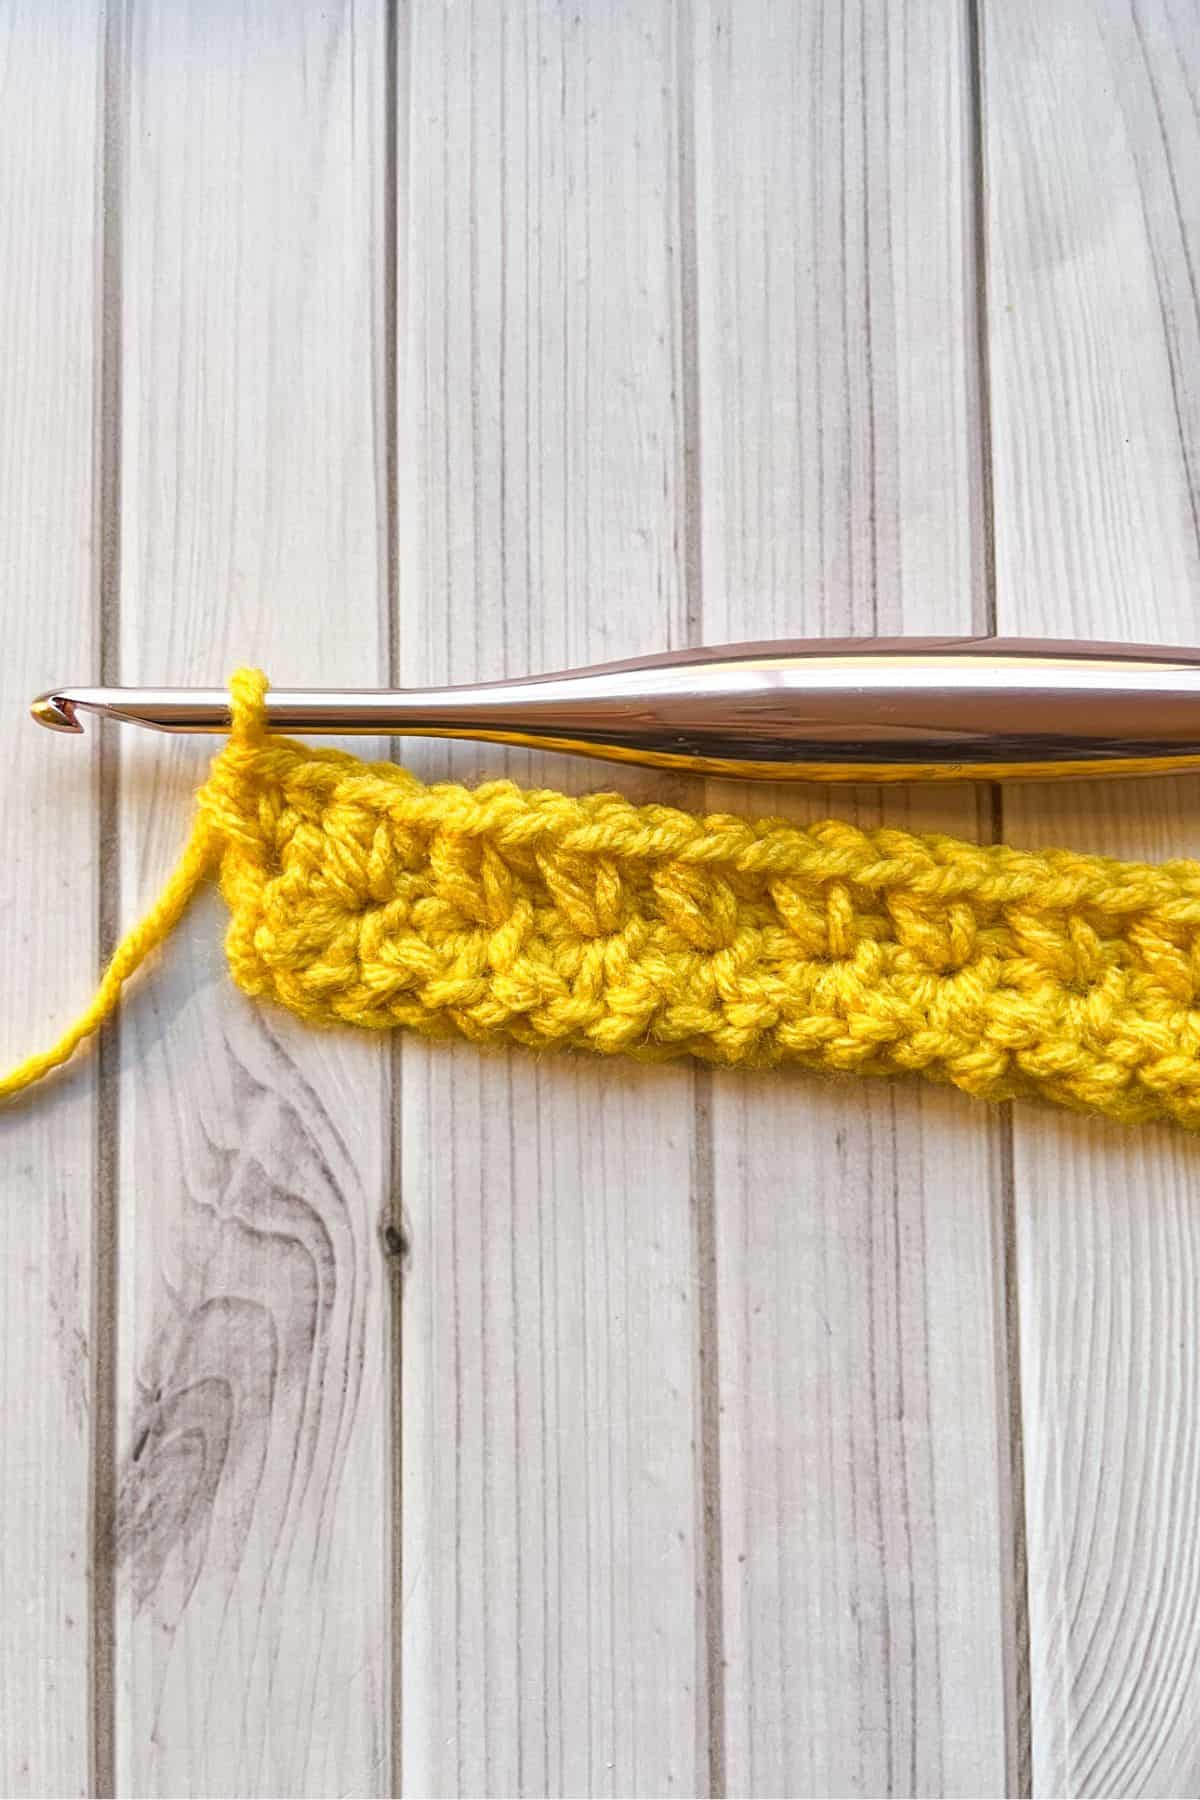
Finish with 1 hdc in the last stitch. Then ch x3 and turn (23).
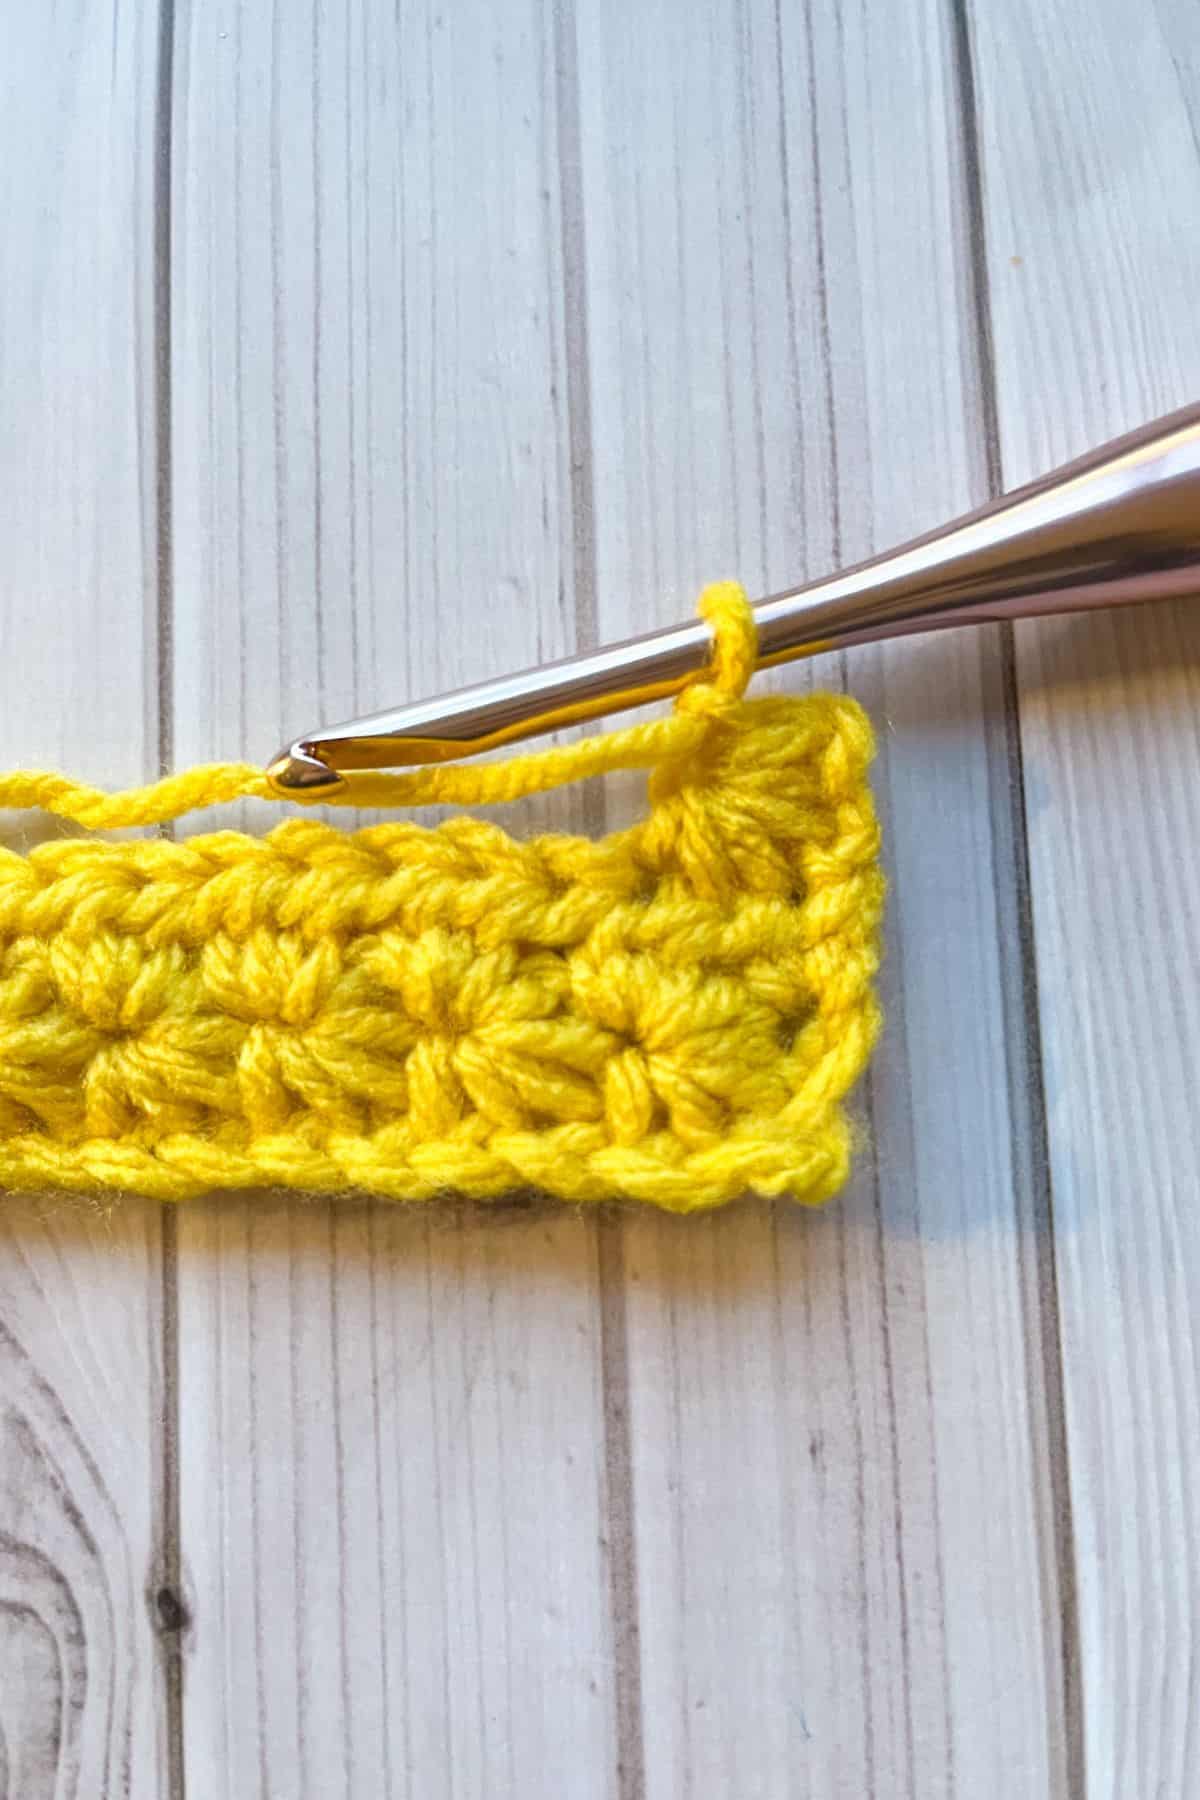
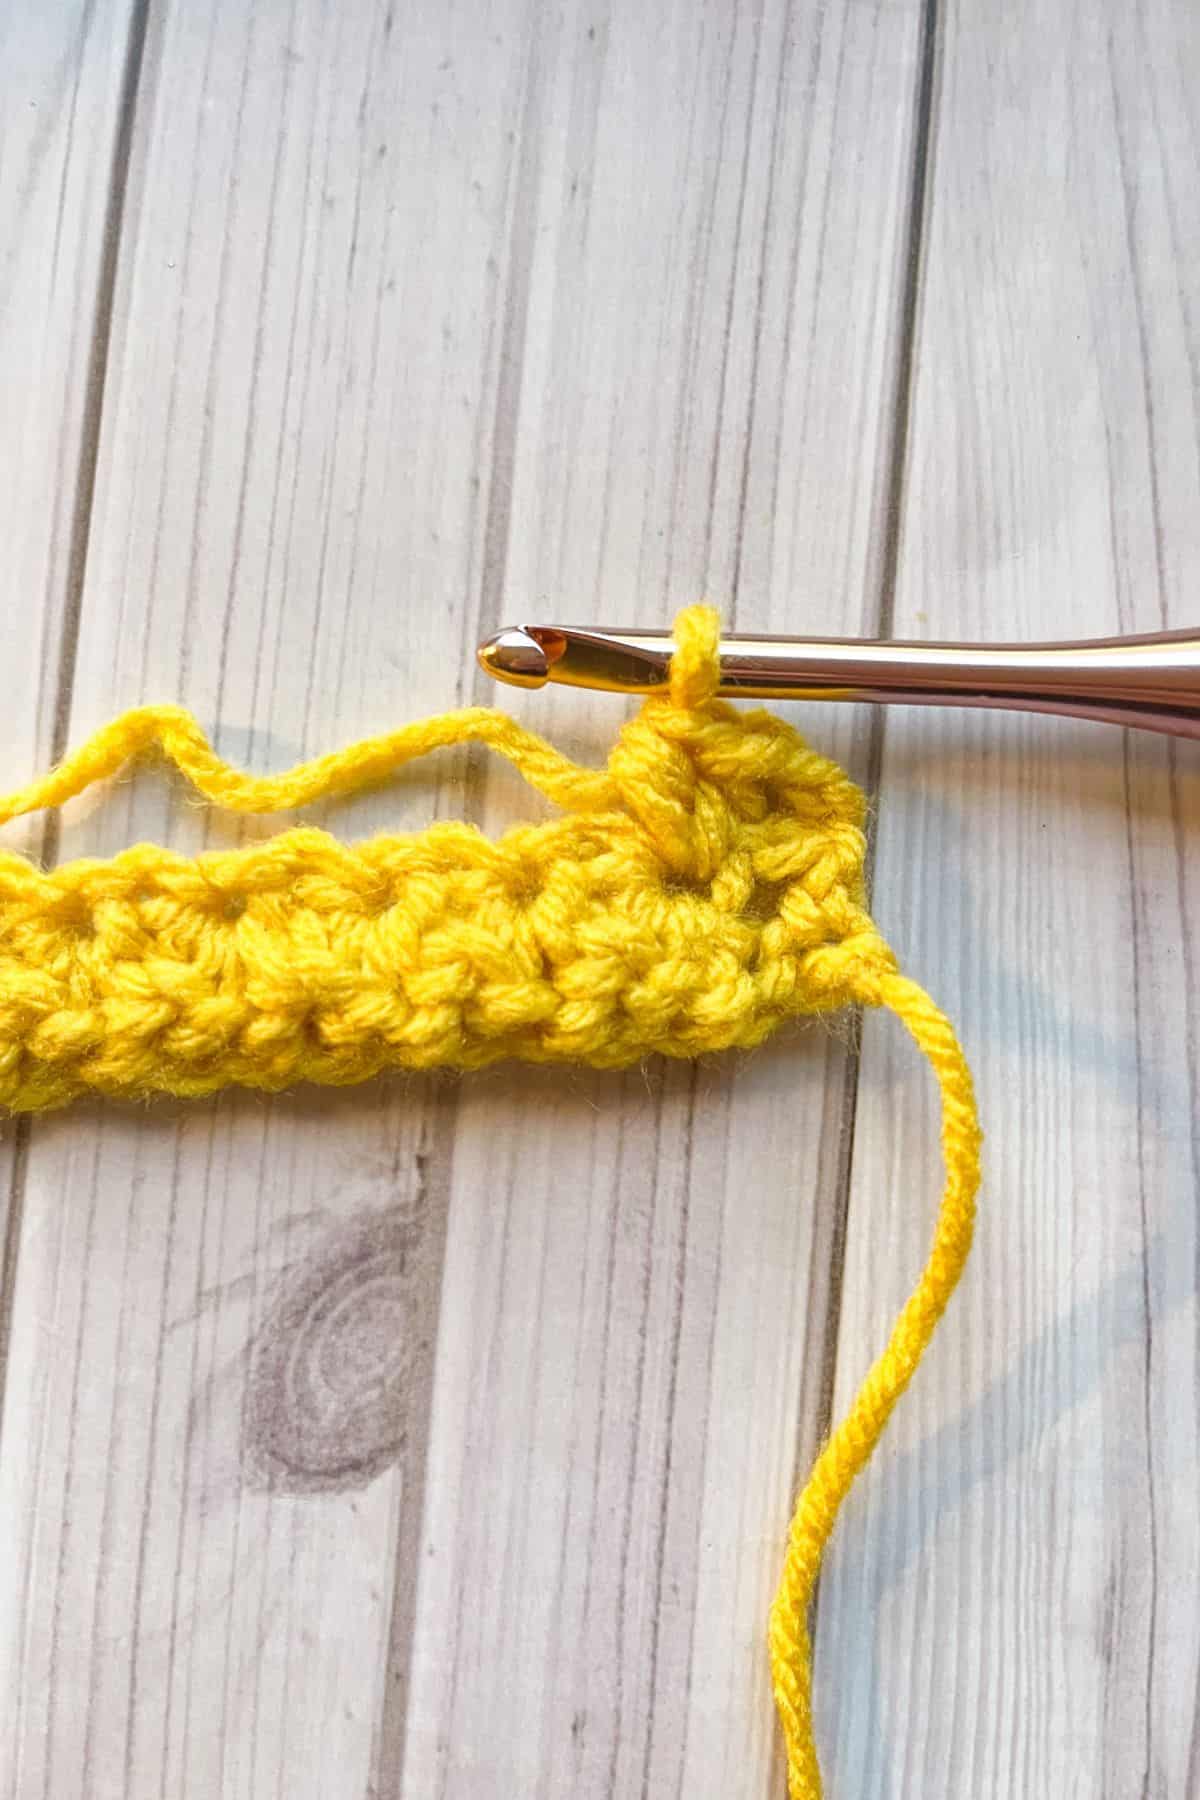
Row 4: Insert your hook into the second chain from the hook, yarn over, and pull through, repeat for the next chain, then continue for the next 3 stitches until you have 6 loops. Then yarn over and pull through all 6 loops, then chain 1 to close the star. This creates the eye of the first star of this row.
Finish the row of star stitches by using the steps in row 2. Then at the end of the row make a hdc and then ch x2.
Repeat Row 3 and 4 until your project is the length you want it.
Thank you for following along with my Daisy Stitch tutorial!
I hope you’re feeling inspired and excited to incorporate this beautiful stitch into your next project. If you’re looking for more stitch inspiration, be sure to check out my Block Stitch in Crochet Pattern, the versatile Sedge Stitch Tutorial, and the textured beauty of my Crochet Wattle Stitch Pattern. Each of these stitches offers something unique to elevate your crochet game.
Happy crocheting, and I can’t wait to see what you create!
🐌Expert Tips
- Maintain Consistency: The key to a clean and uniform Daisy Stitch is keeping your tension consistent. Avoid pulling your loops too tight, as this can cause the stars to look uneven. Practice until you find the right balance for smooth, even stitches.
- Track Your Rows: Since the daisy stitch crochet pattern alternates between star and hdc rows, keeping track of your row numbers is essential. Mark your rows with stitch markers or take note of your progress so you don’t lose your place.
- Check for Slanting: The Daisy Stitch can sometimes create a slight slant if the star stitches aren’t placed in the right spots. Double-check your work after each row to make sure everything is lining up properly.
- Blocking for a Neat Finish: Once you’ve completed your project, blocking it can help even out the stitches and give your piece a polished, professional appearance.
🧵Pattern FAQs
The Daisy Stitch, also known as the Crochet Star Stitch or Marguerite Crochet Stitch, is a textured stitch that creates a flower-like, star-shaped pattern. It’s perfect for adding visual interest to your crochet projects, such as blankets, scarves, and throws.
Absolutely! The Daisy Stitch can be used for a wide variety of projects, including shawls, pillows, bags, and even clothing items. It adds beautiful texture and visual interest to any project.
The Daisy Stitch looks great with a variety of yarns, but it works best with medium-weight yarn (like worsted weight).

🧶More Crochet Stitch Patterns


If you tried this Daisy Stitch Crochet Tutorial (or any other pattern on my website), please let me know how it went in the 📝 comments below. I'd love to hear from you!
Daisy Stitch Crochet Tutorial
Materials
- Any yarn
- 6.5 mm hook
- Tapestry needle
Abbreviations (US terms)
- Chains - ch
- Half double crochet - hdc
Notes
- Starting Chain: Make sure your starting chain is an odd number. This ensures that the pattern will align correctly, and you’ll have a beautiful, symmetrical design as you crochet.
- Watch for the Slant: The Daisy Stitch (or Crochet Star Stitch) can sometimes create a slight slant in your project. To avoid this, double-check that you’re placing the star stitch in the correct spots as you work. Keeping track of where each stitch goes will help maintain the stitch’s neat, consistent look and prevent any unintended slanting.
- Skill Level: The daisy stitch crochet pattern is considered intermediate. It’s perfect for crocheters who are comfortable with basic stitches and are ready to try something a little more intricate. Don’t worry—once you get the hang of the 2-row repeat, it’ll be smooth sailing!
Instructions
- For this daisy stitch crochet tutorial, we will be working in the rows.
- Row 1: Ch x29 (or more chains if making a larger project as this is just a stitch swatch, just make sure it's an ODD amount of chains).
- Row 2: Start by inserting your hook into the second chain from the hook. Yarn over and pull up a loop. Then, insert your hook into the next chain, yarn over, and pull through. You should now have three loops on your hook. Repeat this for the next three chains until you have six loops on the hook.
- Once you have six loops on your hook, yarn over and pull through all six loops.
- Then, chain 1 to complete the star and create the "eye" in the center.
- Next, insert your hook into the "eye" you just made, yarn over, and pull through, leaving two loops on your hook.
- Then, insert your hook into the space between the two last "spikes" of the first star, yarn over, and pull through. This will give you three loops on your hook.
- Now, insert your hook into the same chain where you worked the last stitch of the previous star, yarn over, and pull through, so you have four loops on your hook. Insert your hook into the next chain, yarn over, and pull through. Repeat this in the following chain until you have six loops on your hook.
- Yarn over and pull through all six loops on the hook. Chain 1 to close the second star.
- Repeat these steps for the rest of the row.
- When you reach the end, finish by making 1 hdc in the last stitch. Then ch x2 and turn.
- Row 3: Crochet 2 hdc in the "eye" of each star across.
- Finish with 1 hdc in the last stitch. Then ch x3 and turn (23).
- Row 4: Insert your hook into the second chain from the hook, yarn over, and pull through, repeat for the next chain, then continue for the next 3 stitches until you have 6 loops. Then yarn over and pull through all 6 loops, then chain 1 to close the star. This creates the eye of the first star of this row.
- Finish the row of star stitches by using the steps in row 2. Then at the end of the row make a hdc and then ch x2.
- Repeat Row 3 and 4 until your project is the length you want it.
- Thank you for following along with my Daisy Stitch Crochet tutorial!


Leave a Reply