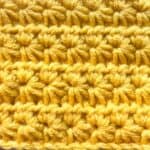
Daisy Stitch Crochet Tutorial
Welcome to my Daisy Stitch Crochet Tutorial! If you’re looking for a stitch that looks intricate and beautiful but is surprisingly simple to master, the Daisy Stitch Crochet is perfect for you.
Materials
- Any yarn
- 6.5 mm hook
- Tapestry needle
Abbreviations (US terms)
- Chains - ch
- Half double crochet - hdc
Notes
- Starting Chain: Make sure your starting chain is an odd number. This ensures that the pattern will align correctly, and you’ll have a beautiful, symmetrical design as you crochet.
- Watch for the Slant: The Daisy Stitch (or Crochet Star Stitch) can sometimes create a slight slant in your project. To avoid this, double-check that you’re placing the star stitch in the correct spots as you work. Keeping track of where each stitch goes will help maintain the stitch’s neat, consistent look and prevent any unintended slanting.
- Skill Level: The daisy stitch crochet pattern is considered intermediate. It’s perfect for crocheters who are comfortable with basic stitches and are ready to try something a little more intricate. Don’t worry—once you get the hang of the 2-row repeat, it’ll be smooth sailing!
Instructions
- For this daisy stitch crochet tutorial, we will be working in the rows.
- Row 1: Ch x29 (or more chains if making a larger project as this is just a stitch swatch, just make sure it's an ODD amount of chains).
- Row 2: Start by inserting your hook into the second chain from the hook. Yarn over and pull up a loop. Then, insert your hook into the next chain, yarn over, and pull through. You should now have three loops on your hook. Repeat this for the next three chains until you have six loops on the hook.
- Once you have six loops on your hook, yarn over and pull through all six loops.
- Then, chain 1 to complete the star and create the "eye" in the center.
- Next, insert your hook into the "eye" you just made, yarn over, and pull through, leaving two loops on your hook.
- Then, insert your hook into the space between the two last "spikes" of the first star, yarn over, and pull through. This will give you three loops on your hook.
- Now, insert your hook into the same chain where you worked the last stitch of the previous star, yarn over, and pull through, so you have four loops on your hook. Insert your hook into the next chain, yarn over, and pull through. Repeat this in the following chain until you have six loops on your hook.
- Yarn over and pull through all six loops on the hook. Chain 1 to close the second star.
- Repeat these steps for the rest of the row.
- When you reach the end, finish by making 1 hdc in the last stitch. Then ch x2 and turn.
- Row 3: Crochet 2 hdc in the "eye" of each star across.
- Finish with 1 hdc in the last stitch. Then ch x3 and turn (23).
- Row 4: Insert your hook into the second chain from the hook, yarn over, and pull through, repeat for the next chain, then continue for the next 3 stitches until you have 6 loops. Then yarn over and pull through all 6 loops, then chain 1 to close the star. This creates the eye of the first star of this row.
- Finish the row of star stitches by using the steps in row 2. Then at the end of the row make a hdc and then ch x2.
- Repeat Row 3 and 4 until your project is the length you want it.
- Thank you for following along with my Daisy Stitch Crochet tutorial!
Tried this pattern?Mention @thecaffeinatedsnail or tag #thecaffeinatedsnail!
