
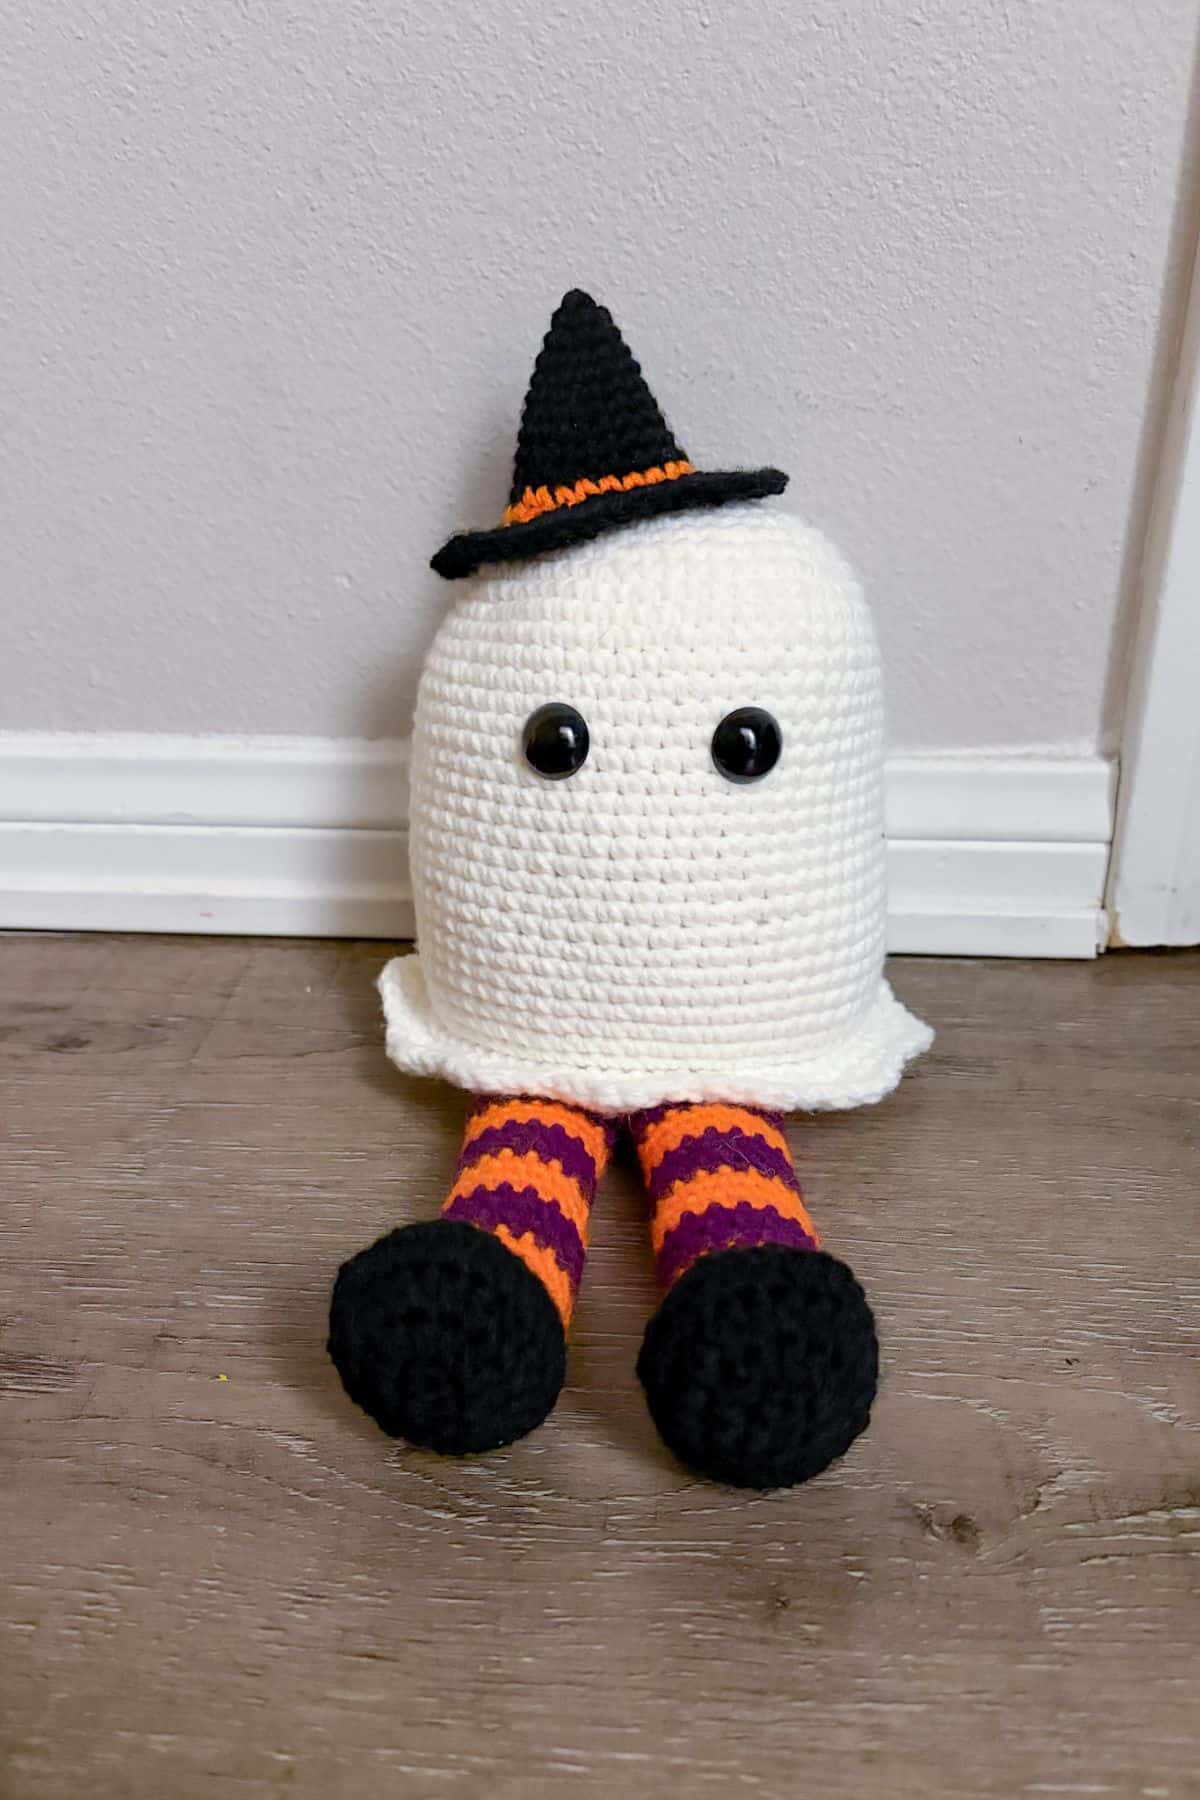
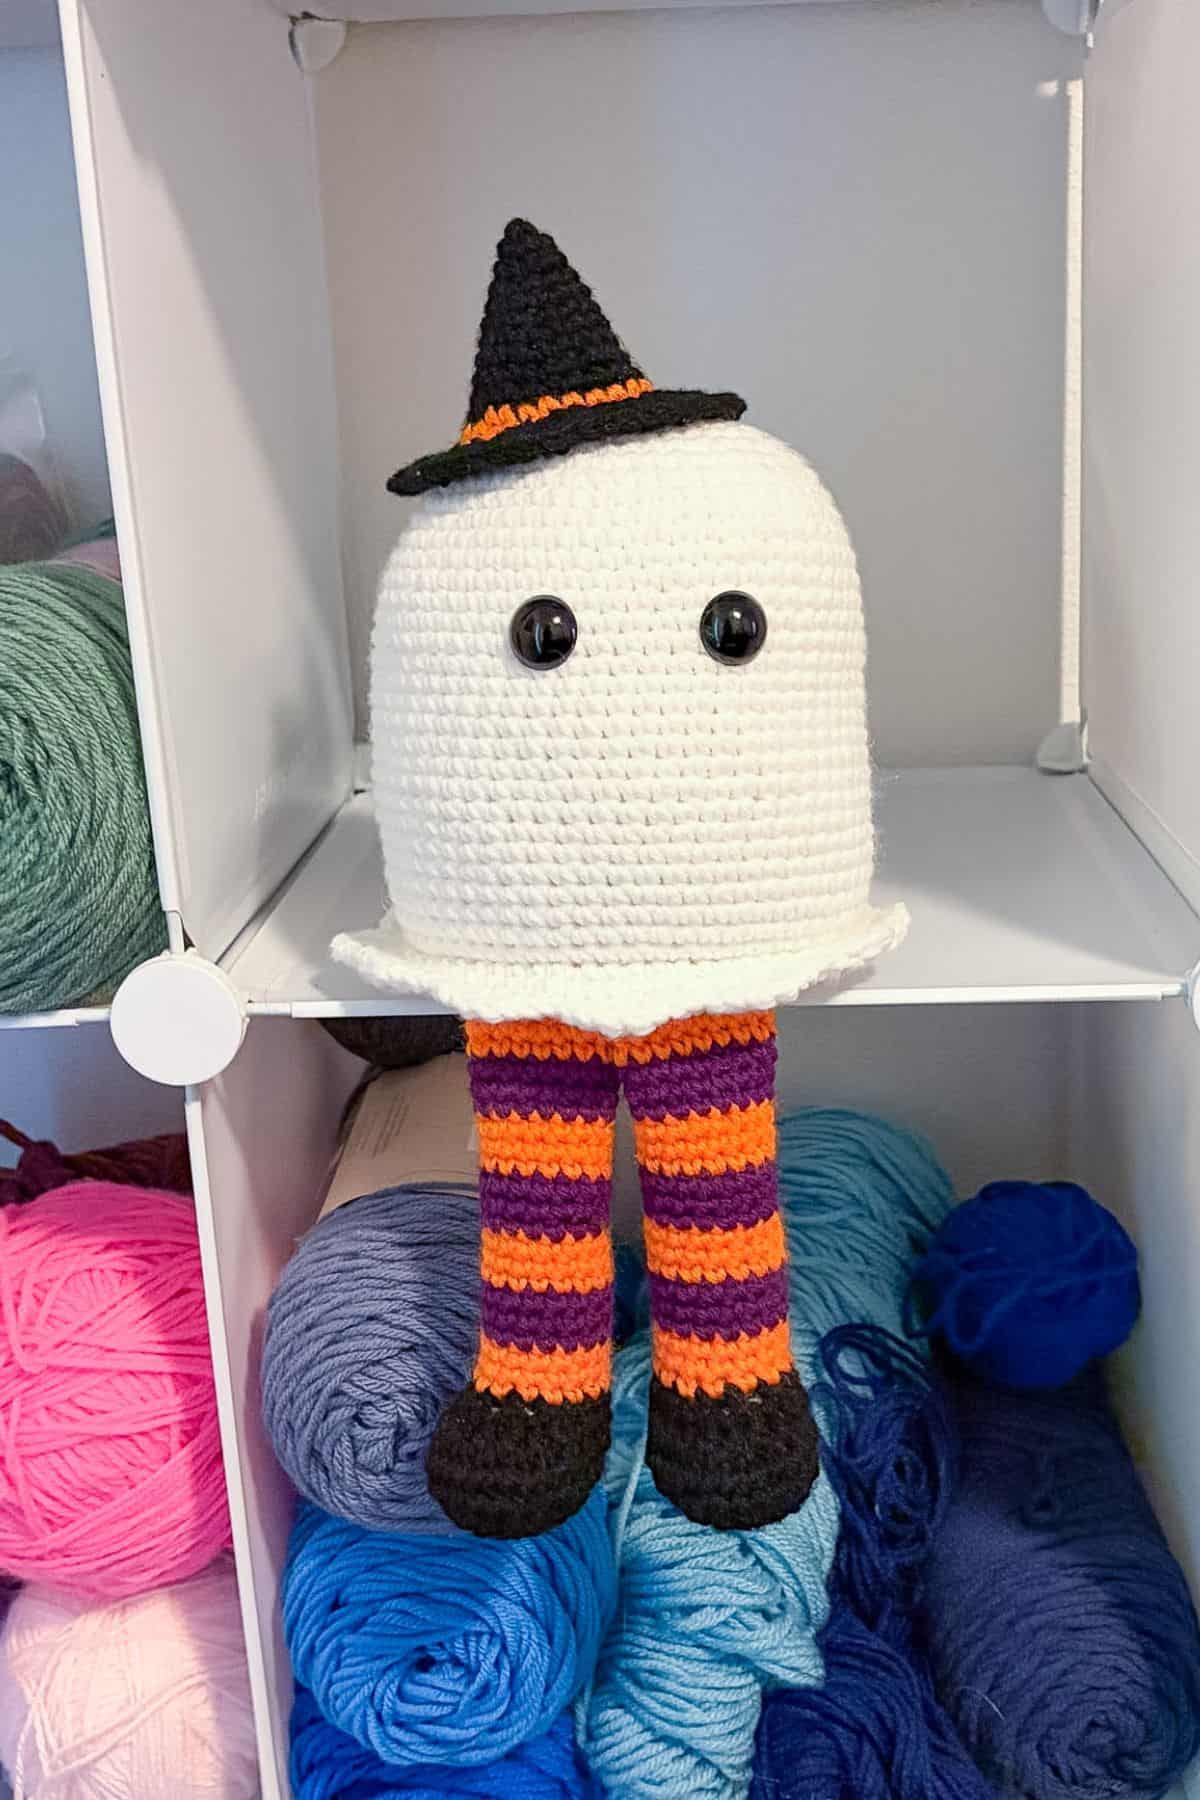
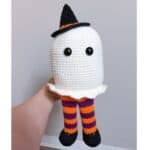
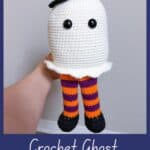
This spooktastic friendly ghost is easy to make with my Free Crochet Ghost Pattern! Ghosts, witches, and trick or treating oh my! Add this crochet ghost pattern to your crochet Halloween arsenal.
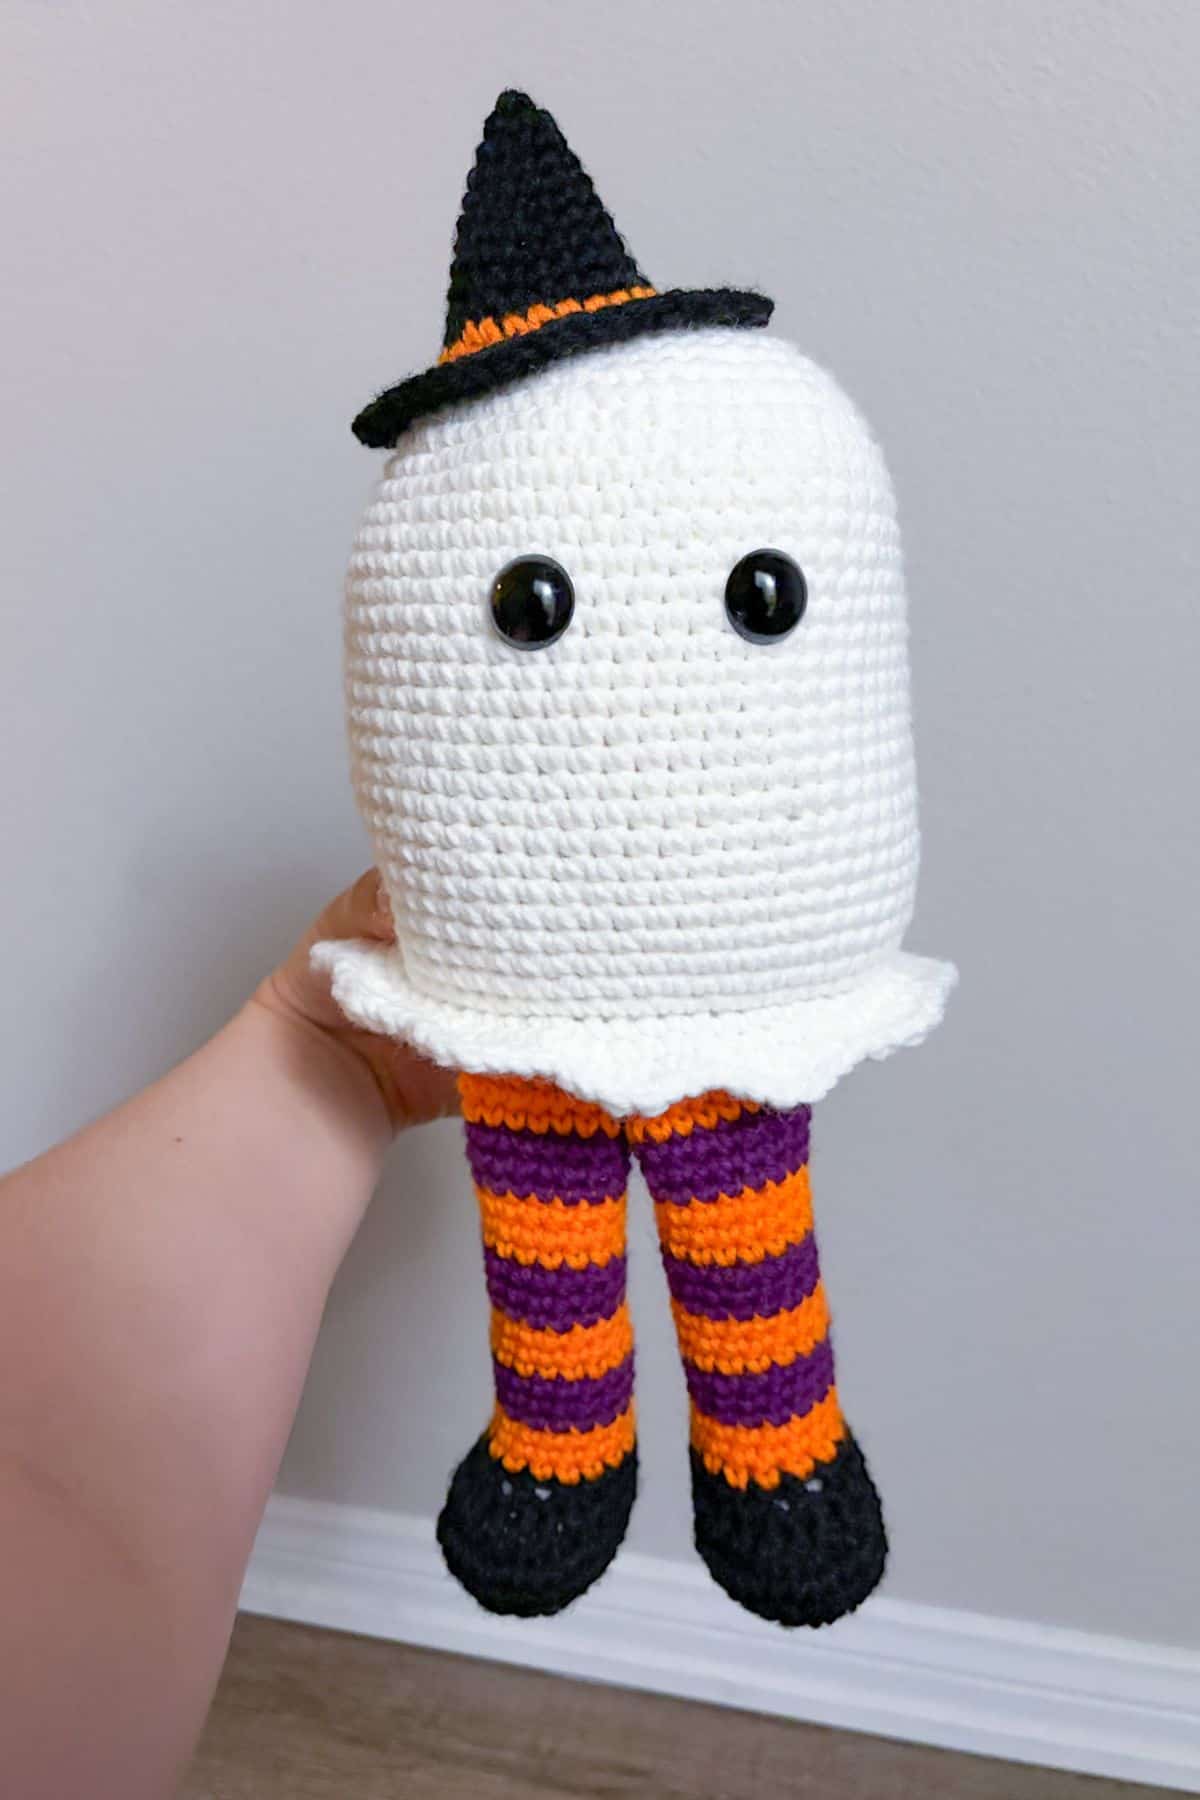
How adorable is this free crochet ghost pattern? If I had the time, I would make a whole gaggle of ghosts in different Halloween costumes. Maybe I can next year if I have the time!
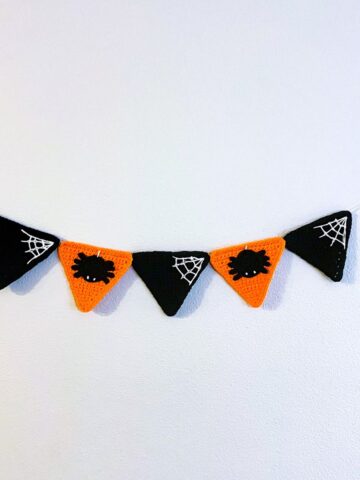
I may not have this crochet ghost in different costumes, but my crochet ghost garland pattern has flat crochet ghosts dressed in Halloween costumes. I also use these ghosts in my crochet Halloween blanket pattern.
This amigurumi ghost is a perfect addition to your fall decor or as a gift for your friend who loves Halloween all year round (we all have at least one friend like this!).
When I look at free crochet Halloween ghost patterns, I rarely see large ghost plushies. Most of them are super small, and I wanted one I could snuggle with.
If you feel like taking it a step further and twinning with your ghost, I have a crochet witch hat pattern you could make for yourself!
Jump to:
✏️ Things to Note:
- Yarn Choice: I made the crochet ghost amigurumi with acrylic yarn since it's what I had on hand, but this project can be completed with any type of yarn. I highly suggest cotton, acrylic, or chunky yarn. If you use chunky yarn, it will be quite enormous.
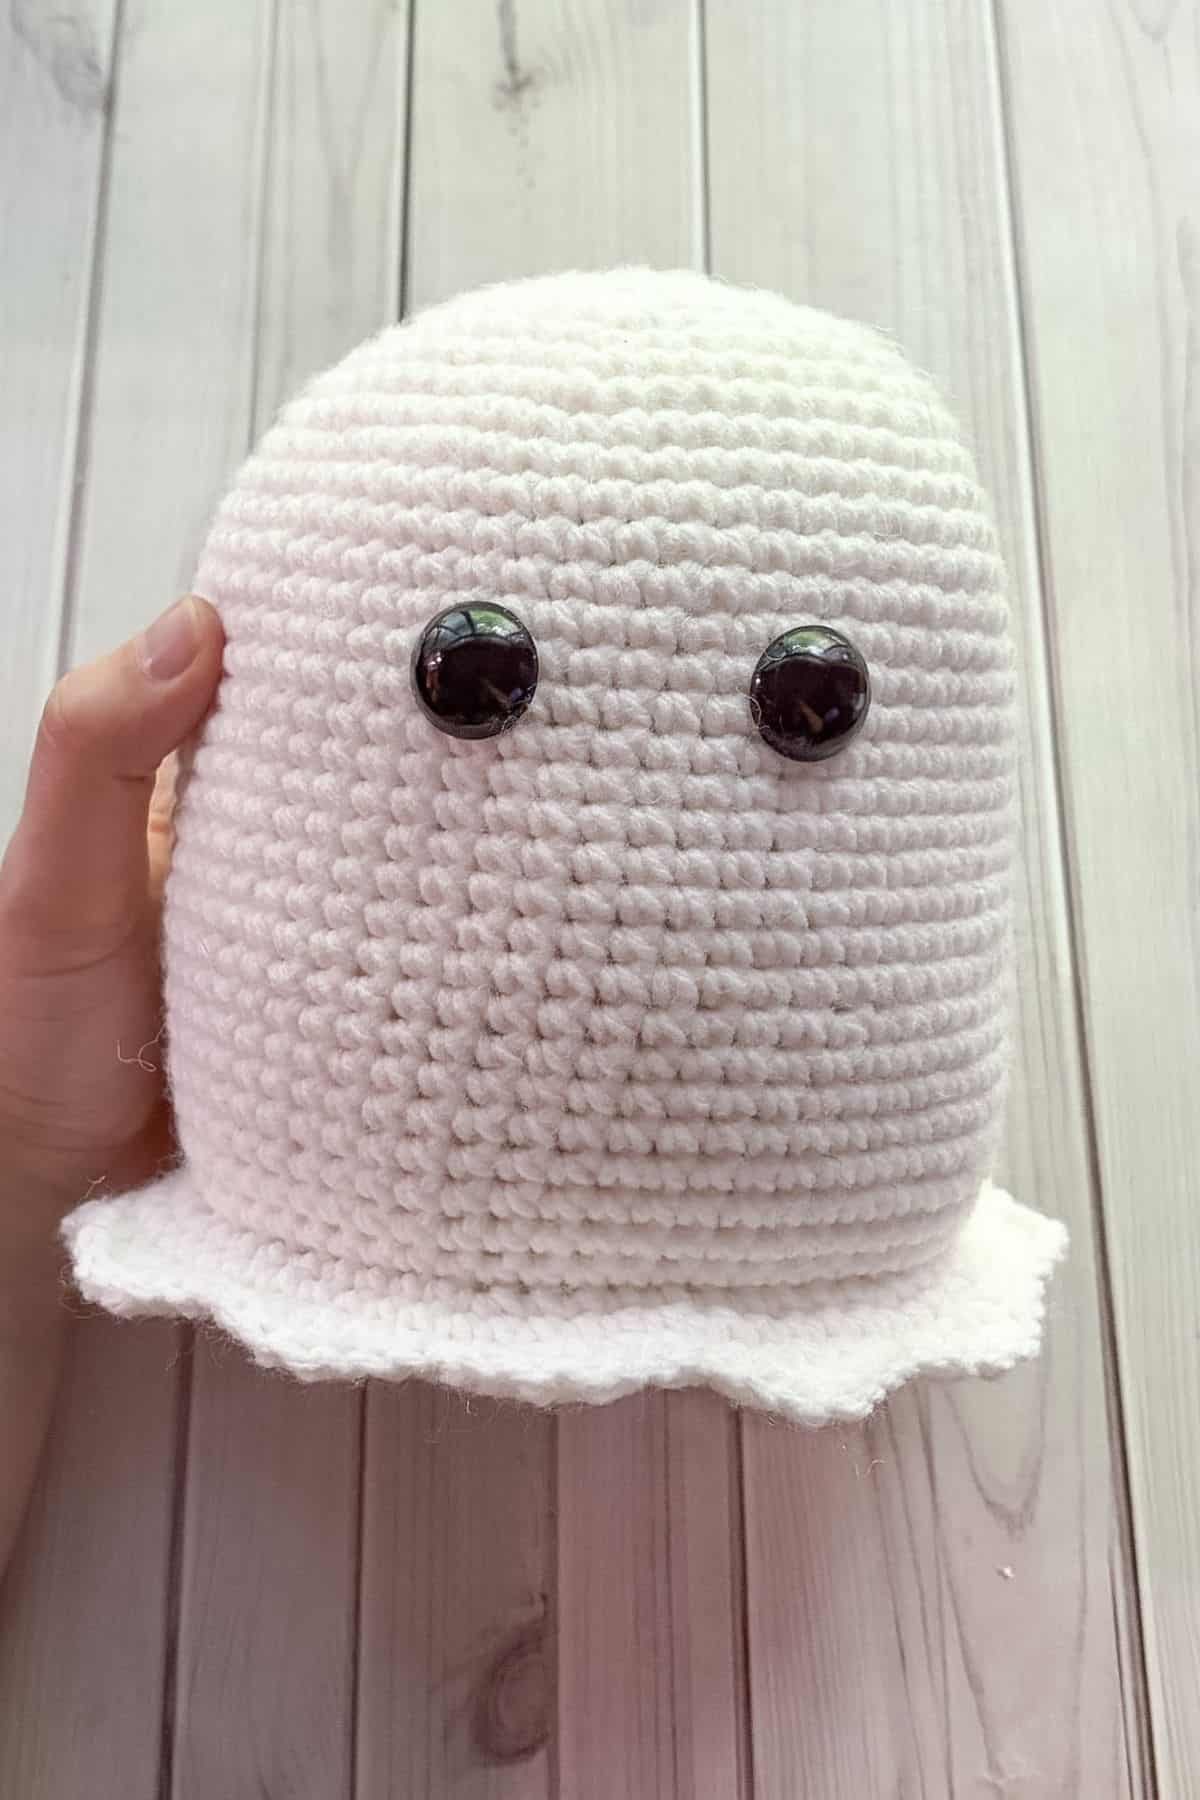
- Finished Size: The finished size of the free crochet ghost pattern is about 14 inches high, including the hat, using a 4mm hook size.
- Updated Pattern: This is an updated pattern for my free crochet ghost pattern. The original pattern had a different method creating the indents of the ghost and it seemed really tricky for others to recreate. For the update, I went with a scalloped edge to make the pattern easier and added witchy legs to make it extra cute.
💭 Abbreviations to Remember (US Terms)
- Magic ring (mr)
- Chains (ch)
- Single crochet (sc)
- Increase (inc) - 2 stitches in the same stitch
- Decrease (dec) - 1 stitch in 2 stitches
- Slip stitch (sl st)
- Half double crochet (hdc)
- Double crochet (dc)
- Front Loop Only (flo)
- Back Loop Only (blo)
🧋 Variations
- Create different Halloween outfits for the ghost! Bat wings and fangs for a vampire, bolts on the side of the head for Frankenstein's Monster—the sky's the limit!
- Switch out the white yarn for glow-in-the-dark yarn to add an extra spooky factor.
🍵 Instructions for Free Crochet Ghost Pattern
For the free crochet ghost pattern, we will mostly be working in rounds.
Ghost body:
Round 1: Using white yarn, make a mr and then make sc x6 in the circle. If you find it difficult making a magic ring you can chain 2 and then crochet sc x6 in the second chain from the hook (6).
Round 2: Inc in every sc (12).
Round 3: Inc and then sc. Then repeat for the rest of the round (18).
Round 4: Inc, then sc x2. Then repeat for the rest of the round (24).
Round 5: Inc, then sc x3. Then repeat for the rest of the round (30).
Round 6: Inc, then sc x4. Then repeat for the rest of the round (36).
Round 7: Inc, then sc x5. Then repeat for the rest of the round (42).
Round 8: Inc, then sc x6. Then repeat for the rest of the round (48).
Round 9: Inc, sc x7. Then repeat for the rest of the round (54).
Round 10: Inc, sc x8. Then repeat for the rest of the round (60).
Round 11-33: Sc in every stitch (60). Add the eyes between rounds 17-18 roughly 5-6 stitches apart.
Round 34: In flo for this round, inc, sc x9. Then repeat for the rest of the round (66).
Round 35: Inc, sc x10. Then repeat for the rest of the round (72).
Round 36: We are making the little scalloped edge this round. *Sl st, sc, hdc, dc inc, hdc, sc. Repeat from * for the rest of the round. Fasten off the yarn and then weave in the ends.
Round 37: Rejoin your yarn to the blo of round 34. Sc in every stitch (60).
Round 38: Dec, sc x8. Repeat for the rest of the round (54).
Round 39: Dec, sc x7. Repeat for the rest of the round (48).
Round 40: We are going to start reducing the rounds by 8 instead of 6. Dec, sc x4. Repeat for the rest of the round (40). Begin to stuff the ghost if you haven't already.
Round 41: Dec, sc x3. Repeat for the rest of the round (32).
Round 42: Dec, sc x2. Repeat for the rest of the round (24).
Round 43: Dec, sc. Repeat for the rest of the round (16).
Round 44: Dec. Repeat for the rest of the round (8). Fasten off and sew the bottom of the ghost closed, weave in any ends.
Crochet Witch Shoes:
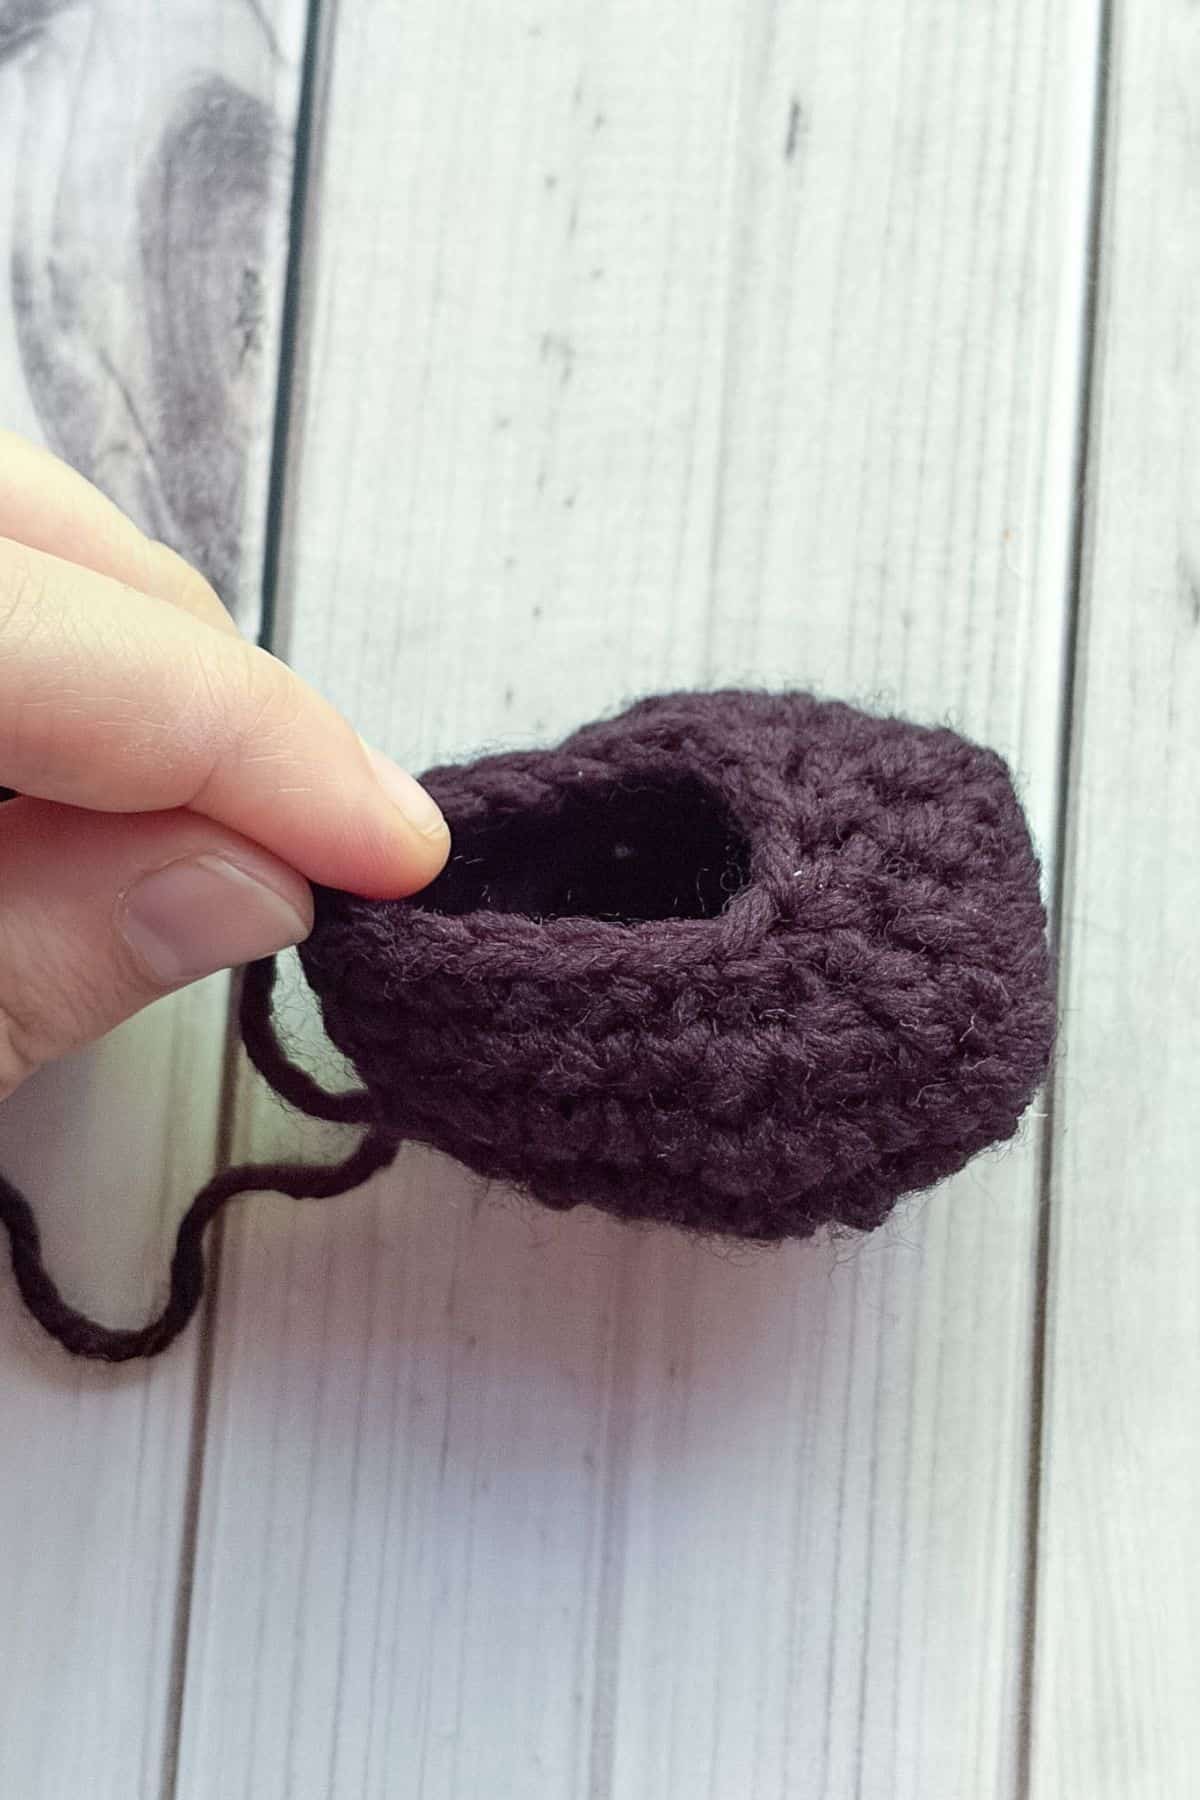
Round 1: Using black yarn, ch x4. In the second ch from the hook make a sc. In the next stitch make a sc. In the last stitch sc x3. Sc in the next st. Inc in the last chain. Sl st to the first sc you made (8). This is the only sl st you'll make when making the shoes.
Round 2: Hdc inc x5, sc inc x3 (16).
Round 3: Hdc inc, hdc. Then repeat for the entire round (24).
Round 4: Sc inc, sc x2. Then repeat for the rest of the round (32).
Round 5: Sc in every stitch (32).
Round 6: Sc x6, sc dec x2, hdc dec x6, sc dec x2, sc x6 (22).
Round 7: Sc x5, sc dec x2, hdc dec x2, sc dec x2, sc x5 (16). Fasten off the black and join the orange.
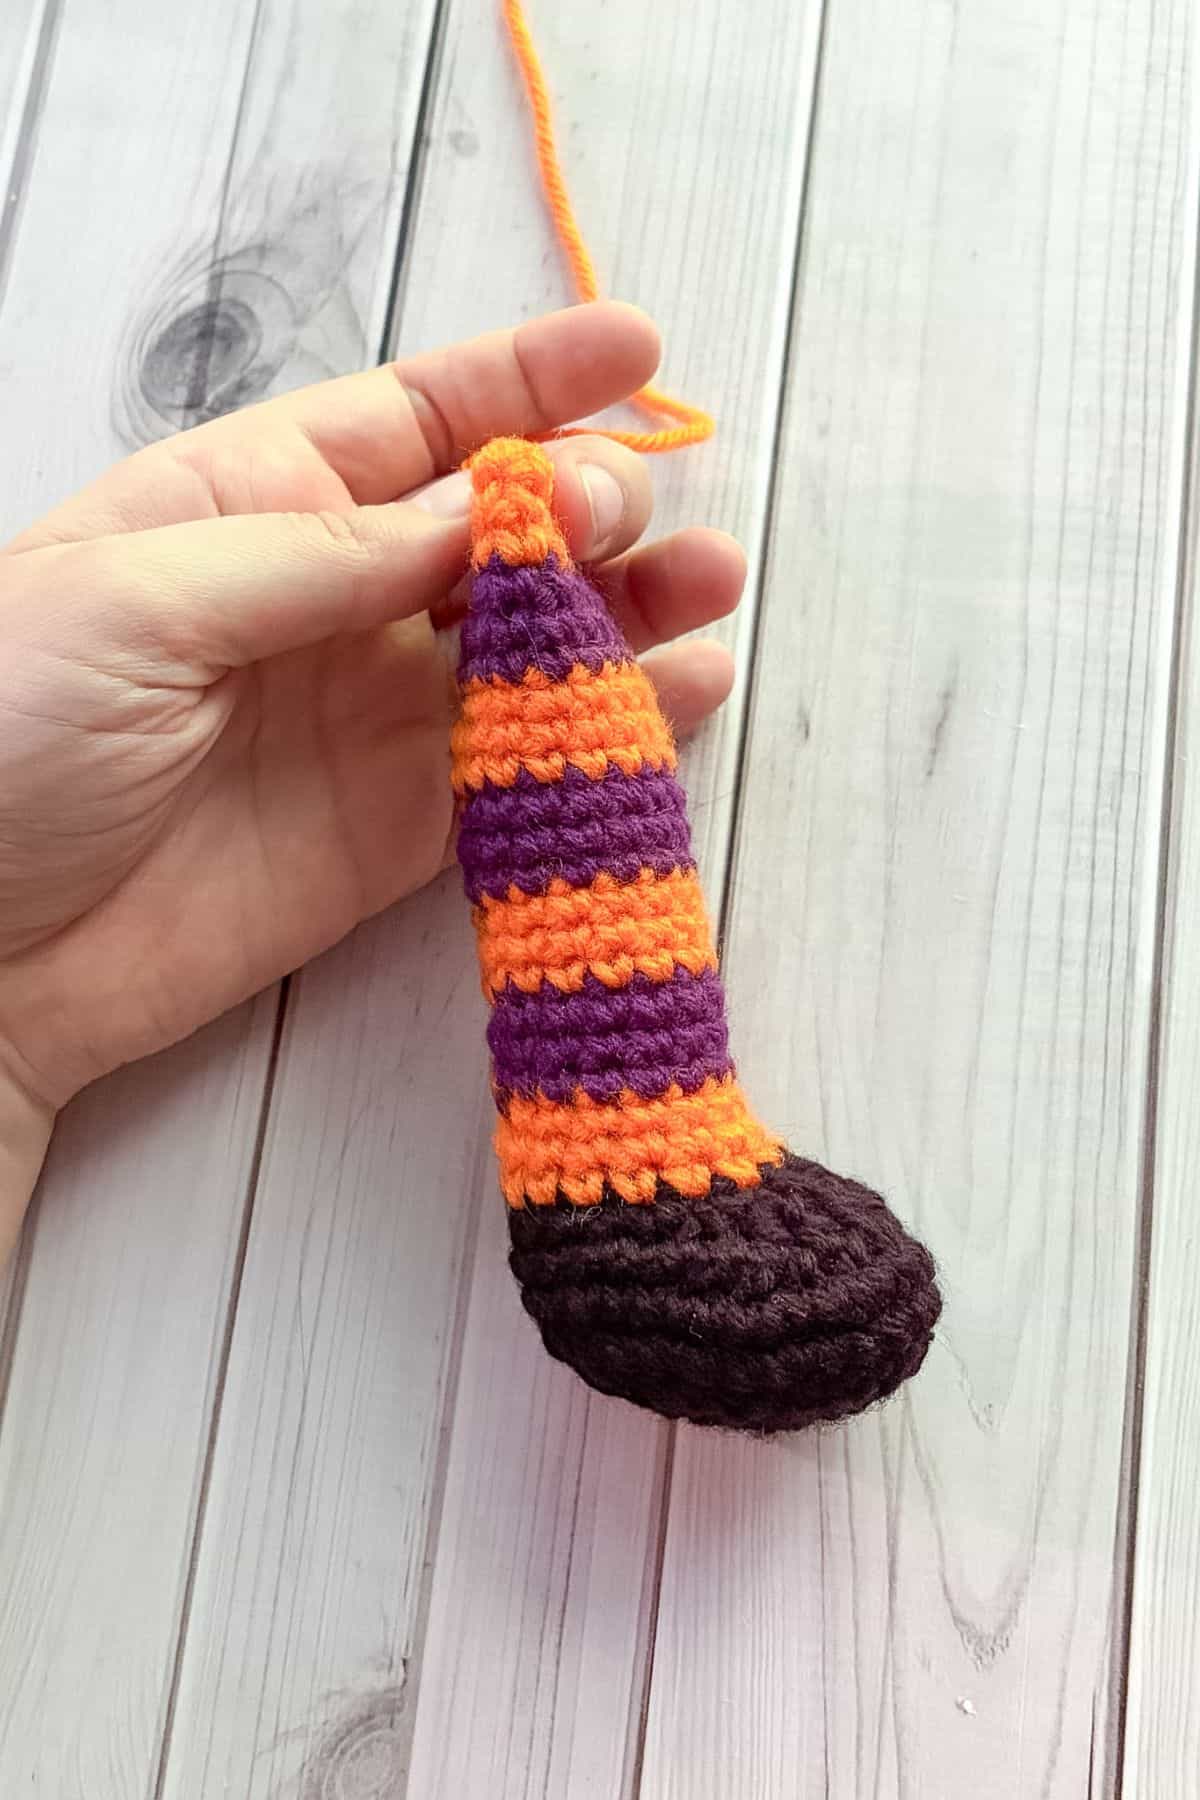
Round 8-10: Sc in every stitch (16). Fasten off the orange and join the purple yarn.
Rounds 11-28: Repeat rounds 8-10 (16), but switch colors every 3 rounds. At the end of round 28, fasten off the orange yarn and stuff the leg a little, and sew the leg closed.
Crochet Witches Hat:
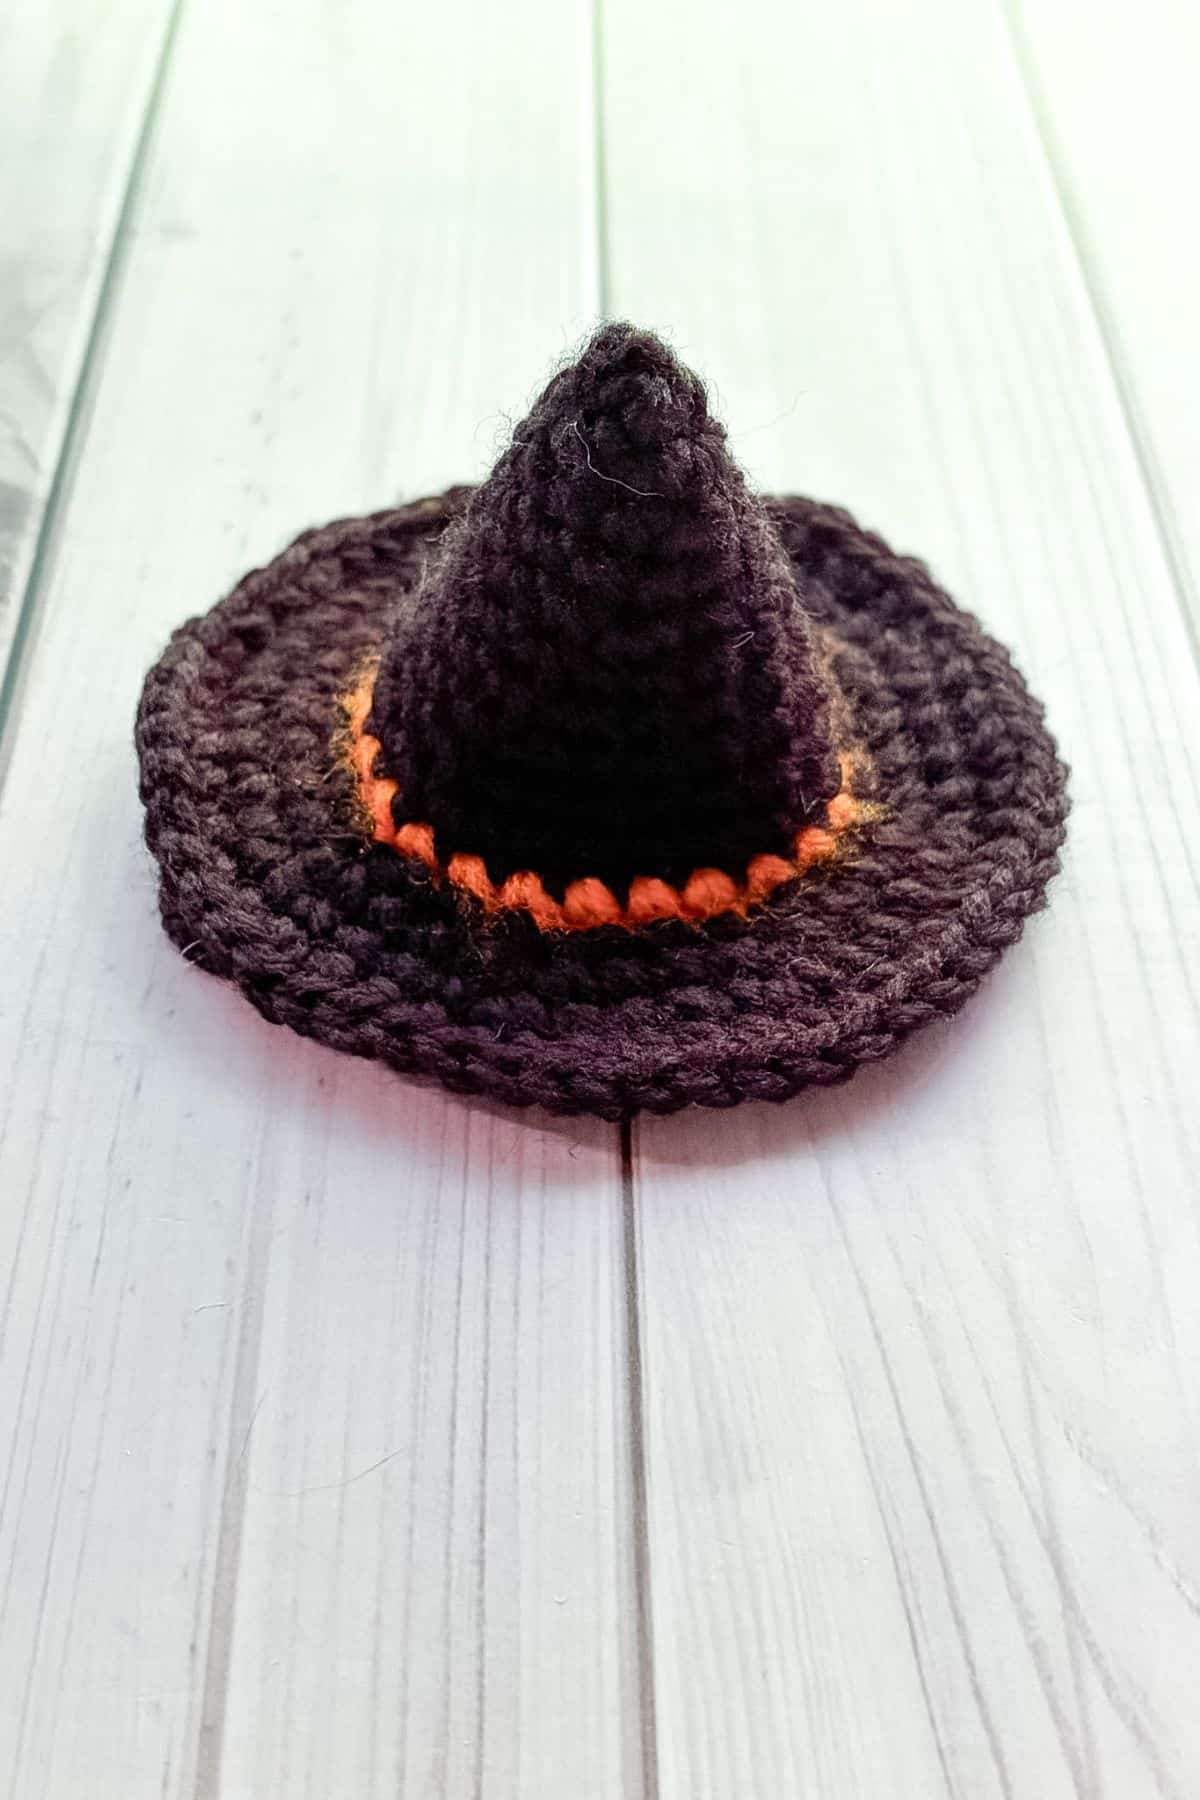
Round 1: Using black yarn, make a mr and sc x3 in the circle (3).
Round 2: Inc in every stitch (6).
Round 3: Inc, then sc. Then repeat for the rest of the round (9).
Round 4: Inc, then sc x2. Then repeat for the rest of the round (12).
Round 5: Sc in every stitch (12).
Round 6: Inc, then sc x3. Then repeat for the rest of the round (15).
Round 7: Sc in every stitch (15).
Round 8: Inc, then sc x4. Then repeat for the rest of the round (18).
Round 9: Sc in every stitch (18).
Round 10: Inc, then sc x5. Then repeat for the rest of the round (21).
Round 11: Sc in every stitch (21).
Round 12: Inc, then sc x6. Then repeat for the rest of the round (24). Fasten off the black yarn and join the orange yarn.
Round 13: Sc in every stitch (24). Fasten off the orange yarn and rejoin the black yarn.
Round 14: For this round, work in flo. Inc, then sc x2. Then repeat for the rest of the round (32).
Round 15: Inc, then sc x3. Then repeat for the rest of the round (40).
Round 16: Inc, then sc x4. Then repeat for the rest of the round (48).
Round 17: Inc, then sc x5. Then repeat for the rest of the round (56).
Sewing:
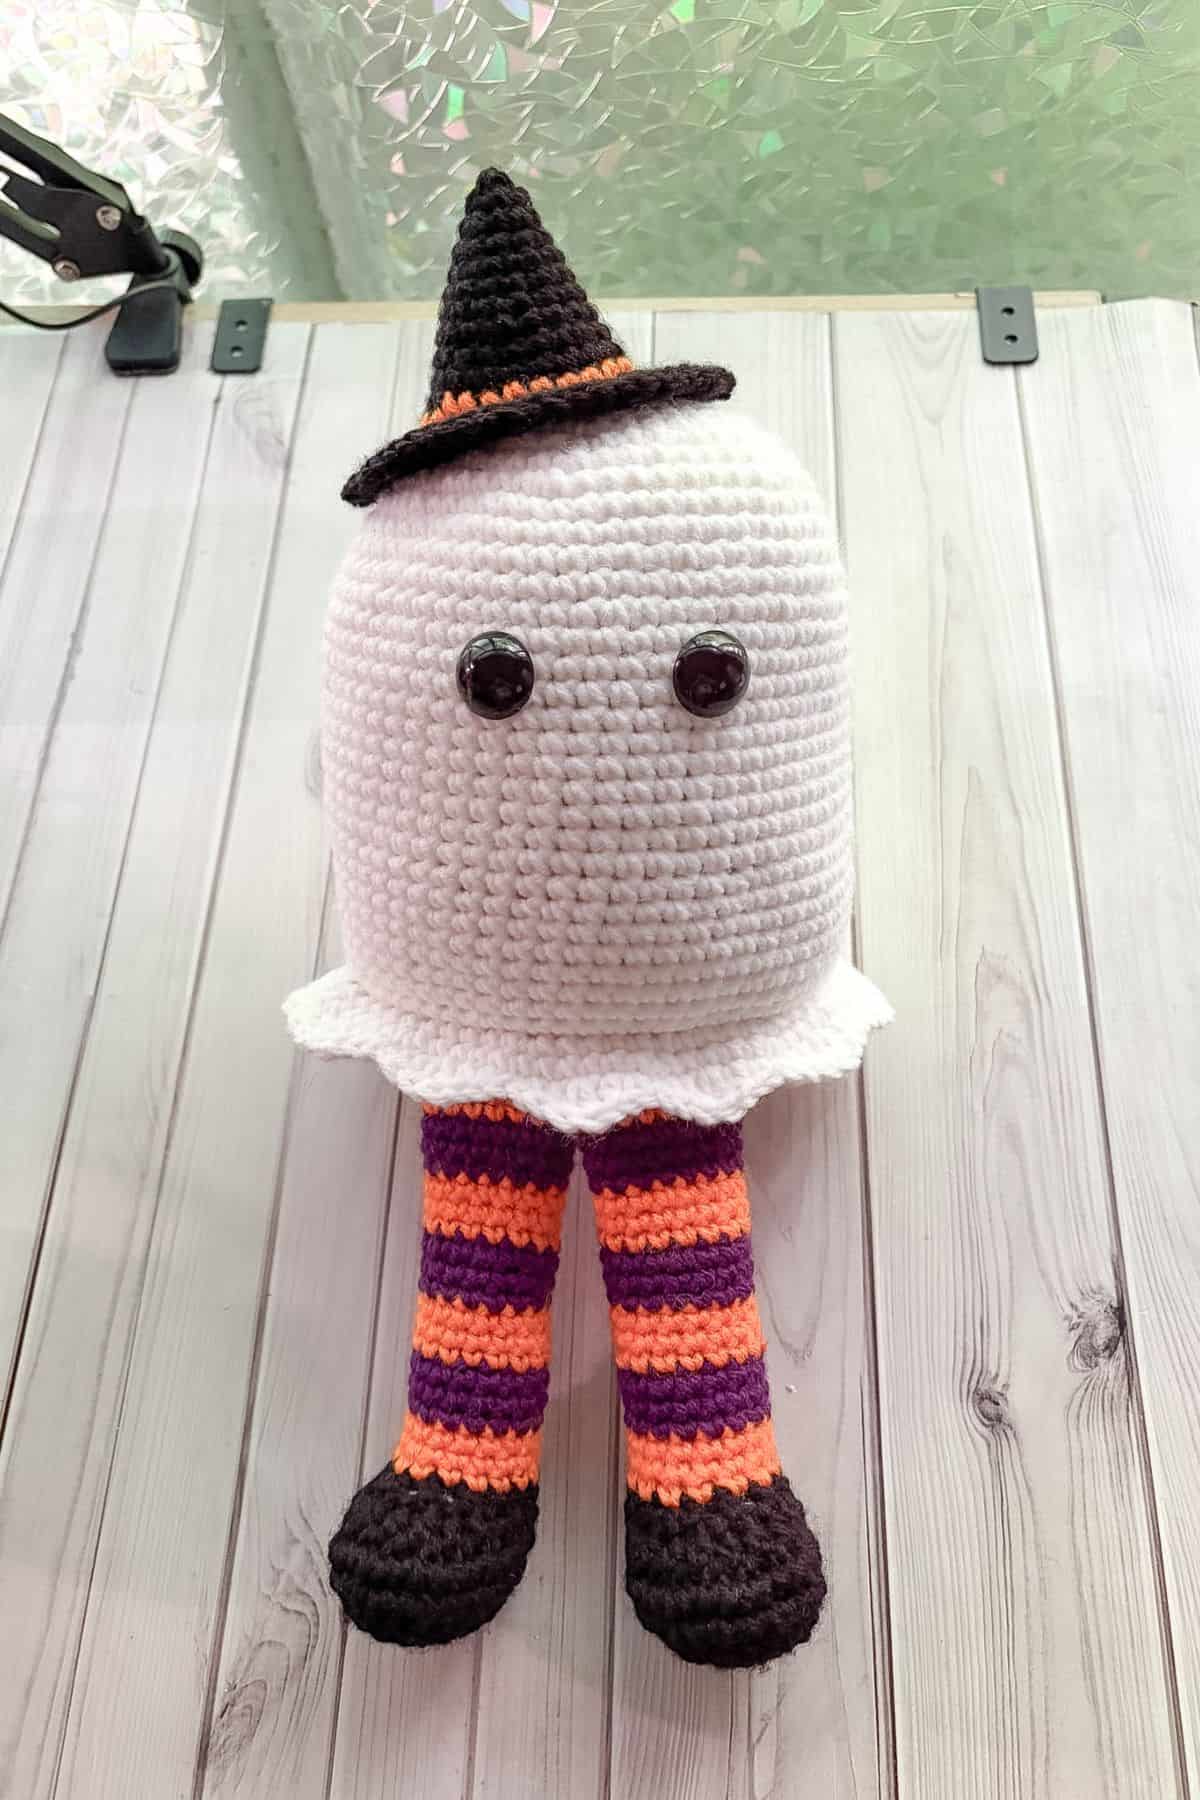
- Sew the legs to the bottom of the ghost, about a ¼ of the way back from the front.
- Sew the hat to the ghost. I like to stuff the hat a little bit and then have it off to the side a little bit.
You are all finished with my free crochet ghost pattern! And now you have a crochet ghost amigurumi ready for Halloween and snuggling!
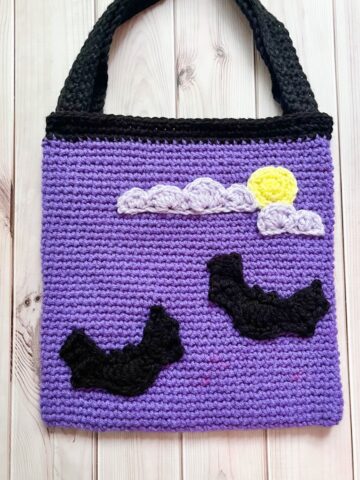
If you have any extra purple and black yarn, you can make a crochet bat bag for trick or treating!
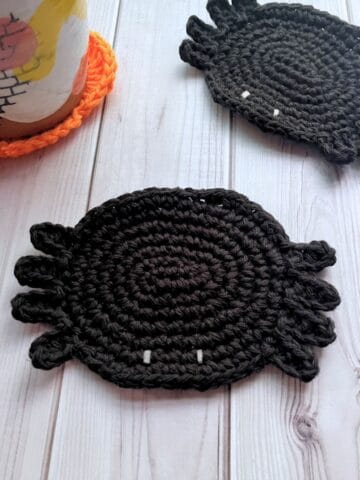
Other Halloween patterns you might be interested in that can use some of the other leftover yarn are my crochet skull granny square pattern, crochet easy pumpkin pattern, or my crochet bat amigurumi pattern.
🐌Expert Tips
- Selecting Yarn: Choose a yarn that complements your overall design. Variegated yarn can add an interesting twist to your ghost's appearance.
- Adjusting Size: If you want a larger or smaller ghost, simply adjust your hook size and yarn weight accordingly. A larger hook with thicker yarn will yield a bigger ghost.
- Embellishments: Consider adding little details like embroidered features or small accessories to personalize your ghost even further.
- Stabilizing the Shape: To maintain the ghost's shape, use a yarn that holds its structure well, especially for the body.
- Making It Sturdy: If you're concerned about the durability of the free crochet ghost pattern, consider adding a sturdy base using cardboard or a similar material to help the ghost stand upright.
🧵 Pattern FAQs
You can make a magic ring, sc x6 into the circle, and then increase in every stitch (12). Fasten off and sew them to the face.
Absolutely! Get creative with the expressions!
Either Amazon or the local craft store depending on my schedule and how soon I need to grab them.
🧶More Crochet Halloween Patterns


If you tried this Free Crochet Ghost Pattern (or any other pattern on my website), please let me know how it went in the 📝 comments below. I'd love to hear from you!
Free Crochet Ghost Pattern
Materials
Abbreviations (US terms)
- Magic ring - mr
- Chains - ch
- Single crochet - sc
- Increase (inc) - 2 stitches in the same stitch
- Decrease (dec) - 1 stitch in 2 stitches
- Slip stitch - sl st
- Half double crochet - hdc
- Double crochet - dc
- Front loop only (flo)
- Back loop only - blo
Notes
- Yarn Choice: I made the crochet ghost amigurumi with acrylic yarn since it's what I had on hand, but this project can be completed with any type of yarn. I highly suggest cotton, acrylic, or chunky yarn. If you use chunky yarn, it will be quite enormous.
- Finished Size: The finished size of the free crochet ghost pattern is about 14 inches high, including the hat, using a 4mm hook size.
- Updated Pattern: This is an updated pattern for my free crochet ghost pattern. The original pattern had a different method creating the indents of the ghost and it seemed really tricky for others to recreate. For the update, I went with a scalloped edge to make the pattern easier and added witchy legs to make it extra cute.
Instructions
- For the free crochet ghost pattern, we will mostly be working in rounds.
Ghost Body:
- Round 1: Using white yarn, make a mr and then make sc x6 in the circle. If you find it difficult making a magic ring you can chain 2 and then crochet sc x6 in the second chain from the hook (6).
- Round 2: Inc in every sc (12).
- Round 3: Inc and then sc. Then repeat for the rest of the round (18).
- Round 4: Inc, then sc x2. Then repeat for the rest of the round (24).
- Round 5: Inc, then sc x3. Then repeat for the rest of the round (30).
- Round 6: Inc, then sc x4. Then repeat for the rest of the round (36).
- Round 7: Inc, then sc x5. Then repeat for the rest of the round (42).
- Round 8: Inc, then sc x6. Then repeat for the rest of the round (48).
- Round 9: Inc, sc x7. Then repeat for the rest of the round (54).
- Round 10: Inc, sc x8. Then repeat for the rest of the round (60).
- Round 11-33: Sc in every stitch (60). Add the eyes between rounds 17-18 roughly 5-6 stitches apart.
- Round 34: In flo for this round, inc, sc x9. Then repeat for the rest of the round (66).
- Round 35: Inc, sc x10. Then repeat for the rest of the round (72).
- Round 36: We are making the little scalloped edge this round. *Sl st, sc, hdc, dc inc, hdc, sc. Repeat from * for the rest of the round. Fasten off the yarn and then weave in the ends.
- Round 37: Rejoin your yarn to the blo of round 34. Sc in every stitch (60).
- Round 38: Dec, sc x8. Repeat for the rest of the round (54).
- Round 39: Dec, sc x7. Repeat for the rest of the round (48).
- Round 40: We are going to start reducing the rounds by 8 instead of 6. Dec, sc x4. Repeat for the rest of the round (40). Begin to stuff the ghost if you haven't already.
- Round 41: Dec, sc x3. Repeat for the rest of the round (32).
- Round 42: Dec, sc x2. Repeat for the rest of the round (24).
- Round 43: Dec, sc. Repeat for the rest of the round (16).
- Round 44: Dec. Repeat for the rest of the round (8). Fasten off and sew the bottom of the ghost closed, weave in any ends.
Crochet Witch Shoes:
- Round 1: Using black yarn, ch x4. In the second ch from the hook make a sc. In the next stitch make a sc. In the last stitch sc x3. Sc in the next st. Inc in the last chain. Sl st to the first sc you made (8). This is the only sl st you'll make when making the shoes.
- Round 2: Hdc inc x5, sc inc x3 (16).
- Round 3: Hdc inc, hdc. Then repeat for the entire round (24).
- Round 4: Sc inc, sc x2. Then repeat for the rest of the round (32).
- Round 5: Sc in every stitch (32).
- Round 6: Sc x6, sc dec x2, hdc dec x6, sc dec x2, sc x6 (22).
- Round 7: Sc x5, sc dec x2, hdc dec x2, sc dec x2, sc x5 (16). Fasten off the black and join the orange.
- Round 8-10: Sc in every stitch (16). Fasten off the orange and join the purple yarn.
- Rounds 11-28: Repeat rounds 8-10 (16), but switch colors every 3 rounds. At the end of round 28, fasten off the orange yarn and stuff the leg a little, and sew the leg closed.
Crochet Witches Hat:
- Round 1: Using black yarn, make a mr and sc x3 in the circle (3).
- Round 2: Inc in every stitch (6).
- Round 3: Inc, then sc. Then repeat for the rest of the round (9).
- Round 4: Inc, then sc x2. Then repeat for the rest of the round (12).
- Round 5: Sc in every stitch (12).
- Round 6: Inc, then sc x3. Then repeat for the rest of the round (15).
- Round 7: Sc in every stitch (15).
- Round 8: Inc, then sc x4. Then repeat for the rest of the round (18).
- Round 9: Sc in every stitch (18).
- Round 10: Inc, then sc x5. Then repeat for the rest of the round (21).
- Round 11: Sc in every stitch (21).
- Round 12: Inc, then sc x6. Then repeat for the rest of the round (24). Fasten off the black yarn and join the orange yarn.
- Round 13: Sc in every stitch (24). Fasten off the orange yarn and rejoin the black yarn.
- Round 14: For this round, work in flo. Inc, then sc x2. Then repeat for the rest of the round (32).
- Round 15: Inc, then sc x3. Then repeat for the rest of the round (40).
- Round 16: Inc, then sc x4. Then repeat for the rest of the round (48).
- Round 17: Inc, then sc x5. Then repeat for the rest of the round (56).
Sewing:
- Sew the legs to the bottom of the ghost, about a ¼ of the way back from the front.
- Sew the hat to the ghost. I like to stuff the hat a little bit and then have it off to the side a little bit.
- You are all finished with my free crochet ghost pattern! And now you have a crochet ghost amigurumi ready for Halloween and snuggling!


Jamie says
I can’t find the picture for doing the bottom of the Ghost of red and black lines to make the indents.
Kimberly Arenas says
The photo is in the main post right before the instructions for the arms 🙂
Maxine says
Hi, what round do the eyes go in please?
Kimberly Arenas says
Between rounds 17 and 18, I will adjust the pattern to reflect this.
Ruth A Larabee says
you have a pattern for the batwings, fangs?
KimberlyArenas says
I do not, but you can always try your hand at making some! 🙂
Chelsea Ann says
I made the whole ghost but I just cannot figure out the whip stitching part, can you please explain further? Or a video or something?! HELP!
KimberlyArenas says
Hi I had a typo in the pattern, it should be a running stitch not a whip stitch, I have also updated the photo to be more visually explanatory so you can see the stitch and where it should go on the bottom 🙂 I hope that helps!