Crochet Wallet Pattern
My Crochet Wallet Pattern is the perfect way to accessorize and keep all your important cards safe! The best part is you can make this crochet wallet in less than an hour.
Materials
- Caron One Pound - white
- Caron One Pound - cape cod
- 4mm hook
- Tapestry needle
- Velcro or button for closure
- Sewing thread and needle for button/velcro.
Abbreviations (US terms)
- Single crochet - sc
- Half double crochet - hdc
- Slip stitch - sl st
- Chains - ch
Notes
- Yarn Type: I used acrylic yarn for the crochet wallet pattern. You can also use cotton yarn.
- Stitch Simplicity: The base of the crochet wallet pattern only calls for single crochet (sc), with no fancy stitches involved.
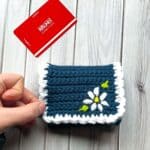
- Finished Size: The finished wallet measures about 3 inches tall and 4 inches wide.
Instructions
- The crochet wallet pattern is worked in rows.
- Ch x66 (66). This should be 15.5-16 inches long.
- Row 1: Starting in the second ch from hook, sc in every stitch (645. Then ch x1 and turn.
- Row 2-13: Sc in every stitch (64). Then ch x1 and turn
- Row 14-28: Sc x16 (16). Then ch x1 and turn. After all the rows are done, fasten off and weave in the tail. This section is the wallet lid.
- Now that the base of the wallet is done, it is time to add trim and then fold it and sew it into a wallet!
- Lay the piece flat so that the long portion of the wallet is at the bottom, and the shorter rows are in the upper right.
Crochet Wallet Trim:
- Join white yarn to the outer side of row 14.
- In the next stitch *hdc x2, then sl st into the next stitch. Repeat from * for the rest of the rest of the section until you reach row 28, then go across row 28, and back down to row 14. Fasten off the white yarn.
- From left to right, fold the bottom portion of the wallet 3 times so that there are 4 walls to the wallet and then ultimately you end up with 3 pockets.
- With yarn and tapestry needle, sew alongside the edges being careful not to sew too far into the wallet that it makes it harder to insert cards.
Embroidery:
- I chose to do a little embroidery of a daisy in the bottom left corner. This is optional, and uses minimal amounts of white, yellow and green yarn.
- To close the wallet. You can either sew a button on or velcro for secure closing and opening.
- As you can see the crochet wallet design is fairly simple and can be completed pretty fast.
Tried this pattern?Mention @thecaffeinatedsnail or tag #thecaffeinatedsnail!
