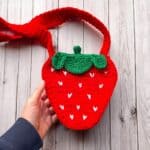
Crochet Strawberry Bag Pattern
This Crochet Strawberry Bag Pattern is a quick project that’s a cute way to accessorize in spring or summer! Wear the crochet strawberry bag to the beach or farmer's market to make a statement.
Materials
Abbreviations (US terms)
- Chains - ch
- Magic ring - mr
- Single crochet - sc
- Double crochet - dc
- Increase - inc
- Decrease - dec
Notes
- Yarn Choice: I used acrylic yarn for this crochet strawberry bag pattern, but cotton or chunky yarn would also work well. I use acrylic for most of my crochet patterns like my crochet strawberry blanket, but I use cotton mostly for coasters like my crochet strawberry coaster pattern.
- Size Consideration: The crochet strawberry bag pattern is designed to hold a phone and a few small objects; it is not intended for large or heavy items—think of it as a small strawberry crochet purse.
- Adjustable Strap: You can adjust the strap length depending on where you want the bag to sit on your side or if it’s for a child. I prefer mine right above my hip.
Instructions
- The crochet strawberry bag pattern will be made in rows:
Crochet Strawberry x2:
- Ch x9 and turn.
- Row 1: In the second ch from the hook, make a sc. Continue making sc for the entire row (8). Then ch x1 and turn.
- Row 2: Inc, sc x6, inc (10). Then ch x1 and turn.
- Row 3: Inc, sc x8, inc (12). Then ch x1 and turn.
- Row 4-5: Sc x12 (12). Then ch x1 and turn.
- Row 6: Inc, sc x10, inc (14). Then ch x1 and turn.
- Row 7: Sc x14 (14). Then ch x1 and turn.
- Row 8: Inc, sc x12, inc (16). Then ch x1 and turn.
- Row 9: Sc x16 (16). Then ch x1 and turn.
- Row 10: Inc, sc x14, inc (18). Then ch x1 and turn.
- Row 11: Sc x18 (18). Then ch x1 and turn.
- Row 12: Inc, sc x16, inc (20). Then ch x1 and turn.
- Row 13: Sc x20 (20). Then ch x1 and turn.
- Row 14: Inc, sc x18, inc (22). Then ch x1 and turn.
- Row 15-17: Sc x22 (22). Then ch x1 and turn.
- Row 18: Inc, sc x20, inc (24). Then ch x1 and turn.
- Row 19: Sc x24 (24). Then ch x1 and turn.
- Row 20: Inc, sc x22, inc (26). Then ch x1 and turn.
- Row 21-24: Sc x26 (26). Then ch x1 and turn.
- Row 25: Dec, sc x22, dec (24). Then ch x1 and turn.
- Row 26: Sc x24 (24). Then ch x1 and turn.
- Row 27: Dec, sc x20, dec (22). Then ch x1 and turn.
- Row 28: Dec, sc x18, dec (20). Then ch x1 and turn.
- Row 29: Sc x20 (20). Then ch x1 and turn.
- Row 30: Dec, sc x16, dec (18). Then ch x1 and turn. Fasten off and weave in ends.
Crochet Strawberry Bag Strap:
- This is going to be the side of the strawberry as well as the strap of the bag.
- Ch x7 (7) and turn.
- Row 1: In the second ch from hook make a sc. Continue to make sc in each ch. (6)
- Row 2-175: Sc x6 (6). Ch x1 and turn.
- You may need to adjust rows depending on the size of the handle you would like, but also keep in mind that this is going to surround the 2 strawberry pieces you made earlier.
- Fasten off but leave the weaving of the ends until the very end so you can adjust the length of the strap if need be.
Crochet Strawberry Leaves:
The middle leaves x2:
- Row 1: Make a mr, ch x2 (counts as a dc) then dc x5 (6). Ch x2 (counts as a dc for the next row) and turn. DO NOT JOIN THE CIRCLE.
- Row 2: Make a dc into the last stitch you made from the previous round, then inc in every stitch (12). Ch x2 and turn.
- Row 3: Make a dc into the last stitch you made from the previous round, dc x1 in the next stitch, then *inc, dc. Repeat from * for the rest of the row (18). Fasten off and weave in the ends.
The outer leaves x4:
- Ch x5 (5).
- Row 1: In the third chain from the hook make a dc. Make another dc in the next stitch. Then dc x6 in the last chain. Dc x3 on the other side of the chains. Fasten off and weave in the ends.
- Crochet the Leaves to the Bag:
- Pin in place a small leaf, the big leaf, and then another small leaf at the top. This should fit almost perfectly with the top edge. Then take the green yarn on the hook and go through both the strawberry and green leaf, yarn over and pull out and finish like you would a single crochet. Then sc the entire edge with the leaves by making sure to go through the sc at the top and then through a closest “hole” on the leafs edge (which is usually at the end of each row).
- When you are half through, so about 8-9 single crochets in, on one strawberry side you will ch x7 then attach the chain back into the same stitch you started the chain in by making a single crochet. Then you will continue to finish attaching the leaves.
- On the other strawberry you will again go halfway on the top edge and make a pom pom stitch (see paragraph below) and then continue to crochet the leaves to the strawberry.
* How to crochet a pom pom stitch:
- Ch x3.
- In the 3rd chain from the hook, dc 4 together. To do this make a normal dc but instead of going through the last 2 loops on your hook you start to make another dc, so each time you make a dc you are gaining an extra loop on your hook. At the end you should have 5 loops on your hook. Then yarn over and go through all 5 loops on your hook.
- Then ch x3.
- In the 3rd chain from your hook, dc 4 together again.
- Fold the cluster of stitches over and sl st into the ch that you made your first group of dc’s in.*
- Sc back into the original stitch you made before making the pom pom, then continue to single crochet the edge of the strawberry bag and leaves together.
Embroidery:
- Sporadically embroider little white Vs on one side of each strawberry pieces.
Crocheting/Sewing the Bag Together:
- Now that the crochet strawberry leaves are attached, you can use the same concept above for attaching the side piece to the front and back pieces.
- With the embroidery and leaves facing outwards, line up the strawberry (right by the leaves) and the beginning of the strawberry strap.
- Crochet the strap (this is also the middle of the bag) and strawberry together. Now crochet along the entire edge of the strawberry, making sure to grab both pieces.
- Once you get to the other side of the bag fasten off and weave in the ends. Repeat the process above for the other side.
- Now that the bag has been made you only have the strap to sew onto the side that it is still not attached to. This is where you can put it on your shoulder and adjust the length of the strap if you need to by either adding more rows or taking a few rows out.
- Once you are happy with the length, take your tapestry needle and sew it to the inside of the crochet strawberry bag.
- After all the sewing and weaving in the ends are done you are finished! You are now done with the crochet strawberry bag pattern!
Tried this pattern?Mention @thecaffeinatedsnail or tag #thecaffeinatedsnail!
