Crochet Pumpkin Pie Potholder Pattern
Pumpkin pie is symbolic of fall and holidays like Thanksgiving, so why not decorate your kitchen with my Crochet Pumpkin Pie Potholder Pattern all season long? This potholder is perfect for pulling pies and casseroles out of the oven.
Materials
Abbreviations (US terms)
- Magic ring - mr
- Single crochet - sc
- Double crochet - dc
- Increase - inc - 2 stitches in the same stitch for this pattern it will be DC stitches unless noted.
- Chains - ch
- Slip stitch - sl st
Notes
- Yarn Choice: I made this with cotton yarn. It’s essential to avoid acrylic and chunky yarns for potholders, as they do not retain heat well. Use heat-resistant yarn, like cotton, that won't melt under high temperatures.
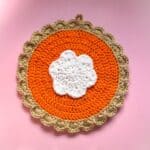
- Finished Size: The finished size of the crochet pie potholder is roughly 10 inches in diameter.
- Color Variations: I used orange cotton, but feel free to change the color for different pie designs!
Instructions
- The crochet pumpkin pie potholder pattern will be made in the round.
- Start with making the whipped cream.
Crochet Whipped Cream:
- Round 1: With white, make a mr, next ch x2 (counts as a dc) and then dc x11 into the mr, then sl st to the beginning chains (12). If you find it difficult making a magic ring you can chain 4, sl st to the first chain and then in the loop: ch x2 and dc x11 then sl st to the chain 2 (12).
- Round 2: Ch x2, dc in the same place you made the chains, then inc in every dc, sl st to starting chains. (24)
- Round 3: Shell stitch round- Skip a stitch and then make 6 dcs in one stitch. Next skip a stitch and then make a sc. You just made a shell stitch. Repeat for the rest of the round. Fasten off and leave a tail for sewing.
- Set aside.
Crochet Pumpkin Pie:
- Make both an orange and tan circle.
- Round 1: Make a mr, next ch x2 and then dc x11 into the mr, then sl st to the beginning chains (12).
- Round 2: Ch x2, dc in the same place you made the chains, then inc in every dc, sl st to starting chains. (24)
- Round 3: Ch x2, dc in the same place you made the chains, and dc in the next stitch. *Inc, dc and then repeat from * for the rest of the round. Then sl st to the starting chains. (36)
- Round 4: Ch x2, dc in the same place you made the chains, and dc in the next 2 stitches stitch. *Inc, dc x2 and then repeat from * for the rest of the round. Then sl st to the starting chains. (48)
- Round 5: Ch x2, dc in the same place you made the chains, and dc in the next 3 stitches. *Inc, dc x3 and then repeat from * for the rest of the round. Then sl st to the starting chains. (60)
- Round 6: Ch x2, dc in the same place you made the chains, and dc in the next 4 stitches. *Inc, dc x4 and then repeat from * for the rest of the round. Then sl st to the starting chains. (72)
- Round 7: Ch x2, dc in the same place you made the chains, and dc in the next 5 stitches. *Inc, dc x5 and then repeat from * for the rest of the round. Then sl st to the starting chains. (84)
Sewing/Assembly:
- Sew the whipped cream to the middle of the orange circle.
- We will crochet the 2 circles together, right side out. Check below for details.
Shell Border:
- Round 8: With tan yarn you will want to SINGLE crochet around the edge going through both the orange and tan circles. You will want to do a SC INC, and then sc x6 and repeat around the entire edge (96).
- Round 9: Now we make the shells! Skip a stitch and then make 6 dcs in one stitch. Next skip a stitch and then make a sc. You just made a shell stitch.
- Repeat for the rest of the round.
- When you reach the end of the shell round ch x10 then sl st into the same stitch you started the chs from. Fasten off and weave in the end.
- If you want the chains to be thicker or more sturdy, you can add 12 sc into the loop.
- Now you have a cute crochet pumpkin pie potholder!
Tried this pattern?Mention @thecaffeinatedsnail or tag #thecaffeinatedsnail!
