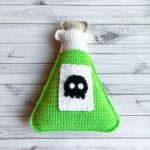
Crochet Potion Bottle Pattern
My crochet potion bottle pattern is a perfect addition to any home as Halloween decor! This pattern can double up as a Halloween crochet pillow for the couch or a plushie to play with or have sit on a shelf.
Materials
Abbreviations (US terms)
- Chain - ch
- Single crochet - sc
- Increase - inc
- Decrease - dec
- Magic ring - mr
- Slip stitch - sl st
Notes
- I made the crochet potion bottle with worsted yarn, but any yarn thickness works.
- Smaller yarns (like DK) make the bottle smaller, and bulky yarns make it larger—just use the correct hook size for the yarn.
- I made a skull applique for the Halloween pillow pattern, but you can choose any applique, like a llama or heart.
- You can also cut and sew felt for the potion label if preferred.
- The finished bottle is about 18" tall when using a 5.5mm hook and worsted yarn.
Instructions
- The crochet potion bottle pillow is made in rows and then crocheted together.
Flat Sides: Make x2
- Row 1: Ch x33 in green, then turn.
- Row 2: In the second chain from the hook make a sc. Then continue making sc for the entire chain length (32). After, ch x1 and then turn.
- Row 3: Inc, then sc x30. In the last stitch in the row make a inc (34). Then ch x1 and turn.
- Row 4: Sc in every stitch (34). Then ch x1 and turn.
- Row 5: Inc, then sc x32. In the last stitch in the row make a inc (36). Then ch x1 and turn.
- Row 6-7: Sc in every stitch (36). Then ch x1 and turn.
- Row 8: Dec, then sc x32. In the last stitch in the row make a dec (34). Then ch x1 and turn.
- Row 9-10: Sc in every stitch (34). Then ch x1 and turn.
- Row 11: Dec, then sc x30. In the last stitch in the row make a dec (32). Then ch x1 and turn.
- Row 12-13: Sc in every stitch (32). Then ch x1 and turn.
- Row 14: Dec, then sc x28. In the last stitch in the row make a dec (30). Then ch x1 and turn.
- Row 15-16: Sc in every stitch (30). Then ch x1 and turn.
- Row 17: Dec, then sc x26. In the last stitch in the row make a dec (28). Then ch x1 and turn.
- Row 18-19: Sc in every stitch (28). Then ch x1 and turn.
- Row 20: Dec, then sc x24. In the last stitch in the row make a dec (26). Then ch x1 and turn.
- Row 21-22: Sc in every stitch (26). Then ch x1 and turn.
- Row 23: Dec, then sc 22. In the last stitch in the row make a dec (24). Then ch x1 and turn.
- Row 24-25: Sc in every stitch (24). Then ch x1 and turn.
- Row 26: Dec, then sc x20. In the last stitch in the row make a dec (22). Then ch x1 and turn.
- Row 27-28: Sc in every stitch (22). Then ch x1 and turn.
- Row 29: Dec, then sc x18. In the last stitch in the row make a dec (20). Then ch x1 and turn.
- Row 30-31: Sc in every stitch (20). Then ch x1 and turn.
- Row 32: Dec, then sc x16. In the last stitch in the row make a dec (18). Then ch x1 and turn.
- Row 33-34: Sc in every stitch (18). Then ch x1 and turn.
- Row 35: Dec, then sc x14. In the last stitch in the row make a dec (16). Then ch x1 and turn.
- Row 36-37: Sc in every stitch (16). Then fasten off the green yarn and join the white, after that ch x1 and turn in the white yarn.
- Row 38: Dec, then sc x12. In the last stitch in the row make a dec (14). Then ch x1 and turn.
- Row 39-40: Sc in every stitch (14). Then ch x1 and turn.
- Row 41: Dec, then sc x10. In the last stitch in the row make a dec (12). Then ch x1 and turn.
- Row 42-43: Sc in every stitch (12). Then ch x1 and turn. After row 43 instead of chaining and turning, fasten off.
- Row 44: With the white yarn, ch x3 and then reattach to the top of the bottle panel by crocheting into the last row you worked in. Crochet for the rest of the row, then ch x4 and turn (19).
- Row 45: In the second ch, make a sc. Then make a sc in each of the next 2 chains. Then sc x12 and then sc in each of the last 3 chains (18). After, ch x1 and turn.
- Row 46-48: Sc x18 (18). Then ch x1 and turn. After row 48, fasten off the yarn.
- Row 49: Using the dove colored yarn, skip 4 sc stitches in the last row you worked, and join the new yarn color. Then sc x10 (10). There should be 4 sc stitches from the previous row that you have not worked in, do not work in those. Then ch x1 and turn.
- Row 50: Sc x10 and then ch x1 and turn (10).
- Row 51: Inc, then sc x8. In the last stitch in the row make a inc (12). Then ch x1 and turn.
- Row 52-53: Sc in every stitch (12). Then ch x1 and turn, but in the last row fasten off.
Potion Label:
- Row 1: With the white yarn, ch x15 and then turn.
- Row 2: In the second ch from the hook, make a sc and then continue making sc down the length of the chain (14). Then ch x1 and turn.
- Row 3-24: Sc in every stitch (14). Then ch x1 and turn. After the last row, fasten off but leave a tail for sewing.
Skull Applique:
- Row 1: With the black yarn, ch x7 and then turn.
- Row 2: In the second ch from the hook, make a sc and then continue making sc down the length of the chain (6). Then ch x1 and turn.
- Row 3: Inc, then sc x4. In the last stitch in the row make a inc (8). Then ch x1 and turn.
- Row 4: Sc in every stitch (8). Then ch x1 and turn.
- Row 5: Inc, then sc x6. In the last stitch in the row make a inc (10). Then ch x1 and turn.
- Row 6-7: Sc in every stitch (10). Then ch x1 and turn.
- Row 8: Dec, then sc x6. In the last stitch in the row make a dec (8). Then ch x1 and turn.
- Row 9: This is the row we make the upper skull teeth.
- *Sl st, then immediately ch x3 and make a sc in each of the 2nd and 3rd chains. After that, sl st in the next stitch from the previous row. * Repeat 3 more times between the *. You should have 4 teeth.
- Fasten off the yarn and leave a tail for sewing.
Eyes:
- Round 1: Make a mr, then immediately sc x6 in the circle, then sl st to the first stitch. Fasten off and leave a tail for sewing. Make 2.
- Once the eyes are made, sew them to the skull.
Assembly:
- Crochet the 2 potion bottle sides together. You can use either 1 color yarn or switch the colors when crocheting the edge to the corresponding color block you are in. I started crocheting the edges together from the side of the potion bottle and went down and then around leaving the top open. I then began to stuff the pillow lightly with polyfill and continued crocheting the top of the bottle in its corresponding colors.
- Once the bottle is crocheted closed, you can work on the label.
- If you are using an applique to put on the label like my crochet skull pattern, you can sew the applique on the label and then sew the label to the bottle.
- Once all the sewing is complete, weave in any ends.
- It's finished! A perfect decoration for Halloween or DnD night. I hope you enjoyed my crochet potion bottle pattern!
Tried this pattern?Mention @thecaffeinatedsnail or tag #thecaffeinatedsnail!
