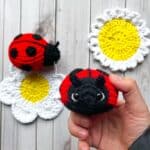
Crochet Ladybug Pattern
This free crochet ladybug pattern is fast, easy and perfect for beginners. Make a whole bunch so you are ready for spring and summer!
Materials
- Magic ring mr
- Single crochet sc
- Increase inc
- Decrease dec
- Slip stitches sl st
Abbreviations (US terms)
Notes
- Size: When using a 4.5mm hook and worsted weight yarn, your finished amigurumi ladybug will measure approximately 4 inches long. If you want it keychain sized, try using size 3 yarn and a 3.5-4mm hook.
- Yarn Flexibility: The crochet ladybug pattern is super versatile when it comes to yarn! While I used worsted weight acrylic for a sturdy finish, you can easily swap in cotton, velvet, or even blanket yarn for different textures, looks, and sizes. Just adjust your hook size accordingly to keep those stitches nice and tight. If you use chunky yarn it will come out as a 6-8inch plushie!
- Beginner-Friendly: If you're new to crochet or amigurumi, don't worry —the crochet ladybug pattern is very approachable! It uses basic stitches like single crochet, increases, and decreases, with no complicated shaping. It’s a great confidence booster for newer crocheters.
Instructions
- For this crochet ladybug pattern, we will be working in rounds.
Crochet Ladybug Shell:
- Round 1: Using the red yarn, make a mr and sc x6 into the circle. If you find it difficult making a magic ring you can chain 2 and then crochet sc x6 in the second chain from the hook (6).
- Round 2: Inc in every sc (12).
- Round 3: Inc, sc. Then repeat until the end of round (18).
- Round 4: Inc, sc x2. Then repeat until the end of round (24).
- Round 5: Inc, sc x3. Then repeat until the end of round (30).
- Round 6: Inc, sc x4. Then repeat until the end of round (36).
- Round 7-10: Sc in every stitch (36). Then fasten off the red yarn and join the black yarn.
- Round 11: In blo - dec, sc x4. Then repeat for the rest of the round (30).
- Round 12: Dec, sc x3. Then repeat for the rest of the round (24).
- Round 13: Dec, sc x2. Then repeat for the rest of the round (18). (If you haven’t already started, you should stuff the crochet ladybug).
- Round 14: Dec, sc. Then repeat for the rest of the round (12).
- Round 15: Dec. Then repeat for the rest of the round (6). Fasten off the yarn and close the hole at the bottom of the ladybug. Weave in any ends.
Crochet Ladybug Head:
- Round 1: Using the black yarn, make a mr and sc x6 into the circle (6).
- Round 2: Inc in every sc (12).
- Round 3: Inc, sc. Then repeat until the end of round (18).
- Round 4-5: Sc in every stitch (18). Then fasten off and leave a yarn tail for sewing.
- Your safety eyes should be placed between rounds 2-3 in the middle of the ladybug face.
Crochet Ladybug Spots:
- Make x6.
- Round 1: Using the black yarn, make a mr and sc x6 into the circle (6). Then fasten off and leave a yarn tail for sewing.
Crochet Ladybug Antennas:
- Make x2.
- Using black yarn, ch x3. Then in the second ch from the hook make a sl st. Make another sl st in the last ch. Then fasten off and leave a yarn tail for sewing.
- Attach the antennas between rounds 3 and 4, right above the eye placement. This can be either before or after you sew on the ladybug head to its body (I did mine after).
Sewing:
- Create a line dividing the ladybug body in half using black yarn.
- Sew the ladybug head to its body. Stuff the head as needed as you are sewing the 2 pieces together.
- Sew on the spots, the placement is up to you.
- Sew the antennas onto the ladybug if you have not already done so (between rounds 3 and 4, right above the eye placement).
- Embroidery: With the white yarn, try and make a little white line right above and below the outer half of the eyes. You want to be as close to the safety eye as possible (even slightly underneath it if you are able to) and make sure you don't pull the yarn too tight otherwise the line disappears. This creates a little dimension to the all dark ladybug face and highlights where the eyes are.
- And now you have a cute little crochet ladybird! I hope you enjoyed my crochet ladybug pattern
Tried this pattern?Mention @thecaffeinatedsnail or tag #thecaffeinatedsnail!
