Crochet Concha Pattern
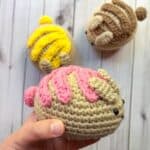
My Crochet Concha Pattern is inspired by Mexican concha bread but with a bunny twist. Concha bread always looks so beautiful to eat, but here is a version you can keep forever!
Materials
- Caron One Pound - Lace
- 1 small ball of frosting color - pink white, yellow, brown
- 4.5 mm hook
- 8 mm Safety Eyes
- Tapestry needle
- Black yarn for embroidery
- Polyfill
Abbreviations (US terms)
- Magic ring - mr
- Chain - ch
- Slip stitch - sl st
- Single crochet - sc
- Increase - inc
- Decrease - dec
Notes
- Yarn Type: I used acrylic yarn for the crochet concha pattern, but any type of yarn will do; just pay attention to the recommended hook size. You can mega size it by using chunky yarn like my crochet strawberry pillow pattern and crochet tempura pattern.
- Finished Size: The finished size of the crochet concha pattern is roughly 5 inches long and 3.5 inches high. Depending on the yarn and hook size you use, the end product may vary.
- Design: The concha icing is made in a way that can be easily adjusted to fit your bunny by curving the lines as its being sewn to the bunny. Use pins if necessary.
Instructions
- The crochet concha pattern will be made in rounds.
- Round 1: Using light brown yarn, make a mr and make sc x6 in to the circle. If you find it difficult making a magic ring you can chain 2 and then crochet sc x6 in the second chain from the hook (6).
- Round 2: Inc in every sc (12).
- Round 3: Inc, sc. Then repeat until end of round (18).
- Round 4: Inc, sc x2. Then repeat until end of round (24).
- Round 5: Inc, sc x3. Then repeat until end of round (30).
- Round 6: Inc, sc x4. Then repeat until end of round (36).
- Round 7: *Inc x2, sc x4, inc, sc x5, inc, sc x5. Repeat from * for the other side of the round (44).
- Round 8: Inc x4, sc x40 (48).
- Round 9: Sc x3, inc x2, sc x43 (50).
- Round 10-13: Sc x50 (50).
- Round 14: Sc x2, dec, sc x3, dec, sc x41 (48).
- Add safety eyes between rounds 9-10 at the pointy end of the bunny. You want them roughly 4-5 stitches apart.
- Round 15: Dec, sc x4. Then repeat until end of round (40).
- Round 16: Dec, sc x3. Then repeat until end of round (32).
- Round 17: Dec, sc x2. Then repeat until end of round (24). Begin to stuff the body.
- Round 18: Dec, sc. Then repeat until end of round (16).
- Round 19: Dec, then repeat until end of round (8).
- Fasten off and sew shut.
Crochet Bunny Ear Pattern x2:
- Make 2 ears. The ears will be made in rounds.
- Round 1: Make a mr and then sc x4 into the circle (4).
- Round 2: Inc, sc. Then repeat for the other half of the round (6).
- Round 3: Sc in every stitch (6). Flip the ear out to right side out.
- Round 4-6: Sc in every stitch (6). Then fasten off and leave tail for sewing.
- Sew the end of the ear closed by going through all front loops from the last round and pull tight.
Icing tail:
- Round 1: Using pink yarn or another icing color, make a mr and then make sc x6 in the circle (6).
- Round 2: Inc in every sc (12).
- Round 3-4: Sc in every stitch (12).
- Round 5: Dec, then repeat until end of round (6). Stuff the tail a little bit as you start the second half of the round. At the end of the round, fasten off and leave a tail for sewing.
Concha Topping:
- Row 1: Ch x16. Starting in the second ch from the hook hdc x14, sl st in the last ch. Then ch x1 and turn.
- Row 2: Make a sl st above the last rows sl st. Then ch x15.
- Row 3: Starting in the second ch from the hook hdc x14, sl st into the last rows sl st. Then ch x1 and turn.
- Row 4: Make a sl st above the last rows sl st. Then ch x13.
- Row 5: Starting in the second ch from the hook hdc x12, sl st into the last rows sl st. Then ch x1 and turn.
- Row 6: Make a sl st above the last rows sl st. Then ch x11.
- Row 7: Starting in the second ch from the hook hdc x10, sl st into the last rows sl st. Fasten off and leave a long tail for sewing.
Sewing:
- Arrange the icing and pin to the concha. The large lines should be near the butt of the bread. Then sew the icing to the bunny. Sew on the tail and then sew on the ears.
- Embroider the eyes (if you didn't use safety eyes) and mouth if you would like.
- And once everything is sewn together, you now have a crochet concha bunny made from my crochet concha pattern!
Tried this pattern?Mention @thecaffeinatedsnail or tag #thecaffeinatedsnail!
