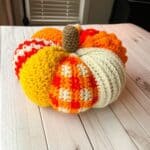
Patchwork Pumpkin Crochet Pattern
My Patchwork Pumpkin Crochet Pattern for 2024 combines my love of crocheting with the aesthetic of patchwork quilting. I used different crochet textures and stitches to make a crochet patchwork pumpkin that is perfect for fall. It is best suited for a more adventurous or advanced crocheter.
Materials
Abbreviations (US terms)
- Chains - ch
- Single crochet - sc
- Half double crochet - hdc
- Double crochet - dc
- Back loop only - blo
- Magic ring - mr
- Special stitches = bobble, camel
Notes
- The patchwork pumpkin pattern uses 8 different crochet stitches, but you can add your own to the patchwork pumpkin crochet pattern.
- The patchwork pumpkin crochet pattern is about 8 inches in diameter. Increase rows for size or adjust the chain length (2 + 1) for height.
- Acrylic, cotton, or other fibers work well for the Patchwork Pumpkin Crochet Pattern, but avoid fuzzy yarn like blanket or chenille, as it can obscure stitch details.
Instructions
- The Patchwork Pumpkin Crochet Pattern is made in rows NOT in the round (except the stem).
- With the red yarn make a crochet chain of 40.
Moss Stitch Segment:
- Tip: Keep your moss stitches a little tighter since it stretches when stuffed. We don’t want giant holes, but small holes will be present. If you want zero holes the houndstooth crochet stitch is a great alternative.
- Row 1: Starting in the second ch from the hook complete this sequence for this row: sc, ch + skip a stitch, sc. At the end of the row you should end in a sc. Then ch x1 and turn. (39)
- Row 2: Sc into the chain space from the row below, ch over the last rows sc, and sc into the next chain space again. While you are completing more rows, make sure you are crocheting into the chain spaces from the previous row, do not make a single crochet into the chain directly (39). Then Ch x1 and change the color to aran.
- Row 3-10: Repeat row 2 but switch colors every 2 rows from scarlet to aran. At the end of the 10th row, switch the color to the yellow yarn. Then ch x1 and turn.
Lemon Peel Pumpkin Segment:
- This section uses the crochet lemon peel stitch or grit stitch.
- Row 11: Make a sc into the last rows sc. Then a dc in the next stitch. The lemon peel stitch is made alternating single and double crochet stitches. So, repeat the process of sc, dc for the rest of the row (39). Then ch x1 and turn.
- Row 12-17: You will repeat row 11 but make sure you are alternating dc and sc and making sure that they stack alternately in rows. So above a dc stitch should be a sc and vice versa.
- When turning if your last stitch is a dc, then you only need 1 turning ch. If the last stitch was a sc then you will need 2 turning chains (39).
- After the 17th row, fasten off the yellow and switch the yarn to red. Then ch x1.
Plaid Pumpkin:
- The crochet plaid stitch is made by switching colors every few sc stitches. Carry your alternating yarn under crochet stitches while working the other color.
- I have a more in depth tutorial on how to do the crochet plaid stitch in dc, but you can easily switch the dc for sc.
- Row 18: With the red yarn, sc x3 —in the last sc when pulling up a loop, switch the yarn to orange. Then sc x3 in orange and switch back to red in the third stitch. Follow this pattern for the rest of the row (39). Then ch x1 and turn.
- Row 19: You will do the same process for the next row but make sure you are stacking the colors - red on red, orange on orange, etc. Then fasten off the red yarn and ch x1 and turn (39).
- Row 20: Sc x3 in orange (above the red stitches) then switch to aran. Sc x3 in aran and switch to orange. Repeat for the rest of the row (39). Then ch x1 and turn.
- Row 21-27: Repeat one more row before switching colors. Repeat rows 18-21. Then do 2 final rows of red and orange (39).
- Fasten off all yarns and weave in tails. Reattach the aran yarn, ch x1 and turn.
Camel Stitch Segment:
- Tip: It's easy to lose stitches here so keep counting!
- Row 28: Hdc x39. Then ch x1 and turn (39).
- Row 29: Insert your hook into only the third loop (the loop behind the back loop) of the first stitch and make a hdc.Always work into that third loop only. It will push the top of your stitch forward. At the end of this row, ch x1 and turn your work (39).
- Row 30: As you look down at the top of your stitch, gently push the top forward to reveal the third loop more clearly. Once the third loop is visible, insert your hook from top to bottom beneath this loop and make a hdc stitch. Then repeat for the rest of the round (39).
- Row 31-36: Repeat row 29 and 30 (39).
- The raised lines created are now the front side of the pattern. It didn't matter to determine the front or back up to this point but we will need to know the difference for the next couple of stitch patterns.
- Fasten off the aran yarn and attach the orange yarn. Then ch x1.
Bobble Stitch Pumpkin Segment:
- Tip: The bobbles should be made when on the wrong side of the pumpkin so that they dace outward on to the correct side - the same side that has the camel stitch mini cable lines.
- The section of the patchwork pumpkin pattern incorporates crochet bobble stitches.
- Row 37-38: Hdc x39, then ch x1 and turn (39).
- Row 39: Hdc x4, then create a bobble stitch* (see paragraph below). Then hdc x2, bobble stitch and then repeat for the rest of the row. Hdc x4 at the end of the row (39). Ch x1 and turn.
- *A bobble stitch is made by yarning over, inserting the hook into the stitch, yarn over, draw loop back through stitch, yarn over pull through 2 loops then STOP. You will have a half completed dc hanging from your hook. Repeat the steps 4 more times until you have 5 half completed dc stitches hanging from your hook and 6 loops ON your hook. Then yarn over and pull through all 6 loops.*
- Row 40: Hdc x39, then ch x1 and turn (39).
- Row 41: Repeat row 39 (39).
- Row 42-43: Hdc x39. Then ch x1 and turn. In the last row fasten off the yarn and attach the red yarn (39).
Mosaic Crochet Pumpkin Segment:
- This is a simple mosaic crochet pattern that creates a crochet polka dot pattern. Since we already made the crochet checkered/plaid pattern, this should feel a little simpler.
- Row 44: Sc x5. In the 5th sc when pulling up a loop, switch the color to yellow. Sc x1 in yellow, and when pulling up a loop, switch the color back to red. Repeat 5 red, 1 yellow sc for the rest of the row (39). You will end the row with 3 red sc.
- Row 45: Sc x39 in red (39).
- Row 46: Sc x2 in red then switch to yellow and sc x1. *Sc x5 in red and then again 1 in yellow. Repeat from * for the rest of the row (39).
- Row 47: Repeat row 45 (39).
- Row 48-53: Repeat rows 44-47 once then 44 and 45 one more time (39). Fasten off the red yarn, you can keep the yellow yarn attached.
Stripe Pumpkin and Solid Pumpkin Segments:
- This part of the crochet pumpkin pattern is made in crochet vertical stripes which will turn horizontal when the pumpkin is stuffed.
- Row 54: In yellow hdc x3, then switch the yarn to aran like you did in the checkered round. Then hdc x3 in aran and switch back to yellow. Keep making hdc stitches and alternating colors for the rest of the round. When you get to the end ch x1 and turn (39).
- Row 55-60: You will continue switching the hdc colors every 3 stitches, just make sure that the colors stack on top of each other to make solid lines. Remember to ch x1 in between each row.
- Fasten off both yarns and weave in any ends (39).
Single Crochet Pumpkin:
- This part of the crochet patchwork pumpkin is just a simple single crochet swatch.
- Row 61-70: Sc x39, then ch x1 and turn (39).
- Fasten off and weave in any ends. Set aside to make the crochet stem.
Pumpkin Stem:
- Round 1: Make a mr, then sc x6 in it (6).
- Round 2: Sc inc for the entire round (12).
- Round 3: Blo sc for the entire round (12).
- Round 4-10: Sc for the entire round (12). Then fasten off but leave a tail for sewing.
Pumpkin Assembly:
- Fold the pumpkin rectangle in half so it's a square, then sew the rectangle closed so it becomes a tube.
- Cinch one end of the pumpkin closed, stuff, and then cinch the other end.
- Tip: If there are holes at the top and bottom from cinching - cinch it again going through just a few loops per cinch (like where the top ridges formed and cinch again)
- To create the pumpkin segments, tie a long string of yarn to the middle part of the pumpkin, then wrap yarn around your pumpkin where the patterns change. You want to pull tight each time you wrap the yarn around the pumpkin so it starts to bulge a bit.
- Once the pumpkin segments are done, sew the crochet pumpkin stem to the top of the pumpkin. If you are using a cinnamon stick instead, omit this part and just insert the cinnamon stick.
- And now the patchwork pumpkin crochet pattern with different stitches is finished! I hope you enjoyed my new pumpkin crochet pattern!
Tried this pattern?Mention @thecaffeinatedsnail or tag #thecaffeinatedsnail!
