How to Crochet an Oval
Learning how to crochet an oval is a fantastic skill to add to your crochet toolbox! Ovals are versatile shapes that can be used for everything from the base of a bag to the body of a stuffed animal.
Materials
- Yarn of your choice I recommend worsted weight for practice
- Matching hook size typically 5.0 mm/H for worsted
- Stitch marker optional but helpful
- Yarn needle
Abbreviations (US terms)
- Chains - ch
- Single crochet - sc
- Double crochet - dc
- Slip stitch - sl st
- Increase - inc
- How to Crochet an Oval
Notes
- Size & Yarn Options: The finished crochet oval depends on how far you want to go with it. You can make it as big or as small as you want.
- Beginner Friendly: This pattern is great for new crocheters. It’s simple and a fast crochet pattern that requires only basic stitches and techniques. It is also an essential crochet shape to know!
- Construction Details: My tutorial on how to crochet an oval uses 10 chains to start, however you can start with as many or as little chains as you want. Just make sure you make more than 3 chains, otherwise you are just making a circle.
Instructions
Single Crochet Oval Pattern:
- Round 1: Ch x10, then in the 2nd ch from the hook make a sc. Sc in the next 7 chains. In the last stitch sc x3, all the while turning to the underside of the chain.
- Now working on the unworked side of the chain, sc x7. Sc inc in the last stitch. Then sl st to the next stitch. This sl st marks the end of the round (20).
- Round 2: In the following stitch make a sc, then sc x6. Inc x3 (in the 3 stitches you made at the end), sc x7, inc x3 (26).
- Round 3: Sc x7, (inc, sc) x3. Then repeat for the other side of the round (32).
- Round 4: Sc x7, (sc x2, inc) x3. Then repeat for the other side of the round (38).
- Again you can add as many rounds as you want to this depending on your project or swatch.
But a few things to note now that you've practiced the oval:
- - We did a slip stitch in only round 1 so we didn't have to split the round when making increases at the ends. This would mean we would have to do an increase and then single crochet the side and the rest of the oval and then do the other 2 increases at the end. It makes it easier to just slip stitch over a stitch so you start with the sc side and do all of the first sides increases at the end.
- - If you noticed, you should only be increasing 6 stitches a round. It's like you are making a circle but with a rectangle in between the 2 circles halves to stretch the circle.
Double Crochet Oval Pattern:
- Round 1: Ch x11, then in the 3rd ch from the hook make a dc. Dc in the next 7 chains. In the last stitch dc x6, all the while turning to the underside of the chain. Now working on the unworked side of the chain, dc x7. Dc x5 in the last stitch. Then sl st to the top of the chains you skipped, this will count as your 6th dc in this last stitch. Now sl st to the next stitch. This sl st marks the end of the round (26).
- Round 2: Ch x2 (counts as a dc) and in the following stitch make a dc, then dc x5. Dc inc x6 (in the 6 stitches you made at the end), dc x7, dc inc x6 (38). Then sl st to the chains at the start of the round.
- For more rounds you are going to follow the same pattern as you did for the single crochet oval, but instead do it for double crochet.
The key differences are:
- - You will ch x2 every round to start and that counts as your first dc.
- - For the ends instead of making 3 increases at the end, it's 6. Double crochet circles increase each round by 12 and that's exactly what we do here - 6 on each side.
- - You will also notice that 2 rounds of double crochet equal the same width as 4 rounds of single crochet. Use each type of stitch wisely for your projects.
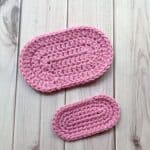
- You’ve now completed a basic double crochet oval, a great shape to use as a foundation for many crochet projects like rugs, baskets, placemats, and more.
- With just a few rounds, you’ve created a smooth, even oval using simple double crochet stitches and single crochet stitches. Keep practicing, and soon you'll be able to adapt this shape to suit all kinds of creative ideas.
Tried this pattern?Mention @thecaffeinatedsnail or tag #thecaffeinatedsnail!
