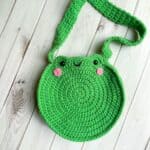
Frog Crochet Bag Pattern
A perfect Frog Crochet Bag Pattern to add to your collection of crochet frog patterns. This frog crochet pattern is easy to follow and quick to make!
Materials
- 1 skein of green
- Small amount of pink
- Small amount of black
- Safety eyes 12mm or larger
- 5.5 mm hook
- Tapestry needle
Abbreviations (US terms)
- Magic ring - mr
- Single crochet - sc
- Chains - ch
- Half double crochet - hdc
- Double crochet - dc
- Increase (inc) (when you see "inc" it will mean 2 hdc in 1 stitch for this pattern)
- Decrease (dec) (when you see "dec" it will mean hdc 2 together for this pattern)
Notes
- Yarn Choice: I used acrylic yarn for this free, easy frog crochet bag pattern, but any type of yarn—cotton, chunky, etc.—would work well.
- Adjusting Size: If you want to make this crochet frog bag pattern bigger, consider adding more rounds or switching to chunky yarn. If using chunky yarn, forgo the middle part and just sew the two pieces together, adding a strap.
- Bag Dimensions: The crochet frog bag is a decent-sized purse, big enough to hold a phone, wallet, and a few other items.
Instructions
- For the main part of the Frog Crochet Bag Pattern, we will make a continuous spiral round and will be using hdc.
Basic Crochet Circle:
Backside of the bag:
- Round 1: Make a mr and hdc x10 (10).
- Round 2: Inc in every stitch (20).
- Round 3: Inc, hdc. Then repeat for the entire round (30)
- Round 4: Inc, hdc x2. Then repeat for the entire round (40)
- Round 5: Inc, hdc x3. Then repeat for the entire round (50)
- Round 6: Inc, hdc x4. Then repeat for the entire round (60)
- Round 7: Inc, hdc x5. Then repeat for the entire round (70)
- Round 8: Inc, hdc x6. Then repeat for the entire round (80)
- Round 9: Inc, hdc x7. Then repeat for the entire round (90). Fasten off and weave in the tail.
Frontside of the bag:
- For the front side follow rounds 1-8 from the backside instructions above.
- Round 9: Inc, hdc x7 only 8 times then make a double crochet shell stitch for the frog eye socket. To make a shell stitch: yarn over, skip a stitch, and then insert the hook into the next stitch and make a dc. In the same stitch make another 5 dc’s in it. Then skip the next stitch and sc into the following stitch.
- Sc x8 and then follow the above instructions for the other eye socket. Make sure you do a hdc to anchor the shell stitch like you did above. Then slip stitch and fasten off the yarn.
Crochet Bag Middle + Strap:
- This part will be worked in rows:
- Row 1: Ch x2, turn
- Row 2: In second ch from hook make a inc (again we are using hdc) (2). Ch x1 and turn (never work in the turning ch after each row)
- Row 3-4: Hdc in each stitch (2)
- Row 5: Inc x2 (4). Ch x1 and turn.
- Row 6-8: Hdc x4 (4). Ch x1 and turn.
- Row 9: Inc, hdc x2, inc (6). Ch x1 and turn.
- Row 10-12: Hdc x6 (6). Ch x1 and turn.
- Row 13: Inc, hdc x4, inc (8). Ch x1 and turn.
- Row 14-39: Hdc x8 (8). Ch x1 and turn.
- Row 40: Dec, hdc x4, dec (6). Ch x1 and turn.
- Row 41-43: Hdc x6 (6). Ch x1 and turn.
- Row 44: Dec, hdc x2, dec (4). Ch x1 and turn.
- Row 45-47: Hdc x4 (4). Ch x1 and turn.
- Row 48: Dec x2 (2). Ch x1 and turn.
- Row 49-50: Hdc x2 (2). Ch x1 and turn.
- Row 51: Inc x2 (4). Ch x1 and turn.
- Row 52-150: Hdc x4 (4). Ch x1 and turn. THIS PART IS THE STRAP.
- Depending on the length of the strap, you want to adjust the amount of rows as needed. Fasten off and leave a tail for sewing.
Crochet Cheeks:
- Round 1: With pink yarn, make a mr and make sc x6 in the circle. If you find it difficult making a magic ring you can chain 2 and then crochet sc x6 in the second chain from the hook (6). Slip stitch to the first sc and fasten off. Leave a tail for sewing.
Sewing:
- Place safety eyes in the bottom of the shell stitches.
- Embroider a mouth in between the eyes using black yarn and a tapestry needle.
- Sew on the cheeks using a tapestry needle, position them below the eyes and slightly left/right of them.
- Sew/crochet the middle piece to the circle and frog. I chose to crochet the edge as it creates a crispy edge, but you can sew it too. I attached the crochet middle right under the frog eyes and worked my way around the frog body. Once the middle was attached to both sides of the frog, I rechecked the length of the purse strap and sewed it to the other side of the bag, again attach to the middle part right below the eyes.
- And now you should have a beautiful crochet frog bag, perfect for holding phones and other small items! I hope you enjoyed my frog crochet bag pattern as much as I did designing it!
Tried this pattern?Mention @thecaffeinatedsnail or tag #thecaffeinatedsnail!
