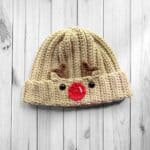
Crochet Reindeer Hat Pattern
My Crochet Reindeer Hat Pattern is a perfect accessory for this holiday season. I mean, what's Christmas without one or two reindeer?
Materials
Abbreviations (US terms)
- Magic ring - mr
- Chains - ch
- Single crochet - sc
- Half double crochet - hdc
- Back loop only - blo
- Slip stitch - sl st
- Double crochet - dc
- Increase - inc
Notes
- Yarn Choices: I used acrylic yarn for this easy crochet reindeer hat pattern, but you can substitute other types, such as cotton or chunky yarn. Just adjust the stitch count and rows as needed.
- Sizing Information: Using a 5mm hook, my crochet rectangle measures roughly 14 inches by 22 inches. This should fit an adult with a medium to large head size. Feel free to adjust the height or length for the perfect fit.
- Child Size Adjustments: If you're making this crochet Rudolph hat pattern for a child, I recommend chaining 35-40 and then following the pattern as normal, but only completing 30-35 rows. Adjust as necessary depending on the child’s age and head size.
Instructions
For this pattern, we will mostly be working in rows.
- Using the lace yarn color, ch x41 and then turn.
- Row 1: In the second chain from the hook, make a hdc. Continue to make hdc for the rest of the row (40). At the end of the row, ch x1 and turn.
- Row 2: In blo, hdc for the entire row (40). Ch x1 and turn.
- Row 3-44: Repeat row 2 (40). Then ch x1 and turn. Don't fasten off the yarn.
- Use more or less rows depending on the size of the hat you are trying to achieve.
- Before fastening off the yarn you want to fold the rectangle in half and then sew it (or crochet it) shut.
- After the side of the hat has been sewn shut, take the yarn and cinch the top of the hat to close. Fasten off and weave in the end.
- Once that is done, flip the hat right side out so now the sewn edges are on the inside of the hat.
- Set the hat aside.
Brim Decorations:
Ears:
- Using the same color yarn as you did for the base of the hat, ch x4 then in the second ch from the hook make a sl st. In the following stitch dc x2. Then in the last stitch sl st and then fasten off the yarn leaving a tail for sewing.
- Make x2.
Antlers:
- Using 2 strands of the cafe latte colored yarn, ch x8. Starting in the second ch from the hook, sc in the next 2 stitches.
- In the next stitch make a sl st, then ch x4.
- From the second ch from the hook make a sc and sc 2 more times in the other chs.
- Then sl st back into the next ch that is part of the main body of the antler. Sc in the rest of the chains.
- Fasten off and leave a tail for sewing. Make x2.
Nose:
- Round 1: With the cherry red color yarn, make a mr, then sc x6 into the circle.
- Round 2: Increase in every stitch (12).
- Round 3: Inc, sc. Then repeat for the rest of the round (18).
- Fasten off and leave a tail for sewing. Feel free to embroider a white line to make the nose appear shiny.
Finishing:
- Sew the nose first to center the face.
- Then add the eyes about half an inch away from the nose.
- Add the antlers above the eyes and the ears on the outside of the antlers.
- Weave in all the ends.
- Once all the steps are complete and the ends have been woven in, your Christmas crochet beanie, made from my crochet reindeer hat pattern, is finished!
- I truly hope that you enjoy wearing your new crochet reindeer beanie as much as I enjoyed creating the pattern for it. It’s always such a rewarding experience to see a project come to life, and I hope that this design brings a little bit of holiday cheer and warmth to your wardrobe.
- Happy crocheting!
Tried this pattern?Mention @thecaffeinatedsnail or tag #thecaffeinatedsnail!
