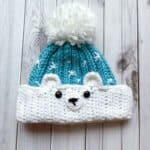
Crochet Polar Bear Hat Pattern
Say hello to winter with a crochet polar bear hat, made for toddlers but can be adjusted for any size head! My Crochet Polar Bear Hat Pattern looks complicated but is easy to make with my step-by-step tutorial.
Materials
- 1 skein of Red Hearts With love in White
- 1 skein of Red Hearts With Love in Iced Aqua
- Black yarn scraps for the nose
- 8mm safety eyes
- 5.5mm crochet hook
- Pom Pom (I made mine, but you can buy yours)
- Tapestry needle (for weaving in the ends)
Abbreviations (US terms)
- mr = Magic ring
- sc = Single crochet
- ch = Chain
- hdc = Half Double Crochet
- blo = Back Loop Only
- sl st = Slip Stitch
- dc = Double Crochet
- tr = Triple Crochet
- long tr = Long triple crochet
- inc = Increase
Notes
- Use acrylic worsted yarn for this easy crochet bear hat; any yarn type works (cotton, chunky, etc.).
- Adjust stitch count and rows accordingly.
- With a 5.5mm hook, the crochet rectangle for the beanie measures roughly 11x15 inches.
- Sized for kids aged 3-5; adjust for different sizes.
- For an adult size, crochet 41 chains and 44 rows.
- Instead of embroidering snowflakes, trail white under the blue yarn and create random white bobble stitches for a falling snow effect.
Instructions
- For this pattern we will mostly be working in rows.
- Row 1: In Iced Aqua, ch x36, turn.
- Row 2: In the second chain from the hook, make a hdc. Continue to make 24 x hdc in Iced Aqua, then switch the color to white. Hdc x11 in White. (35) At the end of the row, ch x1 and turn. (The ch is a turning ch, you will be making these every row but do not work in them!)
- Row 3: In blo, hdc in White for 11 stitches, then switch to Iced Aqua and hdc x24 (35). Ch x1 and turn.
- Row 4: In blo, hdc in Iced Aqua for 24 stitches, then switch to White and hdc x11 (35). Ch x1 and turn
- Row 5-34: Repeat rows 3 and 4. (35). Ch x1 and turn.
- Use more or less rows depending on the size of the hat you are trying to achieve.
- Before fastening off the yarn you want to fold the rectangle in half and then sew it shut. This should be white, but can be either color. You want the sewing to cover up the blue starting chain as much as possible so it isn’t noticeable.
- After the side of the hat has been sewn shut, take the Iced Aqua yarn and cinch the top of the hat shut. Fasten off and weave in the end.
- Once that is done, flip the hat inside out so now the sewn edges are on the inside of the hat.
Brim:
- Figure out what side of the hat you want as the front side. Then insert your yarn onto the brim’s edge (preferably insert the yarn either on the side or back of the hat. I generally insert it on the seam) and make a sc. Make enough sc to get you to where you want to place your first bear ear (the side of the hat you want as the front).
- Now for the bear ear: Make a slip stitch in the next stitch. You are going to make the following stitches in the next stitch. Sl st, dc x2, tr, long tr x3, tr, dc x2, and sl st.
- A long tr is just like a normal tr but you yarn over 3 times instead of 2 at the beginning and then go through 2 loops like normal as you are getting the loops off your hook (should have to do this 4 times to complete the stitch).
- Sl st in the following stitch, then sc x7, then make the second ear just like the one above. Once that is done finish sc the rest of the brim. Fasten off and weave in the ends.
Muzzle:
- Round 1: With the White yarn, make a MR and make sc x6 in the circle. (6)
- Round 2: Make an inc in every stitch. (12). Slip stitch to the first sc and fasten off the yarn but leave a tail for sewing.
- With black yarn embroider the mouth by making a T on the muzzle and then sew muzzle onto the hat brim.
Finishing:
- Insert safety eyes below the ears.
- Sew on the muzzle.
- OPTIONAL: Make a pom pom with leftover white yarn (or buy one) and sew it to the top of the hat.
- Take a long piece of the white yarn and thread it on your tapestry needle. Secure the yarn somewhere on the inside of the hat. Now you are going to make varying sizes of snowflakes on your hat by making either asterisk shapes or plus signs.
- And once all of that is done, the ends are weaved in, your crochet polar bear hat playing in snowflakes is done! I hope you enjoy your crochet polar bear beanie as much as I had fun designing the pattern for it!
Tried this pattern?Mention @thecaffeinatedsnail or tag #thecaffeinatedsnail!
