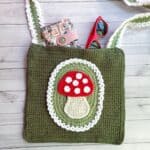
Crochet Mushroom Bag Pattern
Looking for a cottagecore crochet bag? Look no further than my crochet mushroom bag pattern! It is cute, perfect for beginners and large enough to use as an everyday bag!
Materials
Abbreviations (US terms)
- Chains - ch
- Magic ring - mr
- Single crochet - sc
- Half double crochet - hdc
- Slip stitch - sl st
- Increase - inc
- Decrease - dec
Notes
- Appliques: The design of this crochet mushroom bag is made with crochet appliques, then it is all sewn together. As long as you are comfortable crocheting pieces together you should be able to make this bag. Also, you can use sewing pins to help hold the appliques in place while sewing it.
- Yarn: I used worsted weight acrylic yarn for the crochet mushroom bag pattern, but feel free to use any yarn for the bag.
- Size: The crochet mushroom bag itself is roughly 12 inches x 12 inches. Using different yarn and hook sizes can alter the finished size of the bag.
Instructions
Crochet Mushroom Applique:
- With red, ch x5, turn.
- Row 1: In the second ch from the hook, make a inc. Then sc x2 and inc (6). Ch x1 and turn.
- Row 2: Inc, sc x4 and inc (8). Ch x1 and turn.
- Row 3: Inc, sc x6 and inc (10). Ch x1 and turn.
- Row 4: Inc, sc x8 and inc (12). Ch x1 and turn.
- Row 5: Sc in every stitch (12). Ch x1 and turn.
- Row 6: Inc, sc x10 and inc (14). Ch x1 and turn.
- Row 7-9: Sc in every stitch (14). Ch x1 and turn.
- Row 10: Dec, sc x10, dec (12). Now you want to sc around the entire edge of the mushroom cap. This step is based on tension, but rule of thumb is 1 sc per row and then when you hit the top curves and bottom curves of the first and last row you add an additional stitch or two to accommodate the gentle curve to the other side of the mushroom.
- Crochet Mushroom Stem:
- With aran, ch x5, turn.
- Row 1: In the second ch from the hook, make a inc. Then sc x2 and inc (6). Ch x1 and turn.
- Row 2: Inc, sc x4 and inc (8). Ch x1 and turn.
- Row 3: Inc, sc x6 and inc (10). Ch x1 and turn.
- Row 4-5: Sc in every stitch. Ch x1 and turn.
- Row 6: Dec, sc x6, dec (8). Ch x1 and turn.
- Row 7: Dec, sc x4, dec (6). Ch x1 and turn.
- Row 8-11: Sc in every stitch. Ch x1 and turn. now sc around the stem similarly to what you did for the mushroom cap. Then fasten off and leave a tail for sewing.
- Mushroom Dots and Sewing:
- If you want dots for your mushroom make 5-7 dots.
- Make a mr and sc x6 into the circle. Sl st to the first sc and fasten off the yarn. Leave a tail for sewing.
- Finishing:
- Sew the mushroom cap to the top of the mushroom stem. Add dots to the mushroom cap if you want to have a polka dot look.
Crochet Bag:
- Make x2
- With the darker green yarn, ch x46.
- Row 1: In the second ch make a sc. Then make a sc in the rest of the chains (45). Ch x1 and turn.
- Row 2: Sc in every stitch (45).
- Row 3-52: Repeat row 2. Then fasten off and weave in the ends.
Crochet Oval:
- With the lighter green, ch x11.
- Round 1: In the second ch from the hook make a hdc. Hdc in the next 8 chs. Hdc x5 in the last ch. Flip to the unworked side of the ch. Hdc x8. Then hdc x4 into the last ch and sl st to the FIRST hdc that you made in the round (26).
- This is the only time you sl st while making the oval, as it will be made in a continuous round. The sl st moves over your starting point for the round 1 stitch so you start on the "flat" side of the oval.
- Round 2: Hdc x8, hdc inc x5. Repeat for the other side of the round (36).
- Round 3: Hdc x8, (hdc inc, hdc) x5. Repeat for the other side of the round (46).
- Round 4: Hdc x8, (hdc inc, hdc x2) x5. Repeat for the other side of the round (56).
- Round 5: Hdc x8, (hdc inc, hdc x3) x5. Repeat for the other side of the round (66).
- Round 6: Hdc x8, (hdc inc, hdc x4) x5. Repeat for the other side of the round (76).
- Round 7: Hdc x8, (hdc inc, hdc x5) x5. Repeat for the other side of the round (86). Sc into the next stich, sl st into the next and then fasten off and weave in any ends.
Crochet Strap:
- With the light green yarn ch x152.
- Row 1: Starting in the second ch from the hook make a sc in every ch (151). Then ch x1 and turn.
- Row 2: Sc in every stitch (151). Then ch x1 and turn.
- Row 3: Repeat row 2. Then ch x1 and turn.
- Fasten off the green yarn and leave a tail for sewing.
- (I made 1 strap, but you could do 2).
Crochet Lace Edging:
- The lace design will be added to the strap and the oval (I forgot to get a picture of the oval with the frill before attaching it to the bag).
- The lace is made in 2 rows or rounds with the white yarn.
- Row 1 (strap): Join the yarn to the edge with a sl st. Then ch x3 and skip 1 sc. *Sl st, ch x3 and skip 1 sc. Repeat from * for the rest of the row. Make a sl st in the last stitch, then ch x3 and turn.
- Row 2 (strap): In the next ch-3 space make a sl st. *Then ch x3 and make a sl st in the next ch-3 space. Repeat from * for the rest of the row. Fasten off the yarn and weave in the ends.
- Repeat for the other side of the strap.
- Round 1 (oval): With the white yarn, make a sl st to the oval. Then ch x3 and skip 1 hdc. *Sl st, ch x3 and skip 1 hdc. Repeat from * for the rest of the round. Make a sl st in the last stitch (if it doesn't go evenly just adjust a stitch or two to make it work, it really won't be noticeable).
- Round 2 (oval): Ch x3, then in the next ch-3 space make a sl st. *Then ch x3 and make a sl st in the next ch-3 space. Repeat from * for the rest of the round. Fasten off the yarn and weave in the ends.
Sewing:
- - Sew the mushroom to the middle of the oval.
- - Sew the oval to one side of the crochet squares.
- - Crochet or sew the 2 squares together, leave an opening for the top.
- - Sew the strap to the bag.
- And now you have a cute crochet mushroom bag made from my crochet mushroom bag pattern!
Tried this pattern?Mention @thecaffeinatedsnail or tag #thecaffeinatedsnail!
