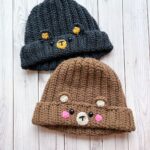
Crochet Bear Hat Pattern
This easy Crochet Bear Hat Pattern will keep you warm during fall and winter while being super cute! Come make the crochet bear hat with me; it can be adjusted to fit any size head!
Materials
- 1 Red Heart Cafe Latte yarn
- 1 Red Heart Light Raspberry yarn
- 1 Red Heart Buff yarn
- And a small amount of black yarn
- Safety eyes 12mm
- 5.5 mm hook
- Tapestry needle
Abbreviations (US terms)
- Magic ring - mr
- Single crochet - sc
- Chains - ch
- Half double crochet - hdc
- Back loop only - blo
- Slip stitch - sl st
- Double crochet - dc
- Triple crochet - tr
- Long triple crochet (long tr)
- Increase - inc
Notes
- Yarn Choices: I used acrylic yarn for this free crochet bear beanie pattern, but any type of yarn—like cotton or wool—would work well. Just adjust the stitch count and rows as needed.
- Sizing Information: By using a 5.5mm hook, my crochet rectangle for the beanie pattern measures roughly 14 inches by 22 inches. I would say my head is about medium-sized, so it should fit an adult medium/large. If you need to adjust the height or length to fit someone’s head, please do so!
- Child Size Adjustments: If you’re making this crochet bear beanie pattern for a child, I recommend chaining 25-30 and then following the pattern as normal, but only doing 30-35 rows. Adjust as needed, as it all depends on the child's age. I have never made this hat for a child, so please keep size in mind; these suggestions may need to change. You can check out my crochet polar bear hat - which is sized to fit a toddler for reference.
Instructions
- For this pattern, we will mostly be working in rows.
Crochet Bear Beanie:
- Ch x41, turn.
- Row 1: In the second chain from the hook, make a hdc. Then continue to make hdc for the rest of the row (40). At the end of the row, ch x1 and turn.
- Row 2: In blo, hdc for the entire row (40). Then ch x1 and turn.
- Row 3-44: Repeat row 3. (40). Ch x1 and turn.
- Use more or less rows depending on the size of the hat you are trying to achieve.
- Before fastening off the yarn you want to fold the rectangle in half and then sew it or crochet it to form a tube.
- After the side of the hat has been sewn together, take the yarn and cinch the top of the hat shut. Fasten off and weave in the end.
- Once that is done, flip the hat inside out so now the sewn edges are on the inside of the hat.
Crochet Hat Brim:
- The seam should be the back center of the hat. Join the brown yarn at the seam and then sc a quarter of the way around the hat (if the hat is laid flat with seam at the center, you should be at the side of the hat).
- Sc x10.
- Now for the bear ear:
- Make a slip stitch in the next stitch. You are going to make the following stitches in the next stitch. Sl st, dc x2, tr, long tr x3, tr, dc x2, and sl st.
- A long tr is just like a normal tr but you yarn over 3 times instead of 2 at the beginning and then go through 2 loops like normal as you are getting the loops off your hook (should have to do this 4 times to complete the stitch).
- Sl st in the following stitch, then sc x7, then make the second ear just like the one above. Once that is done finish sc the rest of the brim. Fasten off and weave in the ends.
Crochet Inner Ear and Muzzle:
Ear circles:
- Round 1: With the buff shade of yarn yarn, make a MR and make sc x6 in the circle. If you find it difficult making a magic ring you can chain 2 and then crochet sc x6 in the second chain from the hook. (6) Slip stitch to the first sc and fasten off the yarn but leave a tail for sewing.
Muzzle:
- Round 1: With the buff shade of yarn, make a MR and make sc x6 in the circle. (6)
- Round 2: Make an inc in every stitch. (12). Slip stitch to the first sc and fasten off the yarn but leave a tail for sewing.
Crochet Cheeks:
- Round 1: With pink yarn, make a MR and make sc x6 in the circle (6). Slip stitch to the first sc and fasten off, leave a tail for sewing.
- Make x2.
Finishing:
- Insert safety eyes below the ears.
- With black yarn embroider the mouth by making a T on the muzzle and then sew muzzle onto the hat brim. Make sure to only sew it through the brim and not both the brim and hat. I shaped the circle a bit when sewing it on so it had a slight ovoid appearance.
- Sew the light brown ear middles to the inner part of the ears.
- Then sew on the cheeks below and slightly left/right of the eyes.
- And once all of that is done, the ends are weaved in, your crochet bear hat made from my crochet bear hat pattern is completed!
- I hope you enjoy your crochet bear beanie as much as I had fun designing the pattern for it!
Video
Tried this pattern?Mention @thecaffeinatedsnail or tag #thecaffeinatedsnail!
