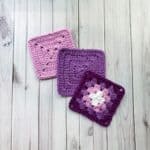
Beginner Crochet Granny Square Patterns
These beginner crochet granny square patterns are perfect for those who are new to crochet or want a refresher on how to complete a basic granny square. This tutorial will go over the classic granny square, the solid granny square, and the "no-holes" granny square.
Materials
- Yarn
- Hook size that matches yarn type
- Tapestry needle
Abbreviations (US terms)
- Magic ring - mr
- Chains - ch
- Double crochet - dc
- Triple crochet - tr (for the no holes granny square)
- Slip stitch - sl st
Notes
- Simple Granny Square Pattern: I go over easy crochet granny square patterns in this tutorial, if you want to try something a little fancier, check out my Crochet Backpack Pattern to make a sunburst granny square pattern.
- Double Crochet: These granny squares use double crochet. Once you get used to making them in double crochet you can experiment with other stitches, like the Moss Stitch Granny Square Pattern.
- Yarn: Yarn type can be almost anything for granny squares - smooth, fuzzy, thin, thick etc. If you are a beginner I suggest going with a smooth yarn so you can see your stitches.
Instructions
- Classic Granny Square Pattern:
- This first granny square crochet pattern utilizes the granny stitch pattern which is 3 double crochet groupings.
- Round 1: With color A, make a magic ring and then ch x3 (counts as a dc) and dc x2 into the mr.
- After, * ch x2 and then dc x3 into the circle.
- Repeat from * 2 more times, then ch x2 and connect to the top of the ch x3 you made at the beginning by making a sl st, pull tight and fasten off.
- Round 2: Join color B in any ch x2 space from the round before. Ch x3
- Then dc x2, ch x2, and dc x3 into that corner space.
- *Dc x3, ch x2, dc x3 into the next corner space and repeat from * 2 more times.
- Then sl st to the beginning chains and fasten off the yarn
- Round 3: Join color C in any ch x2 space from the round below. Ch x3, then dc x2, ch x2, and dc x3 into that corner space. *Then dc x3 in the next space between the 2 corner clusters from the round below. Then in the corner space - dc x3, ch x2 and dc x3. Repeat from * 2 more times, then dc x3 in that last space before the first corner. Then sl st to the beginning chains and fasten off.
- Round 4: Join color D in any ch x2 space from the round below. At this point you want to repeat round 3, but add an extra cluster of 3 dc on the side. At the end, sl st to the beginning chains and fasten off.
- And now you know how to crochet a classic and easy crochet granny square.
Crochet Solid Granny Square:
- Round 1: With any color, make a magic ring and then ch x3 (counts as a dc) and dc x2 into the mr.
- After, * ch x2 and then dc x3 into the circle.
- Repeat from * 2 more times, then ch x2 and connect to the top of the ch x3 you made at the beginning by making a sl st, and pull the circle closed.
- Round 2: Ch x3, dc into the tops of the next 2 stitches.
- * For the ch-2 space from the previous row dc x2, ch x2, dc x2.
- Then dc into the 3 stitches from the round below.
- Repeat from * for the other 2 sides of the granny square.
- Then sl st to the beginning chains.
- Round 3 and onwards: Ch x3, dc into the tops of the dc stitches from the round below, when you get to a corner dc x2, chx2, dc x2. Then sl st to the beginning chains.
- And now you know how to crochet a solid crochet granny square.
No Holes Granny Square:
- Round 1: With any color, make a magic ring and then ch x3 (counts as a dc) and dc, tr into the mr. *dc x2, tr into the ring.
- Repeat from * 2 more times. Sl st to the beginning chains. Pull the circle closed.
- Round 2: Ch x3, dc into the top of the dc stitch. When you get to a tr, you are going to dc, tr, dc into the stitch. The tr will be your "corner" every round. Sl st to the beginning chains.
- Round 3 and onwards: Ch x3, *dc into the tops of the dc stitches from the round below. In the corners (the tr) dc, tr, dc in the one stitch. Repeat from * for the rest of the round. Then sl st to the beginning chains.
- And now you know how to crochet a no holes crochet granny square.
- I hope you enjoyed these free crochet granny squares that are perfect for beginners or for those who just need a little refresher!
Tried this pattern?Mention @thecaffeinatedsnail or tag #thecaffeinatedsnail!
